WPFでMVVMは難しい
残念なことに、WPFでMVVMパターンを適用する際には、.NET標準だけ使うとなると、綺麗でわかりやすく保守が容易なコードが書けません。
書けないような基盤しかないのです。
なので、PrismなどのMVVM基盤ライブラリが必要となります。
https://msdn.microsoft.com/ja-jp/library/gg406140.aspx
他にも様々なライブラリが公開されていますが、MS謹製ということで今回はPrismを利用しようと思います。
Prismを利用することで得られるメリットを公開します。
以下の予定です。
- BindableBase/DelegateCommand ~ViewModelの基盤~
- ErrorsContaier ~便利なエラー通知~
- ViewModelLocationProvider ~ViewとViewModelを自動で関連付け~
- Regionってなんなのさ ~Viewの配置をお手軽に~
- IModuleとUnity ~UIでDI~
- DIPパターンの恩恵 ~MSBuildで並列ビルド~
本稿は上記1の記事になります。
※Visual Studio 2013 Community Editionで実験しています。
Prismのインストール
Nuget Package Manager Consoleにて、以下のように打ちます。
Install-Package Prism
そうすると、以下のようにモジュール参照が追加になります。
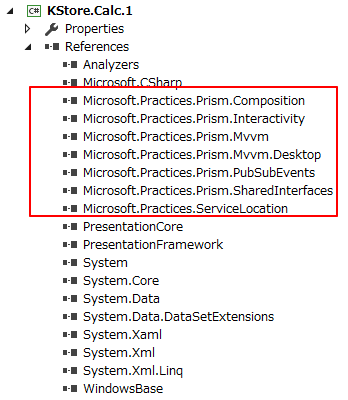
package.configは以下のようになります。
<?xml version=" 1.0" encoding=" utf-8"?>
<packages>
  <package id=" CommonServiceLocator" version=" 1.2" targetFramework=" net45" />
  <package id=" Prism" version=" 5.0.0" targetFramework=" net45" />
  <package id=" Prism.Composition" version=" 5.0.0" targetFramework=" net45" />
  <package id=" Prism.Interactivity" version=" 5.0.0" targetFramework=" net45" />
  <package id=" Prism.Mvvm" version=" 1.0.0" targetFramework=" net45" />
  <package id=" Prism.PubSubEvents" version=" 1.0.0" targetFramework=" net45" />
</packages>
たくさんあって混乱しそうですが、とりあえず今はこのまま!
ビルドすると、出力パスにはこんなにたくさんのDLLやフォルダが!!

Prismのサイズは、多言語Resource含めて約1MBです。
これを多いと思うか否かは環境次第ですが、訳もわからずDLLが増えるのは嫌ですよね。
使ってみる
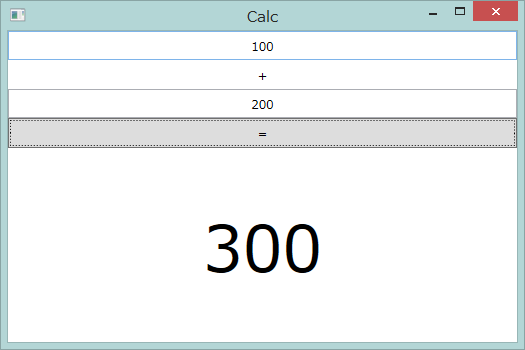
UIはこんな感じを想定しています。ボタンを押したら下に答えが出るようなアプリです。
(かずきさんのアプリを参考しています。)
https://code.msdn.microsoft.com/MVVM-Light-toolkitMessenger-0ec2e5c4
XAMLはこんな感じです。
<Window x :Class="KStore.Calc._1.CalcView"
        xmlns="http://schemas.microsoft.com/winfx/2006/xaml/presentation"
        xmlns:x ="http://schemas.microsoft.com/winfx/2006/xaml"
        xmlns:d ="http://schemas.microsoft.com/expression/blend/2008"
        xmlns:mc ="http://schemas.openxmlformats.org/markup-compatibility/2006"
        xmlns:local ="clr-namespace:KStore.Calc._1"
        mc:Ignorable ="d"
        Title="Calc" Height ="350" Width="525">
    <Grid >
        <Grid.RowDefinitions>
            <RowDefinition Height ="120*"/>
            <RowDefinition Height ="200*"/>
        </Grid.RowDefinitions>
        <Grid Name ="InputRegion" Grid.Row="0">
            <Grid.RowDefinitions>
                <RowDefinition Height ="30*"/>
                <RowDefinition Height ="30*"/>
                <RowDefinition Height ="30*"/>
                <RowDefinition Height ="30*"/>
            </Grid.RowDefinitions>
            <TextBox Grid.Row ="0" Text="{ Binding LeftValue}" Name="LeftValue" VerticalContentAlignment="Center" TextAlignment="Center" />
            <TextBlock Grid.Row ="1"  Text ="+" HorizontalAlignment="Center" VerticalAlignment="Center"/>
            <TextBox Grid.Row ="2" Text="{ Binding RightValue}" Name="RightValue" VerticalContentAlignment="Center" TextAlignment="Center" />
            <Button Grid.Row ="3" Name="CalcButton" Content="=" Command ="{Binding CalcCommand , Mode=OneWay}" />
        </Grid>
        <Grid Name ="OutputRegion" Grid.Row="1">
            <TextBlock Name ="Answer" Text="{ Binding AnswerValue}" HorizontalAlignment="Center" VerticalAlignment="Center" FontSize="48pt"/>
        </Grid>
    </Grid >
</Window>
ViewModelとViewの紐付けは、今は下記のようになります。今回はベタでいきます。わかりやすいですけどね。
using System.Windows;

namespace KStore.Calc._1
{
    public partial class CalcView : Window
    {
        public CalcView()
        {
            InitializeComponent();
            this.DataContext = new CalcViewModel(); // これが紐付けって行。
        }
    }
}
ViewModelは以下のようになります。ここでBindableBaseとDelagateCommandを使用しています。
using KStore.Calc._1.Model;
using Microsoft.Practices.Prism.Commands;
using Microsoft.Practices.Prism.Mvvm;
using System;
using System.Collections.Generic;
using System.Linq;
using System.Text;
using System.Threading.Tasks;
using System.Windows.Input;

namespace KStore.Calc._1
{
    public class CalcViewModel : BindableBase
    {
        private string _leftValue;
        public string LeftValue
        {
            get { return _leftValue; }
            set { this .SetProperty(ref this._leftValue, value); }
        }

        private string _rightValue;
        public string RightValue
        {
            get { return _rightValue; }
            set { this .SetProperty(ref this._rightValue, value); }
        }

        private string _answerValue;
        public string AnswerValue
        {
            get { return _answerValue; }
            set { this .SetProperty(ref this._answerValue, value); }
        }

        private ICommand calcCommand;

        public ICommand CalcCommand
        {
            get { return this.calcCommand ?? ( this.calcCommand = new DelegateCommand(CalcExecute, CanCalcExecute)); }
        }

        private bool CanCalcExecute()
        {
            return true ;
        }

        private void CalcExecute()
        {
            AnswerValue = IntToString( Calculation.Sum(StringToInt(LeftValue), StringToInt(RightValue)));
        }

        private int StringToInt(string src)
        {
            int ret = 0;
            if( int .TryParse(src, out ret) )
            {
                return ret;
            }
            throw new ArgumentException( "src" + src);
        }

        private string IntToString(int src)
        {
            return src.ToString();
        }

    }

}
考え方は単純で、
INotifyPropertyChanged
使いたくないんですよね。
使っちゃうと、文字列でプロパティを表現しないといけません。
下記のようなメソッドを用意してあげて、
private void NotifyPropertyChanged(string info)
{
    if (PropertyChanged != null)
    {
        PropertyChanged(this, new PropertyChangedEventArgs(info));
    }
}

public string RightValue
{
     get { return _rightValue; }
     set
     {
         this .(ref this._rightValue, value);
         NotifyPropertyChanged("RightValue"); // <-- これがダルい。
     }
}
プロパティのセッターで、文字列指定が必要になります。。
プロパティ名が変わってもVisual Studioのリファクタ機能で追従してくれない。
実行時にバグがわかると。
これではC#のような静的言語の旨味も半減です。
コンパイルを活用したいんですよね。せっかくコンパイルするんだから。
これを回避してくれるのが、BindableBase。
https://msdn.microsoft.com/en-us/library/microsoft.practices.prism.mvvm.bindablebase%28v=pandp.50%29.aspx
説明少なっ!
BindableBaseを継承すると、上記サンプルのように、
set { this .SetProperty(ref this._leftValue, value); }
これで良いということになります。
これだけでもPrism使う価値がある!と思う。 ちなみに昔は
NotificationObject
っていう名前だったんですよね。
BindableBaseのほうがわかりやすくて良い。
つづいて、DelegateCommandです。
https://msdn.microsoft.com/en-us/library/microsoft.practices.prism.commands.delegatecommand%28v=pandp.50%29.aspx
これは、もしかしたら不要かも。
このサンプルレベルだと恩恵を受けますが、ある程度の規模の開発になって、ViewやViewModelが超複雑になる場合、
Commandの処理とViewModelを切り離したくなる時がきます。
DelegateCommandだと、ViewModelに直接delegate用メソッドを定義しないとなりません。
ViewやViewModelは、UserControlで切り出して小分けで作るのは、キツイ場合があります。
全部一緒だと何かと都合が良い。UIってそうなんですよね。Class分割しすぎると生産性落とします。
だけどViewModelにロジックを書きたくない。
ただのViewのデータ部分を反映する箱にしておきたい。そんな場合に対応できないです。
そうゆう場合は、ICommandを直接実装してもいいんじゃないかなと考えます。
public class CalcCommand_SeparatedViewModel : ICommand
{
	CalcViewModel _parentViewModel;

	public CalcCommand_SeparatedViewModel(CalcViewModel parentViewModel)
	{
		_parentViewModel = parentViewModel;
	}

	public bool CanExecute(object parameter)
	{
		return true ;
	}

	public event EventHandler CanExecuteChanged;

	public void Execute(object parameter)
	{
		_parentViewModel.AnswerValue = Util.IntToString(Calculation .Sum(Util.StringToInt(_parentViewModel.LeftValue), Util.StringToInt(_parentViewModel.RightValue)));
	}
}
ViewModelでの定義は以下のようになります。
private ICommand _calcCommand_SeparetedViewModel;

public ICommand CalcCommand_SeparetedViewModel
{
	get { return this._calcCommand_SeparetedViewModel ?? ( this._calcCommand_SeparetedViewModel = new CalcCommand_SeparatedViewModel (this)); }
}
まとめ
という訳で、Prism5.0使うなら
BindableBaseは活用しよう!
DelegateCommandは用途に応じて活用しよう!
ということでした。
続いて、ErrorsContainerも試してみます。