はじめに
Laravelを使用してLINE BOTを作成します。
完全なコード
LINE BOT完成イメージ
選択肢を選んでいって最終的に選択した内容をもとにニュースを表示させます。
1. リッチメニューをタップすると"pick a news type"と送信される

2. "pick news type"を検知し言語選択メッセージが送信される

3. 言語選択を選択すると国選択のメッセージが送信される

4. 国選択を選択するとカテゴリ選択のメッセージが送信される

5. 言語、国、カテゴリを基にNewsを検索し表示する

シーケンス図

Laravelのインストール・環境構築
Laravel8を使用します。
バージョンはLINE BOT SDKがインストールできれば何でも◎
LINE BOT SDKの導入
GitHubのREADMEに従ってインストールします。
composer require linecorp/line-bot-sdk
SDK リポジトリ
SDKを使用するClassを作成する
SDKを使用しLINE APIを叩くClassを作成します。
どこでもいいですが今回はServicesというディレクトリにしましょう。
(Facadeに登録しておくと便利になるかもしれませんね)
app/Services/LineBotService.php
<?php

namespace App\Services;

use Illuminate\Http\Request;
use LINE\LINEBot\HTTPClient\CurlHTTPClient;
use LINE\LINEBot;

class LineBotService
{
    /**
    * @var CurlHTTPClient
    */
    protected $httpClient;

    /**
    * @var LINEBot
    */
    protected $bot;

    public function __construct()
    {
        $this->httpClient = new CurlHTTPClient('<channel access token>');
        $this->bot = new LINEBot($this->httpClient, ['channelSecret' => '<channel secret>']);
    }

    /**
     * Reply based on the message sent to LINE.
     * LINEに送信されたメッセージをもとに返信する
     *
     * @param Request
     * @return int
     * @throws \LINE\LINEBot\Exception\InvalidSignatureException
    */
    public function eventHandler(Request $request) : int
    {
        return 200;
    }
}
簡単にLine APIを叩くためコンストラクタ内でBotのクライアントのインスタンスを作成しています。
このインスタンスを使用し以下のようにAPIをCallでき、LINEにメッセージを送信できるようになります。
$response = $this->bot->replyText('<reply token>', 'hello!');
Serviceを呼び出すControllerの作成
先ほど作成したServiceを使用するためContollerを作成します。
php artisan make:controller Api/LineBotController
Controllerのコンストラクタ内でServiceのインスタンスを作成します。
LINEアカウントにメッセージが送信されると
Webhookでこちら側のAPIにリクエストが送信されreply()が実行されます。
reply()内ではとりあえず疎通確認のためリクエストの内容をログに書いているだけです。
<?php

namespace App\Http\Controllers\Api;

use App\Http\Controllers\Controller;
use Illuminate\Http\Request;
use App\Services\LineBotService;

class LineBotController extends Controller
{
    /**
     * @var LineBotService
    */
    protected $line_bot_service;

    public function __construct()
    {
        $this->line_bot_service = new LineBotService();
    }

    /**
     * When a message is sent to the official Line account,
     * The API is called by LINE WebHook and this method is called.
     *
     * Lineの公式アカウントにメッセージが送られたときに
     * LINE Web HookにてAPIがCallされこのメソッドが呼ばれる
     *
     * @param Request
    */
    public function reply(Request $request)
    {
        // Requestが来たかどうか確認する
        $content = 'Request from LINE';
        $param_str = json_encode($request->all());
        $log_message =
        <<<__EOM__
        $content
        $param_str
        __EOM__;

        \Log::debug($log_message);

        $status_code = $this->line_bot_service->eventHandler($request);

        return response('', $status_code, []);
    }
}
apiルートを定義する
/api/line-bot/replyでリクエストを受け取り、LineBotControllerのreply()を実行させます。
Laravel8の記法になります。
<?php

use Illuminate\Http\Request;
use Illuminate\Support\Facades\Route;
+use App\Http\Controllers\Api\LineBotController;

/*
|--------------------------------------------------------------------------
| API Routes
|--------------------------------------------------------------------------
|
| Here is where you can register API routes for your application. These
| routes are loaded by the RouteServiceProvider within a group which
| is assigned the "api" middleware group. Enjoy building your API!
|
*/

+Route::post('/line-bot/reply', [LineBotController::class, 'reply']);
一旦デプロイ
HerokuにあげてLINE側からAPIをCallできるようします。
※このときngrokの存在を知りませんでしたm(__)m
LINEの設定
1.LINE Official Account Managerからアカウントを作成します。
2.作成したらそのアカウントページに行き右上の設定をクリックします。
サイドメニューのMessaging APIへ行き、
Channelを作成します。
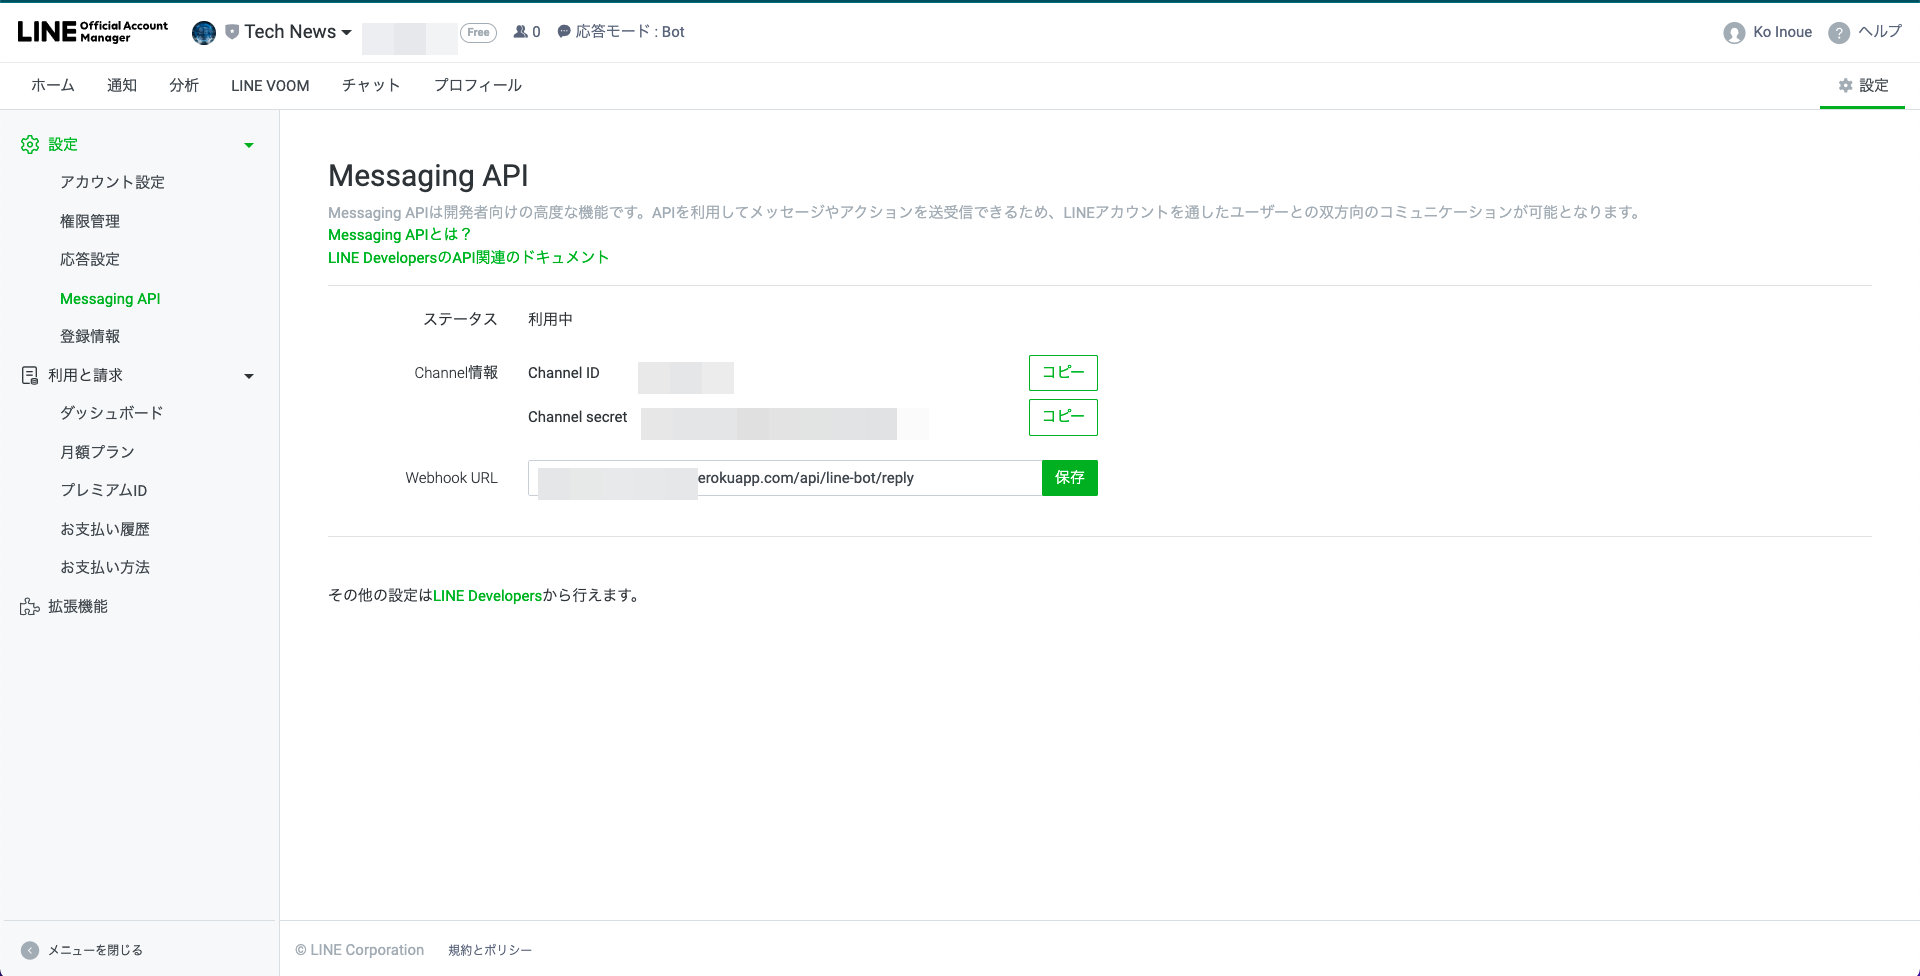
3.作成すると以下の画面になるのでWebhook URLに先程api.phpに定義したpathを記載します。
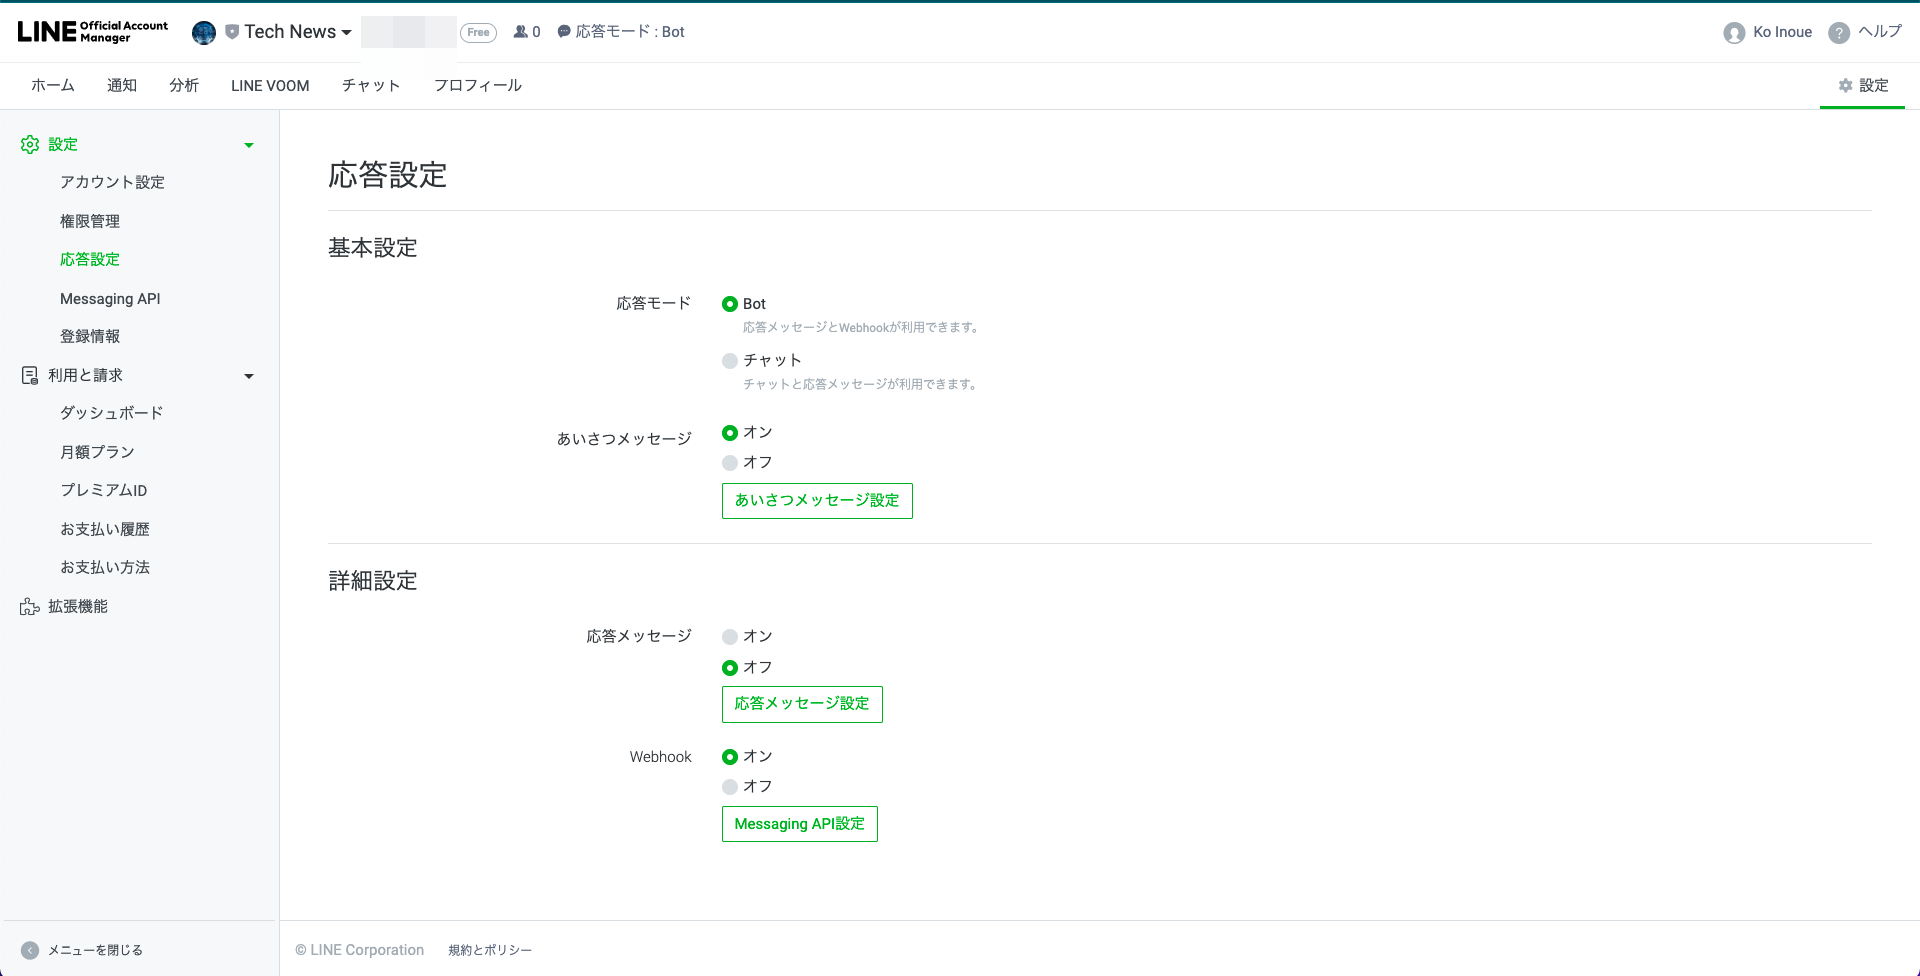
4.次にサイドメニューの応答設定にて、以下画像のように設定します。
5.LINE DeveloperのConsoleに行き先程作成したチャネルを開きます。
6.Messaging APIの設定のWebhook設定からWebhook URLを先程と同様に設定、Webhookの利用にチェックを入れます。
7.同ページ最下部のチャネルアクセストークンを発行しておきます。
8.自分の作ったアカウントを友だち追加する
疎通・ログ確認
LINEのチャットルームに適当にメッセージを送信するとLaravelが以下のようなログを出力します。
LINEからのRequestの中身ですね。
これらのデータを使用すればLINEに返信を送ることが可能になります。
[2022-01-11 12:41:10] production.DEBUG: Request from LINE
{"destination":"Uxxxxxxxxxxxxx","events":[{"type":"message","message":{"type":"text","id":"xxxxxxxxx","text":"ここにLINEに送信したメッセージ"},"timestamp":1641872469897,"source":{"type":"user","userId":"Uxxxxxxxxxxxxxxxxx"},"replyToken":"xxxxxxxxxxxxxxx","mode":"active"}]}
環境変数を定義
LINE Developer consoleからチャネルを開き
以下の値をコピーし.envに貼り付けます。
チャネル基本設定->チャネルシークレットをLINE_CHANNEL_SECRET
Messaging API設定->チャネルアクセストークン(長期)をLINE_CHANNEL_SECRET
+ LINE_CHANNEL_ACCESS_TOKEN=
+ LINE_CHANNEL_SECRET=
configに追加
<?php

return [
+    'line_channel_access_token' => env('LINE_CHANNEL_ACCESS_TOKEN'),
+    'line_channel_secret' => env('LINE_CHANNEL_SECRET'),
];
先程作成したServiceのBOTクライアントのインスタンス生成箇所を修正します。
    public function __construct()
    {
-        $this->httpClient = new CurlHTTPClient('<channel access token>');
-        $this->bot = new LINEBot($this->httpClient, ['channelSecret' => '<channel secret>']);
+        $this->httpClient = new CurlHTTPClient(config('app.line_channel_access_token'));
+        $this->bot = new LINEBot($this->httpClient, ['channelSecret' => config('app.line_channel_secret')]);
    }
DB/Model周り
回答を保存しておくテーブルを定義します。
<?php

use Illuminate\Database\Migrations\Migration;
use Illuminate\Database\Schema\Blueprint;
use Illuminate\Support\Facades\Schema;

class CreateAnswersTable extends Migration
{
    /**
     * Run the migrations.
     *
     * @return void
     */
    public function up()
    {
        Schema::create('answers', function (Blueprint $table) {
            $table->id();
            $table->string('line_user_id'); // LINEのユーザーID
            $table->integer('step'); // なんステップ目の回答か
            $table->string('answer')->nullable(); // 回答
            $table->timestamps();
        });
    }

    /**
     * Reverse the migrations.
     *
     * @return void
     */
    public function down()
    {
        Schema::dropIfExists('answers');
    }
}
モデルも作成
php artisan make:model Answer
<?php

namespace App\Models;

use Illuminate\Database\Eloquent\Factories\HasFactory;
use Illuminate\Database\Eloquent\Model;

class Answer extends Model
{
    use HasFactory;

    protected $fillable = [
        'line_user_id',
        'step',
        'answer',
    ];

    /**
     * Database used by this model
     *
     * @var string
     */
    protected $connection = 'sqlite'; // お好みで

    /**
     * Tables associated with the model
     *
     * @var string
     */
    protected $table = 'answers';
}
これで先程のLINEアカウントにメッセージを送信する準備が整いました!
LINEに送信する前に署名を確認する
指定したLINEアカウントからのリクエストしか受けつないようにするため
Signatureを使用してリクエスト元を判別します。
<?php

namespace App\Services;

use Illuminate\Http\Request;
use LINE\LINEBot;
use LINE\LINEBot\HTTPClient\CurlHTTPClient;

class LineBotService
{
    ...

    /**
     * Reply based on the message sent to LINE.
     * LINEに送信されたメッセージをもとに返信する
     *
     * @param Request
     * @return int
     * @throws \LINE\LINEBot\Exception\InvalidSignatureException
    */
    public function eventHandler(Request $request) : int
    {
        // 署名を検証しLINE以外からのリクエストを受け付けない。
        $this->validateSignature($request);

        return 200;
    }

    /**
     * LINEの署名確認
     *
     * @param Request
     * @return void
     * @throws HttpException
    */
    public function validateSignature(Request $request) : void
    {
        // リクエストヘッダーについてくる実際の署名
        $signature = $request->header('x-line-signature');
        if ($signature === null) {
            abort(400);
        }

        // LINEチャネルシークレットとリクエストボディを基に署名を生成
        $hash = hash_hmac('sha256', $request->getContent(), config('app.line_channel_secret'), true);
        $expect_signature = base64_encode($hash);

        // 実際の署名と生成した署名が同じであれば検証OK
        if (!hash_equals($expect_signature, $signature)) {
            abort(400);
        }
    }
}
リクエストを処理して返信する
リクエストを処理する部分を記述します。
LineBotService.phpを以下のように編集します。
    /**
     * Reply based on the message sent to LINE.
     * LINEに送信されたメッセージをもとに返信する
     *
     * @param Request
     * @return int
     * @throws \LINE\LINEBot\Exception\InvalidSignatureException
    */
    public function eventHandler(Request $request) : int
    {
        // 署名を検証しLINE以外からのリクエストを受け付けない。
        $this->validateSignature($request);

        // リクエストをEventオブジェクトに変換する
        $events = $this->bot->parseEventRequest($request->getContent(), $request->header('x-line-signature'));

        foreach ($events as $event) {
            // Reply token無しでは返信できないため定義しておく
            $reply_token = $event->getReplyToken();
            // 無効な操作があったときに送るメッセージ
            $message_builder = new TextMessageBuilder('Invalid operation. 無効な操作です。');
            // アクションした人のLINEのユーザーID
            $line_user_id = $event->getUserId();

            switch (true){
                // テキストメッセージを受信した場合
                case $event instanceof TextMessage:
                    break;
                // 選択肢を選んだ場合
                case $event instanceof PostbackEvent:
                    break;
            }
        }

        // LINEに返信
        $response = $this->bot->replyMessage($reply_token, $message_builder);

        // 送信に失敗したらログに吐いておく
        if (!$response->isSucceeded()) {
            \Log::error('Failed!' . $response->getHTTPStatus() . ' ' . $response->getRawBody());
        }

        return $response->getHTTPStatus();
    }
これで何かしらのメッセージを送ったら"Invalid operation. 無効な操作です。"と
返信が帰ってくるようになります。
選択肢付きメッセージを送る
選択肢メッセージを送るため、Switch文に追記します。
リッチメニューを押すと'pick news type'と送信されるように
LINE Official Account Managerから編集したので
'pick news type'というテキスト送信をトリガーに
選択肢メッセージを返信します。
    switch (true){
        // テキストメッセージを受信した場合
        case $event instanceof TextMessage:
            // "pick news type"と送信された場合
            if ($event->getText() === 'pick news type') {
                // 国選択メッセージを定義
                $message_builder = $this->buildStep0Msg();
            }
            break;
        // 選択肢を選んだ場合
        case $event instanceof PostbackEvent:
            break;
    }
LineBotServiceクラスにメソッドを追加
    /**
     * Step0用のTemplateMessageBuilderを生成する
     * @param void
     * @return TemplateMessageBuilder
    */
    public function buildStep0Msg() : TemplateMessageBuilder
    {
        return new TemplateMessageBuilder(
            "Select Language / 言語選択", // チャット一覧に表示される
            new ConfirmTemplateBuilder(
                "Select Language / 言語選択", // title
                [
                    new PostbackTemplateActionBuilder("Engish", "en"), // option
                    new PostbackTemplateActionBuilder("French", "fr"), // option
                ]
            )
        );
    }
ConfirmTemplateBuilderを使用することでこちらを
簡単に生成できます。
選択肢部分をPostbackTemplateActionBuilderとすることで
選択したときに同じエンドポイントにリクエストが送信され
Switch文のcase $event instanceof PostbackEvent:に入ってきます。
選択肢の回答を保存し次のステップのメッセージを生成する
回答し次のステップに進んだことをDBに保存しておき
回答自体もDBに保存します。
    switch (true){
        // テキストメッセージを受信した場合
        case $event instanceof TextMessage:
            // "pick news type"と送信された場合
            if ($event->getText() === 'pick news type') {
                // 今までの回答をリセット
                $this->answer_model->resetStep($line_user_id);
                // 国選択メッセージを定義
                $message_builder = $this->buildStep0Msg();

                // 次のステップに進んだことを示すフラグを立てておく
                $this->answer_model->storeNextStep($line_user_id, 0);
            }
            break;
        // 選択肢を選んだ場合
        case $event instanceof PostbackEvent:
            // 回答を定義
            $postback_answer = $event->getPostbackData();
            // 未回答のレコードを取得
            $current_answer = $this->answer_model->latest()->where('answer', '')->first();

            switch ($current_answer->step) {
                case 0: // 言語選択時 selected language
                    // 回答をDBに保存
                    $this->answer_model->storeAnswer($current_answer, $postback_answer);

                    // 次のステップに進んだことを示すフラグを立てておく
                    $this->answer_model->storeNextStep($line_user_id, 1);

                    // 次のメッセージを生成する
                    $message_builder = $this->buildStep1Msg();

                    break;
                default:
                    break;
            }
        default:
            break;
    }
次に送信する選択肢メッセージを生成します。
LineBotServiceクラスにメソッドを追加します。
    /**
     * Return TemplateMessageBuilder for step1.
     * Step1用のTemplateMessageBuilderを生成する
     * @param void
     * @return TemplateMessageBuilder
    */
    public function buildStep1Msg() : TemplateMessageBuilder
    {
        return new TemplateMessageBuilder(
            "Which country do you watch the news for?", // チャットルーム一覧に表示される
            new ButtonTemplateBuilder(
                "Which country do you watch the news for?", // メッセージのタイトル
                "Select A Country / 国選択", // メッセージの内容
                "",
                [
                    new PostbackTemplateActionBuilder("United States", "us"), // 選択肢
                    new PostbackTemplateActionBuilder("Japan", "jp"), // 選択肢
                    new PostbackTemplateActionBuilder("Canada", "ca"), // 選択肢
                ]
            )
        );
    }
ButtonTemplateBuilderを使用することでこちらを
簡単に生成できます。
Modelのメソッド追加
    /**
     * Reset step
     *
     * @param string
     * @return void
     **/
    public function resetStep(string $line_user_id) : void
    {
        $this->where('line_user_id', $line_user_id)->delete();
    }

    /**
     * Store record for next step
     *
     * @param int
     * @return void
     **/
    public function storeNextStep(string $line_user_id, int $step) : void
    {
        $this->line_user_id = $line_user_id;
        $this->step = $step;
        $this->answer = '';
        $this->save();
    }

    /**
     * Store answer replied by LINE user.
     *
     * @param Answer
     * @param string
     * @return void
     **/
    public function storeAnswer(Answer $answer, string $postback_answer) : void
    {
        $answer->answer = $postback_answer;
        $answer->save();
    }
次のステップも同様
Swich文にcase1を追加します。
switch ($current_answer->step) {
    case 0: // 言語選択時 selected language
        ...
        break;
+    case 1: // 国選択時 selected country
+        $this->answer_model->storeAnswer($current_answer, $postback_answer);
+
+        $this->answer_model->storeNextStep($line_user_id, 2);
+
+        $message_builder = $this->buildStep2Msg();
+        break;
    default:
        break;
}
メッセージ生成メソッドも先程と同様です。
    /**
     * Return TemplateMessageBuilder for step2.
     * Step2用のTemplateMessageBuilderを生成する
     * @param void
     * @return TemplateMessageBuilder
    */
    public function buildStep2Msg() : TemplateMessageBuilder
    {
        return new TemplateMessageBuilder(
            "Which category?",
            new ButtonTemplateBuilder(
                "Which category?",
                "Select A Category / カテゴリ選択",
                "",
                [
                    new PostbackTemplateActionBuilder("Business", "business"),
                    new PostbackTemplateActionBuilder("General", "general"),
                    new PostbackTemplateActionBuilder("Science", "science"),
                    new PostbackTemplateActionBuilder("Tech", "technology"),
                ]
            )
        );
    }
最後に結果を送信する
Switch文にcase2を追加します。
    switch ($current_answer->step) {
        case 0: // 言語選択時 selected language
            ...
            break;
        case 1: // 国選択時 selected country
            ...
            break;
        case 2: // カテゴリ選択時 selected category(end)
            $this->answer_model->storeAnswer($current_answer, $postback_answer);

            // Step 0 ~ 2までの回答を取得
            $answers = $this->answer_model->where('line_user_id', $line_user_id)->get();

            // それぞれ定義
            $category = $answers->whereStrict('step', 2)->first()->answer;
            $language = $answers->whereStrict('step', 0)->first()->answer;
            $country = $answers->whereStrict('step', 1)->first()->answer;
            // ニュースを取得
            $news = $this->newsapi_client->getSources($category, $language, $country);

            // 取得したニュースを基に結果メッセージを生成
            $message_builder = $this->buildResultMsg($news->sources);
            break;
        default:
            # code...
            break;
    }
今までの回答を基にNews APIを叩いています。
News APIから取得したニュースデータをメッセージに埋め込んで送信します。
    /**
     * ニュース取得結果のTemplateMessageBuilderを生成する
     * @param array
     * @return TemplateMessageBuilder|TextMessageBuilder
    */
    public function buildResultMsg(array $sources) : mixed
    {
        // Newsデータがない場合
        if (empty($sources)) {
            return new TextMessageBuilder('No result / ニュースがありませんでした');
        } else {
            $columns = [];
            // 5個までアイテムを生成する
            foreach ($sources as $num => $source) {
                if ($num > 4) {
                    break;
                }

                // バックスラッシュ削除
                // httpsにする必要がある
                $replacement = [
                    '\\' => '',
                    'http:' => 'https:'
                ];

                // 置換
                $url = str_replace(
                    array_keys($replacement),
                    array_values($replacement),
                    $source->url
                );

                // URL部分を定義(ボタン部分)
                $link = new UriTemplateActionBuilder('See This News', $url);
                // アスペクト比を適当に変えてそれぞれ違う画像にする
                $acp = $num * 200 === 0 ? 100 : $num * 200;
                // アイテムをColumnとして配列に入れておく
                $columns[] = new CarouselColumnTemplateBuilder(
                    $source->name, // Title
                    mb_strimwidth($source->description, 0, 59, "...", 'UTF-8'), // 60文字までOK
                    "https://placeimg.com/640/$acp/tech", // ランダムな画像のURL
                    [$link] // 先程のURL部分
                );
            }

            // カラムをカルーセルに組み込む
            $carousel = new CarouselTemplateBuilder($columns, 'square');

            return new TemplateMessageBuilder("News results", $carousel);
        }
CarouselTemplateBuilderを使用するとこちら
を簡単に作成できます。

以上になります。