https://github.com/takuuuu517/line_twitter_bot
主な昨日はラインボットを通じて、ツイートをしたり、最新のタイムラインのツイートをみたりなどなど。。。
現在も機能を追加しようとしてます。このプロジェクトの目的は
- pythonの勉強 (pythonに触れるのほぼ初めてです)
- 複数のAPIの活用
- あと単純にラインボット作ってみたかった
機能追加で考えてるのは
- タイムラインをストリーミングして、気に入ったユーザーがツイートしたら、ラインの通知を送ったり
- 自分宛のツイートに返信する
使用したツール、API
- 言語:Python3
- SDK/API:
- ngrok (これはローカルホストで動かしてるサーバーを簡易的にデプロイしてくる感じのサービス、非常に便利)
注意
今回の記事は割と細かく説明しています。ラインボットの基礎がわかってる方はある程度のステップをスキップしてくだい。
ステップ 1
- LINE Developperからline Message API のチャンネルの開設
- Twitter Developper から新しいappを作る
この二つがそもそもないとラインボットの作成もツイッターの操作もできない。
ステップ 2
まずは下準備です。
pip install line-bot-sdk
pip install tweepy
line-bot-sdk
flask
web: python twitter_bot/bot.py
python-3.7.2
# line
LINE_CHANNEL_SECRET = "your line secret"
LINE_CHANNEL_ACCESS_TOKEN = "your line access token"

# twitter
TWITTER_ACCESS_TOKEN = "your twitter access token"
TWITTER_ACCESS_TOKEN_SECRET = "your twitter access secret"
TWITTER_CONSUMER_KEY = "consumer key"
TWITTER_CONSUMER_SECRET = "consumer key"
あとラインボットをファイルを作ります。
LINE SDK のサンプルをまずは使っていきます。
# -*- coding: utf-8 -*-

#  Licensed under the Apache License, Version 2.0 (the "License"); you may
#  not use this file except in compliance with the License. You may obtain
#  a copy of the License at
#
#       https://www.apache.org/licenses/LICENSE-2.0
#
#  Unless required by applicable law or agreed to in writing, software
#  distributed under the License is distributed on an "AS IS" BASIS, WITHOUT
#  WARRANTIES OR CONDITIONS OF ANY KIND, either express or implied. See the
#  License for the specific language governing permissions and limitations
#  under the License.

import os
import sys
from argparse import ArgumentParser

from flask import Flask, request, abort
from linebot import (
    LineBotApi, WebhookHandler
)
from linebot.exceptions import (
    InvalidSignatureError
)
from linebot.models import (
    MessageEvent, TextMessage, TextSendMessage,
)

app = Flask(__name__)

# get channel_secret and channel_access_token from your environment variable
channel_secret = credentials.LINE_CHANNEL_SECRET #ここも変えて
channel_access_token = credentials.LINE_CHANNEL_SECRET #ここも変えて
if channel_secret is None:
    print('Specify LINE_CHANNEL_SECRET as environment variable.')
    sys.exit(1)
if channel_access_token is None:
    print('Specify LINE_CHANNEL_ACCESS_TOKEN as environment variable.')
    sys.exit(1)

line_bot_api = LineBotApi(channel_access_token)
handler = WebhookHandler(channel_secret)


@app.route("/callback", methods=['POST'])
def callback():
    # get X-Line-Signature header value
    signature = request.headers['X-Line-Signature']

    # get request body as text
    body = request.get_data(as_text=True)
    app.logger.info("Request body: " + body)

    # handle webhook body
    try:
        handler.handle(body, signature)
    except InvalidSignatureError:
        abort(400)

    return 'OK'


@handler.add(MessageEvent, message=TextMessage)
def message_text(event):
    line_bot_api.reply_message(
        event.reply_token,
        TextSendMessage(text=event.message.text)
    )


if __name__ == "__main__": #ここも変えて
   port = int(os.getenv("PORT", 8000))
    app.run(host="0.0.0.0", port=port)
一番下とaccesstokenのところだけ変えるのを忘れないようにしてください。
まずはこれで動作確認をしましょう。
ngrokでローカルホストをhttpsのURLを作ってもらい
Forwarding https://ff6fec54.ngrok.io -> http://localhost:8000
この [https://ff6fec54.ngrok.io]
をこのように入力し、更新。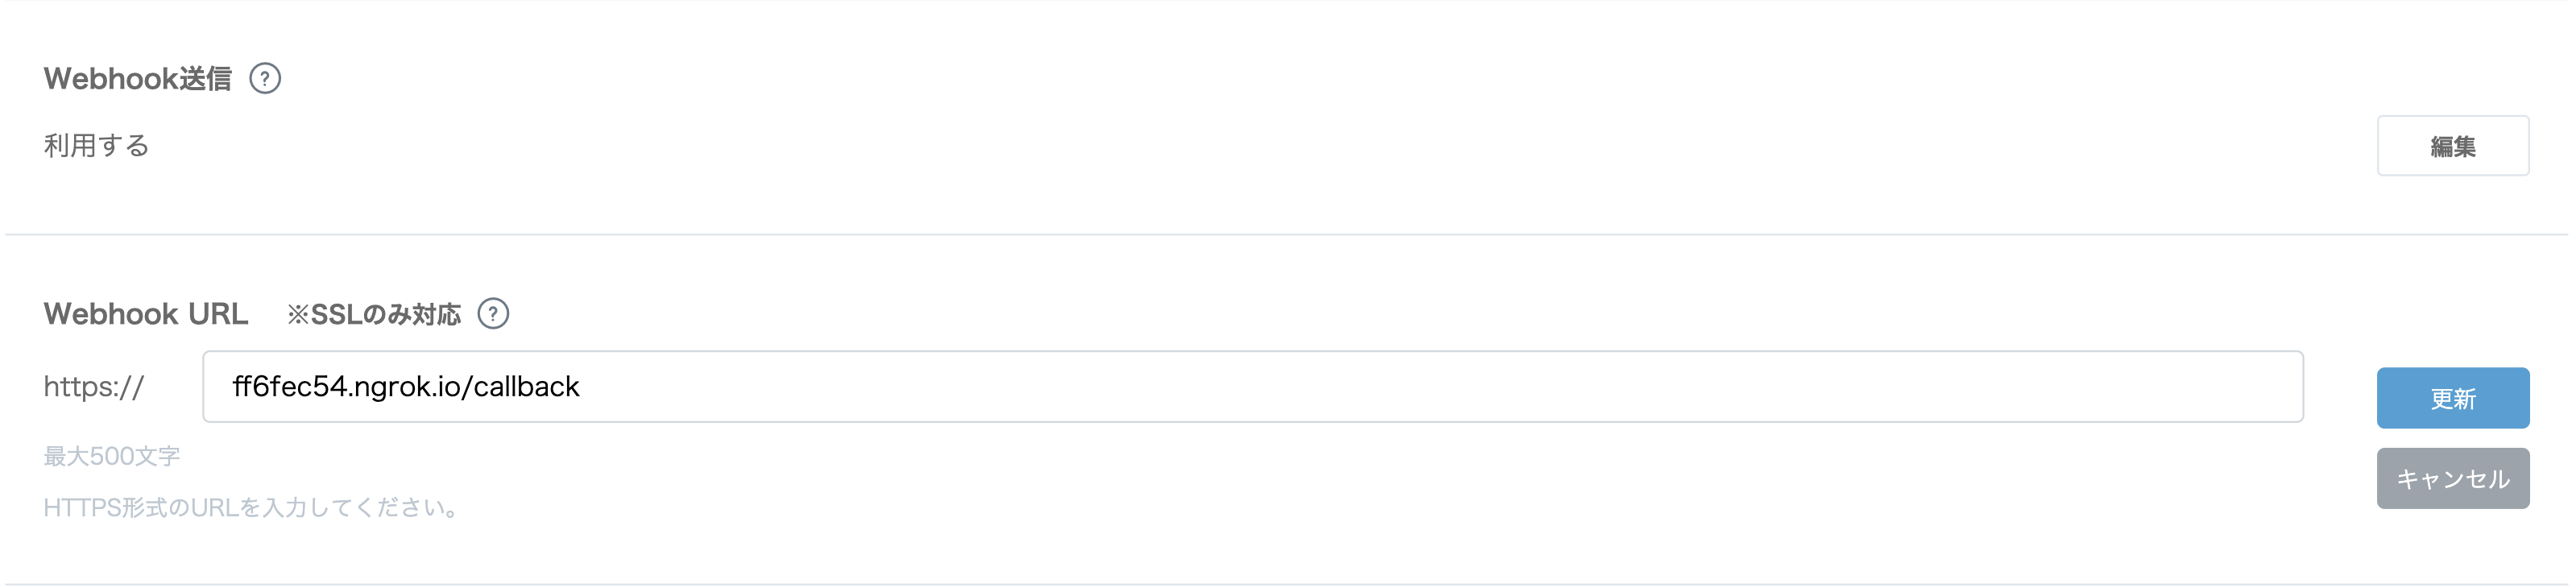
あとはサーバーを動かしてラインボットを友達追加してエコーボットが動いているか確認しましょう。
ステップ 3
ラインボットが動いていたら今度はツイッターのアカウントを認証してラインのアカウントとツイッターのアカウントを連携させていく作業です。
ツイッターのアカウントの認証はTweepy APIに事細かかく書かれています。
consumer_key = credentials.TWITTER_CONSUMER_KEY
consumer_secret = credentials.TWITTER_CONSUMER_SECRET
access_token = credentials.TWITTER_ACCESS_TOKEN
access_token_secret = credentials.TWITTER_ACCESS_TOKEN_SECRET

auth = tweepy.OAuthHandler(consumer_key, consumer_secret)

api = tweepy.API(auth)

def authentication():
    try:
        redirect_url = auth.get_authorization_url()
        return redirect_url
    except tweepy.TweepError:
        print ('Error! Failed to get request token.')


def authentication_final(user_verifier):
    global auth
    global api
    session =	{
        "request_token": auth.request_token,
    }


    # verifier = user_verifier
    # Let's say this is a web app, so we need to re-build the auth handler
    # first...
    auth = tweepy.OAuthHandler(consumer_key, consumer_secret)
    token = session["request_token"]
    session.pop("request_token")
    auth.request_token = token

    try:
        ts = auth.get_access_token(user_verifier)
        token = ts[0]
        secret = ts[1]
        auth.set_access_token(token, secret)
        api = tweepy.API(auth)
        # api.update_status('test tweet!!') # 認証が成功した時にツイートで確認したい方は使ってください
    except tweepy.TweepError:
        print ('Error! Failed to get access token.')
認証プロセスを二つに分けたの理由は後ほど記載します。
handler.add(MessageEvent, message=TextMessage)
def message_text(event):
    message = event.message.text

    sending_message = determine_message_to_send(message)

    line_bot_api.reply_message(
        event.reply_token,
        sending_message
    )

authentication_in_process = False
def determine_message_to_send(user_message):
    sending_message = [TextSendMessage(text="ツイートしたよ!")]
    global authentication_in_process

    if user_message == "認証":
        sending_message = [TextSendMessage(text="ここにアクセスして認証してください"), TextSendMessage(text=twitter.authentication()),TextSendMessage(text="承認番号を送ってください")]
        authentication_in_process = True;
        return sending_message
    elif authentication_in_process: # add regex to make sure the format matches
        authentication_in_process = False
        twitter.authentication_final(user_message)
        return TextSendMessage(text="認証されたよ!")
    else:
        twitter.tweet(user_message)

    return sending_message
ラインボットを使ったtwitterの認証を簡単に説明すると、
- ユーザーが"認証"とラインボット内で送信
- bot.pyでtwitter.py のauthenticationメソッドが呼ばれ、ユーザーに認証するためのURLがメッセージとして送られる
- ユーザーが認証URLにアクセスし、ゲットした認証番号をユーザーがボットに送信
- bot.pyでauthentication_finalが呼ばれ認証が完了する。
ステップ 4
ここまできたらもうほぼ終わりです!
あとはTweepyAPIを読むなり、LINEAPIを読むなり、自分の好きな機能を追加してみてください!
ちなみに単純にツイートするにはtwitter.py で
api.update_status('test tweet!!')
で、できます。
最後に
筆者は現在、自分のラインのアカウント、ツイッターのアカウントしか使ってないのでこのように単純にすることができている(必要な情報はとりあえずcredential.pyにおいとけばいいから)が、ユーザーが増えるのであれば、ラインとツイッターのアカウントを紐ずけるデータベースが必要になるのかなと考えている。
間違ってたらコメントください。
また、説明足りてないよ、ステップ抜けてない?ってゆうコメントもどんどんください。