コード
SAGANのコードとなります。
具体的にやっていることはこちらに記載しています。
(長いので別記事にしました。)
GeneratorとDiscriminatorの学習
# パッケージのimport
import random
import math
import time
import pandas as pd
import numpy as np
from PIL import Image
import glob

import torch
import torch.utils.data as data
import torch.nn as nn
import torch.nn.functional as F
import torch.optim as optim

from torchvision import transforms

# driveのマウント:google driveに画像がある場合
from google.colab import drive
drive.mount('/gdrive')
folder = "/gdrive/My Drive/gan/img" ##自分の環境に合わせて書き換える

# Self-Attentionモジュールの実装
class Self_Attention(nn.Module):
    """ Self-AttentionのLayer"""

    def __init__(self, in_dim):
        super(Self_Attention, self).__init__()

        # 1×1の畳み込み層によるpointwise convolutionを用意
        self.query_conv = nn.Conv2d(
            in_channels=in_dim, out_channels=in_dim//8, kernel_size=1)
        self.key_conv = nn.Conv2d(
            in_channels=in_dim, out_channels=in_dim//8, kernel_size=1)
        self.value_conv = nn.Conv2d(
            in_channels=in_dim, out_channels=in_dim, kernel_size=1)

        # Attention Map作成時の規格化のソフトマックス
        self.softmax = nn.Softmax(dim=-2)

        # 元の入力xとSelf-Attention Mapであるoを足し算するときの係数
        # output = x +gamma*o
        # 最初はgamma=0で、学習させていく
        self.gamma = nn.Parameter(torch.zeros(1))

    def forward(self, x):

        # 入力変数
        X = x

        # 畳み込みをしてから、サイズを変形する。 B,C',W,H→B,C',N へ
        proj_query = self.query_conv(X).view(
            X.shape[0], -1, X.shape[2]*X.shape[3])  # サイズ:B,C',N
        proj_query = proj_query.permute(0, 2, 1)  # 転置操作
        proj_key = self.key_conv(X).view(
            X.shape[0], -1, X.shape[2]*X.shape[3])  # サイズ:B,C',N

        # かけ算
        S = torch.bmm(proj_query, proj_key)  # bmmはバッチごとの行列かけ算です

        # 規格化
        attention_map_T = self.softmax(S)  # 行i方向の和を1にするソフトマックス関数
        attention_map = attention_map_T.permute(0, 2, 1)  # 転置をとる

        # Self-Attention Mapを計算する
        proj_value = self.value_conv(X).view(
            X.shape[0], -1, X.shape[2]*X.shape[3])  # サイズ:B,C,N
        o = torch.bmm(proj_value, attention_map.permute(
            0, 2, 1))  # Attention Mapは転置してかけ算

        # Self-Attention MapであるoのテンソルサイズをXにそろえて、出力にする
        o = o.view(X.shape[0], X.shape[1], X.shape[2], X.shape[3])
        out = x+self.gamma*o

        return out

# Generatorの実装
class Generator(nn.Module):

    def __init__(self, z_dim=20, image_size=64):
        super(Generator, self).__init__()

        self.layer1 = nn.Sequential(
            # Spectral Normalizationを追加
            nn.utils.spectral_norm(nn.ConvTranspose2d(z_dim, image_size * 16,
                                                      kernel_size=4, stride=1)),
            nn.BatchNorm2d(image_size * 16),
            nn.ReLU(inplace=True))

        self.layer2 = nn.Sequential(
            # Spectral Normalizationを追加
            nn.utils.spectral_norm(nn.ConvTranspose2d(image_size * 16, image_size * 8,
                                                      kernel_size=4, stride=2, padding=1)),
            nn.BatchNorm2d(image_size * 8),
            nn.ReLU(inplace=True))

        self.layer3 = nn.Sequential(
            # Spectral Normalizationを追加
            nn.utils.spectral_norm(nn.ConvTranspose2d(image_size * 8, image_size * 4,
                                                      kernel_size=4, stride=2, padding=1)),
            nn.BatchNorm2d(image_size * 4),
            nn.ReLU(inplace=True))

        # Self-Attentin層を追加
        self.self_attntion1 = Self_Attention(in_dim=image_size * 4)

        self.layer4 = nn.Sequential(
            # Spectral Normalizationを追加
            nn.utils.spectral_norm(nn.ConvTranspose2d(image_size * 4, image_size * 2,
                                                      kernel_size=4, stride=2, padding=1)),
            nn.BatchNorm2d(image_size * 2),
            nn.ReLU(inplace=True))

        # Self-Attentin層を追加
        self.self_attntion2 = Self_Attention(in_dim=image_size * 2)

        self.layer5 = nn.Sequential(
            # Spectral Normalizationを追加
            nn.utils.spectral_norm(nn.ConvTranspose2d(image_size * 2, image_size,
                                                      kernel_size=4, stride=2, padding=1)),
            nn.BatchNorm2d(image_size),
            nn.ReLU(inplace=True))

        # Self-Attentin層を追加
        self.self_attntion3 = Self_Attention(in_dim=image_size)

        self.last = nn.Sequential(
            nn.ConvTranspose2d(image_size, 3, kernel_size=4,
                               stride=2, padding=1),
            nn.Tanh())
        # カラー画像なので出力チャネルは3つ


    def forward(self, z):
        out = self.layer1(z)
        out = self.layer2(out)
        out = self.layer3(out)
        out = self.self_attntion1(out)
        out = self.layer4(out)
        out = self.self_attntion2(out)
        out = self.layer5(out)
        out = self.self_attntion3(out)
        out = self.last(out)

        return out

# Discriminatorの実装
class Discriminator(nn.Module):

    def __init__(self, z_dim=20, image_size=64):
        super(Discriminator, self).__init__()

        self.layer1 = nn.Sequential(
            # Spectral Normalizationを追加
            nn.utils.spectral_norm(nn.Conv2d(3, image_size, kernel_size=4,
                                             stride=2, padding=1)),
            nn.LeakyReLU(0.1, inplace=True))
        # カラー画像なので出力チャネルは3つ

        self.layer2 = nn.Sequential(
            # Spectral Normalizationを追加
            nn.utils.spectral_norm(nn.Conv2d(image_size, image_size*2, kernel_size=4,
                                             stride=2, padding=1)),
            nn.LeakyReLU(0.1, inplace=True))

        self.layer3 = nn.Sequential(
            # Spectral Normalizationを追加
            nn.utils.spectral_norm(nn.Conv2d(image_size*2, image_size*4, kernel_size=4,
                                             stride=2, padding=1)),
            nn.LeakyReLU(0.1, inplace=True))


        # Self-Attentin層を追加
        self.self_attntion1 = Self_Attention(in_dim=image_size*4)

        self.layer4 = nn.Sequential(
            # Spectral Normalizationを追加
            nn.utils.spectral_norm(nn.Conv2d(image_size*4, image_size*8, kernel_size=4,
                                             stride=2, padding=1)),
            nn.LeakyReLU(0.1, inplace=True))

        # Self-Attentin層を追加
        self.self_attntion2 = Self_Attention(in_dim=image_size*8)

        self.layer5 = nn.Sequential(
            # Spectral Normalizationを追加
            nn.utils.spectral_norm(nn.Conv2d(image_size*8, image_size*16, kernel_size=4,
                                             stride=2, padding=1)),
            nn.LeakyReLU(0.1, inplace=True))

        # Self-Attentin層を追加
        self.self_attntion3 = Self_Attention(in_dim=image_size*16)

        self.last = nn.Conv2d(image_size*16, 1, kernel_size=4, stride=1)

    def forward(self, x):
        out = self.layer1(x)
        out = self.layer2(out)
        out = self.layer3(out)
        out = self.self_attntion1(out)
        out = self.layer4(out)
        out, = self.self_attntion2(out)
        out = self.layer5(out)
        out = self.self_attntion3(out)
        out = self.last(out)

        return out


# 動作確認
z_dim = 40
D = Discriminator(z_dim=z_dim, image_size=64)
G = Generator(z_dim=z_dim, image_size=64)

# 偽画像を生成
input_z = torch.randn(1, z_dim)
input_z = input_z.view(input_z.size(0), input_z.size(1), 1, 1)
fake_images = G(input_z)

# 偽画像をDに入力
d_out = D(fake_images)

# 出力d_outにSigmoidをかけて0から1に変換
print(nn.Sigmoid()(d_out))

# DataLoaderの作成
class ImageTransform():
    """画像の前処理クラス"""

    def __init__(self, mean, std):
        self.data_transform = transforms.Compose([
            transforms.ToTensor(),
            transforms.Normalize(mean, std),
            transforms.RandomResizedCrop((256,256), scale=(1.0, 1.0), ratio=(1.0, 1.0)),
            transforms.Resize((128,128))
        ])

    def __call__(self, img):
        return self.data_transform(img)

class GAN_Img_Dataset(data.Dataset):
    """画像のDatasetクラス。PyTorchのDatasetクラスを継承"""

    def __init__(self, file_list, transform):
        self.file_list = file_list
        self.transform = transform

    def __len__(self):
        '''画像の枚数を返す'''
        return len(self.file_list)

    def __getitem__(self, index):
        '''前処理をした画像のTensor形式のデータを取得'''

        img_path = self.file_list[index]
        img = Image.open(img_path)  # [高さ][幅]白黒

        # 画像の前処理
        img_transformed = self.transform(img)

        return img_transformed

# DataLoaderの作成と動作確認

# ファイルリストを作成
train_img_list = glob.glob(folder+"/*")

# Datasetを作成
mean = (0.5,)
std = (0.5,)
train_dataset = GAN_Img_Dataset(
    file_list=train_img_list, transform=ImageTransform(mean, std))

# DataLoaderを作成
batch_size = 16

train_dataloader = torch.utils.data.DataLoader(
    train_dataset, batch_size=batch_size, shuffle=True)

# 動作の確認
batch_iterator = iter(train_dataloader)  # イテレータに変換
imges = next(batch_iterator)  # 1番目の要素を取り出す
print(imges.size())  # torch.Size([64, 1, 64, 64])

# 画像の表示
plt.imshow(imges[0].detach().numpy().transpose((1,2,0)))
plt.show()

# 学習
# モデルを学習させる関数を作成
def train_model(G, D, dataloader, num_epochs):

    # GPUが使えるかを確認
    device = torch.device("cuda:0" if torch.cuda.is_available() else "cpu")
    print("使用デバイス:", device)

    # 最適化手法の設定
    g_lr, d_lr = 0.0001, 0.0004
    beta1, beta2 = 0.0, 0.9
    g_optimizer = torch.optim.Adam(G.parameters(), g_lr, [beta1, beta2])
    d_optimizer = torch.optim.Adam(D.parameters(), d_lr, [beta1, beta2])

    # パラメータをハードコーディング
    z_dim = 40

    # ネットワークをGPUへ
    G.to(device)
    D.to(device)

    G.train()  # モデルを訓練モードに
    D.train()  # モデルを訓練モードに

    # ネットワークがある程度固定であれば、高速化させる
    torch.backends.cudnn.benchmark = True

    # 画像の枚数
    num_train_imgs = len(dataloader.dataset)
    batch_size = dataloader.batch_size

    # イテレーションカウンタをセット
    iteration = 1
    logs = []

    # epochのループ
    for epoch in range(num_epochs):

        # 開始時刻を保存
        t_epoch_start = time.time()
        epoch_g_loss = 0.0  # epochの損失和
        epoch_d_loss = 0.0  # epochの損失和

        print('-------------')
        print('Epoch {}/{}'.format(epoch, num_epochs))
        print('-------------')
        print('(train)')

        # データローダーからminibatchずつ取り出すループ
        for imges in dataloader:

            # --------------------
            # 1. Discriminatorの学習
            # --------------------
            # ミニバッチがサイズが1だと、バッチノーマライゼーションでエラーになるのでさける
            if imges.size()[0] == 1:
                continue

            # GPUが使えるならGPUにデータを送る
            imges = imges.to(device)

            # 正解ラベルと偽ラベルを作成
            # epochの最後のイテレーションはミニバッチの数が少なくなる
            mini_batch_size = imges.size()[0]

            # 真の画像を判定
            d_out_real = D(imges)

            # 偽の画像を生成して判定
            input_z = torch.randn(mini_batch_size, z_dim).to(device)
            input_z = input_z.view(input_z.size(0), input_z.size(1), 1, 1)
            fake_images = G(input_z)
            d_out_fake = D(fake_images)


            d_loss_real = torch.nn.ReLU()(1.0 - d_out_real).mean()
            # 誤差 d_out_realが1以上で誤差0になる。d_out_real>1で、
            # 1.0 - d_out_realが負の場合ReLUで0にする

            d_loss_fake = torch.nn.ReLU()(1.0 + d_out_fake).mean()
            # 誤差 d_out_fakeが-1以下なら誤差0になる。d_out_fake<-1で、
            # 1.0 + d_out_realが負の場合ReLUで0にする

            d_loss = d_loss_real + d_loss_fake

            # バックプロパゲーション
            g_optimizer.zero_grad()
            d_optimizer.zero_grad()

            d_loss.backward()
            d_optimizer.step()

            # --------------------
            # 2. Generatorの学習
            # --------------------
            # 偽の画像を生成して判定
            input_z = torch.randn(mini_batch_size, z_dim).to(device)
            input_z = input_z.view(input_z.size(0), input_z.size(1), 1, 1)
            fake_images = G(input_z)
            d_out_fake = D(fake_images)

            # 誤差を計算→hinge version of the adversarial lossに変更
            #g_loss = criterion(d_out_fake.view(-1), label_real)
            g_loss = - d_out_fake.mean()

            # バックプロパゲーション
            g_optimizer.zero_grad()
            d_optimizer.zero_grad()
            g_loss.backward()
            g_optimizer.step()

            # --------------------
            # 3. 記録
            # --------------------
            epoch_d_loss += d_loss.item()
            epoch_g_loss += g_loss.item()
            iteration += 1

        # epochのphaseごとのlossと正解率
        t_epoch_finish = time.time()
        print('-------------')
        print('epoch {} || Epoch_D_Loss:{:.4f} ||Epoch_G_Loss:{:.4f}'.format(
            epoch, epoch_d_loss/batch_size, epoch_g_loss/batch_size))
        print('timer:  {:.4f} sec.'.format(t_epoch_finish - t_epoch_start))
        t_epoch_start = time.time()

        torch.save(G.state_dict(), "/gdrive/My Drive/gan/weights/generator_"+str(epoch)+".pt")
        torch.save(D.state_dict(), "/gdrive/My Drive/gan/weights/discriminator_"+str(epoch)+".pt")

    # print("総イテレーション回数:", iteration)

    return G, D
# ネットワークの初期化
def weights_init(m):
    classname = m.__class__.__name__
    if classname.find('Conv') != -1:
        # Conv2dとConvTranspose2dの初期化
        nn.init.normal_(m.weight.data, 0.0, 0.02)
        nn.init.constant_(m.bias.data, 0)
    elif classname.find('BatchNorm') != -1:
        # BatchNorm2dの初期化
        nn.init.normal_(m.weight.data, 1.0, 0.02)
        nn.init.constant_(m.bias.data, 0)


# 初期化の実施
G.apply(weights_init)
D.apply(weights_init)

print("ネットワークの初期化完了")

# 学習・検証を実行する
# 時間がかかる
num_epochs = 300
G_update, D_update = train_model(
    G, D, dataloader=train_dataloader, num_epochs=num_epochs)
検証
import torchvision
# 美女を可視化する
device = torch.device("cuda:0" if torch.cuda.is_available() else "cpu")

# 入力の乱数生成
batch_size = 16 #今回は16人
z_dim = 40
fixed_z = torch.randn(batch_size, z_dim)
fixed_z = fixed_z.view(fixed_z.size(0), fixed_z.size(1), 1, 1)

# 画像生成
G_update.eval()
fake_images = G_update(fixed_z.to(device))

fig = plt.figure(figsize=(25, 16))
fake_images = torchvision.utils.make_grid(fake_images, nrow=8, padding=1)
plt.imshow(fake_images.cpu().detach().numpy().transpose((1,2,0)))
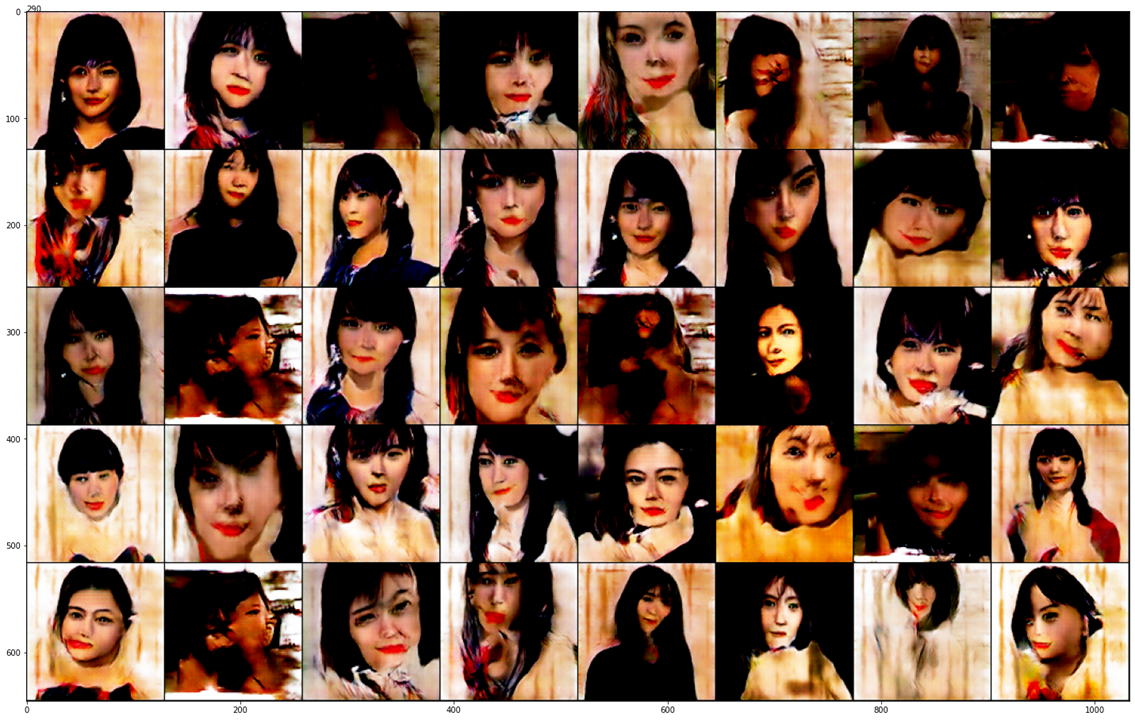
300エポック学習した後の結果はこんな感じになります。