前書き
jetpack composeには、「状態」をうまく扱う仕組みが整っている。この仕組みを構築している思想に単方向データフロー(Unidirectinal data flow)がある。ドキュメントの状態ホイスティングのところにもさっくり書いてある。
PureなUnidirectinal data flow を知りたくなったので(そんなものがあるのかも含め)、以下参考に超シンプルに実装した。
Unidirectional data flow on Android using Kotlin: The blog post
(part1 ~ part3)
Unidirectinal data flow
Unidirectional data flowとはざっくりいうと。
「何をしたいか」 を「Action」で定義し、
「Action」に応じて「State」を変化させ、
「State」の変化を「View」に反映させる。
Actionが各種クラスを横断し、Storeと呼ばれるドメイン層にて新しいStateが作成される。作成されたStateはViewにCallback等で通知される。このActionの動きとStateの動きがそれぞれ単方向なので、その名前がついている、(と思ってます。)
Redux と Flux というFaceBookが作ったアーキテクチャがBaseになっているが、この辺はここでは書かない。
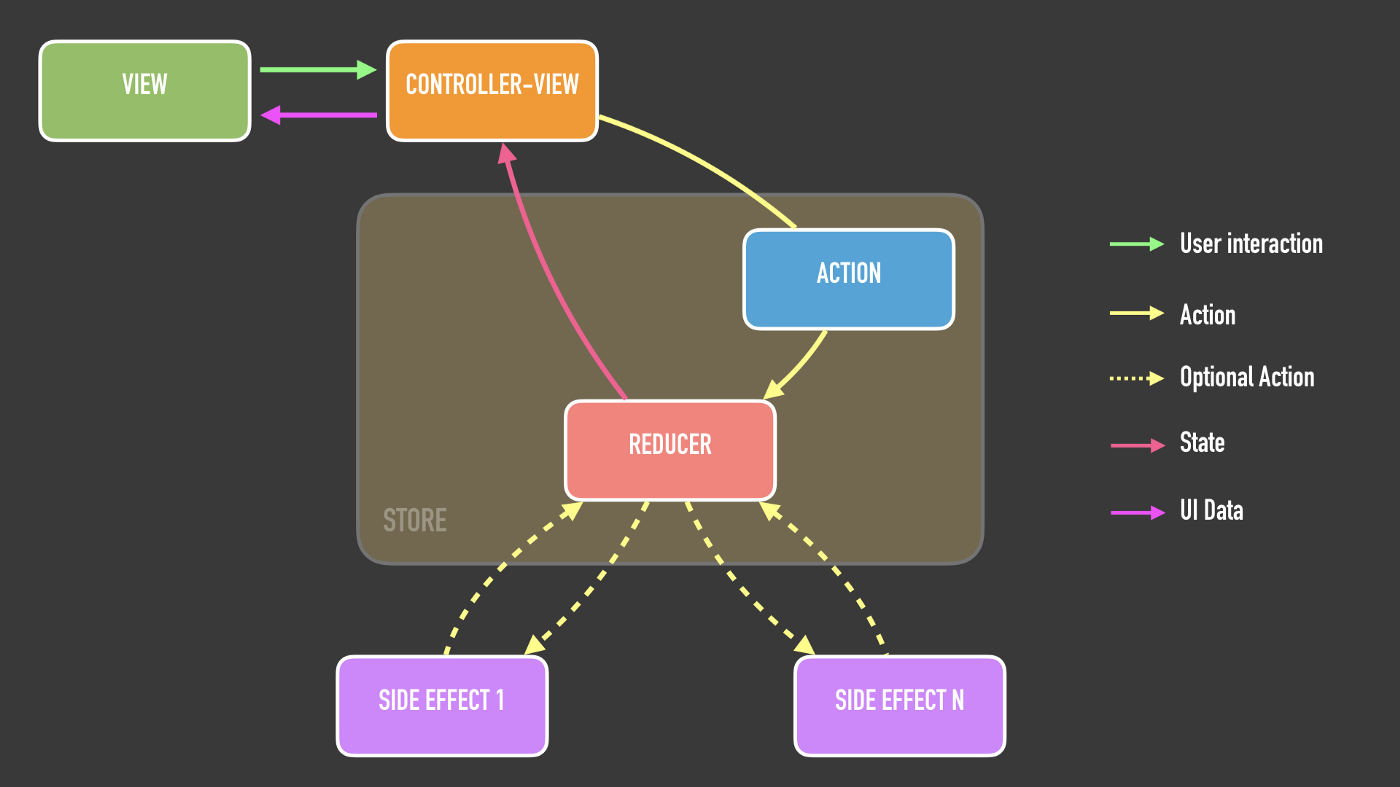
Components
- ControllerView
- Store
- Reducer
- Action
- State
- SideEffect
ざっくり以下。
ControllerView
ビジネスロジックとUiUxを仲介。ViewModel(というよりPresenter)と似たようなもの。
Store
このアーキテクチャのCore。ビジネスロジックの記載場所。CleanArchitecterのDomainと似たようなもの。
Action
何をするか。プログラムに何をしてほしいか。を定義。
(ex:CreateItemAction, DeleteItemAction, UpdateItemWithColorAction..etc)
State
アプリの状態であり、Dataの状態であり、UIの状態であり、時間とともに変化するもの全てのうち、扱うべきものを定義する。
Reducer
Actionと現在のStateから、新しいStateを作るもの。
SideEffect
API通信とData Baseロジック。
ActionとStateは図で言うと矢印であり、controllerViewはお馴染みのViewmodelやPresenterと役割が似ているので、Store以降と矢印部分を意識して理解できれば問題ない。
コード
全体は、gitに
シンプルにボタンを押したらインジケータを表示、5秒後にコンテンツを表示する動きやってます。動きが分かればOKなコードです。
ランダムアップデートとか言いつつ、生成されるオブジェクトは固定。

State と Action
enum class UiState {
    Loading,
    Show
}
data class State (
    val contents: List<Content> = emptyList(),
    val uiState: UiState = UiState.Show
)
sealed class GenerateAction: Action() {
    class GenerateTodo: GenerateAction()
}
sealed class LoadAction: Action() {
    data class LoadContent(val todos: List<Content> = emptyList()): LoadAction()
}
ActionとStateの実装。Actionが各レイヤを行き来するので、度々出てきます。
View → controllerView
...

OutlinedButton(onClick = {
  controllerView.onEvent(ContentListEvent.UpdateTodoList)
}) {
...
Unidirectinal Data flowのプロセスを開始点。
ContentListEvent.UpdateTodoListはユーザイベントを定義したsealed class。なんのEventが起こったかの識別子。
onEventでユーザ操作の発火が伝わる。
ControllerView → Store
...

override fun onEvent(userEvent: UserEvent) {
        when(userEvent) {
            is ContentListEvent.UpdateTodoList -> store.dispatch(GenerateAction.GenerateTodo())
        }
    }

...
ViewからのEventに応じて、storeへActionを送付。Event→Actionの変換が責務。

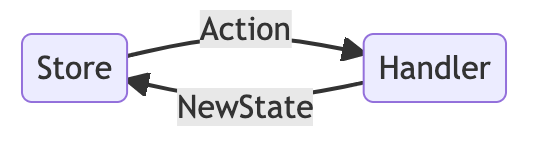
Store
...
private var _state = MutableStateFlow( State() )
    val state = _state
override fun dispatch(action: Action) {
        _state.value = reduce(action, _state.value)
        sideEffect?.handle(action)
    }

private fun reduce(action: Action, currentState: State): State {
        return when(action) {
            is LoadAction -> ShowReducer.reduce(action, currentState)
            is GenerateAction -> GenerateReducer.reduce(action, currentState)
        }
    }

...
reduce(action: Action, currentState: State)
StateとActionから、新しいStateを作成。その変換ロジックはReducerがもつ。
Api通信やDatabase操作など重たい処理はSideEffectで行うので、Reducerはそれ以外(今回のコードだとインジケータの状態)を新しいStateに変更↓。
...
override fun reduceUiState(action: GenerateAction, uiState: UiState): UiState {
        return when(action) {
            is GenerateAction.GenerateTodo -> UiState.Loading
        }
    }
...
GenerateReducer.reduceで↑の関数を呼び、UiStateをShow→Loadingに変更(インジケータの表示に使用。)して、新しいStateを返却。
Store → ControllerView
...

private var _state = MutableStateFlow( State() )
    val state = _state

...
flowでcontrollerViewへ公開。
controllerView → View
...
private var _uiState = MutableStateFlow(UiState.Show)
    val uiState = _uiState
...

init {
        GlobalScope.launch {
            store.state.collect {
                _uiState.value = it.uiState
                ...
            }
        }
    }

...
同じく、View側にflowで公開。
View
val uiState by controllerView.uiState.collectAsState(initial = UiState.Show)
あとは再コンポーズしてもらえばOK.インジケータ表示のようなSideEffectが絡まないシンプルな制御。

Actionが登っていき、Stateが返っていくのがわかる。
Store ⇄ SideEffect
ちょっと上で書いた、Storeの続き。
Side Effectの処理。
sideEffect?.handle(action)
actionに応じて、重い処理。
...
override fun handle(action: Action) {
        when(action) {
            is GenerateAction.GenerateTodo -> GenerateHandler.handle(action) { store.dispatch(it) }
            else -> Unit
        }
    }
...
...
override fun handle(action: GenerateAction, actionDispatcher: (Action) -> Unit) {
        when(action) {
            is GenerateAction.GenerateContent -> {
                GlobalScope.launch {
                    delay(5000) // 重い処理
                    actionDispatcher.invoke(LoadAction.LoadContent(generateMockContent()))
                }
            }
        }
    }
...
actionDispatcherで処理結果をstoreへ(ここでは、generateMockContentが結果)
新しいデータ付きのActionがStoreへ流れる。

store#dispach(action)がLoadActionで動くので、
store#reduceでそのAcrionに応じた新しいStateが作成される
flowで公開しているStateが更新 される
private var _state = MutableStateFlow( State() )
    val state = _state
監視しているflowの更新によって再コンポーズが起こる
val contents by controllerView.contents.collectAsState(initial = emptyList()
の流れが動きます。
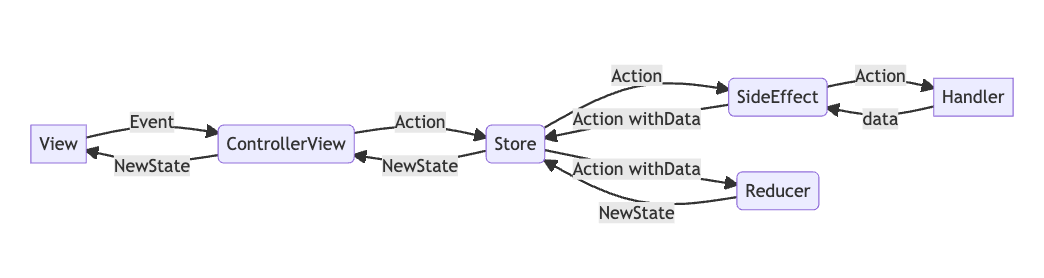
StoreへActionが向かい,ReducerでStateに変換され、更新されたStateがViewに通知されている。
終わり
Thread制御が必要なら、引数でThreadExcuterやらCroutine Scopeを送れば、制御が容易かと。テストもかける。
Viewの値(TextFieldの文字列や、トグルのTrueFalse)をStore側で処理したいのであれば、Actionに持たせてStoreへ伝達させる。
SideEffect、思想的には任意らしいのでnull許容。SideEffectが必要のないアプリはないと思いますが。
2021年のDroidKaigiのソースも、この考え方を使っているので、理解の一助になればなあ。。と学習。
最近主流?のFlow + JetpackComposeを使うアプリでは使いやすいと感じてます。
以上。
個人的な理解が主なので、ご意見いただけると嬉しいです。