前回の記事 で作成したボイラープレートにSASSの読み込み設定を実装する。
使用するnpmモジュール
今回使用するモジュールは以下の通り。(使用するモジュールは全てlatest)
| npmモジュール名 | バージョン | 説明 |
|---|---|---|
| node-sass | 4.12.0 | Sassのコンパイルに必要 |
| style-loader | 0.23.1 | cssのバンドルに必要 |
| css-loader | 3.0.0 | cssのバンドルに必要 |
| sass-loader | 7.1.0 | Sassの読み込みに必要 |
| autoprefixer | 9.6.1 | ベンダープレフィックスを自動的に付与してくれる ※1 |
| postcss-loader | 3.0.0 | autoprefixerをwebpackで使用するのに必要 |
※1
Autoprefixer を使うと、ベンダープレフィックスを自動的に付与される。そのため、コーディングに集中でき、ブラウザ間の差異を意識する必要がなくなるので採用。
ベンダープレフィックスの例
  -webkit-transform: scale(2);
  -ms-transform: scale(2);
  transform: scale(2);
package.jsonへのモジュール追加とインストール
使用するnpmモジュールをpackage.jsonに追加する。
{
  "name": "react-ts-webpack",
  "version": "1.0.0",
  "description": "",
  "main": "index.js",
  "scripts": {
    "start": "webpack-dev-server --open",
    "build": "webpack",
    "build-prod": "webpack --mode=production"
  },
  "keywords": [],
  "author": "kento75 <kento2github@gmail.com> (https://overreact.tk)",
  "license": "ISC",
  "dependencies": {
    "@babel/core": "^7.4.5",
    "@babel/preset-env": "^7.4.5",
    "@babel/preset-react": "^7.0.0",
    "@babel/preset-typescript": "^7.3.3",
    "@types/react": "^16.8.22",
    "@types/react-dom": "^16.8.4",
    "autoprefixer": "^9.6.1",
    "babel-loader": "^8.0.6",
    "css-loader": "^3.0.0",
    "node-sass": "^4.12.0",
    "postcss-loader": "^3.0.0",
    "react": "^16.8.6",
    "react-dom": "^16.8.6",
    "sass-loader": "^7.1.0",
    "style-loader": "^0.23.1",
    "webpack": "^4.35.0",
    "webpack-cli": "^3.3.5"
  },
  "devDependencies": {
    "webpack-dev-server": "^3.7.2"
  }
}
追加後、以下のコマンドを実行してnpmモジュールをインストールする。
$ npm install
webpack.config.jsファイルに設定追加
web pack.config.jsファイルにSass用の設定を追加する。
const path = require('path');
const rules = [
  /* TypeScript用の設定 */
  {
    // 対象とする拡張子を指定
    test: /\.tsx?/,
    // 対象から外すディレクトリを指定
    exclude: /node_modules/,
    // babelを使用する
    loader: 'babel-loader',
  },

/////  ここから追加  /////
  /* Sass用設定 */
  {
    // 対象とする拡張子を指定
    test: /\.scss$/,
    use: [
      // linkタグへの出力用
      "style-loader",
      // CSSのバンドル設定
      {
        loader: "css-loader",
        options: {
          url: false,
          // // ソースマップの有効化 development と production で勝手に切り替わるのでコメントアウト
          // sourceMap: true,

          // sass-loader と postcss-loader を使用するので 2 を設定
          // ここを参考に設定 https://github.com/webpack-contrib/css-loader#importloaders
          importLoaders: 2,
        }
      },
      "postcss-loader",
      {
        loader: "sass-loader",
        // options: {
        // // ソースマップの有効化 development と production で勝手に切り替わるのでコメントアウト
        //   sourceMap: true,
        // }
      }
    ]
  },
/////  ここまで追加  /////
];

module.exports = {
  // ブラウザ環境で使用するためwebをtargetとする
  target: 'web',
  // モード値を production に設定すると最適化された状態で、
  // development に設定するとソースマップ有効でJSファイルが出力される
  mode: 'development',
  // 起点となるTSXファイル(エントリーポイント)
  entry: './src/index.tsx',
  // ビルド後の出力先設定
  output: {
    // 出力先パス
    path: path.resolve(__dirname, 'build'),
    // ファイル名
    filename: 'bundle.js',
  },
  module: {
    // ビルド時に使用するルール(上で設定)を設定
    rules,
  },
  resolve: {
    // 対象とする拡張子を指定
    extensions: ['.ts', '.tsx', '.js'],
  },
  // webpack-dev-serverの設定
  devServer: {
    // 起点となるパス
    contentBase: './',
    // ポート番号
    port: 5000,
  },
};
postcss.config.jsファイルの作成
ベンダープレフィックスの設定ファイルを作成する。webpack実行時にこのファイルに定義されたルールが適用される。
プロジェクト直下にpostcss.config.jsファイルを作成して、各種設定を各種設定を追加する。
module.exports = {
  plugins: [
    require("autoprefixer")({
      grid: "autoplace", // gridレイアウトの有効化
    })
  ]
};
ここまでの設定で使用する準備は完了。
動作確認
動作を確認するためにindex.tsxでSassを読み込む修正を行う。
import React from 'react';
import ReactDOM from 'react-dom';
import './scss-style.scss';  // sassをimport

function App(): JSX.Element {
  const sum = (a: number, b: number): number => a + b;

  return (
    <React.Fragment>
      <div>
        <h1>React & TypeScript!</h1>
        <p>Test: {sum(15, 15)} </p>
      </div>
      <div className="scss-style" />
    </React.Fragment>
  );
}

export default App;

const root = document.getElementById('app-root');

ReactDOM.render(<App />, root);
sass-style.scssファイルをsrcディレクトリ直下に作成して確認用の設定を追加する。
.scss-style {
  background: #e47474;
  height: 15px;
  // ベンダープレフィックス確認用に適当に入れただけ
  transform: scale(2);
}
実装が完了したら、以下のコマンドを実行して開発用サーバー起動することを確認する。
$ npm start

> react-ts-webpack@1.0.0 start /Users/kento/Programing/VScodeProjects/ts-react-simple-boiler-with-sass
> webpack-dev-server --open

ℹ 「wds」: Project is running at http://localhost:5000/
ℹ 「wds」: webpack output is served from /
ℹ 「wds」: Content not from webpack is served from ./
ℹ 「wdm」: wait until bundle finished: /
ℹ 「wdm」: Hash: c5761becd5bd8fc6e16b
Version: webpack 4.35.0
Time: 2340ms
Built at: 2019-07-06 13:44:56
    Asset      Size  Chunks             Chunk Names
bundle.js  1.25 MiB    main  [emitted]  main
Entrypoint main = bundle.js
[0] multi (webpack)-dev-server/client?http://localhost:5000 ./src/index.tsx 40 bytes {main} [built]
[./node_modules/ansi-html/index.js] 4.16 KiB {main} [built]
[./node_modules/react-dom/index.js] 1.33 KiB {main} [built]
[./node_modules/react/index.js] 190 bytes {main} [built]
[./node_modules/webpack-dev-server/client/index.js?http://localhost:5000] (webpack)-dev-server/client?http://localhost:5000 4.29 KiB {main} [built]
[./node_modules/webpack-dev-server/client/overlay.js] (webpack)-dev-server/client/overlay.js 3.51 KiB {main} [built]
[./node_modules/webpack-dev-server/client/socket.js] (webpack)-dev-server/client/socket.js 1.53 KiB {main} [built]
[./node_modules/webpack-dev-server/client/utils/createSocketUrl.js] (webpack)-dev-server/client/utils/createSocketUrl.js 2.77 KiB {main} [built]
[./node_modules/webpack-dev-server/client/utils/log.js] (webpack)-dev-server/client/utils/log.js 964 bytes {main} [built]
[./node_modules/webpack-dev-server/client/utils/reloadApp.js] (webpack)-dev-server/client/utils/reloadApp.js 1.63 KiB {main} [built]
[./node_modules/webpack-dev-server/client/utils/sendMessage.js] (webpack)-dev-server/client/utils/sendMessage.js 402 bytes {main} [built]
[./node_modules/webpack-dev-server/node_modules/strip-ansi/index.js] (webpack)-dev-server/node_modules/strip-ansi/index.js 161 bytes {main} [built]
[./node_modules/webpack/hot sync ^\.\/log$] (webpack)/hot sync nonrecursive ^\.\/log$ 170 bytes {main} [built]
[./src/index.tsx] 554 bytes {main} [built]
[./src/scss-style.scss] 1.35 KiB {main} [built]
    + 34 hidden modules
ℹ 「wdm」: Compiled successfully.
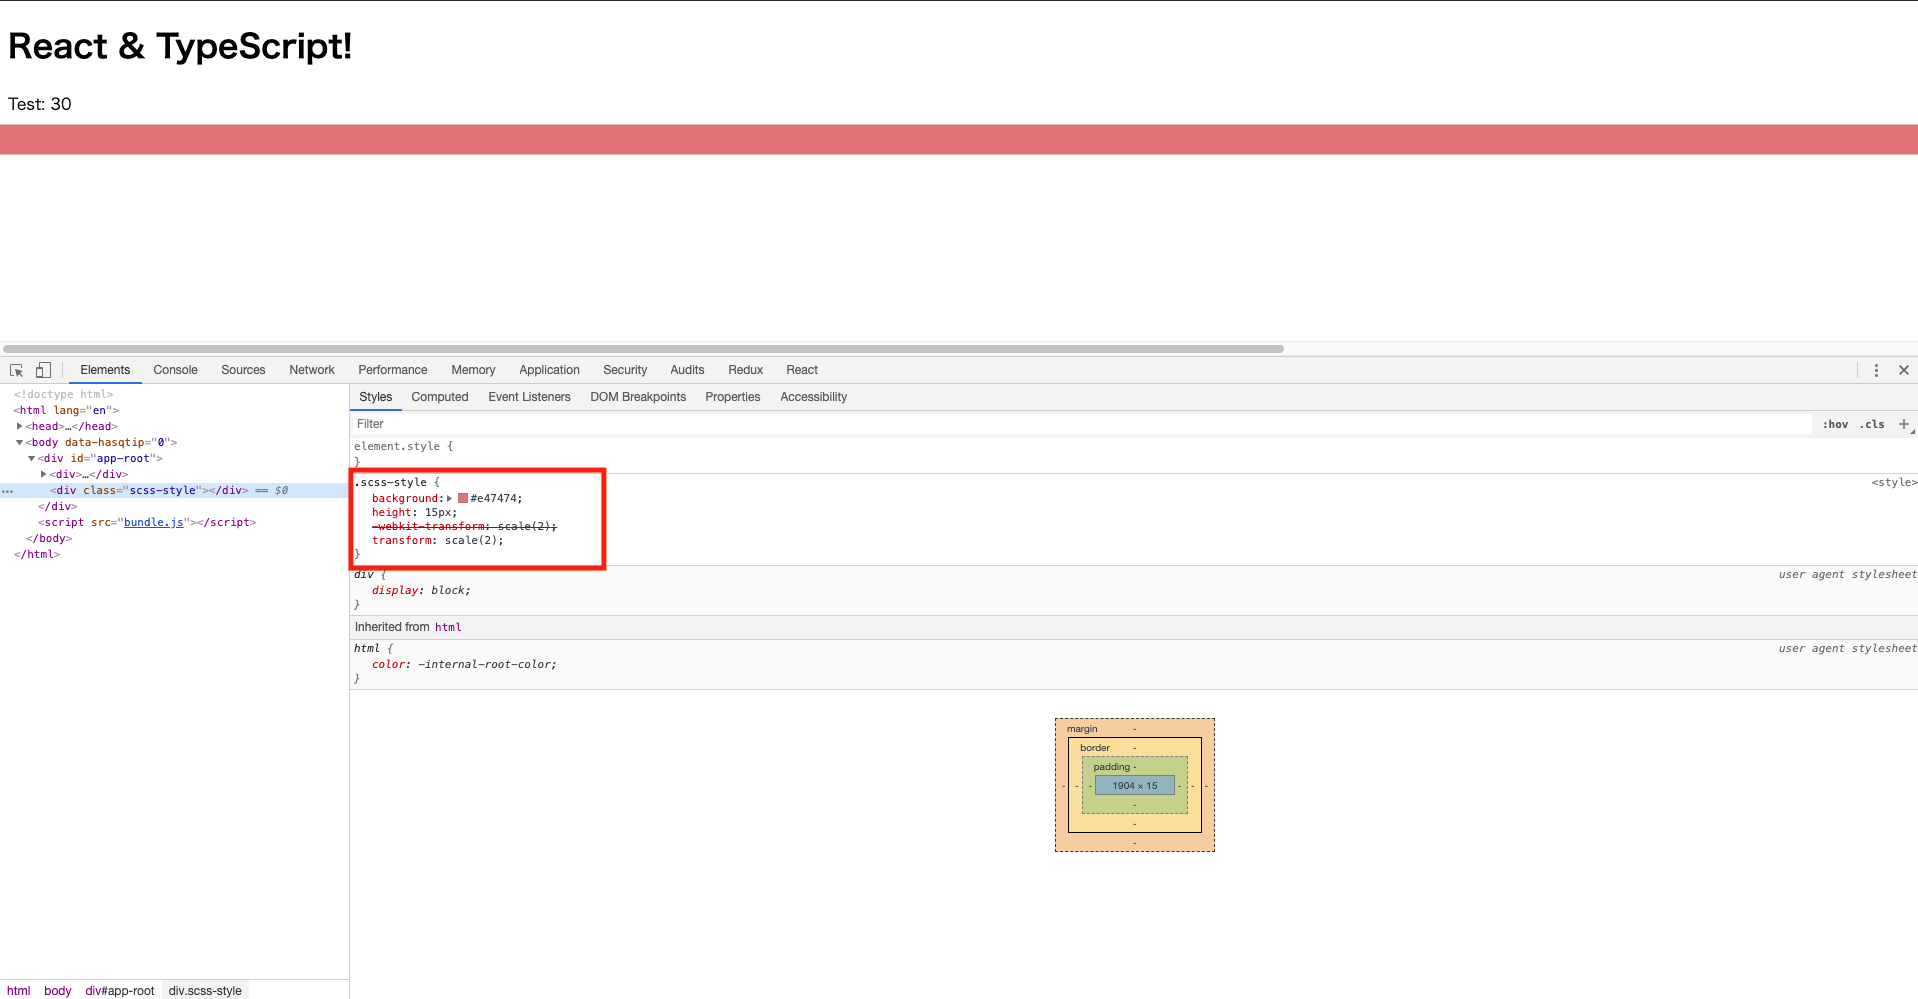
起動後、localhost:5000 にアクセスする。
Sassファイルの内容が反映されていることが確認できる。また、ベンダープレフィックスも設定されていることが確認できる。
以上で確認完了。
作成したボイラープレートは こちら