はじめに
- 初学者の備忘録
- 殴り書き
やりたいこと
- ESP32(M5Atom-U)からhttps通信でgetとpostメソッドを実行したい
準備したこと
- AWS Lambda+Dynamodb+CloudFrontで超簡潔なHTTPS APIを作成
- Arduino IDEのインストール
- M5Atom-Uへコードを書き込める環境
環境
- M5Atom-U(ESP32 PICO)
- Arduino IDE 2.3.2
- Boards Manager: M5Stackライブラリの
M5Stack/M5Atomを使用
- Boards Manager: M5Stackライブラリの
早速実装していく
1. ルート証明書を取得する
まず前提として、httpsはSSL/TLSを使用、プロトコルを暗号化して送信することで、盗聴や改ざんを防ぎます。
そのためにサーバは身分を認証することが必須であり、サーバは証明書を発行します。それをSSL/TLS証明書といい、webを作ったことがある人は取得したことがあるのではないでしょうか。
さて、この証明書、しっかりしたものか検証が必要ですよね?
その役割を行うのがブラウザ等にインストールされているルート証明書です。
早速見に行ってみましょう
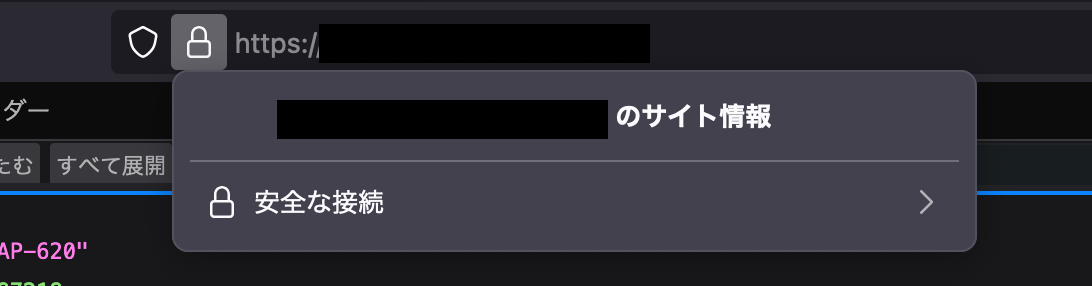
Firefoxから今回使用するAPIのエンドポイントに飛びます
鍵マーク -> 安全な接続 -> 詳細を表示


セキュリティ -> 証明書を表示
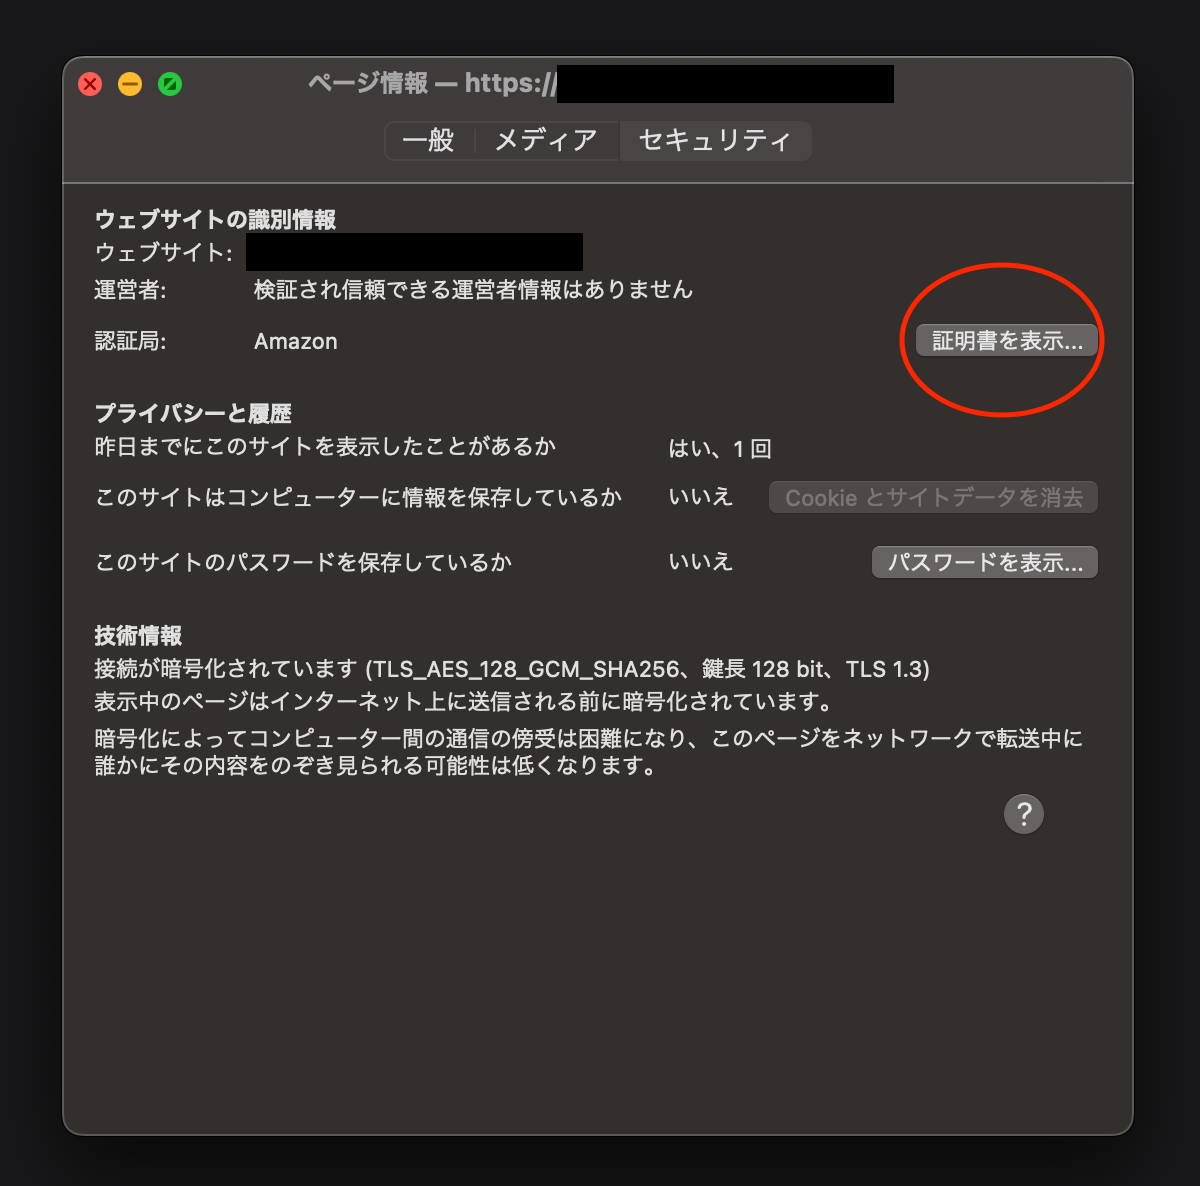
証明書が3個ほど表示されますが、使える証明書は一つです
よく分からない方は全ての証明書をダウンロードし、使えるのをコードで実際に試して見つけるのがおすすめです
私はAmazon RSA 2048 M03の証明書でいけました

ダウンロードした.pemファイルを適当にエディタなどで開いてコピペします
---BEGIN CERTIFICATE---から---END CERTIFICATE---まで全てコピペします

2. GETを実装してみる
以下のようなコードを用意しました
参考サイトとほぼ一緒です
#include <WiFi.h>
#include <WiFiClientSecure.h>

//wifiのSSIDとパスワードを入力
const char* ssid       = "";
const char* password   = "";

//ルート証明書
const char* root_ca = \
"-----BEGIN CERTIFICATE-----\n" \

"ここに証明書を貼り付ける\n" \

"-----END CERTIFICATE-----\n";

uint32_t WebGet_LastTime = 0;

//**************************セットアップ関数**************************
void setup() {
  Serial.begin(115200);
  delay(100);

  Serial.println();
  Serial.print("Attempting to connect to SSID: ");
  Serial.println(ssid);
  WiFi.begin(ssid, password);

  while (WiFi.status() != WL_CONNECTED) {
    Serial.print(".");
    delay(500);
  }

  Serial.println();
  Serial.print("Connected to ");
  Serial.println(ssid);
  Serial.println(WiFi.localIP());
  delay(2000);

  WebGet_LastTime = 200000; //多めの数値で初期化しておく
}

//**************************メインの関数**************************
String https_Get(const char* host1, String target_page) {

  String ret_str;
  WiFiClientSecure https_client;
  https_client.setCACert(root_ca); // ルート証明書をセット

  if (https_client.connect(host1, 443)) {
    Serial.print(host1); Serial.print(F("-------------"));
    Serial.println(F("connected"));
    Serial.println(F("-------WEB HTTPS GET Request Send"));

    String str1 = String("GET https://") + String(host1) + target_page + " HTTP/1.1\r\n" +
                  "Host: " + String(host1) + "\r\n" +
                  "User-Agent: BuildFailureDetectorESP32\r\n" +
                  "Connection: close\r\n\r\n";

    https_client.print(str1);
    https_client.flush();
    Serial.print(str1);
    Serial.flush();

    while (https_client.connected() || https_client.available()) {
      if (https_client.available()) {
        String line = https_client.readStringUntil('\n');
        line.trim(); // 改行、空白を削除
        if (line.length() > 0) {
          ret_str += line + "\n"; // レスポンスを蓄積
        }
      }
    }

  } else {
    Serial.println(F("------connection failed"));
    if (WiFi.status() != WL_CONNECTED) {
      Serial.println("WiFi is not connected");
    } else {
      Serial.println("SSL/TLS handshake failed");
    }
  }

  if (https_client) {
    https_client.stop();
    Serial.println(F("-------Client Stop"));
  }
  Serial.flush();

  return ret_str;
}

//**************************メインループ**************************
void loop() {
  if((millis() - WebGet_LastTime) > 180000){ //180秒(3分)毎に取得
    String str = https_Get("test.com", "/api");
    Serial.println(str);
    Serial.flush();
    WebGet_LastTime = millis();
  }
}
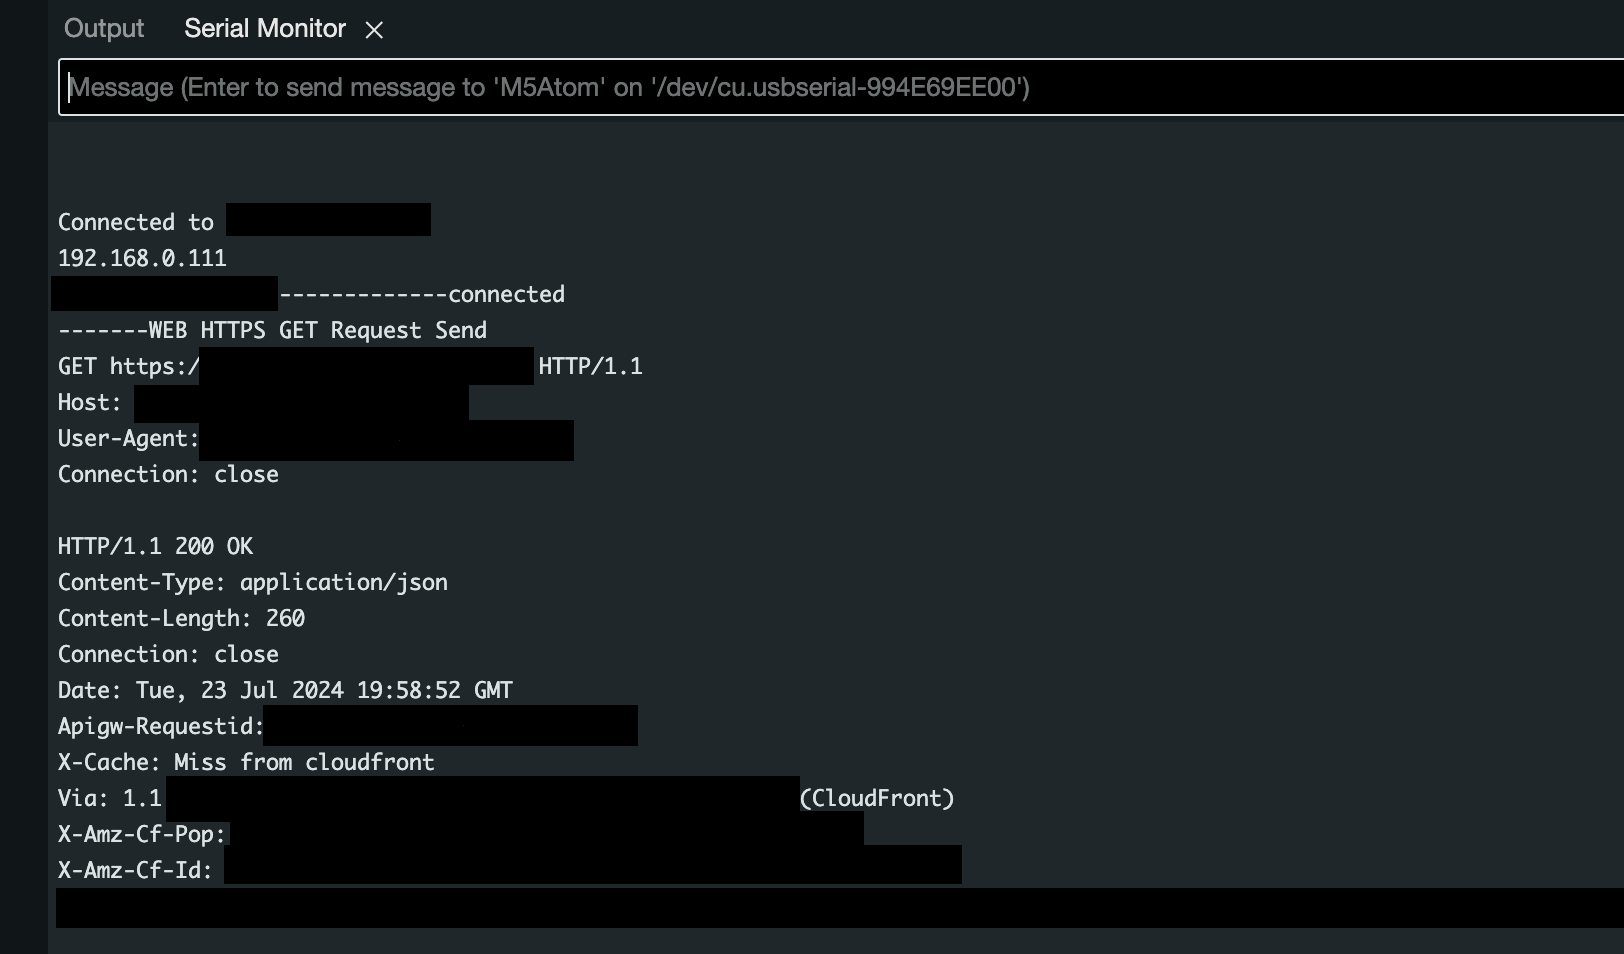
Serial Monitorから確認してみると、しっかりgetできていますね!
SSL/TLS handshake failedとエラーが出る際はルート証明書を変えて再実行しましょう
3. POSTを実装してみる
続いて、POSTを実装してみます
ほとんどgetのコードと変わりません
#include <WiFi.h>
#include <WiFiClientSecure.h>

// WiFiのSSIDとパスワードを入力
const char* ssid = "";
const char* password = "";

// ルート証明書
const char* root_ca = \
"-----BEGIN CERTIFICATE-----\n" \

"ここに証明書を貼り付ける\n" \

"-----END CERTIFICATE-----\n";

uint32_t WebGet_LastTime = 0;

//**************************セットアップ関数**************************
void setup() {
  Serial.begin(115200);
  delay(100);

  Serial.println();
  Serial.print("Attempting to connect to SSID: ");
  Serial.println(ssid);
  WiFi.begin(ssid, password);

  while (WiFi.status() != WL_CONNECTED) {
    Serial.print(".");
    delay(500);
  }

  Serial.println();
  Serial.print("Connected to ");
  Serial.println(ssid);
  Serial.println(WiFi.localIP());
  delay(2000);

  WebGet_LastTime = 200000; // 多めの数値で初期化しておく
}

//**************************メインの関数**************************
String https_Post(const char* host1, String target_page) {
  WiFiClientSecure https_client;
  https_client.setCACert(root_ca);

  if (https_client.connect(host1, 443)) {
    Serial.println(F("Connected to server"));
    String postData = "{\"Id\": \"000\"}";
    String request = "POST " + String(target_page) + " HTTP/1.1\r\n" +
                     "Host: " + String(host1) + "\r\n" +
                     "Content-Type: application/json\r\n" +
                     "Connection: close\r\n" +
                     "Content-Length: " + String(postData.length()) + "\r\n\r\n" +
                     postData;

    https_client.print(request);
    Serial.println("Request sent");
    while (https_client.connected() || https_client.available()) {
      String line = https_client.readStringUntil('\n');
      if (line == "\r") {
        Serial.println("Headers received, body starts:");
      }
      if (line.length() > 0) {
        Serial.println(line);
      }
    }
    https_client.stop();
  } else {
    Serial.println(F("Connection failed"));
  }
  return String();
}

//**************************メインループ**************************
void loop() {
  if ((millis() - WebGet_LastTime) > 21600000) {  // 21600000ms = 6 hours
    https_POST("test.com", "/api");
    WebGet_LastTime = millis();
    }
}
POSTもいい感じにできました
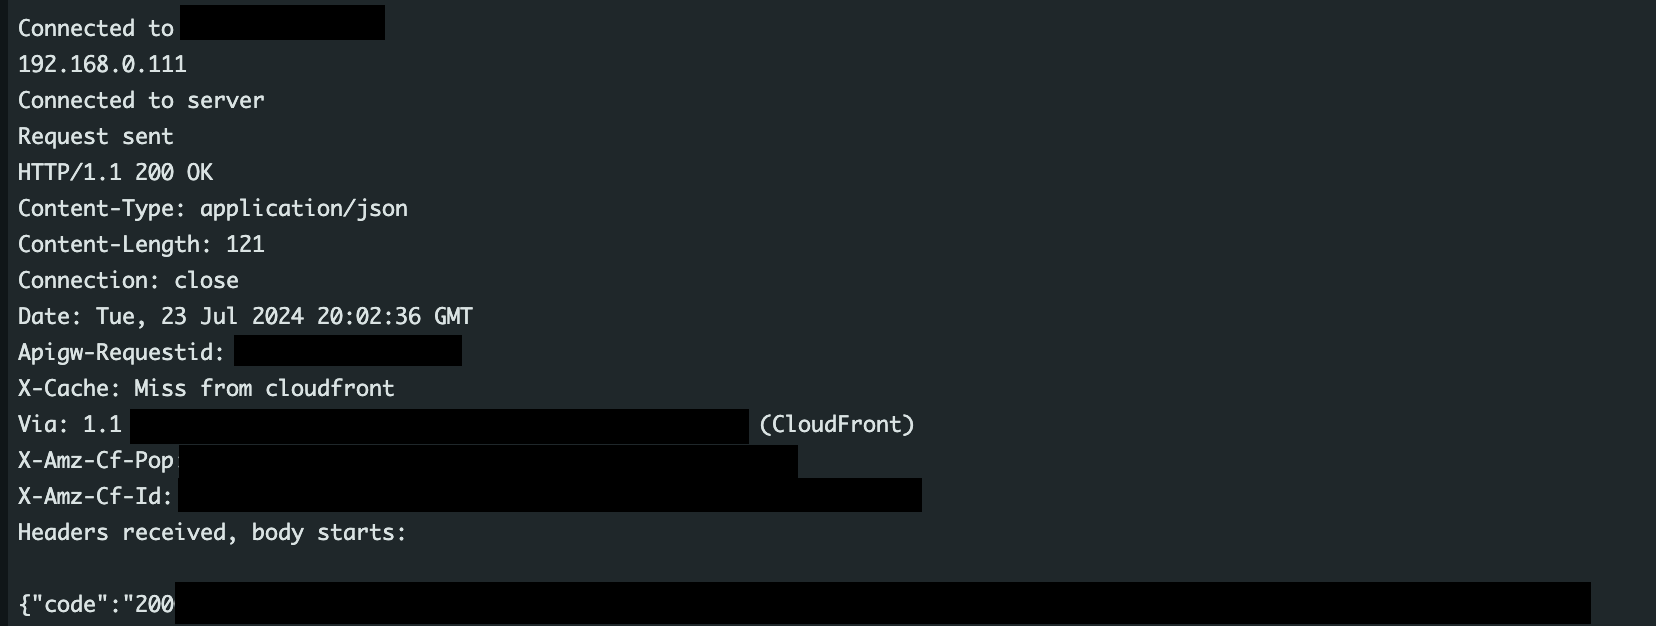
お疲れ様でした!
+α解説
setup関数
setup関数とは、起動時に一度実行される関数
今回は
- Serialの通信の開始
-
WiFi.hライブラリでWiFiのセットアップ - 接続の待機と確立
を行なっています
pirnt関数と要らないものを抜くと、以下のように簡潔にまとまります
公式のarduinoドキュメントにメソッドが全て一覧で載っているので、詳しく知りたい方はそちらからどうぞ
# incloude <WiFi.h>

void setup() {
  // 通信の開始
  Serial.begin(115200);

  // WiFiのssidとpasswordをセット
  WiFi.begin(ssid, password);

  // 待機と確立
  while (WiFi.status() != WL_CONNECTED) {
    Serial.print(".");
    delay(500);
  }
  Serial.println("WiFiを接続しました");
}
メインで使用する関数
この記事では、https_Getとhttps_Postを用意しています
基本送信する文章内にメソッドも記述してしまうので、GetとPostではコード上ほとんど変わりません
最小構成は以下に示す通りで、
-
WiFiClientSecure.hライブラリをセットアップ -
https_client.connectで接続を確認 -
https_client.printで送信 -
https_client.flushで全てのデータが返ってくるのを待つ -
https_client.stopで処理を閉じる
が一連の流れとなります。
flushの下で送られてきた文章を処理して、戻り値で返すという処理を組むことが可能です
ちなみにstopは忘れるとメモリを食い散らかして大変なことになるので注意
こちらを参考にしています
# incloude <WiFiClientSecure.h>

// Get
String https_Get(const char* host1, String target_page) {

  WiFiClientSecure https_client; // 初期化
  https_client.setCACert(root_ca); // ルート証明書をセット

  // 接続を確認して処理スタート
  if (https_client.connect(host1, 443)) {

    String str1 = String("GET https://") + String(host1) + target_page + " HTTP/1.1\r\n" +
                  "Host: " + String(host1) + "\r\n" +
                  "User-Agent: BuildFailureDetectorESP32\r\n" +
                  "Connection: close\r\n\r\n";

    https_client.print(str1); // 送信
    https_client.flush(); // 処理が終わるまで待つ
  }
  https_client.stop(); // 接続を閉じる

  retrun;
}
# incloude <WiFiClientSecure.h>

// Post
String https_POST(const char* host1, String target_page) {
  WiFiClientSecure https_client; // 初期化
  https_client.setCACert(root_ca); // ルート証明書をセット

  // 接続を確認して処理スタート
  if (https_client.connect(host1, 443)) {

    String postData = "{\"Id\": \"000\"}";
    String request = "POST " + String(target_page) + " HTTP/1.1\r\n" +
                     "Host: " + String(host1) + "\r\n" +
                     "Content-Type: application/json\r\n" +
                     "Connection: close\r\n" +
                     "Content-Length: " + String(postData.length()) + "\r\n\r\n" +
                     postData;

    https_client.print(request); // 送信
    https_client.flush(); // 処理が終わるまで待つ
  }
  https_client.stop(); // 接続を閉じる

  return;
}
loop関数
loop関数とは、電源が切れるまでループし続ける関数です
関数実行までのタイマーと関数を呼び出しています
解説するまでもないので、今回は省略します
読んでいただき、ありがとうございました。
参考文献