背景
Gmail API の送信する方法は記事たくさんあると思うんですが、受信側はなかなかないですよね。
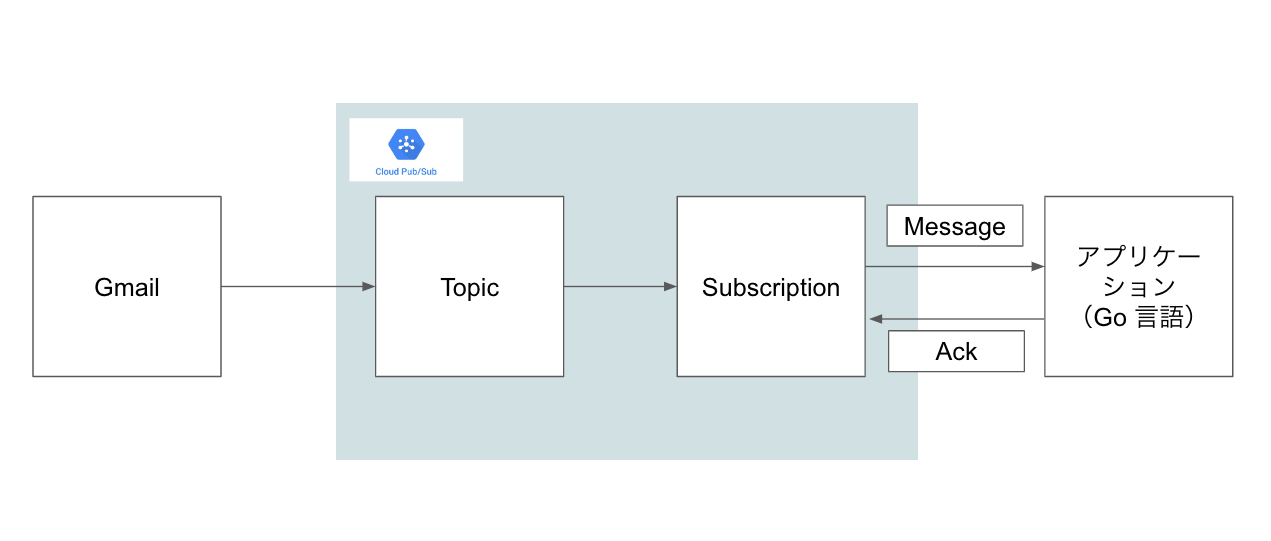
GAS使うっていうのも一つの手かとは思うんですが、1分ごとに実行し続けるっていうのもちょっと気持ち悪いですし、ラグが出てしまうと思うので、今回 Cloud Pub/Subを使って実装してみたいと思います。

Pub/Subとは
Pub/Sub を使用すると、パブリッシャーとサブスクライバーと呼ばれるイベント プロデューサーとコンシューマーのシステムを作成できます。パブリッシャーは、同期リモート プロシージャ コール(RPC)ではなく、イベントをブロードキャストすることによってサブスクライバーと非同期に通信します。
カタカナ多めで頭混乱しますが、パブリッシャーとサブスクライバーというものがあって、push型でイベントを実行できるみたいです。
流れ
Gmail API登録
まず、Gmail APIを有効にできるように設定します。
参考
https://hongo.dev/blog/nodemailer-send-emails-using-alias-address-for-gmail
credentials.json を取得しておきます。
Cloud Pub/Sub
1. トピック の追加
https://console.cloud.google.com/cloudpubsub/topic/list?tutorial=pubsub_quickstart
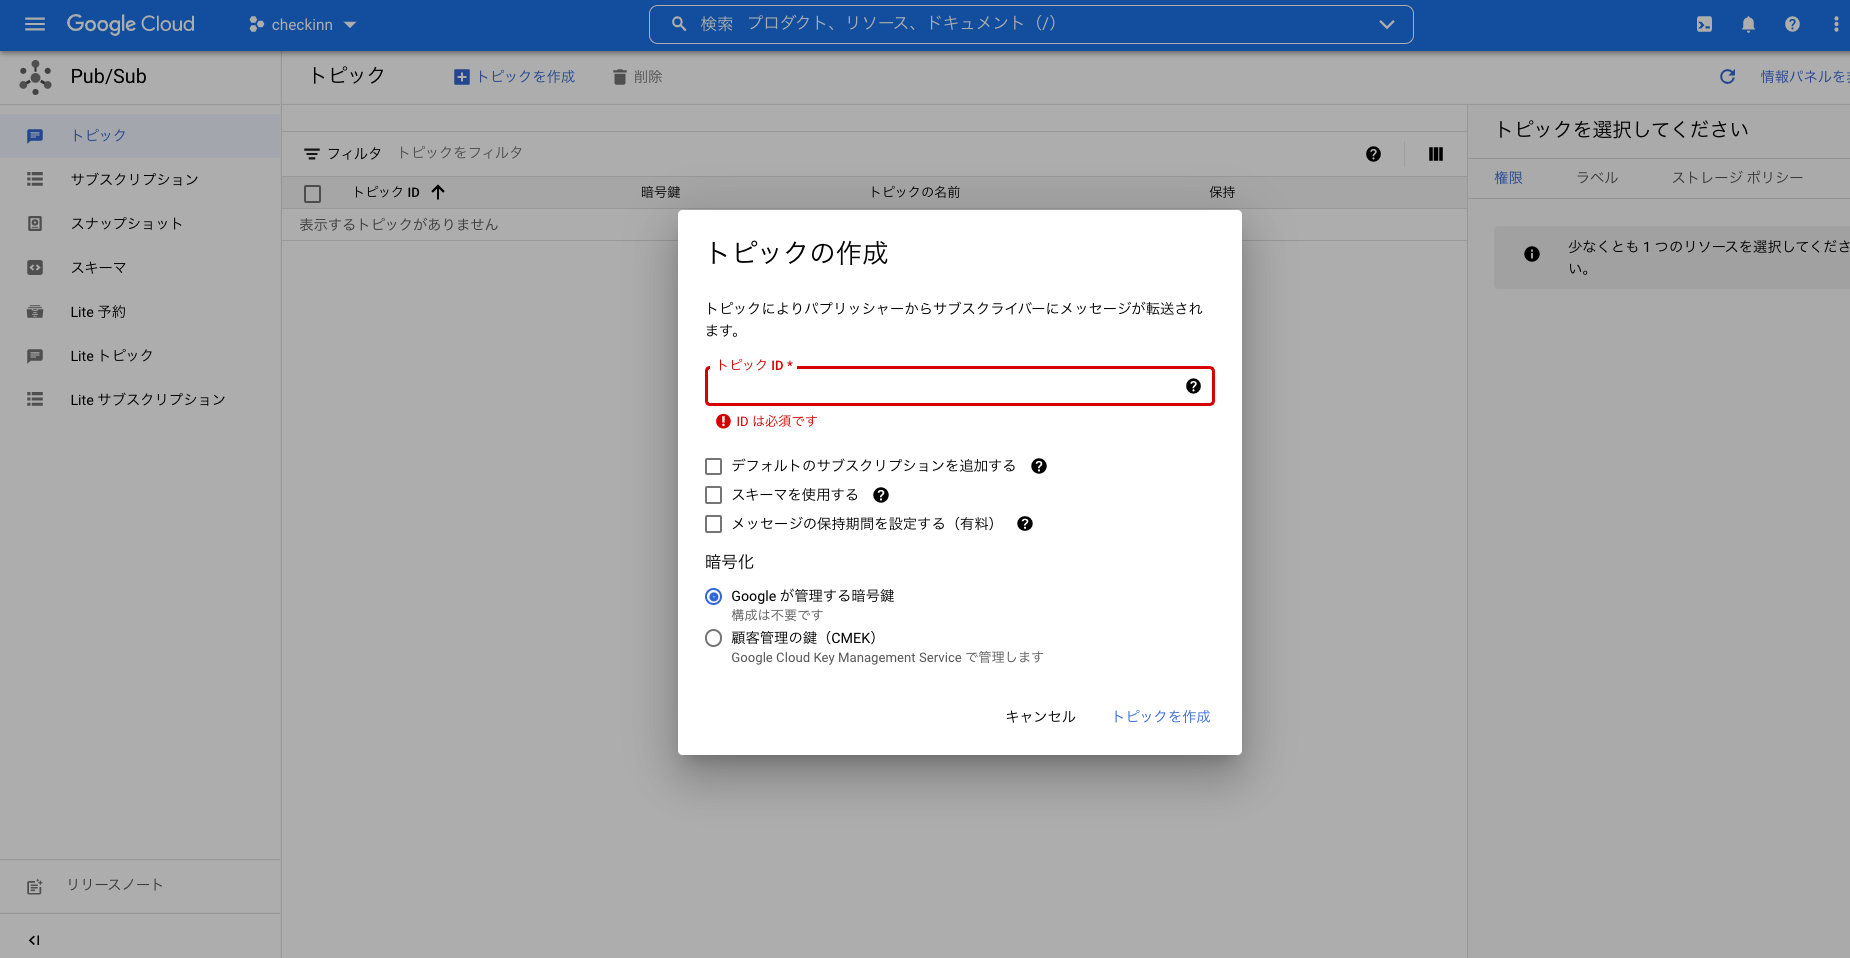
こちらから、トピックを作成します。

デフォルトのサブスクリプションも同時に追加することができますが、今回はpush型のサブスクリプションを作成するので、チェックを外して作成します。
2. サブスクリプションの追加
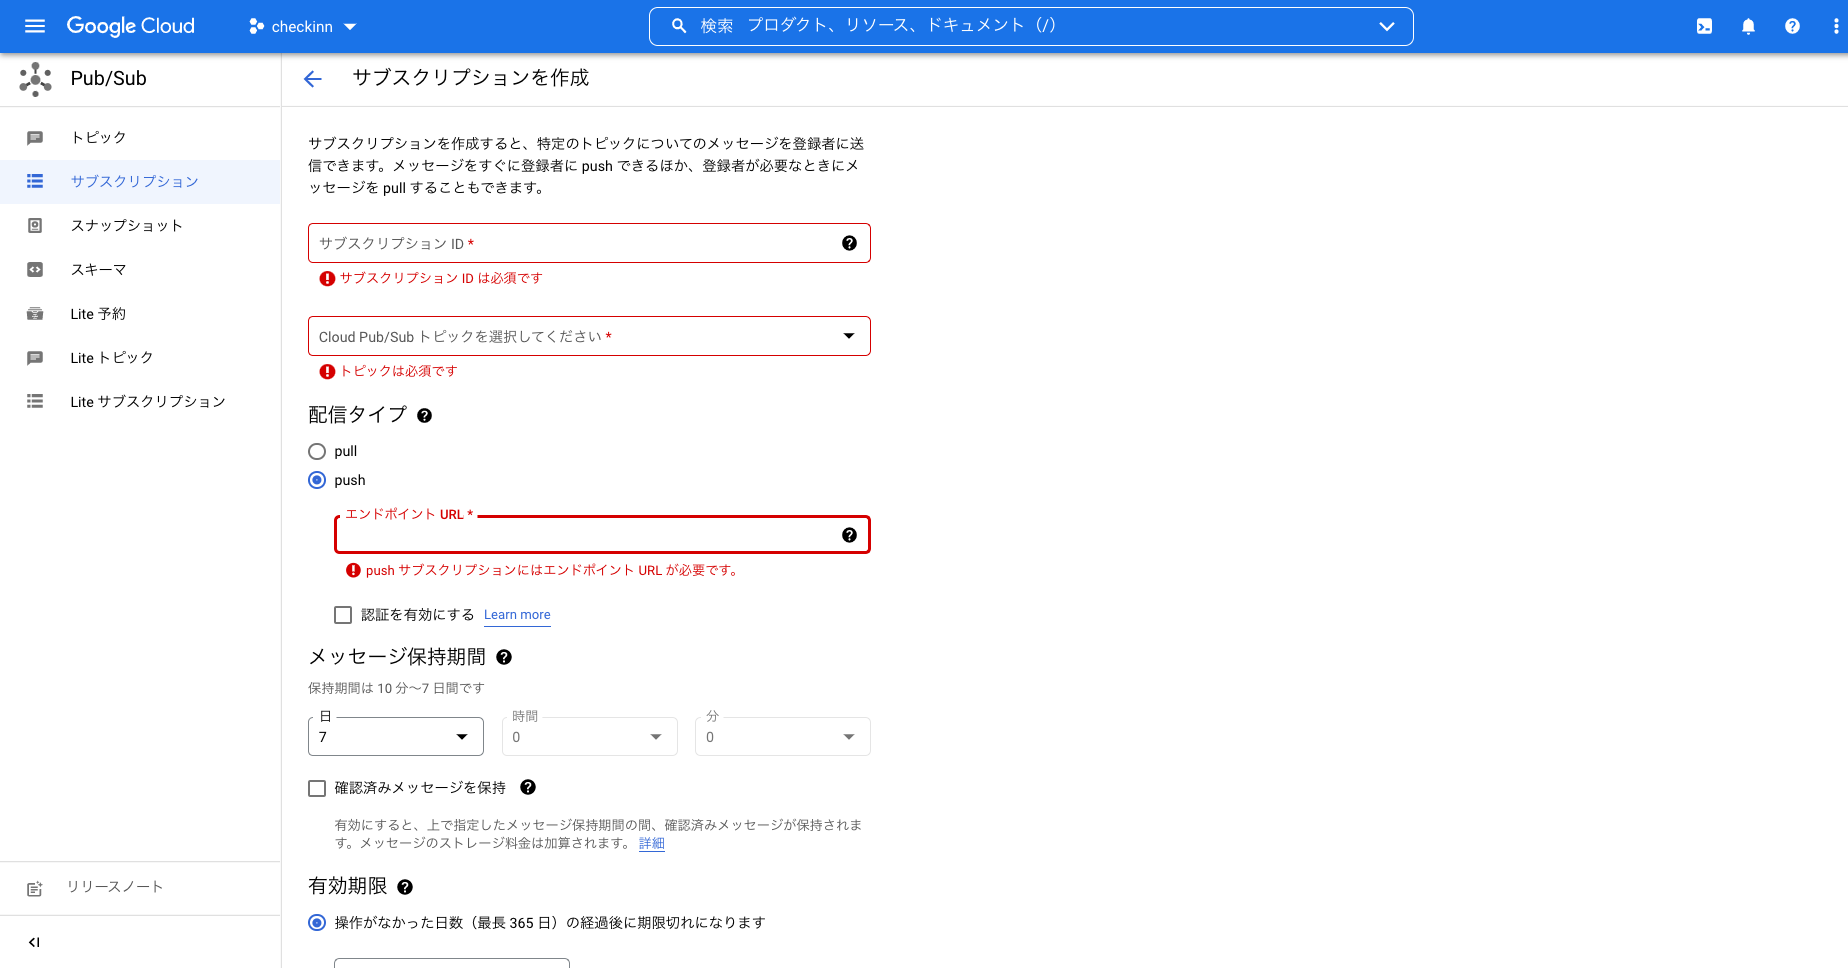
次にサブスクリプション作成の画面から、push型のサブスクリプションの作成をします。

エンドポイントに、pushするURLを入力します。
あとで編集できるので、一旦適当に入れておきます。(httpは無効なので、どっかにデプロイしないとテストできないのが辛い。動作確認だけならCloud Functionとかでいいかも)
3. トピックに関するIAM公開権を付与する
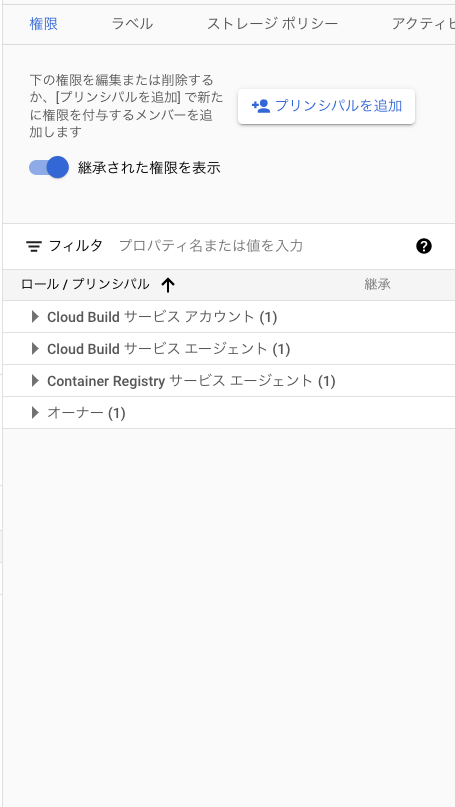
トピックを選択し、情報パネルを表示した後、 gmail-api-push@system.gserviceaccount.com というメンバーを Pub/Subパブリッシャーの役割 で追加してください。

4. Gmailメールボックスの更新を取得
こちらのサンプルコードを参考にしています。
まず、Gmail APIクライアントに、watch リクエストというものを送ります。
ここで注意したいのが、コマンドラインではない環境でこれを使いたい場合、独自の設定が必要です。私は、コマンドラインを実行後生成された token.json をそのまま残して、アプリケーションを実行させたので、以下のコードの credintials.json と token.json のみ独自のパスを設定しました(git管理は良くないので、環境変数とかで設定するのが良いです)
package main

import (
        "context"
        "encoding/json"
        "fmt"
        "io/ioutil"
        "log"
        "net/http"
        "os"

        "golang.org/x/oauth2"
        "golang.org/x/oauth2/google"
        "google.golang.org/api/gmail/v1"
        "google.golang.org/api/option"
)

// Retrieve a token, saves the token, then returns the generated client.
func getClient(config *oauth2.Config) *http.Client {
        // The file token.json stores the user's access and refresh tokens, and is
        // created automatically when the authorization flow completes for the first
        // time.
        tokFile := "token.json"
        tok, err := tokenFromFile(tokFile)
        if err != nil {
                tok = getTokenFromWeb(config)
                saveToken(tokFile, tok)
        }
        return config.Client(context.Background(), tok)
}

// Request a token from the web, then returns the retrieved token.
func getTokenFromWeb(config *oauth2.Config) *oauth2.Token {
        authURL := config.AuthCodeURL("state-token", oauth2.AccessTypeOffline)
        fmt.Printf("Go to the following link in your browser then type the "+
                "authorization code: \n%v\n", authURL)

        var authCode string
        if _, err := fmt.Scan(&authCode); err != nil {
                log.Fatalf("Unable to read authorization code: %v", err)
        }

        tok, err := config.Exchange(context.TODO(), authCode)
        if err != nil {
                log.Fatalf("Unable to retrieve token from web: %v", err)
        }
        return tok
}

// Retrieves a token from a local file.
func tokenFromFile(file string) (*oauth2.Token, error) {
        f, err := os.Open(file)
        if err != nil {
                return nil, err
        }
        defer f.Close()
        tok := &oauth2.Token{}
        err = json.NewDecoder(f).Decode(tok)
        return tok, err
}

// Saves a token to a file path.
func saveToken(path string, token *oauth2.Token) {
        fmt.Printf("Saving credential file to: %s\n", path)
        f, err := os.OpenFile(path, os.O_RDWR|os.O_CREATE|os.O_TRUNC, 0600)
        if err != nil {
                log.Fatalf("Unable to cache oauth token: %v", err)
        }
        defer f.Close()
        json.NewEncoder(f).Encode(token)
}

func main() {
        ctx := context.Background()
        b, err := ioutil.ReadFile("credentials.json")
        if err != nil {
                log.Fatalf("Unable to read client secret file: %v", err)
        }

        // If modifying these scopes, delete your previously saved token.json.
        config, err := google.ConfigFromJSON(b, gmail.GmailReadonlyScope)
        if err != nil {
                log.Fatalf("Unable to parse client secret file to config: %v", err)
        }
        client := getClient(config)

        srv, err := gmail.NewService(ctx, option.WithHTTPClient(client))
        if err != nil {
                log.Fatalf("Unable to retrieve Gmail client: %v", err)
        }

        user := "me"
        r, err := srv.Users.Labels.List(user).Do()
        if err != nil {
                log.Fatalf("Unable to retrieve labels: %v", err)
        }
        if len(r.Labels) == 0 {
                fmt.Println("No labels found.")
                return
        }
        fmt.Println("Labels:")
        for _, l := range r.Labels {
                fmt.Printf("- %s\n", l.Name)
        }
        // ここにwatchリクエストを追加
        watch_res, err := srv.Users.Watch(user, &gmail.WatchRequest{TopicName: "projects/[プロジェクト名]/topics/[トピック名]"}).Do()
	    fmt.Println(watch_res)
        if err != nil {
		log.Fatalf("Unable to retrieve watch action: %v", err)
	}
}
こちらをまずコマンドラインで実行。
URLが出てくるのでそちらを叩き、Authorization Codeをコピーし、ターミナル上でPasteします。
すると、
Labels:
- CHAT
- SENT
- INBOX
- IMPORTANT
- TRASH
- DRAFT
- SPAM
- CATEGORY_FORUMS
- CATEGORY_UPDATES
- CATEGORY_PERSONAL
- CATEGORY_PROMOTIONS
- CATEGORY_SOCIAL
- STARRED
- UNREAD
こんな感じで返答が帰ってくると、成功です。生成された token.json は使いまわしています
こちらの処理は、少なくとも7日ごとに再呼び出しする必要があるそうなので、結局バッジ処理は必要になるみたいですね、、
token.json があればブラウザ立ち上げは必要ないです。
5. データの取得
ここまでくると、メールを受け取れると、指定のサブスクリプションで登録したURLを叩くようになります。
Goで試しに受け取ってみると、
package controllers

import (
	"fmt"
	"net/http"

	"github.com/labstack/echo"
)

type PubsubStruct struct {
	Subscription string `json:"subscription"`
	Message      MessageStruct
}

type MessageStruct struct {
	Data      string `json:"data"`
	MessageId string `json:"message_id"`
}

func GmailWebhook(c echo.Context) error {
	pubsubStruct := new(PubsubStruct)
	if err := c.Bind(pubsubStruct); err != nil {
		return c.JSON(http.StatusOK, map[string]bool{
			"success": false,
		})
	} else {
		fmt.Println("cloud pub/sub Subscription: %v", pubsubStruct.Subscription)
		fmt.Println("cloud pub/sub message: %v", pubsubStruct.Message)
		return c.JSON(http.StatusOK, map[string]bool{
			"success": true,
		})
	}
}
これでログに、Message に data と、 message_id を取得できます。
"data"をbase64でデコードすると、以下のようになります
{"emailAddress": "user@example.com", "historyId": "1234567890"}
以上のようにデータを取得できるので、historyId を使って、Gmail APIを呼び出しましょう。
まとめ
Google Cloud Pub/Sub を使って、Gmail が取得されたタイミングで、アクションを起こすよう処理を記載しました。
バッジ処理ではなく、非同期にイベントを実行する方法として、いろんな用途で使えそうだなあと感動しました。
参考にさせていただいた記事🙏
https://qiita.com/1ulce/items/672ae85d8c23bd9c478e#3%E3%81%82%E3%81%A8%E4%B8%80%E6%AD%A9-%E3%83%88%E3%83%94%E3%83%83%E3%82%AF%E3%81%ABwebhook%E3%81%A7%E3%81%AEsubscription%E3%82%92%E4%BD%9C%E6%88%90%E3%81%99%E3%82%8B
https://qiita.com/asamas/items/c0cc2c44a80a52c788be#pubsub%E3%81%8B%E3%82%89%E9%80%81%E3%82%89%E3%82%8C%E3%81%A6%E3%81%8F%E3%82%8B%E3%83%87%E3%83%BC%E3%82%BF%E3%82%92%E5%8A%A0%E5%B7%A5%E3%81%99%E3%82%8B