まえがき
Android 8.0(Oreo)でBLEスキャン用の新しいメソッドが追加されました。
Nougatまではコールバックでスキャン結果を受け取るスタイルでしたが、追加されたメソッドではPendingIntentで結果を受け取れるようになります。
さっそく動かしてどんな感じなのか感触をつかんでみました。
環境
- Nexus5X(Android 8.0)
- Android Sutdio 3.0.1
- Kotlin 1.2.0
Android 7.1.2(Nougat)までのBLEスキャン
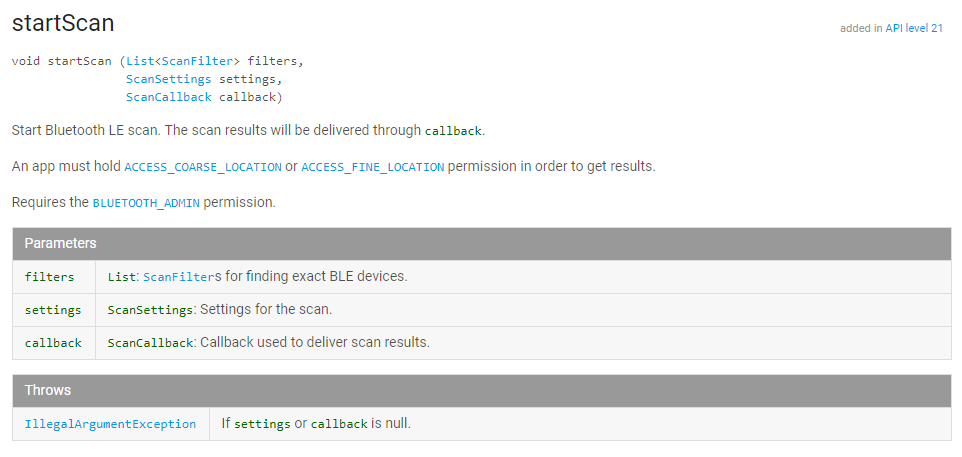
Nougatまではスキャン結果はコールバックで受け取るスタイルでした。
これだとアプリのプロセスが生きている間しか受け取れないので、
BLEのスキャンを常時し続けるタイプのアプリでは、ちょっとしか小細工を入れてあげる必要がありました。
例えば、フォアグラウンドサービスを使って常駐したり、JobSchedulerやAlarmManagerで周期的にサービスを起動してあげてBLEスキャンをする必要がありました。
ちなみにこちらがNougat以前のBLEスキャン用のメソッドです。

Android 8.0(Oreo)以降でのBLEスキャン
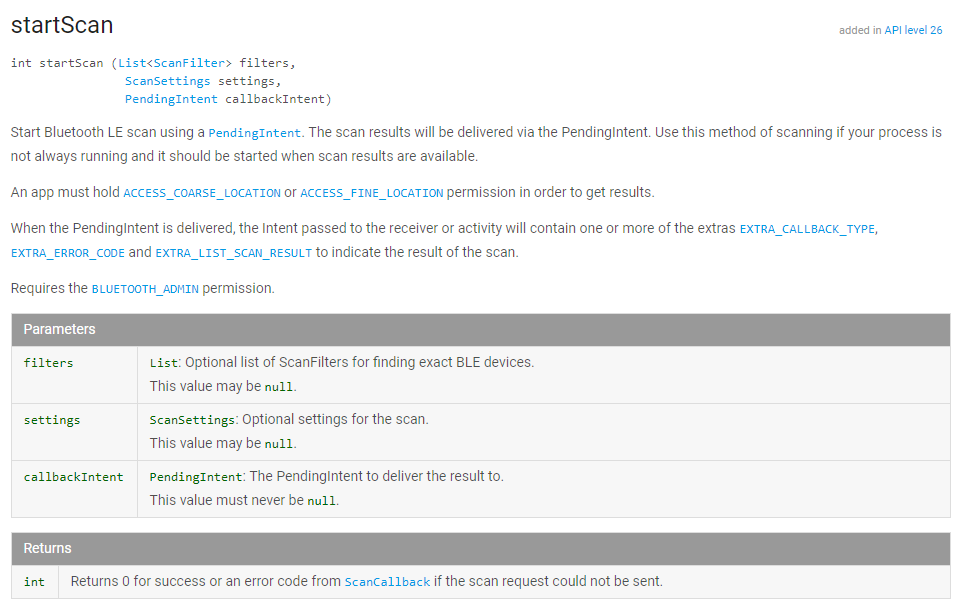
そしてOreoで追加されたBLEスキャン用のメソッドがこちらです。

コールバックを設定する代わりにPendingIntetでスキャン結果を受け取れるようになっています。
スキャンの開始成功・失敗はメソッドの戻り値で返るように変更されています。
1.PendingIntentの生成
まずはPendingIntentを生成します。
今回はBLEスキャン結果を受け取るためのBroadcastReceiverを指定するようにしてみました。
requestCodeは任意の一意な値を指定しておけばOKです(0を指定するとIntentが通知されないので注意)
fun createBleScanPendingIntent(context: Context): PendingIntent {
    val requestCode = 222
    val intent = Intent(context, BleScanReceiver::class.java)
    return PendingIntent.getBroadcast(context, requestCode, intent, PendingIntent.FLAG_UPDATE_CURRENT)
}
2.BLEスキャン開始
BLEスキャン設定、スキャンフィルタについてはNougat以前の指定方法と同じです。null指定も可能。
スキャン開始用メソッドにコールバックではなくPendingIntentを指定すればスキャンが開始されます。
fun startBleScan(context: Context) {
    // BLE Scan設定
    val scanSettings = ScanSettings.Builder()
            .setScanMode(ScanSettings.SCAN_MODE_BALANCED)
            .build()

    // BLE Scanフィルタ
    val scanFilters = listOf(ScanFilter.Builder().setDeviceAddress("XX:XX:XX:XX:XX:XX").build())

    // PendingIntent
    val pendingIntent = createBleScanPendingIntent(context)

    // BLEスキャン開始
    bluetoothAdapter?.bluetoothLeScanner?.startScan(scanFilters, scanSettings, pendingIntent).let {
        if(it != 0) {
            // BLEスキャン失敗
        }
    }
}
ちょっと気になるのがBLEスキャン失敗のケースです。やはりBluetoothをOFF/ONするしかないのか気になるところです。
3.BLEスキャン結果受け取り
BroadcastReceiverにエラーコード、コールバックタイプ、BLEスキャン結果が通知されます。
Oreoでは暗黙的なIntentを受信するBroadcastReceiverをAndroidManifest.xmlに指定できないという制限が入りましたが
こちらは明示的なIntentなのでAndroidManifest.xmlに指定できます。
class BleScanReceiver : BroadcastReceiver() {

    override fun onReceive(context: Context?, intent: Intent?) {
        // Error code
        val error = intent.getIntExtra(BluetoothLeScanner.EXTRA_ERROR_CODE, -1)
        if (error != -1) {
            // BLEスキャン失敗
            Log.d(TAG, "BLE Scan error : $error")
            return
        }

        // Callback type
        val callbackType = intent.getIntExtra(BluetoothLeScanner.EXTRA_CALLBACK_TYPE, -1)
        Log.d(TAG, "Callback type : $callbackType")

        // Scan results
        val scanResults: ArrayList<ScanResult> = intent.getParcelableArrayListExtra(BluetoothLeScanner.EXTRA_LIST_SCAN_RESULT)
        for (scanResult in scanResults) {
            // ゴニョゴニョ
            scanResult.device.name?.let {
                Log.d(TAG, "Scan reuslt : $it")
            }
        }

        // BLEスキャン停止
        stopBleScan(context)
    }
}
4.BLEスキャン停止
スキャンを停止する時はスキャンを開始した時と同じ内容のPendingIntentを指定してあげます。
fun stopBleScan(context: Context) {
    // BLEスキャン開始した時と同じ内容のPendingIntentを使う
    val pendingIntent = createBleScanPendingIntent(context)

    // BLEスキャン停止
    bluetoothAdapter?.bluetoothLeScanner?.stopScan(pendingIntent)
}
まとめ
Nougat以前とOreoでそれほど大きな違いはなく、PendingIntentでBLEスキャン結果を受け取れるという点が変わっただけでした。
ただ、PendingIntentになったことによりアプリが常駐してBLEスキャンをし続ける必要がなくなったのが大きな違いです。
参考
https://developer.android.com/reference/android/bluetooth/le/BluetoothLeScanner.html
https://developer.android.com/about/versions/oreo/background.html