今回のチュートリアルでは、Alibaba Cloud上で継続的にインテグレーションを行うためのGitLabの設定を行います。
本ブログは英語版からの翻訳です。オリジナルはこちらからご確認いただけます。一部機械翻訳を使用しております。翻訳の間違いがありましたら、ご指摘いただけると幸いです。
継続的インテグレーション(CI)と継続的展開(CD)はどのように進化したのか?
CI/CDなし
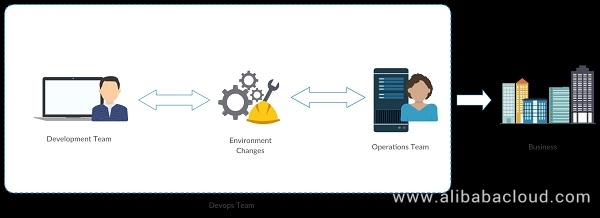
ビジネスチームから要件を入手したら、開発チームは要件をソフトウェアの形で何らかの形の機能コードに変換する作業を行います。全体の活動は、主に開発環境内で行われます。開発は、この活動が完了すると、要件に応じて数ヶ月または数年かかる可能性がありますが、全体のプロジェクトは、運用チームにテストするために与えられ、本番環境に展開します。
プロジェクトが運用チームに引き渡されると、このチームは本番環境でのコードのテスト、デプロイ、メンテナンスを担当します。多くの場合、本番環境は開発環境と似ていません。この違いは、多くの問題(依存関係エラー、パフォーマンスの問題や環境の問題など)につながります。チームがエラーがアプリケーションレベルであると認識した場合、開発チームにエスカレーションし、全体のプロセスサイクルを再び繰り返すことになります。環境に起因するエラーがある場合は、運用チームがそれを修正し、プロジェクトをデプロイして、最終的にビジネスユーザーが利用できるようにします。

CI/CDなしでの統合
この方法自体には多くのデメリットがあります。
1、製品の市場投入までの時間が非常に高い
2、チームはそれぞれの境界線の中で仕事をする
3、非効率的な資源利用
4、時間のかかるプロセス
CI/CD付き
ビジネスチームから要件を入手したら、開発チームと運用チームが一緒になって環境の異なる構成パラメータを決定する作業を行います。この連携により、開発環境が本番環境と似ているか、少なくとも開発したプロジェクトが本番環境に移行しても問題が発生しないようにします。
バージョン管理のためのGitlabやその他多くのツールを使用することで、開発チームと運用チームの両方にリアルタイムのレポートを提供し、プロジェクトのパフォーマンスを確認することができます。
リソースオーケストレーションサービスのような異なるサービスを使用することで、運用チームは簡単な設定でサービスを作成して管理することができるため、運用にかかるオーバーヘッドを大幅に削減することができます。このプロセスはまた、各チームが他のチームがプロジェクト内で何をしていたかの基本的なアイデアを持っている必要があります。
CI/CDとの統合
このアプローチには大きなメリットがあります。
1、機能の迅速な提供
2、より安定した動作環境
3、異なるチーム間の連携を強化
4、製品を革新するためのより多くの時間
5、管理するための複雑さが少ない
6、継続的なソフトウェア配信
7、迅速な問題解決
GitLab CIのセットアップ
GitLab Community Edition (CE)は、バージョン管理、課題追跡、コードレビュー、CI/CDなどを内蔵したオープンソースのエンドツーエンドのソフトウェア開発プラットフォームです。
前提条件
Gitlabの継続的インテグレーションに取り組んでいるので、Alibaba Cloud Elastic Compute Service (ECS)インスタンス上のUbuntu 16.04サーバーにGitlabインスタンスをインストールする必要があります。GitLabは、少なくとも2つのCPUコアと4GBのRAMを持つサーバーを推奨しています。
Alibaba Cloud ECSインスタンス上でのGitlab CEのセットアップ方法を知りたい場合は、このチュートリアルに従ってください: https://www.alibabacloud.com/blog/version-control-with-gitlab-on-alibaba-cloud_593276
では、GitLab CIとはどのようなものなのかを見ていきましょう。
GitLab CI/CDはGitLabの一部であり、その状態をデータベースに保存するAPIを持つWebアプリケーションです。プロジェクト/ビルドを管理し、GitLabのすべての機能に加えて、フレンドリーなユーザーインターフェイスを提供します。
GitLab CI/CD の利点とは?
統合:GitLab CI/CDはGitLabの一部です。
ユーザーフレンドリー:GitLab CI/CDはGitLabと同様の素晴らしい体験を提供します。親しみやすく、使いやすいです。
スケーラブル:テストは別のマシンに分散して実行されますが、必要な数だけ追加することができます。
より迅速な結果:各ビルドを複数のマシンで並列に実行する複数のジョブに分割できます。
継続的なデリバリー(CD):複数のステージ、手動でのデプロイ、環境、変数
オープンソース:CI/CD はオープンソースの GitLab Community Edition と独自の GitLab Enterprise Edition の両方に含まれています。
Gitlab CI/CDの一環として、GitLab Runnerのインストールも行います。
GitLab Runnerは、ビルドを処理するアプリケーションです。単体でのデプロイも可能で、APIを介してGitLab CI/CDと連携します。
Gitlab CI Runnerを使用することで、自動的にコードをチェックアウトしてテストを実行し、新たな変更点を検証します。開発環境から独立したテスト環境を作るために すべてのテストをDocker Containers内で実行します。そのためには、Gitlab CIランナーがインストールされている場所にDocker環境を設定します。
Alibaba Cloud ECSインスタンス上のUbuntuでDocker環境を設定する際にヘルプが必要な場合は、以下の記事に従ってください: https://www.alibabacloud.com/blog/how-to-install-and-use-docker-on-ubuntu-16-04_470612
dockerがインストールされているかどうかを確認するには、Alibaba Cloud ECSインスタンスにログインします。
Saraths-MacBook-Pro:~ sarathchandrap$ ssh root@149.129.130.217
root@149.129.130.217's password:
Welcome to Ubuntu 16.04.4 LTS (GNU/Linux 4.4.0-117-generic x86_64)

 * Documentation:  https://help.ubuntu.com
 * Management:     https://landscape.canonical.com
 * Support:        https://ubuntu.com/advantage

Welcome to Alibaba Cloud Elastic Compute Service !

Last login: Sun Jul 15 04:06:56 2018 from 1.23.17.158
root@GITLABCICD:~#
sudo systemctl status docker コマンドを実行して docker の現在のステータスを確認すると、以下のようなステータスが表示されるはずです。
root@GITLABCICD:~# sudo systemctl status docker
● docker.service - Docker Application Container Engine
   Loaded: loaded (/lib/systemd/system/docker.service; enabled; vendor preset: enabled)
   Active: active (running) since Thu 2018-07-05 16:59:57 CST; 1 weeks 2 days ago
     Docs: https://docs.docker.com
 Main PID: 6102 (dockerd)
    Tasks: 26
   Memory: 826.4M
      CPU: 35min 35.798s
   CGroup: /system.slice/docker.service
           ├─6102 /usr/bin/dockerd -H fd://
           └─6126 docker-containerd --config /var/run/docker/containerd/containerd.toml
dockerコマンドを実行して、利用可能なすべてのスイッチを確認します。
root@GITLABCICD:~# docker

Usage:    docker COMMAND

A self-sufficient runtime for containers

Options:
      --config string      Location of client config files (default "/root/.docker")
  -D, --debug              Enable debug mode
  -H, --host list          Daemon socket(s) to connect to
  -l, --log-level string   Set the logging level ("debug"|"info"|"warn"|"error"|"fatal") (default "info")
      --tls                Use TLS; implied by --tlsverify
      --tlscacert string   Trust certs signed only by this CA (default "/root/.docker/ca.pem")
      --tlscert string     Path to TLS certificate file (default "/root/.docker/cert.pem")
      --tlskey string      Path to TLS key file (default "/root/.docker/key.pem")
      --tlsverify          Use TLS and verify the remote
  -v, --version            Print version information and quit

Management Commands:
  config      Manage Docker configs
  container   Manage containers
  image       Manage images
  network     Manage networks
  node        Manage Swarm nodes
  plugin      Manage plugins
  secret      Manage Docker secrets
  service     Manage services
  swarm       Manage Swarm
  system      Manage Docker
  trust       Manage trust on Docker images
  volume      Manage volumes

Commands:
  attach      Attach local standard input, output, and error streams to a running container
  build       Build an image from a Dockerfile
  commit      Create a new image from a container's changes
  cp          Copy files/folders between a container and the local filesystem
  create      Create a new container
  diff        Inspect changes to files or directories on a container's filesystem
  events      Get real time events from the server
  exec        Run a command in a running container
  export      Export a container's filesystem as a tar archive
  history     Show the history of an image
  images      List images
  import      Import the contents from a tarball to create a filesystem image
  info        Display system-wide information
  inspect     Return low-level information on Docker objects
  kill        Kill one or more running containers
  load        Load an image from a tar archive or STDIN
  login       Log in to a Docker registry
  logout      Log out from a Docker registry
  logs        Fetch the logs of a container
  pause       Pause all processes within one or more containers
  port        List port mappings or a specific mapping for the container
  ps          List containers
  pull        Pull an image or a repository from a registry
  push        Push an image or a repository to a registry
  rename      Rename a container
  restart     Restart one or more containers
  rm          Remove one or more containers
  rmi         Remove one or more images
  run         Run a command in a new container
  save        Save one or more images to a tar archive (streamed to STDOUT by default)
  search      Search the Docker Hub for images
  start       Start one or more stopped containers
  stats       Display a live stream of container(s) resource usage statistics
  stop        Stop one or more running containers
  tag         Create a tag TARGET_IMAGE that refers to SOURCE_IMAGE
  top         Display the running processes of a container
  unpause     Unpause all processes within one or more containers
  update      Update configuration of one or more containers
  version     Show the Docker version information
  wait        Block until one or more containers stop, then print their exit codes
コマンドの詳細については、'docker COMMAND --help' を実行してください。
docker info" を実行すると、以下のような出力が得られるはずです。
root@GITLABCICD:~# docker info
Containers: 3
 Running: 0
 Paused: 0
 Stopped: 3
Images: 3
Server Version: 18.03.1-ce
Storage Driver: overlay2
 Backing Filesystem: extfs
 Supports d_type: true
 Native Overlay Diff: true
Logging Driver: json-file
Cgroup Driver: cgroupfs
Plugins:
 Volume: local
 Network: bridge host macvlan null overlay
 Log: awslogs fluentd gcplogs gelf journald json-file logentries splunk syslog
Swarm: inactive
Runtimes: runc
Default Runtime: runc
Init Binary: docker-init
containerd version: 773c489c9c1b21a6d78b5c538cd395416ec50f88
runc version: 4fc53a81fb7c994640722ac585fa9ca548971871
init version: 949e6fa
Security Options:
 apparmor
 seccomp
  Profile: default
Kernel Version: 4.4.0-117-generic
Operating System: Ubuntu 16.04.4 LTS
これで、インスタンスにDockerが正しく設定されていることが確認できました。さて、GitLab CIのセットアップを開始するには、リポジトリが必要です。GitHubからGitLabにクローンを作成することから始めましょう。
GitHubプロジェクトをインポートする
今回はGitlab CIのデモに以下のリポジトリを使用します。下はNodeJSアプリケーションです。
https://github.com/do-community/hello_hapi.git
インポートする前にプロジェクトを作成する必要があります。

「新規プロジェクト」をクリックし、下の画面で「プロジェクトのインポート>URLでレポ」を選択します。
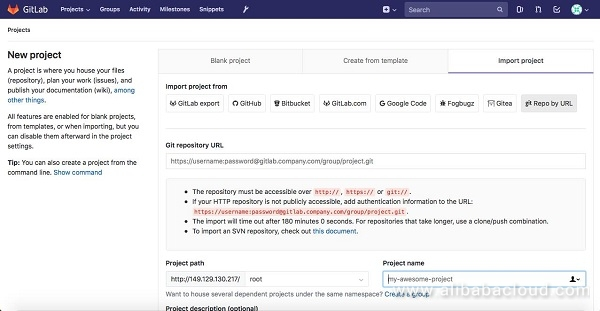
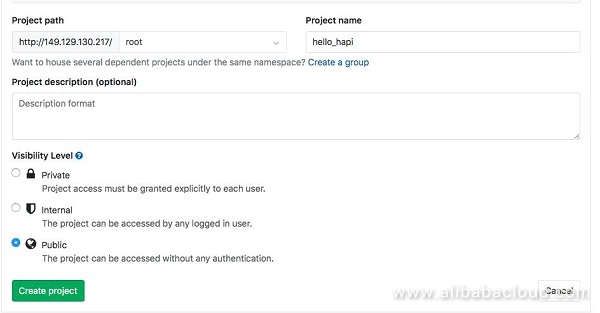
冒頭のURLでGitリポジトリを貼り付け、必要に応じて「プロジェクト名」「プロジェクトの説明」「可視化レベル」を更新し、「プロジェクトの作成」を選択します。
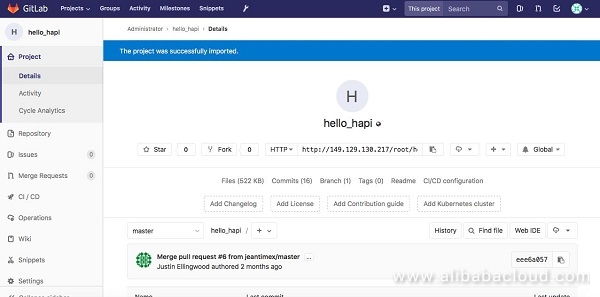
プロジェクトをインポートすると、次のような画面が表示されます。
ここで、Gitlab-CIのビルド記述子(.gitlab-ci.yml)の動作を理解する必要があります。ファイルはYAML形式で、リポジトリでファイルを開くと以下のようになります。
image: node:carbon

stages:
  - build
  - test

cache:
  paths:
    - node_modules/

install_dependencies:
  stage: build
  script:
    - npm install
  artifacts:
    paths:
      - node_modules/

test_with_lab:
  stage: test
  script: npm test


image: node:carbon
上記はdockerコンテナを作成しながら最新のnodeJSイメージを使用しています。
stages:
  - build
  - test
これらはコードをテストする際に定義するステージですが、上記の定義では「ビルドを実行し、成功したらテストを実行する」と読みます。同じステージのジョブは並行して実行されます。これらはあくまでも作成するタグですが、実際の定義は次のようになります。Gitlabには "build"、"test"、"deploy "の3つのステージがあります。
cache:
  paths:
    - node_modules/
そして、node_modules(ノードプロジェクト内の依存関係)を保存するキャッシュを作成します。そうすれば、これらのファイルをステージをまたいで使うことができるようになります。
install_dependencies:
  stage: build
  script:
    - npm install
  artifacts:
    paths:
      - node_modules/
これは最初のジョブ(install_dependencies)で、ノードの依存関係をインストールするための手順を詳しく説明します。script' タグは、ジョブ内の実際のスクリプトを指定するために使用されます。「paths」は、ジョブの出力が保存される場所を指定します。
test_with_lab:
  stage: test
  script: npm test
test_with_lab" ジョブは、"install_dependencies" ジョブが成功するとテストを実行します。
CIジョブのトリガー
新しいファイルをリポジトリにコミットすることで、Gitlabのジョブをトリガーします。
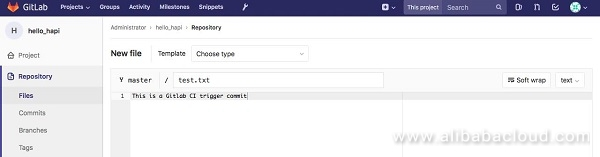
'+' アイコンをクリック > 新規ファイル
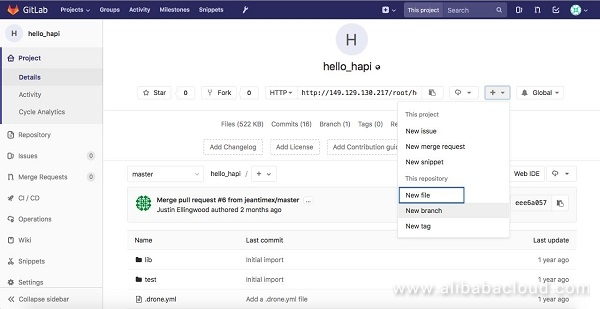
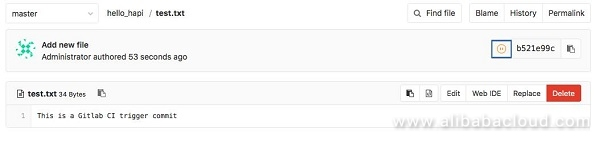
テキストと "変更のコミット "を含む.txtファイルを作成します。
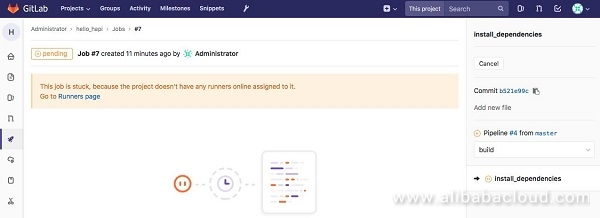
コミットが完了すると、保留中の状態で小さな一時停止アイコンが表示されます。
アイコンをクリックすると、コミットの詳細なステータスが表示されます。
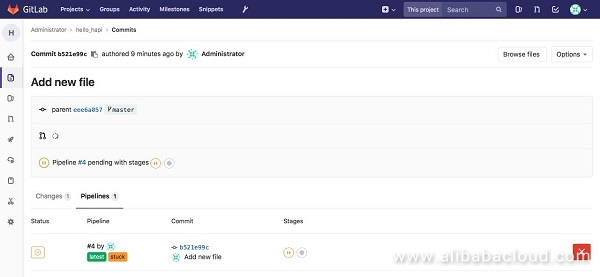
ジョブの詳細情報を見ると、「プロジェクトにはオンラインで割り当てられたランナーがないため、ジョブは停止しています。ジョブに設定されているランナーがないため、一時停止状態になっていることがわかります。
GitLab CI Runner のインストールと設定
以下のコマンドを実行して、リポジトリから最新版のGitlab CI Runnerをサーバーの/tmpディレクトリにダウンロードしてください。
curl -L https://packages.gitlab.com/install/repositories/runner/gitlab-runner/script.deb.sh -o /tmp/gl-runner.deb.sh
ダウンロードしたスクリプトからインストーラを実行
sudo bash /tmp/gl-runner.deb.sh
上記のスクリプトを実行することで、同じリポジトリからGitlabランナーのパッケージを管理することができます。スクリプトが正常に実行されたら、Gitlabランナーをインストールします。
sudo apt-get install gitlab-runner
これでGitlab runnerサービスがインストールされ、起動します。
Gitlab ランナーを設定するには、次の2つの方法があります。
1、シェアードサービス
2、プロジェクト別サービス
プロジェクト固有のサービスを設定する方法を見ていきます。その前にランナーサービスの情報を収集する必要があります。
プロジェクト→設定→CI/CD→ランナー設定→展開
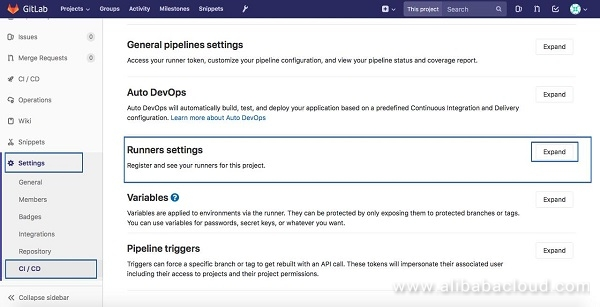
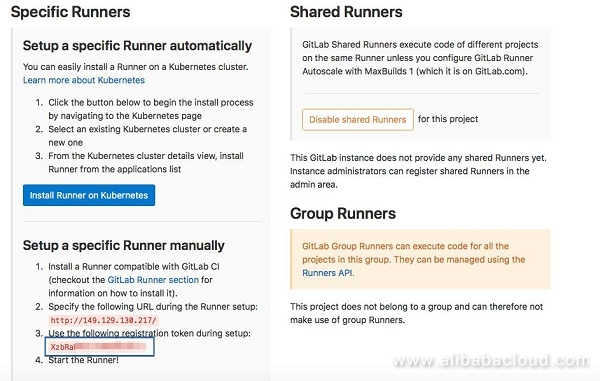
ランナーを設定する際に必要なので、上の写真でハイライトされているURLとトークンを保存しておきます。
Gitlab CIランナーを登録する
サーバーにログインして、以下のコマンドを実行します。
sudo gitlab-runner register
以下のような変数を入力します。
root@GITLABCICD:~# sudo gitlab-runner register
Running in system-mode.

Please enter the gitlab-ci coordinator URL (e.g. https://gitlab.com/):
http://149.129.130.217/
Please enter the gitlab-ci token for this runner:

Please enter the gitlab-ci token for this runner:
XzbRaWXE-ckWEwBJf4-b
Please enter the gitlab-ci description for this runner:
[GITLABCICD]: This to demonstrate the dedicated Gitlab CI Runner
Please enter the gitlab-ci tags for this runner (comma separated):

Registering runner... succeeded                     runner=XzbRaWPE
Please enter the executor: shell, ssh, virtualbox, docker+machine, docker-ssh+machine, kubernetes, docker, parallels, docker-ssh:
docker
Please enter the default Docker image (e.g. ruby:2.1):
alpine:latest
Runner registered successfully. Feel free to start it, but if it's running already the config should be automatically reloaded!
ポータルに戻ってコミットステータスを見ると、このように実行中の状態になっているはずです。
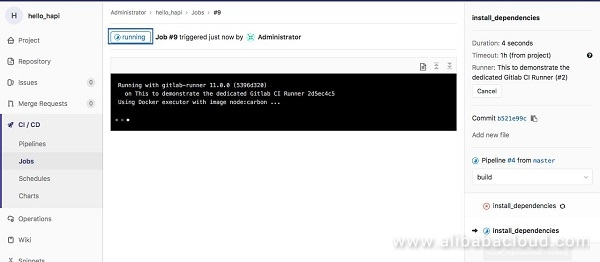
しばらくすると、以下のような出力でジョブが成功していることがわかります。
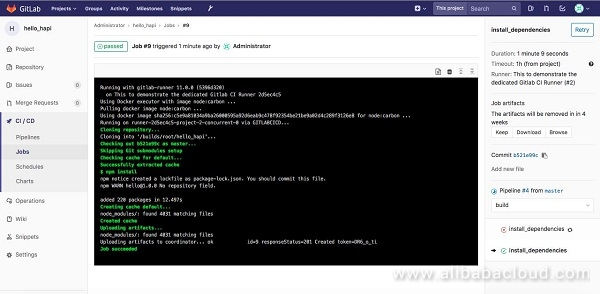
おめでとうございます。Alibaba Cloud Elastic Compute Service (ECS) インスタンスに GitLab CI を GitLab CE と一緒に設定しました。これにより、開発者はバージョン管理の中で簡単に機能を実行してテストすることができます。
アリババクラウドは日本に2つのデータセンターを有し、世界で60を超えるアベラビリティーゾーンを有するアジア太平洋地域No.1(2019ガートナー)のクラウドインフラ事業者です。
アリババクラウドの詳細は、こちらからご覧ください。
アリババクラウドジャパン公式ページ