この記事では、Apache Log4j上に構築された新しいログシステムであるLog4j 2のソースコードを分解して、その基礎となる概念について深く掘り下げていきます。
本ブログは英語版からの翻訳です。オリジナルはこちらからご確認いただけます。一部機械翻訳を使用しております。翻訳の間違いがありましたら、ご指摘いただけると幸いです。
概要
Log4j 2は、Logbackアーキテクチャを参照してApache Log4j上に構築された全く新しいログシステムです。これは、Log4jが基本的にLogbackによって非推奨になっているからだと思います。
Log4j 2の利点については、公式ドキュメントApache Log4j 2を参照してください。
-
Log4j 2 は、Logback アーキテクチャに内在するいくつかの問題を修正しながら、Logback で利用可能な多くの改善点を提供しています。
-
APIの分離:Log4j 2のAPIは、Log4j 2の実装と一緒に使っても良いですが、Logbackなどの他のロギング実装の前に使うこともある(誰もやらないと思いますが)ロギングファサードです。
-
パフォーマンスの向上:Log4j 2には、LMAX Disruptorライブラリに基づいた次世代の非同期ロガーが含まれています。マルチスレッドのシナリオでは、非同期ロガーは、Log4jやLogbackよりも18倍高いスループットと桁違いに低いレイテンシを持っています。
-
複数のAPIのサポート:Log4j 2は、Log4j 1.2、SLF4J、Commons Loggingおよびjava.util.logging (JUL) APIのサポートを提供します。
-
ロックインを回避:Log4j 2 APIにコード化されたアプリケーションは、常に、log4j-to-slf4jアダプタを使用して、そのロガーの実装として、任意のSLF4J準拠のライブラリを使用するオプションを持っています。
-
設定の自動リロード: Logback と同様に、Log4j 2 は、変更時に自動的に設定をリロードすることができます。Logbackとは異なり、再構成が行われている間、ログイベントを失うことなくこれを行います。
-
高度なフィルタリング:Logbackのように、Log4j 2は、コンテキストデータ、マーカー、正規表現、およびログイベントの他のコンポーネントに基づいたフィルタリングをサポートします。
-
プラグインアーキテクチャ:Log4jは、コンポーネントを構成するためにプラグインパターンを使用します。そのため、Appender、Layout、Pattern Converterなどを作成して構成するためのコードを書く必要はありません。Log4jは自動的にプラグインを認識し、コンフィギュレーションがそれらを参照するときにそれらを使用します。
-
プロパティのサポート:あなたは、コンフィギュレーションでプロパティを参照することができ、Log4jは、直接それらを置き換えるか、または、Log4jは、それらを動的に解決する基礎となるコンポーネントにそれらを渡します。
-
Java 8 Lambda のサポート
-
カスタムログレベル
-
ガーベッジフリー:定常状態のロギングの間、Log4j 2は、スタドアロン・アプリケーションではガーベッジフリーで、ウェブ・アプリケーションでは低いガーベッジです。これは、ガーベッジコレクタへの圧力を軽減し、より良い応答時間のパフォーマンスを与えることができます。
-
アプリケーションサーバとの統合:バージョン2.10.0は、Apache TomcatとEclipse Jettyとの統合を改善するために、モジュールlog4j-appserverを導入します。
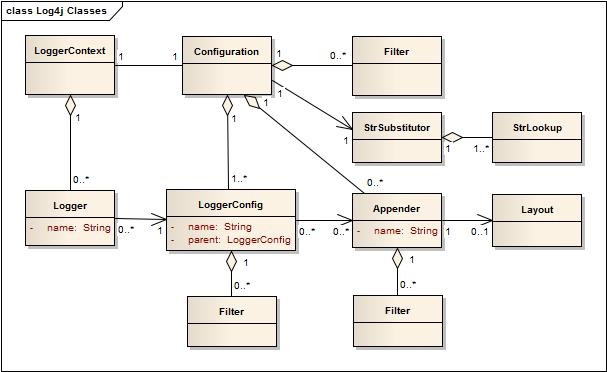
Log4j 2クラス図:
この記事では、Log4j 2のソースコードを、起動、設定、非同期化、プラグインベースのコンポーネントの4つの側面から探ります。
ソースコードの探索
スタートアップ
Log4j 2の主な構成要素
-
LogManager
LogManager は、指定された LogContextFactory に基づいて対応する LoggerContext を初期化します。 -
LoggerContext
1.  Parses the configuration file to obtain the corresponding Java object
2.  Cache log configuration through LoggerRegisty
3.  Obtain the configuration information
4.  Use the start() method to parse the configuration file, and convert the configuration file into the corresponding Java object
5.  Obtain the logger object through getLogger
- Logger
LogManager
LogManagerはLog4jを起動するためのキーです。LoggerContextもLoggerもLogManagerのスタティックメソッドを呼び出すことで取得します。Loggerを取得するには、以下のコードを使用します。
Logger logger = LogManager.getLogger();
LogManagerが重要なコンポーネントであることがお分かりいただけたと思います。そこで、ここではLogManagerの起動処理を詳しく分析していきます。
LogManagerを起動するには、以下の静的コードスニペットを使用します。
/**
     * Scans the classpath to find all logging implementation. Currently, only one will be used but this could be
     * extended to allow multiple implementations to be used.
     */
    static {
        // Shortcut binding to force a specific logging implementation.
        final PropertiesUtil managerProps = PropertiesUtil.getProperties();
        final String factoryClassName = managerProps.getStringProperty(FACTORY_PROPERTY_NAME);
        if (factoryClassName ! = null) {
            try {
                factory = LoaderUtil.newCheckedInstanceOf(factoryClassName, LoggerContextFactory.class);
            } catch (final ClassNotFoundException cnfe) {
                LOGGER.error("Unable to locate configured LoggerContextFactory {}", factoryClassName);
            } catch (final Exception ex) {
                LOGGER.error("Unable to create configured LoggerContextFactory {}", factoryClassName, ex);
            }
        }

        if (factory == null) {
            final SortedMap<Integer, LoggerContextFactory> factories = new TreeMap<>();
            // note that the following initial call to ProviderUtil may block until a Provider has been installed when
            // running in an OSGi environment
            if (ProviderUtil.hasProviders()) {
                for (final Provider provider : ProviderUtil.getProviders()) {
                    final Class<? extends LoggerContextFactory> factoryClass = provider.loadLoggerContextFactory();
                    if (factoryClass ! = null) {
                        try {
                            factories.put(provider.getPriority(), factoryClass.newInstance());
                        } catch (final Exception e) {
                            LOGGER.error("Unable to create class {} specified in provider URL {}", factoryClass.getName(), provider
                                    .getUrl(), e);
                        }
                    }
                }

                if (factories.isEmpty()) {
                    LOGGER.error("Log4j2 could not find a logging implementation. "
                            + "Please add log4j-core to the classpath. Using SimpleLogger to log to the console...") ;
                    factory = new SimpleLoggerContextFactory();
                } else if (factories.size() == 1) {
                    factory = factories.get(factories.lastKey());
                } else {
                    final StringBuilder sb = new StringBuilder("Multiple logging implementations found: \n");
                    for (final Map.Entry<Integer, LoggerContextFactory> entry : factories.entrySet()) {
                        sb.append("Factory: ").append(entry.getValue().getClass().getName());
                        sb.append(", Weighting: ").append(entry.getKey()).append('\n');
                    }
                    factory = factories.get(factories.lastKey());
                    sb.append("Using factory: ").append(factory.getClass().getName());
                    LOGGER.warn(sb.toString());

                }
            } else {
                LOGGER.error("Log4j2 could not find a logging implementation. "
                        + "Please add log4j-core to the classpath. Using SimpleLogger to log to the console...") ;
                factory = new SimpleLoggerContextFactory();
            }
        }
    }
この静的スニペットは、以下の手順で実装されています。
- まず、特定の設定ファイルの設定情報に基づいてloggerContextFactoryを取得します。
- LoggerContextFactory の実装クラスが見つからない場合は、ProviderUtil の getProviders() メソッドを使用してプロバイダをロードします。次に、プロバイダのloadLoggerContextFactory()メソッドでLoggerContextFactoryの実装クラスをロードします。
- プロバイダから LoggerContextFactory の実装クラスのロードに失敗した場合やプロバイダが空の場合は、LoggerContextFactory として SimpleLoggerContextFactory を使用します。
LoggerContextFactory を設定ファイルに従ってロードする
// Shortcut binding to force a specific logging implementation.
        final PropertiesUtil managerProps = PropertiesUtil.getProperties();
        final String factoryClassName = managerProps.getStringProperty(FACTORY_PROPERTY_NAME);
        if (factoryClassName ! = null) {
            try {
                factory = LoaderUtil.newCheckedInstanceOf(factoryClassName, LoggerContextFactory.class);
            } catch (final ClassNotFoundException cnfe) {
                LOGGER.error("Unable to locate configured LoggerContextFactory {}", factoryClassName);
            } catch (final Exception ex) {
                LOGGER.error("Unable to create configured LoggerContextFactory {}", factoryClassName, ex);
            }
        }
このスニペットでは、LogManagerはまず「log4j2.component.properties」設定ファイルの「log4j2.loggerContextFactory」設定項目を使用してLoggerContextFactoryを取得します。対応する設定が完了したら、newCheckedInstanceOf()メソッドでLoggerContextFactoryのオブジェクトをインスタンス化します。以下のスニペットにその動作を示します。
public static <T> T newInstanceOf(final Class<T> clazz)
            throws InstantiationException, IllegalAccessException, InvocationTargetException {
        try {
            return clazz.getConstructor().newInstance();
        } catch (final NoSuchMethodException ignored) {
            // FIXME: looking at the code for Class.newInstance(), this seems to do the same thing as above
            return clazz.newInstance();
        }
    }
デフォルトでは初期設定ファイルlog4j2.component.propertiesは存在しません。そのため、他の方法でLoggerContextFactoryを取得する必要があります。
LoggerContextFactoryオブジェクトをインスタンス化するためにプロバイダを使用
コードは:
if (factory == null) {
            final SortedMap<Integer, LoggerContextFactory> factories = new TreeMap<>();
            // note that the following initial call to ProviderUtil may block until a Provider has been installed when
            // running in an OSGi environment
            if (ProviderUtil.hasProviders()) {
                for (final Provider provider : ProviderUtil.getProviders()) {
                    final Class<? extends LoggerContextFactory> factoryClass = provider.loadLoggerContextFactory();
                    if (factoryClass ! = null) {
                        try {
                            factories.put(provider.getPriority(), factoryClass.newInstance());
                        } catch (final Exception e) {
                            LOGGER.error("Unable to create class {} specified in provider URL {}", factoryClass.getName(), provider
                                    .getUrl(), e);
                        }
                    }
                }

                if (factories.isEmpty()) {
                    LOGGER.error("Log4j2 could not find a logging implementation. "
                            + "Please add log4j-core to the classpath. Using SimpleLogger to log to the console...") ;
                    factory = new SimpleLoggerContextFactory();
                } else if (factories.size() == 1) {
                    factory = factories.get(factories.lastKey());
                } else {
                    final StringBuilder sb = new StringBuilder("Multiple logging implementations found: \n");
                    for (final Map.Entry<Integer, LoggerContextFactory> entry : factories.entrySet()) {
                        sb.append("Factory: ").append(entry.getValue().getClass().getName());
                        sb.append(", Weighting: ").append(entry.getKey()).append('\n');
                    }
                    factory = factories.get(factories.lastKey());
                    sb.append("Using factory: ").append(factory.getClass().getName());
                    LOGGER.warn(sb.toString());

                }
            } else {
                LOGGER.error("Log4j2 could not find a logging implementation. "
                        + "Please add log4j-core to the classpath. Using SimpleLogger to log to the console...") ;
                factory = new SimpleLoggerContextFactory();
            }
        }
hasProviders と getProviders の両方が、スレッドセーフメソッドを使って ProviderUtil オブジェクトを遅延的に初期化しているのは興味深いです。lazyInit() メソッドを見てみましょう。
protected static void lazyInit() {
        //noinspection DoubleCheckedLocking
        if (INSTANCE == null) {
            try {
                STARTUP_LOCK.lockInterruptibly();
                if (INSTANCE == null) {
                    INSTANCE = new ProviderUtil();
                }
            } catch (final InterruptedException e) {
                LOGGER.fatal("Interrupted before Log4j Providers could be loaded.", e);
                Thread.currentThread().interrupt();
            } finally {
                STARTUP_LOCK.unlock();
            }
        }
    }
施工方法を見てみましょう。
private ProviderUtil() {
        for (final LoaderUtil.UrlResource resource : LoaderUtil.findUrlResources(PROVIDER_RESOURCE)) {
            loadProvider(resource.getUrl(), resource.getClassLoader());
        }
    }
ここでいう初期化とは、プロバイダオブジェクトを初期化することです。providerUtilのインスタンスを新規作成すると、プロバイダオブジェクトが直接インスタンス化されます。まず、getClassLoaders()メソッドを使ってプロバイダのクラスローダーを取得します。そして、loadProviders(classLoader);を使用してクラスをロードします。providerUtilのインスタンス化の最後のステップでは、「META-INF/log4j-provider.properties」ファイル内の対応するプロバイダのURLを一律に検索します。プロバイダをリモートでロードすることを検討します。loadProviders()メソッドは、ProviderUtilのPROVIDERSリストにプロバイダを追加します。デフォルトのプロバイダは org.apache.logging.log4j.core.impl.Log4jContextFactory です。
LoggerContextFactory = org.apache.logging.log4j.core.impl.Log4jContextFactory
Log4jAPIVersion = 2.1.0
FactoryPriority= 10
興味深いことに、lazy-init は lockInterruptibly() メソッドを使ってロックされています。
lockInterruptiblyとlockの違いは?
lockとlockInterruptiblyの違いは?
lockは最初にロックを取得してから割り込み信号に反応します。
lockInterruptiblyは、ロックを取得したり、ロックを再取得したりするのではなく、他のスレッドから送られてきた割り込み信号に即座に反応します。
ReentrantLock.lockInterruptiblyは、別のスレッドが
ロックを取得するために待機しているスレッドのThread.interrupt()メソッドは、待機をやめてすぐに戻るようにしています。この場合、待機中のスレッドはロックを取得しません。その代わりに、InterruptedExceptionをスローします。ReentrantLock.lockは、Thread.interrupt()メソッドを呼び出してもスレッドの割り込みを許しません。スレッドは、Thread.isInterruptedが検出された場合でも、ロックの取得を再試行し続けます。ロックの取得に失敗したスレッドは待機キューに追加されます。最後に、スレッドがロックを取得すると、そのスレッドは割り込み状態に設定され、割り込みが発生します。
上記のコメントは注目に値します。
/**
     * Guards the ProviderUtil singleton instance from lazy initialization. This is primarily used for OSGi support.
     *
     * @since 2.1
     */
    protected static final Lock STARTUP_LOCK = new ReentrantLock();
    // STARTUP_LOCK guards INSTANCE for lazy initialization; this allows the OSGi Activator to pause the startup and
    // wait for a Provider to be installed. See LOG4J2-373
    private static volatile ProviderUtil INSTANCE;
このスニペットは、OSGi Activatorが起動を一時停止できるようにするために使用されていることがわかりました。
LogManagerに戻ります。
プロバイダがインストールされると、LogManagerはファクトリーバインディングを進めます。
if (factories.isEmpty()) {
                    LOGGER.error("Log4j2 could not find a logging implementation. "
                            + "Please add log4j-core to the classpath. Using SimpleLogger to log to the console...") ;
                    factory = new SimpleLoggerContextFactory();
                } else if (factories.size() == 1) {
                    factory = factories.get(factories.lastKey());
                } else {
                    final StringBuilder sb = new StringBuilder("Multiple logging implementations found: \n");
                    for (final Map.Entry<Integer, LoggerContextFactory> entry : factories.entrySet()) {
                        sb.append("Factory: ").append(entry.getValue().getClass().getName());
                        sb.append(", Weighting: ").append(entry.getKey()).append('\n');
                    }
                    factory = factories.get(factories.lastKey());
                    sb.append("Using factory: ").append(factory.getClass().getName());
                    LOGGER.warn(sb.toString());

                }
LogManagerの起動処理はここで終了します。
コンフィグレーション
slf4jを使わずに、ロガーを取得するには
Logger logger = logManager.getLogger(xx.class)
getLogger() メソッドを見てみましょう。
    public static Logger getLogger(final Class<? > clazz) {
        final Class<? > cls = callerClass(clazz);
        return getContext(cls.getClassLoader(), false).getLogger(toLoggerName(cls));
    }
getContext() メソッドを見てみましょう。
public static LoggerContext getContext(final ClassLoader loader, final boolean currentContext) {
        try {
            return factory.getContext(FQCN, loader, null, currentContext);
        } catch (final IllegalStateException ex) {
            LOGGER.warn(ex.getMessage() + " Using SimpleLogger");
            return new SimpleLoggerContextFactory().getContext(FQCN, loader, null, currentContext);
        }
    }
前述したように、ファクトリーメソッドはLog4jContextFactoryで実装されています。getContextを見てみましょう。
メソッド:
public LoggerContext getContext(final String fqcn, final ClassLoader loader, final Object externalContext,
                                    final boolean currentContext) {
        final LoggerContext ctx = selector.getContext(fqcn, loader, currentContext);
        if (externalContext ! = null && ctx.getExternalContext() == null) {
            ctx.setExternalContext(externalContext);
        }
        if (ctx.getState() == LifeCycle.State.INITIALIZED) {
            ctx.start();
        }
        return ctx;
    }
start()メソッドを見てみましょう。
public void start() {
        LOGGER.debug("Starting LoggerContext[name={}, {}]...", getName(), this);
        if (PropertiesUtil.getProperties().getBooleanProperty("log4j.LoggerContext.stacktrace.on.start", false)) {
            LOGGER.debug("Stack trace to locate invoker",
                    new Exception("Not a real error, showing stack trace to locate invoker"));
        }
        if (configLock.tryLock()) {
            try {
                if (this.isInitialized() || this.isStopped()) {
                    this.setStarting();
                    reconfigure();
                    if (this.configuration.isShutdownHookEnabled()) {
                        setUpShutdownHook();
                    }
                    this.setStarted();
                }
            } finally {
                configLock.unlock();
            }
        }
        LOGGER.debug("LoggerContext[name={}, {}] started OK.", getName(), this);
    }
コアなメソッドはreconfigure()です。移動します。
private void reconfigure(final URI configURI) {
        final ClassLoader cl = ClassLoader.class.isInstance(externalContext) ? (ClassLoader) externalContext : null;
        LOGGER.debug("Reconfiguration started for context[name={}] at URI {} ({}) with optional ClassLoader: {}",
                contextName, configURI, this, cl);
        final Configuration instance = ConfigurationFactory.getInstance().getConfiguration(this, contextName, configURI, cl);
        if (instance == null) {
            LOGGER.error("Reconfiguration failed: No configuration found for '{}' at '{}' in '{}'", contextName, configURI, cl);
        } else {
            setConfiguration(instance);
            /*
             * instance.start(); Configuration old = setConfiguration(instance); updateLoggers(); if (old ! = null) {
             * old.stop(); }
             */
            final String location = configuration == null ?  "?" : String.valueOf(configuration.getConfigurationSource());
            LOGGER.debug("Reconfiguration complete for context[name={}] at URI {} ({}) with optional ClassLoader: {}",
                    contextName, location, this, cl);
        }
    }
それぞれの設定はConfigurationFactoryから来ていることがわかります。まずはこのクラスのgetInstance()メソッドを見てみましょう。
public static ConfigurationFactory getInstance() {
        // volatile works in Java 1.6+, so double-checked locking also works properly
        //noinspection DoubleCheckedLocking
        if (factories == null) {
            LOCK.lock();
            try {
                if (factories == null) {
                    final List<ConfigurationFactory> list = new ArrayList<ConfigurationFactory>();
                    final String factoryClass = PropertiesUtil.getProperties().getStringProperty(CONFIGURATION_FACTORY_PROPERTY);
                    if (factoryClass ! = null) {
                        addFactory(list, factoryClass);
                    }
                    final PluginManager manager = new PluginManager(CATEGORY);
                    manager.collectPlugins();
                    final Map<String, PluginType<? >> plugins = manager.getPlugins();
                    final List<Class<? extends ConfigurationFactory>> ordered =
                        new ArrayList<Class<? extends ConfigurationFactory>>(plugins.size());
                    for (final PluginType<? > type : plugins.values()) {
                        try {
                            ordered.add(type.getPluginClass().asSubclass(ConfigurationFactory.class));
                        } catch (final Exception ex) {
                            LOGGER.warn("Unable to add class {}", type.getPluginClass(), ex);
                        }
                    }
                    Collections.sort(ordered, OrderComparator.getInstance());
                    for (final Class<? extends ConfigurationFactory> clazz : ordered) {
                        addFactory(list, clazz);
                    }
                    // see above comments about double-checked locking
                    //noinspection NonThreadSafeLazyInitialization
                    factories = Collections.unmodifiableList(list);
                }
            } finally {
                LOCK.unlock();
            }
        }

        LOGGER.debug("Using configurationFactory {}", configFactory);
        return configFactory;
    }
ConfigurationFactoryは初期化にPluginManagerを使用していることがわかります。PluginManagerはConfigurationFactoryのサブクラスをロードします。デフォルトのサブクラスはXmlConfigurationFactory、JsonConfigurationFactory、YamlConfigurationFactoryです。これらはプラグインとしてロードされます。
reconfigure()メソッドに戻ります。LogManagerはConfigurationFactoryのインスタンスを取得した後にgetConfiguration()メソッドを呼び出していることがわかります。
public Configuration getConfiguration(final String name, final URI configLocation, final ClassLoader loader) {
        if (! isActive()) {
            return null;
        }
        if (loader == null) {
            return getConfiguration(name, configLocation);
        }
        if (isClassLoaderUri(configLocation)) {
            final String path = extractClassLoaderUriPath(configLocation);
            final ConfigurationSource source = getInputFromResource(path, loader);
            if (source ! = null) {
                final Configuration configuration = getConfiguration(source);
                if (configuration ! = null) {
                    return configuration;
                }
            }
        }
        return getConfiguration(name, configLocation);
    }
getConfiguration() メソッドを見てみましょう。getConfiguration() は複数回呼び出されるので、混乱しないように注意してください。よくわからない場合は、デバッグしてみてください。
public Configuration getConfiguration(final String name, final URI configLocation) {

            if (configLocation == null) {
                final String config = this.substitutor.replace(
                    PropertiesUtil.getProperties().getStringProperty(CONFIGURATION_FILE_PROPERTY));
                if (config ! = null) {
                    ConfigurationSource source = null;
                    try {
                        source = getInputFromUri(FileUtils.getCorrectedFilePathUri(config));
                    } catch (final Exception ex) {
                        // Ignore the error and try as a String.
                        LOGGER.catching(Level.DEBUG, ex);
                    }
                    if (source == null) {
                        final ClassLoader loader = LoaderUtil.getThreadContextClassLoader();
                        source = getInputFromString(config, loader);
                    }
                    if (source ! = null) {
                        for (final ConfigurationFactory factory : factories) {
                            final String[] types = factory.getSupportedTypes();
                            if (types ! = null) {
                                for (final String type : types) {
                                    if (type.equals("*") || config.endsWith(type)) {
                                        final Configuration c = factory.getConfiguration(source);
                                        if (c ! = null) {
                                            return c;
                                        }
                                    }
                                }
                            }
                        }
                    }
                }
            } else {
                for (final ConfigurationFactory factory : factories) {
                    final String[] types = factory.getSupportedTypes();
                    if (types ! = null) {
                        for (final String type : types) {
                            if (type.equals("*") || configLocation.toString().endsWith(type)) {
                                final Configuration config = factory.getConfiguration(name, configLocation);
                                if (config ! = null) {
                                    return config;
                                }
                            }
                        }
                    }
                }
            }

            Configuration config = getConfiguration(true, name);
            if (config == null) {
                config = getConfiguration(true, null);
                if (config == null) {
                    config = getConfiguration(false, name);
                    if (config == null) {
                        config = getConfiguration(false, null);
                    }
                }
            }
            if (config ! = null) {
                return config;
            }
            LOGGER.error("No log4j2 configuration file found. Using default configuration: logging only errors to the console.") ;
            return new DefaultConfiguration();
        }
そして、LogManagerは、先に読み込まれた設定ファクトリから設定を取得します。
reconfigure()メソッドに戻ります。次に呼び出すメソッドはsetConfiguration()で、入力引数には先ほど取得したconfigを指定します。
private synchronized Configuration setConfiguration(final Configuration config) {
        Assert.requireNonNull(config, "No Configuration was provided");
        final Configuration prev = this.config;
        config.addListener(this);
        final ConcurrentMap<String, String> map = config.getComponent(Configuration.CONTEXT_PROPERTIES);

        try { // LOG4J2-719 network access may throw android.os.NetworkOnMainThreadException
            map.putIfAbsent("hostName", NetUtils.getLocalHostname());
        } catch (final Exception ex) {
            LOGGER.debug("Ignoring {}, setting hostName to 'unknown'", ex.toString());
            map.putIfAbsent("hostName", "unknown");
        }
        map.putIfAbsent("contextName", name);
        config.start();
        this.config = config;
        updateLoggers();
        if (prev ! = null) {
            prev.removeListener(this);
            prev.stop();
        }

        firePropertyChangeEvent(new PropertyChangeEvent(this, PROPERTY_CONFIG, prev, config));

        try {
            Server.reregisterMBeansAfterReconfigure();
        } catch (final Throwable t) {
            // LOG4J2-716: Android has no java.lang.management
            LOGGER.error("Could not reconfigure JMX", t);
        }
        return prev;
    }
このメソッドの最も重要なステップはconfig.startで、設定を解析します。
public void start() {
        LOGGER.debug("Starting configuration {}", this);
        this.setStarting();
        pluginManager.collectPlugins(pluginPackages);
        final PluginManager levelPlugins = new PluginManager(Level.CATEGORY);
        levelPlugins.collectPlugins(pluginPackages);
        final Map<String, PluginType<? >> plugins = levelPlugins.getPlugins();
        if (plugins ! = null) {
            for (final PluginType<? > type : plugins.values()) {
                try {
                    // Cause the class to be initialized if it isn't already.
                    Loader.initializeClass(type.getPluginClass().getName(), type.getPluginClass().getClassLoader());
                } catch (final Exception e) {
                    LOGGER.error("Unable to initialize {} due to {}", type.getPluginClass().getName(), e.getClass()
                            .getSimpleName(), e);
                }
            }
        }
        setup();
        setupAdvertisement();
        doConfigure();
        final Set<LoggerConfig> alreadyStarted = new HashSet<LoggerConfig>();
        for (final LoggerConfig logger : loggers.values()) {
            logger.start();
            alreadyStarted.add(logger);
        }
        for (final Appender appender : appenders.values()) {
            appender.start();
        }
        if (! alreadyStarted.contains(root)) { // LOG4J2-392
            root.start(); // LOG4J2-336
        }
        super.start();
        LOGGER.debug("Started configuration {} OK.", this);
    }
このプロセスでは、次のような手順を踏んでいます。
- ログレベルのプラグインを取得する
- 初期化
- 広告主の初期化
- 構成
初期化ステップでは、setup() メソッドが呼び出されます。setup() メソッドを上書きする必要があります。XMLConfigurationを例にして動作を説明します。
@Override
    public void setup() {
        if (rootElement == null) {
            LOGGER.error("No logging configuration");
            return;
        }
        constructHierarchy(rootNode, rootElement);
        if (status.size() > 0) {
            for (final Status s : status) {
                LOGGER.error("Error processing element {}: {}", s.name, s.errorType);
            }
            return;
        }
        rootElement = null;
    }
ここでは重要なメソッド constructHierarchy() が使われています。それを見てみましょう。
private void constructHierarchy(final Node node, final Element element) {
        processAttributes(node, element);
        final StringBuilder buffer = new StringBuilder();
        final NodeList list = element.getChildNodes();
        final List<Node> children = node.getChildren();
        for (int i = 0; i < list.getLength(); i++) {
            final org.w3c.dom.Node w3cNode = list.item(i);
            if (w3cNode instanceof Element) {
                final Element child = (Element) w3cNode;
                final String name = getType(child);
                final PluginType<? > type = pluginManager.getPluginType(name);
                final Node childNode = new Node(node, name, type);
                constructHierarchy(childNode, child);
                if (type == null) {
                    final String value = childNode.getValue();
                    if (! childNode.hasChildren() && value ! = null) {
                        node.getAttributes().put(name, value);
                    } else {
                        status.add(new Status(name, element, ErrorType.CLASS_NOT_FOUND));
                    }
                } else {
                    children.add(childNode);
                }
            } else if (w3cNode instanceof Text) {
                final Text data = (Text) w3cNode;
                buffer.append(data.getData());
            }
        }

        final String text = buffer.toString().trim();
        if (text.length() > 0 || (! node.hasChildren() && ! node.isRoot())) {
            node.setValue(text);
        }
    }
ご覧の通り、ツリートラバーサル処理です。もちろん、設定ファイルはXML形式で提供されています。XML文書は階層構造を持っており、概念的にはツリー構造と解釈することができます。start()メソッドに戻ります。doConfigure() メソッドを見てみましょう。
protected void doConfigure() {
        if (rootNode.hasChildren() && rootNode.getChildren().get(0).getName().equalsIgnoreCase("Properties")) {
            final Node first = rootNode.getChildren().get(0);
            createConfiguration(first, null);
            if (first.getObject() ! = null) {
                subst.setVariableResolver((StrLookup) first.getObject());
            }
        } else {
            final Map<String, String> map = this.getComponent(CONTEXT_PROPERTIES);
            final StrLookup lookup = map == null ?  null : new MapLookup(map);
            subst.setVariableResolver(new Interpolator(lookup, pluginPackages));
        }

        boolean setLoggers = false;
        boolean setRoot = false;
        for (final Node child : rootNode.getChildren()) {
            if (child.getName().equalsIgnoreCase("Properties")) {
                if (tempLookup == subst.getVariableResolver()) {
                    LOGGER.error("Properties declaration must be the first element in the configuration");
                }
                continue;
            }
            createConfiguration(child, null);
            if (child.getObject() == null) {
                continue;
            }
            if (child.getName().equalsIgnoreCase("Appenders")) {
                appenders = child.getObject();
            } else if (child.isInstanceOf(Filter.class)) {
                addFilter(child.getObject(Filter.class));
            } else if (child.getName().equalsIgnoreCase("Loggers")) {
                final Loggers l = child.getObject();
                loggers = l.getMap();
                setLoggers = true;
                if (l.getRoot() ! = null) {
                    root = l.getRoot();
                    setRoot = true;
                }
            } else if (child.getName().equalsIgnoreCase("CustomLevels")) {
                customLevels = child.getObject(CustomLevels.class).getCustomLevels();
            } else if (child.isInstanceOf(CustomLevelConfig.class)) {
                final List<CustomLevelConfig> copy = new ArrayList<CustomLevelConfig>(customLevels);
                copy.add(child.getObject(CustomLevelConfig.class));
                customLevels = copy;
            } else {
                LOGGER.error("Unknown object \"{}\" of type {} is ignored.", child.getName(),
                        child.getObject().getClass().getName());
            }
        }

        if (! setLoggers) {
            LOGGER.warn("No Loggers were configured, using default. Is the Loggers element missing?") ;
            setToDefault();
            return;
        } else if (! setRoot) {
            LOGGER.warn("No Root logger was configured, creating default ERROR-level Root logger with Console appender");
            setToDefault();
            // return; // LOG4J2-219: creating default root=ok, but don't exclude configured Loggers
        }

        for (final Map.Entry<String, LoggerConfig> entry : loggers.entrySet()) {
            final LoggerConfig l = entry.getValue();
            for (final AppenderRef ref : l.getAppenderRefs()) {
                final Appender app = appenders.get(ref.getRef());
                if (app ! = null) {
                    l.addAppender(app, ref.getLevel(), ref.getFilter());
                } else {
                    LOGGER.error("Unable to locate appender {} for logger {}", ref.getRef(), l.getName());
                }
            }

        }

        setParents();
    }
このメソッドは、以前に取得した設定を解析し、その結果を適切な場所に挿入していることがわかります。start()メソッドに戻ります。設定が完了したら、ロガーとアペンダーを起動する必要があります。
非同期化
非同期アペンダー
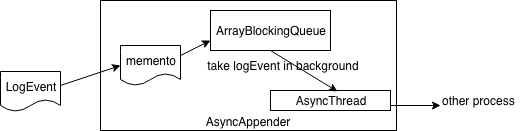
AsyncAppenderは、他のログサービスとは一線を画す優れた機能です。まずはログの印刷から仕組みを見ていきます。Loggerに移動して、ロギングメソッドを探します。
public void debug(final Marker marker, final Message msg) {
        logIfEnabled(FQCN, Level.DEBUG, marker, msg, msg ! = null ? msg.getThrowable() : null);
    }
動きかしていきます。
@PerformanceSensitive
    // NOTE: This is a hot method. Current implementation compiles to 29 bytes of byte code.
    // This is within the 35 byte MaxInlineSize threshold. Modify with care!
    private void logMessageTrackRecursion(final String fqcn,
                                          final Level level,
                                          final Marker marker,
                                          final Message msg,
                                          final Throwable throwable) {
        try {
            incrementRecursionDepth(); // LOG4J2-1518, LOG4J2-2031
            tryLogMessage(fqcn, level, marker, msg, throwable);
        } finally {
            decrementRecursionDepth();
        }
    }
ご覧のように、ログの印刷前にコール数が記録されています。tryLogMessage()メソッドを見てみましょう。
@PerformanceSensitive
    // NOTE: This is a hot method. Current implementation compiles to 26 bytes of byte code.
    // This is within the 35 byte MaxInlineSize threshold. Modify with care!
    private void tryLogMessage(final String fqcn,
                               final Level level,
                               final Marker marker,
                               final Message msg,
                               final Throwable throwable) {
        try {
            logMessage(fqcn, level, marker, msg, throwable);
        } catch (final Exception e) {
            // LOG4J2-1990 Log4j2 suppresses all exceptions that occur once application called the logger
            handleLogMessageException(e, fqcn, msg);
        }
    }
動かしていきます。
@Override
    public void logMessage(final String fqcn, final Level level, final Marker marker, final Message message,
            final Throwable t) {
        final Message msg = message == null ?  new SimpleMessage(Strings.EMPTY) : message;
        final ReliabilityStrategy strategy = privateConfig.loggerConfig.getReliabilityStrategy();
        strategy.log(this, getName(), fqcn, marker, level, msg, t);
    }
ご覧のように、ログ印刷時には、ログ印刷ストラテジーが config から取得されます。ReliabilityStrategy の作成方法を見てみましょう。デフォルトの実装クラスは DefaultReliabilityStrategy です。実際のログ印刷メソッドを見てみましょう。
@Override
    public void log(final Supplier<LoggerConfig> reconfigured, final String loggerName, final String fqcn, final Marker marker, final Level level,
            final Message data, final Throwable t) {
        loggerConfig.log(loggerName, fqcn, marker, level, data, t);
    }
実際のログ印刷方法はconfigで実装されています。かなり珍しいことです。よく見てみてください。
@PerformanceSensitive("allocation")
    public void log(final String loggerName, final String fqcn, final Marker marker, final Level level,
            final Message data, final Throwable t) {
        List<Property> props = null;
        if (! propertiesRequireLookup) {
            props = properties;
        } else {
            if (properties ! = null) {
                props = new ArrayList<>(properties.size());
                final LogEvent event = Log4jLogEvent.newBuilder()
                        .setMessage(data)
                        .setMarker(marker)
                        .setLevel(level)
                        .setLoggerName(loggerName)
                        .setLoggerFqcn(fqcn)
                        .setThrown(t)
                        .build();
                for (int i = 0; i < properties.size(); i++) {
                    final Property prop = properties.get(i);
                    final String value = prop.isValueNeedsLookup() // since LOG4J2-1575
                            ? config.getStrSubstitutor().replace(event, prop.getValue()) //
                            : prop.getValue();
                    props.add(Property.createProperty(prop.getName(), value));
                }
            }
        }
        final LogEvent logEvent = logEventFactory.createEvent(loggerName, marker, fqcn, level, data, props, t);
        try {
            log(logEvent, LoggerConfigPredicate.ALL);
        } finally {
            // LOG4J2-1583 prevent scrambled logs when logging calls are nested (logging in toString())
            ReusableLogEventFactory.release(logEvent);
        }
    }
tryの前のスニペットがLogEventを作成し、tryの部分だけがロギングを実装していることがよくわかります。
private void processLogEvent(final LogEvent event, LoggerConfigPredicate predicate) {
        event.setIncludeLocation(isIncludeLocation());
        if (predicate.allow(this)) {
            callAppenders(event);
        }
        logParent(event, predicate);
    }
次に、callAppenders()メソッドを見ていきます。まずは、AsyncAppenderのappend()メソッドからです。
/**
     * Actual writing occurs here.
     *
     * @param logEvent The LogEvent.
     */
    @Override
    public void append(final LogEvent logEvent) {
        if (! isStarted()) {
            throw new IllegalStateException("AsyncAppender " + getName() + " is not active");
        }
        final Log4jLogEvent memento = Log4jLogEvent.createMemento(logEvent, includeLocation);
        InternalAsyncUtil.makeMessageImmutable(logEvent.getMessage());
        if (! transfer(memento)) {
            if (blocking) {
                if (AbstractLogger.getRecursionDepth() > 1) { // LOG4J2-1518, LOG4J2-2031
                    // If queue is full AND we are in a recursive call, call appender directly to prevent deadlock
                    AsyncQueueFullMessageUtil.logWarningToStatusLogger();
                    logMessageInCurrentThread(logEvent);
                } else {
                    // delegate to the event router (which may discard, enqueue and block, or log in current thread)
                    final EventRoute route = asyncQueueFullPolicy.getRoute(thread.getId(), memento.getLevel());
                    route.logMessage(this, memento);
                }
            } else {
                error("Appender " + getName() + " is unable to write primary appenders. queue is full");
                logToErrorAppenderIfNecessary(false, memento);
            }
        }
    }
重要なステップは以下の通りです。
- LogEventを作成します。
- Transfer() メソッドを呼び出して、LogEvent を BlockingQueue に追加します。
- BlockingQueue が一杯の場合は、対応するストラテジーを有効にします。
同様に、スレッドは非同期消費を実装するために使用されます。
private class AsyncThread extends Log4jThread {

        private volatile boolean shutdown = false;
        private final List<AppenderControl> appenders;
        private final BlockingQueue<LogEvent> queue;

        public AsyncThread(final List<AppenderControl> appenders, final BlockingQueue<LogEvent> queue) {
            super("AsyncAppender-" + THREAD_SEQUENCE.getAndIncrement());
            this.appenders = appenders;
            this.queue = queue;
            setDaemon(true);
        }

        @Override
        public void run() {
            while (! shutdown) {
                LogEvent event;
                try {
                    event = queue.take();
                    if (event == SHUTDOWN_LOG_EVENT) {
                        shutdown = true;
                        continue;
                    }
                } catch (final InterruptedException ex) {
                    break; // LOG4J2-830
                }
                event.setEndOfBatch(queue.isEmpty());
                final boolean success = callAppenders(event);
                if (! success && errorAppender ! = null) {
                    try {
                        errorAppender.callAppender(event);
                    } catch (final Exception ex) {
                        // Silently accept the error.
                    }
                }
            }
            // Process any remaining items in the queue.
            LOGGER.trace("AsyncAppender.AsyncThread shutting down. Processing remaining {} queue events.",
                queue.size());
            int count = 0;
            int ignored = 0;
            while (! queue.isEmpty()) {
                try {
                    final LogEvent event = queue.take();
                    if (event instanceof Log4jLogEvent) {
                        final Log4jLogEvent logEvent = (Log4jLogEvent) event;
                        logEvent.setEndOfBatch(queue.isEmpty());
                        callAppenders(logEvent);
                        count++;
                    } else {
                        ignored++;
                        LOGGER.trace("Ignoring event of class {}", event.getClass().getName());
                    }
                } catch (final InterruptedException ex) {
                    // May have been interrupted to shut down.
                    // Here we ignore interrupts and try to process all remaining events.
                }
            }
            LOGGER.trace("AsyncAppender.AsyncThread stopped. Queue has {} events remaining. "
                + "Processed {} and ignored {} events since shutdown started.", queue.size(), count, ignored);
        }

        /**
         * Calls {@link AppenderControl#callAppender(LogEvent) callAppender} on all registered {@code AppenderControl}
         * objects, and returns {@code true} if at least one appender call was successful, {@code false} otherwise. Any
         * exceptions are silently ignored.
         *
         * @param event the event to forward to the registered appenders
         * @return {@code true} if at least one appender call succeeded, {@code false} otherwise
         */
        boolean callAppenders(final LogEvent event) {
            boolean success = false;
            for (final AppenderControl control : appenders) {
                try {
                    control.callAppender(event);
                    success = true;
                } catch (final Exception ex) {
                    // If no appender is successful the error appender will get it.
                }
            }
            return success;
        }

        public void shutdown() {
            shutdown = true;
            if (queue.isEmpty()) {
                queue.offer(SHUTDOWN_LOG_EVENT);
            }
            if (getState() == State.TIMED_WAITING || getState() == State.WAITING) {
                this.interrupt(); // LOG4J2-1422: if underlying appender is stuck in wait/sleep/join/park call
            }
        }
    }
run()メソッドの動作を見てみましょう。
- LogEventを取得するスレッドをブロックします。
- LogEventを送信します。
- ブロッキングキューのすべてのイベントが消費されるまで、スレッドをシャットダウンすることはできません。
非同期ロガー
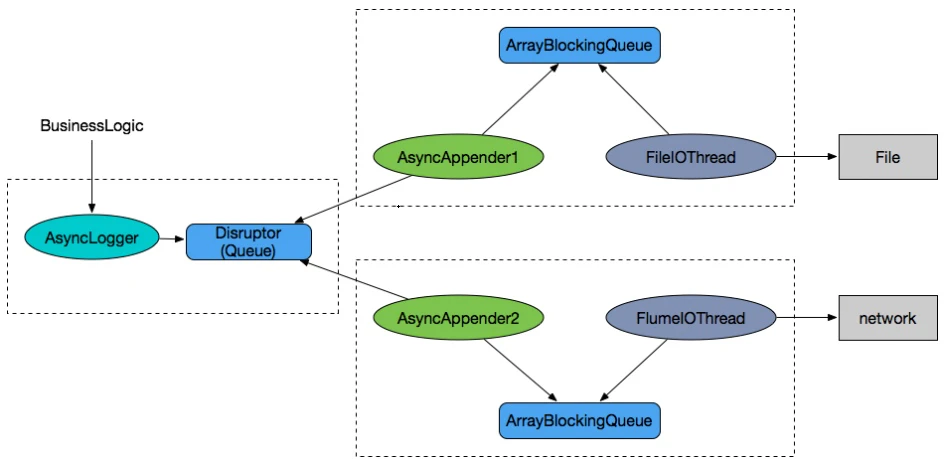
まずはAsyncLoggerのlogMessage()メソッドから始めてみましょう。
public void logMessage(final String fqcn, final Level level, final Marker marker, final Message message,
            final Throwable thrown) {

        if (loggerDisruptor.isUseThreadLocals()) {
            logWithThreadLocalTranslator(fqcn, level, marker, message, thrown);
        } else {
            // LOG4J2-1172: avoid storing non-JDK classes in ThreadLocals to avoid memory leaks in web apps
            logWithVarargTranslator(fqcn, level, marker, message, thrown);
        }
    }
logWithThreadLocalTranslator() メソッドを見てみましょう。
private void logWithThreadLocalTranslator(final String fqcn, final Level level, final Marker marker,
            final Message message, final Throwable thrown) {
        // Implementation note: this method is tuned for performance. MODIFY WITH CARE!

        final RingBufferLogEventTranslator translator = getCachedTranslator();
        initTranslator(translator, fqcn, level, marker, message, thrown);
        initTranslatorThreadValues(translator);
        publish(translator);
    }
このメソッドのロジックは単純明快です。ログ関連情報をRingBufferLogEventに変換し、RingBufferに公開します。RingBufferは、Disruptorのロックフリーキューと考えることができます。ログ情報は、RingBufferに公開された後、何らかの消費ロジックによって処理されると仮定することができます。この消費ロジックを見つけるには、以下の2つの方法があります。
- Disruptorが使用されている場所を探して、詳細を確認する。しかし、そうすると簡単に混乱してしまうかもしれません。
- Log4j 2のロガーは、通常、独自のstart()メソッドを持っています。そのstart()メソッドで試してみます。
start()メソッドの中にスニペットがあります。
final RingBufferLogEventHandler[] handlers = {new RingBufferLogEventHandler()};
        disruptor.handleEventsWith(handlers);
RingBufferLogEventHandler クラスがどのように実装されているかを見てみましょう。
public class RingBufferLogEventHandler implements
        SequenceReportingEventHandler<RingBufferLogEvent>, LifecycleAware {

    private static final int NOTIFY_PROGRESS_THRESHOLD = 50;
    private Sequence sequenceCallback;
    private int counter;
    private long threadId = -1;

    @Override
    public void setSequenceCallback(final Sequence sequenceCallback) {
        this.sequenceCallback = sequenceCallback;
    }

    @Override
    public void onEvent(final RingBufferLogEvent event, final long sequence,
            final boolean endOfBatch) throws Exception {
        event.execute(endOfBatch);
        event.clear();

        // notify the BatchEventProcessor that the sequence has progressed.
        // Without this callback the sequence would not be progressed
        // until the batch has completely finished.
        if (++counter > NOTIFY_PROGRESS_THRESHOLD) {
            sequenceCallback.set(sequence);
            counter = 0;
        }
    }

    /**
     * Returns the thread ID of the background consumer thread, or {@code -1} if the background thread has not started
     * yet.
     * @return the thread ID of the background consumer thread, or {@code -1}
     */
    public long getThreadId() {
        return threadId;
    }

    @Override
    public void onStart() {
        threadId = Thread.currentThread().getId();
    }

    @Override
    public void onShutdown() {
    }
}
そうすると、以下のようなインターフェースがあります。
/**
 * Callback interface to be implemented for processing events as they become available in the {@link RingBuffer}
 *
 * @param <T> event implementation storing the data for sharing during exchange or parallel coordination of an event.
 * @see BatchEventProcessor#setExceptionHandler(ExceptionHandler) if you want to handle exceptions propagated out of the handler.
 */
public interface EventHandler<T>
{
    /**
     * Called when a publisher has published an event to the {@link RingBuffer}
     *
     * @param event      published to the {@link RingBuffer}
     * @param sequence   of the event being processed
     * @param endOfBatch flag to indicate if this is the last event in a batch from the {@link RingBuffer}
     * @throws Exception if the EventHandler would like the exception handled further up the chain.
     */
    void onEvent(T event, long sequence, boolean endOfBatch) throws Exception;
}
コメントから、onEvent()メソッドが処理ロジックであることがわかります。RingBufferLogEventHandlerのonEvent()メソッドに戻ると、以下のようにexecute()メソッドがあります。
public void execute(final boolean endOfBatch) {
        this.endOfBatch = endOfBatch;
        asyncLogger.actualAsyncLog(this);
    }
このメソッドを使ってログを出力します。AsyncLoggerはシンプルなようで、Disruptorを使っているだけです。
プラグインベースのコンポーネント
他のコードスニペットでは、以下のようなものがよく見られます。
final PluginManager manager = new PluginManager(CATEGORY);
manager.collectPlugins(pluginPackages);
より良い拡張性を実現するために、多くのLog4j 2コンポーネントはプラグインで作られています。設定中にプラグインベースのコンポーネントをロードする必要があります。
collectPluginsを見てみましょう。
 public void collectPlugins(final List<String> packages) {
        final String categoryLowerCase = category.toLowerCase();
        final Map<String, PluginType<? >> newPlugins = new LinkedHashMap<>();

        // First, iterate the Log4j2Plugin.dat files found in the main CLASSPATH
        Map<String, List<PluginType<? >>> builtInPlugins = PluginRegistry.getInstance().loadFromMainClassLoader();
        if (builtInPlugins.isEmpty()) {
            // If we didn't find any plugins above, someone must have messed with the log4j-core.jar.
            // Search the standard package in the hopes we can find our core plugins.
            builtInPlugins = PluginRegistry.getInstance().loadFromPackage(LOG4J_PACKAGES);
        }
        mergeByName(newPlugins, builtInPlugins.get(categoryLowerCase));

        // Next, iterate any Log4j2Plugin.dat files from OSGi Bundles
        for (final Map<String, List<PluginType<? >>> pluginsByCategory : PluginRegistry.getInstance().getPluginsByCategoryByBundleId().values()) {
            mergeByName(newPlugins, pluginsByCategory.get(categoryLowerCase));
        }

        // Next iterate any packages passed to the static addPackage method.
        for (final String pkg : PACKAGES) {
            mergeByName(newPlugins, PluginRegistry.getInstance().loadFromPackage(pkg).get(categoryLowerCase));
        }
        // Finally iterate any packages provided in the configuration (note these can be changed at runtime).
        if (packages ! = null) {
            for (final String pkg : packages) {
                mergeByName(newPlugins, PluginRegistry.getInstance().loadFromPackage(pkg).get(categoryLowerCase));
            }
        }

        LOGGER.debug("PluginManager '{}' found {} plugins", category, newPlugins.size());

        plugins = newPlugins;
    }
処理ロジックは以下の通りです。
- Log4j2Plugin.datファイルから全ての組み込みプラグインを読み込みます。
- OSGi BundlesのLog4j2Plugin.datファイルから全てのプラグインをロードします。
- パッケージパスに渡されたプラグインを読み込みます。
- 最後に、設定からプラグインをロードします。
ロジックは一筋縄ではいかない。しかし、ソースコードを確認してみると、面白いことがわかりました。Log4j 2コアのプラグインをロードすると、以下のようになります。
PluginRegistry.getInstance().loadFromMainClassLoader()
decodeCacheFiles() メソッドを見てみましょう。
private Map<String, List<PluginType<? >>> decodeCacheFiles(final ClassLoader loader) {
        final long startTime = System.nanoTime();
        final PluginCache cache = new PluginCache();
        try {
            final Enumeration<URL> resources = loader.getResources(PluginProcessor.PLUGIN_CACHE_FILE);
            if (resources == null) {
                LOGGER.info("Plugin preloads not available from class loader {}", loader);
            } else {
                cache.loadCacheFiles(resources);
            }
        } catch (final IOException ioe) {
            LOGGER.warn("Unable to preload plugins", ioe);
        }
        final Map<String, List<PluginType<? >>> newPluginsByCategory = new HashMap<>();
        int pluginCount = 0;
        for (final Map.Entry<String, Map<String, PluginEntry>> outer : cache.getAllCategories().entrySet()) {
            final String categoryLowerCase = outer.getKey();
            final List<PluginType<? >> types = new ArrayList<>(outer.getValue().size());
            newPluginsByCategory.put(categoryLowerCase, types);
            for (final Map.Entry<String, PluginEntry> inner : outer.getValue().entrySet()) {
                final PluginEntry entry = inner.getValue();
                final String className = entry.getClassName();
                try {
                    final Class<? > clazz = loader.loadClass(className);
                    final PluginType<? > type = new PluginType<>(entry, clazz, entry.getName());
                    types.add(type);
                    ++pluginCount;
                } catch (final ClassNotFoundException e) {
                    LOGGER.info("Plugin [{}] could not be loaded due to missing classes.", className, e);
                } catch (final LinkageError e) {
                    LOGGER.info("Plugin [{}] could not be loaded due to linkage error.", className, e);
                }
            }
        }

        final long endTime = System.nanoTime();
        final DecimalFormat numFormat = new DecimalFormat("#0.000000");
        final double seconds = (endTime - startTime) * 1e-9;
        LOGGER.debug("Took {} seconds to load {} plugins from {}",
            numFormat.format(seconds), pluginCount, loader);
        return newPluginsByCategory;
    }
必要なプラグインがすべて同じファイルから読み込まれていることがわかります。PLUGIN_CACHE_FILEです。私が不思議に思ったのは、なぜプラグインをリフレクトで直接スキャンするのではなく、ファイルからロードするのでしょうか?プラグインをファイルに書き込んでしまうと、なかなか拡張性が出ません。そこで、静的変数PLUGIN_CACHE_FILEの使い方を探してみました。すると、アノテーションプロセッサを使うPluginProcessorクラスを見つけました。
/**
 * Annotation processor for pre-scanning Log4j 2 plugins.
 */
@SupportedAnnotationTypes("org.apache.logging.log4j.core.config.plugins. *")
public class PluginProcessor extends AbstractProcessor {

    // TODO: this could be made more abstract to allow for compile-time and run-time plugin processing

    /**
     * The location of the plugin cache data file. This file is written to by this processor, and read from by
     * {@link org.apache.logging.log4j.core.config.plugins.util.PluginManager}.
     */
    public static final String PLUGIN_CACHE_FILE =
            "META-INF/org/apache/logging/log4j/core/config/plugins/Log4j2Plugins.dat";

    private final PluginCache pluginCache = new PluginCache();

    @Override
    public boolean process(final Set<? extends TypeElement> annotations, final RoundEnvironment roundEnv) {
        System.out.println("Processing annotations");
        try {
            final Set<? extends Element> elements = roundEnv.getElementsAnnotatedWith(Plugin.class);
            if (elements.isEmpty()) {
                System.out.println("No elements to process");
                return false;
            }
            collectPlugins(elements);
            writeCacheFile(elements.toArray(new Element[elements.size()]));
            System.out.println("Annotations processed");
            return true;
        } catch (final IOException e) {
            e.printStackTrace();
            error(e.getMessage());
            return false;
        } catch (final Exception ex) {
            ex.printStackTrace();
            error(ex.getMessage());
            return false;
        }
    }
}
(重要性の低い方法は省略)
process() メソッドでは、PluginProcessor クラスが最初にすべてのプラグインを収集し、ファイルに書き込んでいることがわかります。そうすることで、リフレクションのオーバーヘッドを節約しています。
プラグインに関するコメントを見てみましょう。プラグインのRetentionPolicyはRUNTIMEです。一般的にPluginProcessorはRetentionPolicy.SOURCEとCLASSを併用します。プラグインをスキャンしてファイルに書き込んでいるのであれば、RetentionPolicyをRUNTIMEにしても意味がありません。これは私にはよくわからないところです。
まとめ
最後に、我々はLog4j 2のコードを通過しました。コンポーネントをプラグイン化することで柔軟性が向上するという設計思想に感銘を受けました。インターネット技術の急速な発展に伴い、様々なミドルウェアが登場しています。私たちは、あるコードと別のコードの関係についてもっと考える必要があります。デカップリングされた関係が最も美しいものであることは間違いありません。
アリババクラウドは日本に2つのデータセンターを有し、世界で60を超えるアベラビリティーゾーンを有するアジア太平洋地域No.1(2019ガートナー)のクラウドインフラ事業者です。
アリババクラウドの詳細は、こちらからご覧ください。
アリババクラウドジャパン公式ページ