Getting Stuck While Setting Up CrewAI
I recently tried out the trending agent framework CrewAI. Long story short — the installation process is a huge pain.
Despite what many blog posts or videos might suggest, it’s not as simple as just running a few Python commands. Here's a breakdown of where I got stuck, what went wrong, and how I eventually got through it (or gave up).
Is uv Really Required?
The official CrewAI documentation immediately recommends using uv, a relatively new Python package and environment manager:
curl -fsSL https://astral.sh/uv/install.sh | sh
uv venv
uv pip install crewai
If you’ve never heard of uv, you’re not alone. While Python developers are typically used to venv, pipenv, or poetry, CrewAI has taken the approach of promoting uv heavily.
Installing uv itself on Windows wasn’t that hard — but that’s just the beginning of the trouble.
Installing CrewAI: The “cl Not Found” Nightmare
Once I created the virtual environment with uv and ran the installation command, I hit an error:
cl : The term 'cl' is not recognized as the name of a cmdlet, function, script file, or operable program.
...
fatal error C1083: Cannot open include file: 'float.h': No such file or directory
...
And here's what it looked like on my end:
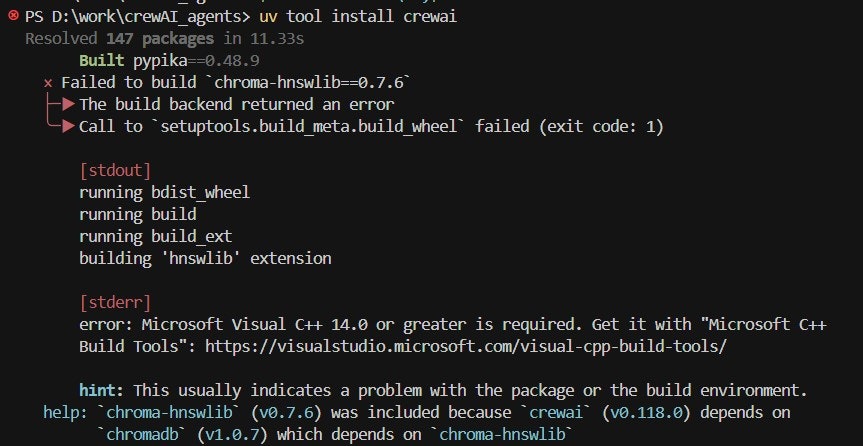
After some digging, I realized that Visual C++ Build Tools was required for building hnswlib, a dependency of CrewAI.
Then I got told that float.h was missing — which means I also needed the Windows SDK. I had skipped installing it to save disk space and moved parts of my environment to drive D. That decision came back to haunt me — I lost several hours because of this.
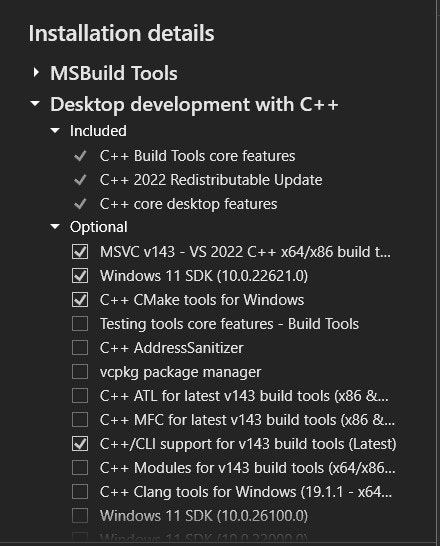
The build tool and SDK installation were painfully slow, and unless you check “C++ Desktop Development” during the Visual Studio install process, cl.exe won’t even be usable.
Required Visual Build Tool screen:
Who said this was “just a Python project”!?
Differences Between GitHub and Official Docs
At one point I checked the CrewAI GitHub README, only to realize that the steps listed there were a bit different from the official site.
Also, early tutorials required signing up for a third-party service called serper.dev for search capabilities. Luckily, that requirement seems to have been removed in recent versions.
If you're using the BaseAgent class, the .env file is automatically loaded — so configuration has become somewhat easier.
How to Pass Parameters at Runtime
CrewAI is designed to be run via crewai run, but many users (like me) want to pass variables at runtime — such as the topic of a post or document.
This is possible by using placeholders like {topic} in your task definitions (tasks.py), and calling:
crew.kickoff(inputs={"topic": "AI LLMs"})
This allows you to dynamically inject values from sys.argv or .env without modifying your code every time. This is super handy if you're looping over topics or running batch tasks. I haven’t fully automated this part yet, so I’ll follow up on that later.
What About LangChain?
After all this hassle, I briefly considered switching to LangChain. It’s very popular, but after reviewing its structure, it seemed… a bit too complex.
If your use case is focused on simple but flexible agent flows, CrewAI still has an edge in readability and control. That said, LangChain is still widely supported and has more Japanese documentation and tutorials — so I may try it later.
Final Thoughts
CrewAI has a solid architecture and flexible agent design — but getting started is a serious barrier. My key pain points were:
- Mandatory use of
uv -
cl.exemissing (requires Build Tools) - Windows SDK and C++ toolchain setup
- Constantly changing documentation
- Some tutorials are outdated or inconsistent
But once you get through the painful setup, defining your flows and tasks becomes relatively intuitive and clean.
Hopefully, future updates will streamline the installation process even further.