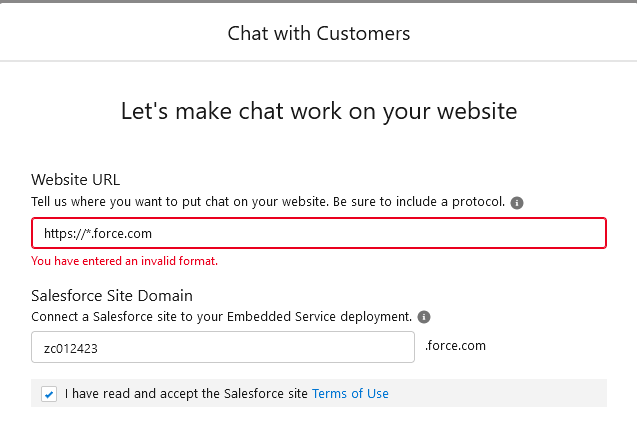
Have you tried with entering URL from your page address bar. For Example:
https://playful-panda-t2gi7m-dev-ed.lightning.force.com/
Note: You may need to change highlighted part with your org URL.
https://trailhead.salesforce.com/trailblazer-community/feed/0D54S00000A99N9SAJ
他の解決策があるみたい。
that as of November of last year this .force.com format seemed to have worked as seen in the related issue, none of those posting had this issue, it was with the next entry field of initial and date.
see:
Scott Reed (Mind Trick Consulting) asked in #Trailhead Challenges
Set Up Web Chats -- won't accept Salesforce Site Domain
https://trailhead.salesforce.com/trailblazer-community/feed/0D54S00000KhaZDSAZ
One validation error messages on this field states that it should be ok with an example.
(take the period out after the asterisk to receive this error)
Invalid use of a wildcard in a URL pattern. A wildcard must be in front of a second-level domain, such as https://.example.com.
昨年 11 月の時点では、この .force.com 形式は関連する問題に見られるように機能していたようですが、どの投稿にもこの問題はなく、次の入力フィールドのイニシャルと日付が問題でした。
見る:
Scott Reed (Mind Trick Consulting) が #Trailhead Challenges で質問しました
Web チャットを設定する -- Salesforce サイト ドメインを受け入れません
https://trailhead.salesforce.com/trailblazer-community/feed/0D54S00000KhaZDSAZ
このフィールドに関する検証エラー メッセージの 1 つは、例では問題ないことを示しています。
(このエラーを受け取るには、アスタリスクの後のピリオドを削除してください)
URL パターンでのワイルドカードの使用が無効です。ワイルドカードは、https://.example.com などの第 2 レベルのドメインの前に置く必要があります。
Embedded Code Snippet Not Showing
Set up the Service Console, Set up Web Chats for your Console
I had the same problem. During the setup for the chat, I ended up just not adding the secondary user account (Ada Balewa) that the script asks you to add to the chat.
In addition to this, I also used a made up domain since the https://.force.com prompt doesn't seem to work at this moment.
私も同じ問題を抱えていました。チャットのセットアップ中に、スクリプトがチャットに追加するように求めるセカンダリ ユーザー アカウント (Ada Balewa) を追加しなかっただけです。
これに加えて、現時点では https://.force.comプロンプトが機能しないように見えるため、作成したドメインも使用しました。
レコードページに追加した後、ナレッジがケースに表示されない
I checked the org and found that the "knowledge" related list was missing from the page layout. I added the same and this should pass now. Let me know if any further concerns.
組織を確認したところ、ページ レイアウトに「ナレッジ」関連リストが欠落していることがわかりました。同じものを追加しました。これで問題なくなるはずです。さらにご不明な点がございましたらお知らせください。
Set Up the Service Console - Add the Softphone Utility to Your App
I had same issue , but then I found out that one step was missing on traning.
Try to do those steps and instead of using Add Omni-channel use "Soft phone":
Add the Omni-Channel Utility
The Omni-Channel utility lets your Lightning console users receive work requests routed through Omni-Channel. Now that you have everything in place for your Omni-Channel utility, add it to the Ursa Major Solar Service Console so Ada and her team can access it.
- If you’re not already there, click the gear icon and select Service Setup.
- Enter App Manager in the Quick Find box, and select App Manager.
- Click the dropdown next to Ursa Major Solar’s Service Console, and select Edit.
- Click Utility Items from the menu on the left side of the screen.
- Click the Add Utility Item button and select Omni-Channel.
- Click Save, then click .
- Click the App Launcher and select Ursa Major Solar Service Console.
- Click Omni-Channel from the utility bar at the bottom of the console.
- Click the dropdown next to Offline, and select Available - Chat as your status.
私も同じ問題を抱えていましたが、トレーニングに 1 つのステップが欠けていることがわかりました。
これらの手順を実行し、オムニチャネルの追加を使用する代わりに「ソフトフォン」を使用してみてください。
オムニチャネルユーティリティを追加する
オムニチャネルユーティリティを使用すると、Lightning コンソールユーザはオムニチャネル経由でルーティングされた作業リクエストを受信できるようになります。オムニチャネル ユーティリティの準備がすべて完了したので、それを Ursa Major Solar Service Console に追加して、Ada と彼女のチームがアクセスできるようにします。
- まだそこにいない場合は、歯車アイコンをクリックして [サービス設定] を選択します。
- [クイック検索] ボックスに「アプリ マネージャー」と入力し、[アプリ マネージャー] を選択します。
- Ursa Major Solar のサービス コンソールの横にあるドロップダウンをクリックし、[編集] を選択します。
- 画面左側のメニューから「ユーティリティ項目」をクリックします。
- 「ユーティリティ項目の追加」ボタンをクリックし、「オムニチャネル」を選択します。
- [保存]をクリックし、次に をクリックします。
- アプリ ランチャーをクリックし、Ursa Major Solar Service Console を選択します。
- コンソール下部のユーティリティ バーから [オムニチャネル] をクリックします。
- [オフライン] の横にあるドロップダウンをクリックし、ステータスとして [利用可能 - チャット] を選択します。
シークレット ブラウザ モードで完了できました。(何が起こっているのかよくわかりません。)

