経緯
Google I/O 2018 Extended OKINAWAで、Android Thingsの話もあり、これからのAndroid開発がKotlinになるんじゃないか?という話を受けて、I2Cの機器をコントロールできるアプリをKotlinで書いてみようと思った。
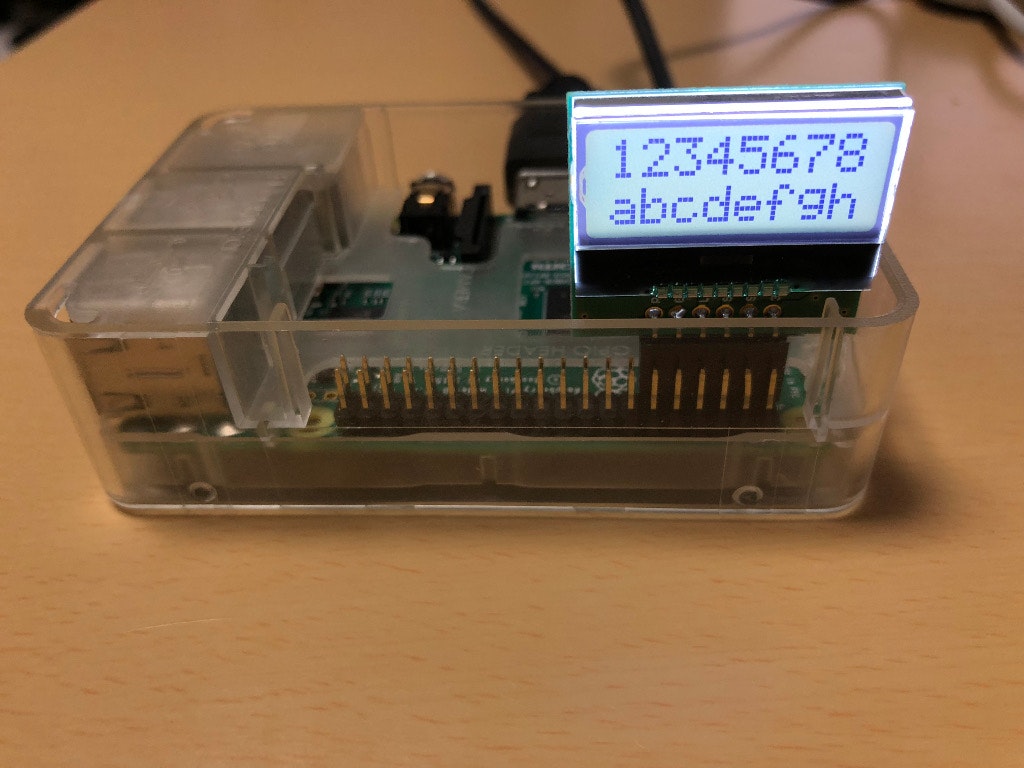
手元に、秋月電子で販売していた『Raspberry Pi キャラクタ液晶ディスプレイモジュールキット バックライト付』があったので、動かしてみました。
動作環境
・Android Things 1.0 for Raspberry pi 3
・Raspberry Pi キャラクタ液晶ディスプレイモジュールキット バックライト付
( http://akizukidenshi.com/catalog/g/gK-11354/ )
・Android Studio 3.1.2
動作イメージ
ソースコード
GPIOを利用するためには、『com.google.android.things.permission.USE_PERIPHERAL_IO』の追加が必要です。
AndroidManifest.xml
<?xml version="1.0" encoding="utf-8"?>
<manifest xmlns:android="http://schemas.android.com/apk/res/android"
    package="jp.eguchi.android.androidthingstest3">

    <uses-permission android:name="com.google.android.things.permission.USE_PERIPHERAL_IO"/>

    <application>
        <uses-library android:name="com.google.android.things" />

        <activity android:name=".MainActivity">
            <intent-filter>
                <action android:name="android.intent.action.MAIN" />

                <category android:name="android.intent.category.LAUNCHER" />
            </intent-filter>
            <intent-filter>
                <action android:name="android.intent.action.MAIN" />

                <category android:name="android.intent.category.IOT_LAUNCHER" />
                <category android:name="android.intent.category.DEFAULT" />
            </intent-filter>
        </activity>
    </application>

</manifest>
MainActivity.kt
package jp.eguchi.android.androidthingstest3

// Android Things 1.0で、Raspberry Pi 3に接続した秋月電子のAE-AQM0802+PCA9515モジュールを制御するサンプルアプリ
// Progmramed by Kazuyuki Eguchi

import android.app.Activity
import android.os.Bundle
import com.google.android.things.pio.Gpio
import com.google.android.things.pio.PeripheralManager

class MainActivity : Activity() {

    override fun onCreate(savedInstanceState: Bundle?) {
        super.onCreate(savedInstanceState)

        val bklight = PeripheralManager.getInstance().openGpio("BCM4")
        bklight.setDirection(Gpio.DIRECTION_OUT_INITIALLY_LOW)
        bklight.setActiveType(Gpio.ACTIVE_HIGH);
        bklight.value = true

        val reset = PeripheralManager.getInstance().openGpio("BCM17")
        reset.setDirection(Gpio.DIRECTION_OUT_INITIALLY_HIGH)
        reset.setActiveType(Gpio.ACTIVE_HIGH);

        val i2c = PeripheralManager.getInstance().openI2cDevice("I2C1",0x3e)

        // AQM0802Aの初期化コマンド
        i2c.writeRegByte(0x00,0x38)
        i2c.writeRegByte(0x00,0x39)
        i2c.writeRegByte(0x00,0x14)
        i2c.writeRegByte(0x00,0x70)     // コントラスト 0x71-0x7f で調整
        i2c.writeRegByte(0x00,0x56)
        i2c.writeRegByte(0x00,0x6c)
        i2c.writeRegByte(0x00,0x38)
        i2c.writeRegByte(0x00,0x0c)
        i2c.writeRegByte(0x00,0x01)     // Clear Display

        i2c.close()
    }

    override fun onStart() {
        super.onStart()

        val i2c = PeripheralManager.getInstance().openI2cDevice("I2C1",0x3e)

        // 1行目の1文字目
        i2c.writeRegByte(0x00, 0x80.toByte())

        val line1 = "12345678"
        for(i in 0 until line1.length) {
            i2c.writeRegByte(0x40, line1[i].toByte())
        }

        // 2行目の1文字目
        i2c.writeRegByte(0x00, 0xc0.toByte())

        val line2 = "abcdefgh"
        for(i in 0 until line2.length) {
            i2c.writeRegByte(0x40, line2[i].toByte())
        }

        i2c.close()
    }
}