- この記事はOpenCV Advent Calendar 2020の12日目の記事です。
- 他の記事は目次にまとめられています。
対象者
以下みたいな作業依頼を受けることのある人。
つまり、デザインに予算はつかないけど、ある程度の工夫を求められるやつ。。。
上長「部内とかで見せるちょっとしたデモをパパッと作って欲しい」
高橋「デザインは○○さんか、△△社さんにお願いします?」
※○○さん:デザイン会社から派遣で来ているデザイナーさん
※△△社:デザイン会社
上長「今回、デザインに出すお金は無い」
高橋「What?」
高橋「それじゃ、見た目は気にしな」
上長「偉い人も見る可能性あるからソレっぽくしといてもらわないと困る」
高橋「短い間ですが、お世話になりました」
Flaskとか立てて、UI作る人とデザイナーと役割分担出来るようなプロジェクトは対象外![]()
はじめに
OpenCVとかPillowで出来る範囲の工夫をします。
実際に業務で使ったものではなく、
雰囲気とか工夫を再現したものですが、以下に8つほど例を記載しています。
何かの参考になれば幸い![]()
今回まとめたソースコードは以下リポジトリにあります。

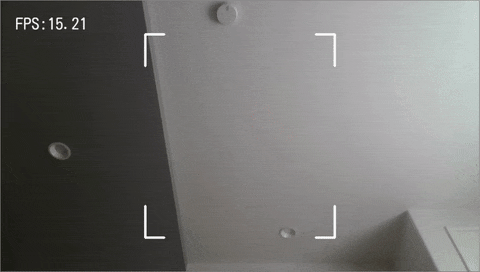
例01.画像分類(Classification)
ソースコード:
[01_classification_demo.py](https://github.com/Kazuhito00/Qiita-AdventCalendar-20201212-OpenCV/blob/main/01_classification_demo.py) (折り畳み内に描画処理を抜粋したものを記載)
def draw_demo_image(
    image,
    detection_count,
    classification_string,
    display_fps,
    trim_point,
):
    image_width, image_height = image.shape[1], image.shape[0]

    # フォント
    font_path = './utils/font/KosugiMaru-Regular.ttf'

    # 四隅枠表示
    if detection_count < 4:
        gap_length = int((trim_point[2] - trim_point[0]) / 10) * 9
        cv.line(image, (trim_point[0], trim_point[1]),
                (trim_point[2] - gap_length, trim_point[1]), (255, 255, 255),
                3)
        cv.line(image, (trim_point[0] + gap_length, trim_point[1]),
                (trim_point[2], trim_point[1]), (255, 255, 255), 3)
        cv.line(image, (trim_point[2], trim_point[1]),
                (trim_point[2], trim_point[3] - gap_length), (255, 255, 255),
                3)
        cv.line(image, (trim_point[2], trim_point[1] + gap_length),
                (trim_point[2], trim_point[3]), (255, 255, 255), 3)
        cv.line(image, (trim_point[0], trim_point[3]),
                (trim_point[2] - gap_length, trim_point[3]), (255, 255, 255),
                3)
        cv.line(image, (trim_point[0] + gap_length, trim_point[3]),
                (trim_point[2], trim_point[3]), (255, 255, 255), 3)
        cv.line(image, (trim_point[0], trim_point[1]),
                (trim_point[0], trim_point[3] - gap_length), (255, 255, 255),
                3)
        cv.line(image, (trim_point[0], trim_point[1] + gap_length),
                (trim_point[0], trim_point[3]), (255, 255, 255), 3)

    line_x1 = int(image_width / 1.55)
    line_x2 = int(image_width / 1.1)
    line_y = int(image_height / 5)

    # 回転丸表示
    if detection_count > 0:
        draw_angle = int(detection_count * 45)
        cv.ellipse(image, (int(image_width / 2), int(image_height / 2)),
                   (10, 10), -45, 0, draw_angle, (255, 255, 255), -1)
    # 斜線表示
    if detection_count > 10:
        cv.line(image, (int(image_width / 2), int(image_height / 2)),
                (line_x1, line_y), (255, 255, 255), 2)

    # 横線・分類名・スコア表示
    if detection_count > 10:
        font_size = 32
        cv.line(image, (line_x1, line_y), (line_x2, line_y), (255, 255, 255),
                2)
        image = CvDrawText.puttext(
            image, classification_string,
            (line_x1 + 10, line_y - int(font_size * 1.25)), font_path,
            font_size, (255, 255, 255))

    # FPS描画 #######################################################
    fps_string = u"FPS:" + str(display_fps)
    image = CvDrawText.puttext(image, fps_string, (30, 30), font_path, 32,
                               (255, 255, 255))

    return image
工夫点:
・ImageNetのラベルを英語のまま表示しない
・柔らか目の日本語フォント(小杉丸フォント)を使用
→日本語フォント表示にはPillowを利用
→表示用のクラスは「Kazuhito00/cvdrawtext」で公開したものを利用
・何か解析している風な動きを付ける(実際には即時推論結果が出ていますが、、、
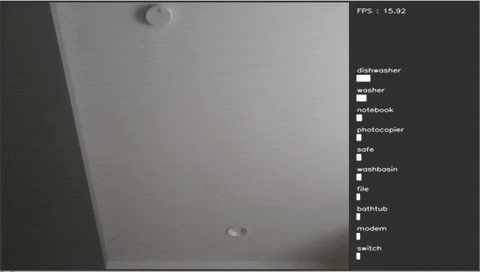
例02.画像分類(Classification)
ソースコード:
[02_classification_demo.py](https://github.com/Kazuhito00/Qiita-AdventCalendar-20201212-OpenCV/blob/main/02_classification_demo.py) (折り畳み内に描画処理を抜粋したものを記載)
def draw_demo_image(
    image,
    classifications,
    display_fps,
):
    image_width, image_height = image.shape[1], image.shape[0]

    cvuiframe = np.zeros((image_height + 6, image_width + 6 + 200, 3),
                         np.uint8)
    cvuiframe[:] = (49, 52, 49)

    # 画像:撮影映像
    display_frame = copy.deepcopy(image)
    cvui.image(cvuiframe, 3, 3, display_frame)

    # 文字列:FPS
    cvui.printf(cvuiframe, image_width + 15, 15, 0.4, 0xFFFFFF,
                'FPS : ' + str(display_fps))

    # 文字列、バー:クラス分類結果
    if classifications is not None:
        for i, classification in enumerate(classifications):
            cvui.printf(cvuiframe, image_width + 15,
                        int(image_height / 4) + (i * 40), 0.4, 0xFFFFFF,
                        classification[1])
            cvui.rect(cvuiframe, image_width + 15,
                      int(image_height / 4) + 15 + (i * 40),
                      int(181 * float(classification[2])), 12, 0xFFFFFF,
                      0xFFFFFF)

    return cvuiframe
例03.顔検出(Face Detection)

ソースコード:
[03_face_detection_demo.py](https://github.com/Kazuhito00/Qiita-AdventCalendar-20201212-OpenCV/blob/main/03_face_detection_demo.py) (折り畳み内に描画処理を抜粋したものを記載)
    # 顔検出 ##############################################################
    dets, lms = centerface(resize_frame,
                           frame_height,
                           frame_width,
                           threshold=0.35)

    # デバッグ表示 ########################################################
    # バウンディングボックス
    for det in dets:
        bbox, _ = det[:4], det[4]  # BBox, Score
        x1, y1 = int(bbox[0]), int(bbox[1])
        x2, y2 = int(bbox[2]), int(bbox[3])

        # 顔の立幅に合わせて重畳画像をリサイズ
        image_height, image_width = images[0].shape[:2]
        resize_ratio = (y2 - y1) / image_height
        resize_image_height = int(image_height * resize_ratio)
        resize_image_width = int(image_width * resize_ratio)

        resize_image_height = int(
            (resize_image_height + (ceil_num - 1)) / ceil_num * ceil_num)
        resize_image_width = int(
            (resize_image_width + (ceil_num - 1)) / ceil_num * ceil_num)
        resize_image_height = int(resize_image_height * image_ratio)
        resize_image_width = int(resize_image_width * image_ratio)

        resize_image = cv.resize(images[animation_counter],
                                 (resize_image_width, resize_image_height))

        # 画像描画
        overlay_x = int((x2 + x1) / 2) - int(resize_image_width / 2)
        overlay_y = int((y2 + y1) / 2) - int(resize_image_height / 2)
        resize_frame = CvOverlayImage.overlay(
            resize_frame, resize_image,
            (overlay_x + x_offset, overlay_y + y_offset))

    animation_counter += 1
    if animation_counter >= len(images):
        animation_counter = 0
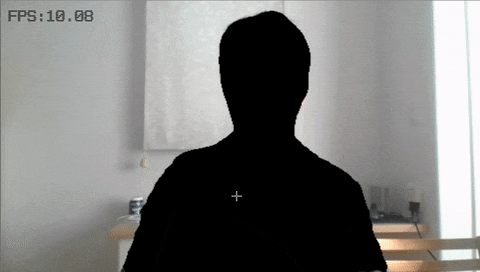
例04.物体検出:手検出(Hand Detection)

ソースコード:
[04_hand_detection_demo.py](https://github.com/Kazuhito00/Qiita-AdventCalendar-20201212-OpenCV/blob/main/04_hand_detection_demo.py) (折り畳み内に描画処理を抜粋したものを記載)
def bba_rotate_dotted_ring3(
        image,
        p1,
        p2,
        color=(255, 255, 205),
        thickness=None,  # unused
        font=None,  # unused
        text=None,  # unused
        fps=10,
        animation_count=0,
):

    draw_image = copy.deepcopy(image)

    animation_count = int(135 / fps) * animation_count

    x1, y1 = p1[0], p1[1]
    x2, y2 = p2[0], p2[1]

    radius = int((y2 - y1) * (5 / 10))
    ring_thickness = int(radius / 20)
    cv.ellipse(draw_image, (int((x1 + x2) / 2), int(
        (y1 + y2) / 2)), (radius, radius), 0 + animation_count, 0, 50, color,
               ring_thickness)
    cv.ellipse(draw_image, (int((x1 + x2) / 2), int(
        (y1 + y2) / 2)), (radius, radius), 80 + animation_count, 0, 50, color,
               ring_thickness)
    cv.ellipse(draw_image, (int((x1 + x2) / 2), int(
        (y1 + y2) / 2)), (radius, radius), 150 + animation_count, 0, 30, color,
               ring_thickness)
    cv.ellipse(draw_image, (int((x1 + x2) / 2), int(
        (y1 + y2) / 2)), (radius, radius), 200 + animation_count, 0, 10, color,
               ring_thickness)
    cv.ellipse(draw_image, (int((x1 + x2) / 2), int(
        (y1 + y2) / 2)), (radius, radius), 230 + animation_count, 0, 10, color,
               ring_thickness)
    cv.ellipse(draw_image, (int((x1 + x2) / 2), int(
        (y1 + y2) / 2)), (radius, radius), 260 + animation_count, 0, 60, color,
               ring_thickness)
    cv.ellipse(draw_image, (int((x1 + x2) / 2), int(
        (y1 + y2) / 2)), (radius, radius), 337 + animation_count, 0, 5, color,
               ring_thickness)

    radius = int((y2 - y1) * (4.5 / 10))
    ring_thickness = int(radius / 10)
    cv.ellipse(draw_image, (int((x1 + x2) / 2), int(
        (y1 + y2) / 2)), (radius, radius), 0 - animation_count, 0, 50, color,
               ring_thickness)
    cv.ellipse(draw_image, (int((x1 + x2) / 2), int(
        (y1 + y2) / 2)), (radius, radius), 80 - animation_count, 0, 50, color,
               ring_thickness)
    cv.ellipse(draw_image, (int((x1 + x2) / 2), int(
        (y1 + y2) / 2)), (radius, radius), 150 - animation_count, 0, 30, color,
               ring_thickness)
    cv.ellipse(draw_image, (int((x1 + x2) / 2), int(
        (y1 + y2) / 2)), (radius, radius), 200 - animation_count, 0, 30, color,
               ring_thickness)
    cv.ellipse(draw_image, (int((x1 + x2) / 2), int(
        (y1 + y2) / 2)), (radius, radius), 260 - animation_count, 0, 60, color,
               ring_thickness)
    cv.ellipse(draw_image, (int((x1 + x2) / 2), int(
        (y1 + y2) / 2)), (radius, radius), 337 - animation_count, 0, 5, color,
               ring_thickness)

    radius = int((y2 - y1) * (4 / 10))
    ring_thickness = int(radius / 15)
    cv.ellipse(draw_image, (int((x1 + x2) / 2), int(
        (y1 + y2) / 2)), (radius, radius), 30 + int(animation_count / 3 * 2),
               0, 50, color, ring_thickness)
    cv.ellipse(draw_image, (int((x1 + x2) / 2), int(
        (y1 + y2) / 2)), (radius, radius), 110 + int(animation_count / 3 * 2),
               0, 50, color, ring_thickness)
    cv.ellipse(draw_image, (int((x1 + x2) / 2), int(
        (y1 + y2) / 2)), (radius, radius), 180 + int(animation_count / 3 * 2),
               0, 30, color, ring_thickness)
    cv.ellipse(draw_image, (int((x1 + x2) / 2), int(
        (y1 + y2) / 2)), (radius, radius), 230 + int(animation_count / 3 * 2),
               0, 10, color, ring_thickness)
    cv.ellipse(draw_image, (int((x1 + x2) / 2), int(
        (y1 + y2) / 2)), (radius, radius), 260 + int(animation_count / 3 * 2),
               0, 10, color, ring_thickness)
    cv.ellipse(draw_image, (int((x1 + x2) / 2), int(
        (y1 + y2) / 2)), (radius, radius), 290 + int(animation_count / 3 * 2),
               0, 60, color, ring_thickness)
    cv.ellipse(draw_image, (int((x1 + x2) / 2), int(
        (y1 + y2) / 2)), (radius, radius), 367 + int(animation_count / 3 * 2),
               0, 5, color, ring_thickness)

    return draw_image
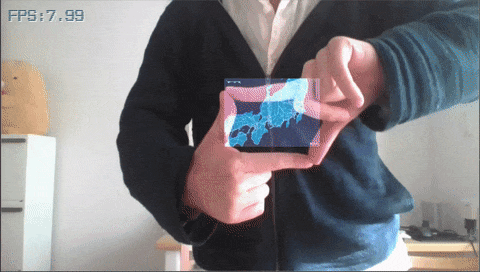
例05.物体検出:フィンガーフレーム検出(FingerFrame Detection)
ソースコード:
[05_finger_frame_detection_demo.py](https://github.com/Kazuhito00/Qiita-AdventCalendar-20201212-OpenCV/blob/main/05_finger_frame_detection_demo.py) (折り畳み内に描画処理を抜粋したものを記載)
    # 検出実施 #############################################################
    frame = frame[:, :, [2, 1, 0]]  # BGR2RGB
    image_np_expanded = np.expand_dims(frame, axis=0)

    output = run_inference_single_image(image_np_expanded, inference_func)

    num_detections = output['num_detections']
    for i in range(num_detections):
        score = output['detection_scores'][i]
        bbox = output['detection_boxes'][i]
        # class_id = output['detection_classes'][i].astype(np.int)

        if score < score_th:
            continue

        # 検出結果可視化 ###################################################
        x1, y1 = int(bbox[1] * frame_width), int(bbox[0] * frame_height)
        x2, y2 = int(bbox[3] * frame_width), int(bbox[2] * frame_height)

        risize_ratio = 0.15
        bbox_width = x2 - x1
        bbox_height = y2 - y1
        x1 = x1 + int(bbox_width * risize_ratio)
        y1 = y1 + int(bbox_height * risize_ratio)
        x2 = x2 - int(bbox_width * risize_ratio)
        y2 = y2 - int(bbox_height * risize_ratio)

        x1 = int((x1 - 5) / 10) * 10
        y1 = int((y1 - 5) / 10) * 10
        x2 = int((x2 + 5) / 10) * 10
        y2 = int((y2 + 5) / 10) * 10

        deque_x1.append(x1)
        deque_y1.append(y1)
        deque_x2.append(x2)
        deque_y2.append(y2)
        x1 = int(sum(deque_x1) / len(deque_x1))
        y1 = int(sum(deque_y1) / len(deque_y1))
        x2 = int(sum(deque_x2) / len(deque_x2))
        y2 = int(sum(deque_y2) / len(deque_y2))

        ret, video_frame = video.read()
        if ret is not False:
            video.grab()
            video.grab()

            debug_add_image = np.zeros((frame_height, frame_width, 3),
                                       np.uint8)
            map_resize_image = cv.resize(video_frame,
                                         ((x2 - x1), (y2 - y1)))
            debug_add_image = CvOverlayImage.overlay(
                debug_add_image, map_resize_image, (x1, y1))
            debug_add_image = cv.cvtColor(debug_add_image,
                                          cv.COLOR_BGRA2BGR)
            # cv.imshow('1', debug_add_image)
            debug_image = cv.addWeighted(debug_image, 1.0, debug_add_image,
                                         2.0, 0)
        else:
            video = cv.VideoCapture('map.mp4')
例06.物体検出:NARUTO 印検出(NARUTO’s Hand Signe Detection)

ソースコード:
[06_naruto_hand_sign_demo.py](https://github.com/Kazuhito00/Qiita-AdventCalendar-20201212-OpenCV/blob/main/06_naruto_hand_sign_demo.py) (折り畳み内に描画処理を抜粋したものを記載)
def draw_debug_image(
    debug_image,
    font_path,
    fps_result,
    labels,
    result_inference,
    score_th,
    erase_bbox,
    use_display_score,
    jutsu,
    sign_display_queue,
    sign_max_display,
    jutsu_display_time,
    jutsu_font_size_ratio,
    lang_offset,
    jutsu_index,
    jutsu_start_time,
):
    frame_width, frame_height = debug_image.shape[1], debug_image.shape[0]

    # 印のバウンディングボックスの重畳表示(表示オプション有効時) ###################
    if not erase_bbox:
        num_detections = result_inference['num_detections']
        for i in range(num_detections):
            score = result_inference['detection_scores'][i]
            bbox = result_inference['detection_boxes'][i]
            class_id = result_inference['detection_classes'][i].astype(np.int)

            # 検出閾値未満のバウンディングボックスは捨てる
            if score < score_th:
                continue

            x1, y1 = int(bbox[1] * frame_width), int(bbox[0] * frame_height)
            x2, y2 = int(bbox[3] * frame_width), int(bbox[2] * frame_height)

            # バウンディングボックス(長い辺にあわせて正方形を表示)
            x_len = x2 - x1
            y_len = y2 - y1
            square_len = x_len if x_len >= y_len else y_len
            square_x1 = int(((x1 + x2) / 2) - (square_len / 2))
            square_y1 = int(((y1 + y2) / 2) - (square_len / 2))
            square_x2 = square_x1 + square_len
            square_y2 = square_y1 + square_len
            cv.rectangle(debug_image, (square_x1, square_y1),
                         (square_x2, square_y2), (255, 255, 255), 4)
            cv.rectangle(debug_image, (square_x1, square_y1),
                         (square_x2, square_y2), (0, 0, 0), 2)

            # 印の種類
            font_size = int(square_len / 2)
            debug_image = CvDrawText.puttext(
                debug_image, labels[class_id][1],
                (square_x2 - font_size, square_y2 - font_size), font_path,
                font_size, (185, 0, 0))

            # 検出スコア(表示オプション有効時)
            if use_display_score:
                font_size = int(square_len / 8)
                debug_image = CvDrawText.puttext(
                    debug_image, '{:.3f}'.format(score),
                    (square_x1 + int(font_size / 4),
                     square_y1 + int(font_size / 4)), font_path, font_size,
                    (185, 0, 0))

    # ヘッダー作成:FPS #########################################################
    header_image = np.zeros((int(frame_height / 18), frame_width, 3), np.uint8)
    header_image = CvDrawText.puttext(header_image, "FPS:" + str(fps_result),
                                      (5, 0), font_path,
                                      int(frame_height / 20), (255, 255, 255))

    # フッター作成:印の履歴、および、術名表示 ####################################
    footer_image = np.zeros((int(frame_height / 10), frame_width, 3), np.uint8)

    # 印の履歴文字列生成
    sign_display = ''
    if len(sign_display_queue) > 0:
        for sign_id in sign_display_queue:
            sign_display = sign_display + labels[sign_id][1]

    # 術名表示(指定時間描画)
    if lang_offset == 0:
        separate_string = '・'
    else:
        separate_string = ':'
    if (time.time() - jutsu_start_time) < jutsu_display_time:
        if jutsu[jutsu_index][0] == '':  # 属性(火遁等)の定義が無い場合
            jutsu_string = jutsu[jutsu_index][2 + lang_offset]
        else:  # 属性(火遁等)の定義が有る場合
            jutsu_string = jutsu[jutsu_index][0 + lang_offset] + \
                separate_string + jutsu[jutsu_index][2 + lang_offset]
        footer_image = CvDrawText.puttext(
            footer_image, jutsu_string, (5, 0), font_path,
            int(frame_width / jutsu_font_size_ratio), (255, 255, 255))
    # 印表示
    else:
        footer_image = CvDrawText.puttext(footer_image, sign_display, (5, 0),
                                          font_path,
                                          int(frame_width / sign_max_display),
                                          (255, 255, 255))

    # ヘッダーとフッターをデバッグ画像へ結合 ######################################
    debug_image = cv.vconcat([header_image, debug_image])
    debug_image = cv.vconcat([debug_image, footer_image])

    return debug_image
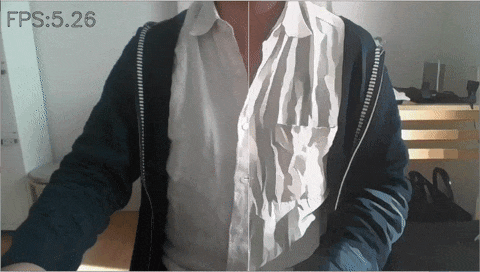
例07.画像セグメンテーション(Semantic Segmentation)
ソースコード:
[07_semantic_segmentation_demo.py](https://github.com/Kazuhito00/Qiita-AdventCalendar-20201212-OpenCV/blob/main/07_semantic_segmentation_demo.py) (折り畳み内に描画処理を抜粋したものを記載)
def create_pascal_label_colormap():
    colormap = np.zeros((256, 3), dtype=int)

    ind = np.arange(256, dtype=int)
    for shift in reversed(range(8)):
        for channel in range(3):
            colormap[:, channel] |= ((ind >> channel) & 1) << shift
        ind >>= 3

    colormap[15] = [0, 0, 0]

    return colormap


def create_pascal_label_personmask():
    colormap = np.zeros((256, 3), dtype=int)

    colormap[15] = [255, 255, 255]

    return colormap


def label_to_color_image(label):
    colormap = create_pascal_label_colormap()

    return colormap[label]


def label_to_person_mask(label):
    colormap = create_pascal_label_personmask()

    return colormap[label]


def draw_demo_image(
        image,
        segmentation_map,
        display_fps,
        inf_size=(480, 320),
):
    # フォント
    font_path = './utils/font/x12y20pxScanLine.ttf'

    # ピクセル塗りつぶし
    image_width, image_height = image.shape[1], image.shape[0]

    draw_image = copy.deepcopy(image)
    draw_image = cv.resize(draw_image, inf_size)

    seg_image = label_to_color_image(segmentation_map).astype(np.uint8)
    seg_mask = label_to_person_mask(segmentation_map).astype(np.uint8)

    draw_image = np.where(seg_mask == 255, seg_image, draw_image)

    draw_image = cv.resize(draw_image, (image_width, image_height))

    # FPS描画
    fps_string = u"FPS:" + str(display_fps)
    draw_image = CvDrawText.puttext(draw_image, fps_string, (15, 15),

    return draw_image
例08.画像変換:White-box-Cartoonization(Style Transfer:White-box-Cartoonization)
ソースコード:
[08_style_transfer_demo.py](https://github.com/Kazuhito00/Qiita-AdventCalendar-20201212-OpenCV/blob/main/08_style_transfer_demo.py) (折り畳み内に描画処理を抜粋したものを記載)
    # カメラキャプチャ #####################################################
    ret, frame = cap.read()
    if not ret:
        continue
    frame_width, frame_height = frame.shape[1], frame.shape[0]
    debug_image = copy.deepcopy(frame)

    # 変換実施 #############################################################
    out = session_run(sess, debug_image, input_photo, final_out)

    # 画面反映 #############################################################
    cvwindow.imshow(frame, out, fps=display_fps)
おわりに
本来は、デザイナーさんやUI作る人とガッツリチーム組めると良いのですが、、、
そーいうのが無理な時は○○さん曰く、以下だけでも意識してみると良いかも。だそうです。
・デフォルトのフォントを使わない
・画像系のデモでちょいちょい見るG:255みたいな色は避ける
→Webセーフカラーとか流行色使ってみるとか
次は、12/13:@shinnkun様の「アイトラッカー作ってみた.」です。
以上。