オープンソースのツールを使って、OpenStreetMap のデータから POI だけのベクトルタイルをビルドします。
著作権の帰属
© OpenStreetMap contributors
https://www.openstreetmap.org/copyright
この投稿では OpenStreetMap のデータを利用しています。データの著作権は OpenStreetMap の貢献者に帰属しています。
実行環境
この投稿の内容は以下の環境で試しています。
$ system_profiler SPHardwareDataType
Hardware:

    Hardware Overview:

      Model Name: MacBook Pro
      Model Identifier: MacBookPro14,2
      Processor Name: Dual-Core Intel Core i7
      Processor Speed: 3.5 GHz
      Number of Processors: 1
      Total Number of Cores: 2
      L2 Cache (per Core): 256 KB
      L3 Cache: 4 MB
      Hyper-Threading Technology: Enabled
      Memory: 16 GB
$ node -v
v10.20.1
OpenStreetMap のデータを入手する
まずは OpenStreetMap のデータを入手しましょう。今回は、 GeoFabrikというドイツのOpenStreetMapのコンサルティング会社がホストしてくれているデータを利用してみます。
なお、ダウンロードページにデータの注釈として GDPR 関係の興味深いことが書かれていました。
The OpenStreetMap data files provided on this server do not contain the user names, user IDs and changeset IDs of the OSM objects. These metadata fields contain personal information about the OpenStreetMap contributors and are subject to data protection regulations in the European Union. Please note that these regulations apply even to processing that happens outside the European Union because some OpenStreetMap contributors live in the European Union.
Extracts with full metadata are available to OpenStreetMap contributors only.
GeoFabrik が提供する OpenStreetMap のデータにはユーザー名・ユーザーID・OSMオブジェクトの更新履歴などは含まれておらず、これらのデータは個人情報を含んでいて EU の GDPR の対象とのこと。
OpenStreetMapのデータのダウンロード
全世界のデータをダウンロードすると膨大な量になってしまうので、今回は日本のデータのみを扱います。
http://download.geofabrik.de/asia/japan.html

環境の用意
npm の環境を用意し、 node-osmium を利用可能にします。
node-osmium は OpenStreetMap を扱うためのライブラリ Osmiumの JavaScript バインディングです。
$ mkdir sandbox-osmium
$ cd sandbox-osmium
$ yarn init -y # or npm init -y
$ yarn add osmium # or npm install osmium -S
ダウンロードしたデータを npm 環境下に置いて利用可能にしておきます。
$ mkdir data
$ cp ~/Downloads/japan-latest.osm.pbf ./data/
データを読んでみる
OpenStreetMap のデータは node、 way、 relation という3種類の要素があります。
https://wiki.openstreetmap.org/wiki/JA:要素
ノード(node、空間に地点を定義するもの)
ウェイ(way、線形の地物や範囲の境界線を定義するもの)
リレーション(relation、他の要素と共に使われていることを表すために使用されるもの)
今回は POI に関心があるので node エレメントだけを扱い、座標と タグ を抽出してみます。
ファイルの読み込みには、 osmium.Reader クラス、データの走査には osmium.Handler クラスを使います。
const osmium = require('osmium')
const path = require('path')

const input = path.join(__dirname, 'data', 'japan-latest.osm.pbf')
const reader = new osmium.Reader(input);

const handler = new osmium.Handler();
handler.on("init", () => console.log("init"));
// node エレメントを走査するハンドラーを定義
handler.on("node", (node) => {
  // node の座標を取得
  const { coordinates } = node.geojson();
  // node のタグを取得
  const tags = node.tags();
  // とりあえず座標とタグをダンプ
  console.log(JSON.stringify({ coordinates, tags }))
});

// 走査開始
osmium.apply(reader, handler);

console.log('done')
実行すると座標とタグがダンプされました。
$ node index.js
...
{"coordinates":[139.7382085,35.6339939],"tags":{"name":"高輪二丁目","source":"image,2013-04;Bing","highway":"traffic_signals","name:en":"Takanawa 2-chome"}}
{"coordinates":[139.7377937,35.6323339],"tags":{}}
{"coordinates":[139.7377035,35.6317522],"tags":{}}
{"coordinates":[139.7375975,35.6290462],"tags":{"name":"品川駅前","highway":"traffic_signals","name:en":"Shinagawa Sta.","name:ja":"品川駅前"}}
{"coordinates":[139.7376053,35.628689],"tags":{"name":"品川駅前","highway":"traffic_signals","name:en":"Shinagawa Sta.","name:ja":"品川駅前"}}
{"coordinates":[139.7376599,35.6275069],"tags":{}}
{"coordinates":[139.7380343,35.6258971],"tags":{}}
{"coordinates":[139.7434818,35.6446537],"tags":{}}
{"coordinates":[139.7428284,35.6439081],"tags":{"source":"Bing 2010","highway":"crossing"}}
{"coordinates":[139.7426085,35.6436324],"tags":{}}
{"coordinates":[139.7413832,35.6415812],"tags":{}}
{"coordinates":[139.7407889,35.6402207],"tags":{"name":"高輪大木戸跡","highway":"traffic_signals","name:en":"Okidoato","name:ja":"高輪大木戸跡"}}
{"coordinates":[139.7392581,35.6373758],"tags":{}}
{"coordinates":[139.7376311,35.6322775],"tags":{}}
{"coordinates":[139.7375575,35.6317716],"tags":{}}
{"coordinates":[139.7374549,35.6290127],"tags":{"name":"品川駅前","highway":"traffic_signals","name:en":"Shinagawa Sta.","name:ja":"品川駅前"}}
{"coordinates":[139.7374648,35.6287259],"tags":{"name":"品川駅前","highway":"traffic_signals","name:en":"Shinagawa Sta.","name:ja":"品川駅前"}}
{"coordinates":[139.7375486,35.6273358],"tags":{}}
{"coordinates":[139.7376569,35.6267787],"tags":{}}
{"coordinates":[139.7382241,35.6251844],"tags":{}}
...
なお、タグが空のものは、おそらく way 要素を構成する node です。
https://wiki.openstreetmap.org/wiki/JA:要素
ノードはウェイの形を定義するためにも使用されます。ウェイの点として使用される場合、ノードはふつうタグを持ちませんが、持つ場合もあります。例えば、 highway=traffic_signals は道路上の信号を表し、 power=tower は電力線の鉄塔を表します。
これらについては以降はフィルターして取り除き、残りのデータを POI を表すものとして扱います。
データを ndjson 形式に変換する
これらの POI のデータをベクトルタイルに変換する場合は、行区切りで扱える ndjson 形式 が便利です。ベクトルタイルに変換する前処理として ndjson 形式の GeoJSON に変換しておきます。
// index.js
const osmium = require("osmium");
const path = require("path");
const fs = require("fs");

const input = path.join(__dirname, "data", "japan-latest.osm.pbf");
const reader = new osmium.Reader(input);

// 出力ファイルを open
const output = path.join(__dirname, "out.ndjson");
const fd = fs.openSync(output, "a");

const handler = new osmium.Handler();
handler.on("init", () => console.log("init"));
// node エレメントを走査するハンドラーを定義
handler.on("node", (node) => {
  const tags = node.tags();
  // name タグを持つ node のみをピックアップ
  if (Object.keys(tags).includes("name")) {
    // GeoJSON のフォーマット
    const feature = {
      type: "Feature",
      properties: tags,
      geometry: node.geojson(),
    };
    // GeoJSON を行区切りで append する
    fs.appendFileSync(fd, JSON.stringify(feature) + "\n", "utf8");
  }
});

// 走査開始
osmium.apply(reader, handler);
fs.closeSync(fd);
console.log("done");
実行すると out.ndjson というファイルが生成されます。
私の環境だと10分くらいで終わりました。
$ less out.ndjson
...
{"type":"Feature","properties":{"name":"永山橋","highway":"traffic_signals","name:en":"Nagayamabashi","name:ja":"永山橋"},"geometry":{"type":"Point","coordinates":[139.4461628,35.6347877]}}
{"type":"Feature","properties":{"highway":"traffic_signals","name":"乞田新大橋","name:ja":"乞田新大橋","name:ja_rm":"Kotta Shin-ohashi"},"geometry":{"type":"Point","coordinates":[139.4425513,35.6329902]}}
{"type":"Feature","properties":{"highway":"traffic_signals","name":"貝取","name:en":"Kaidori","name:ja":"貝取"},"geometry":{"type":"Point","coordinates":[139.4426189,35.6202553]}}
{"type":"Feature","properties":{"highway":"traffic_signals","name":"多摩卸売市場前","name:en":"Tama oroshiurishijo"},"geometry":{"type":"Point","coordinates":[139.4429641,35.6111579]}}
{"type":"Feature","properties":{"highway":"traffic_signals","name":"南豊ヶ丘フィールド前","name:en":"Minamitoyogaoka Field","name:ja":"南豊ヶ丘フィールド前"},"geometry":{"type":"Point","coordinates":[139.4327976,35.6098895]}}
{"type":"Feature","properties":{"highway":"traffic_signals","name":"小野路配水場前","name:ja":"小野路配水場前"},"geometry":{"type":"Point","coordinates":[139.4295148,35.6091251]}}
{"type":"Feature","properties":{"highway":"traffic_signals","name":"多摩鶴牧六丁目","name:en":"Tamatsurumaki 6","name:ja":"多摩鶴牧六丁目"},"geometry":{"type":"Point","coordinates":[139.4156993,35.6124594]}}
{"type":"Feature","properties":{"highway":"traffic_signals","name":"多摩市総合福祉センター前","name:en":"Tama-shi Sogo Fukushi Center"},"geometry":{"type":"Point","coordinates":[139.4120305,35.6130059]}}
{"type":"Feature","properties":{"highway":"traffic_signals","name":"那古船形駅入口","name:en":"Nakofunakata Sta. Ent."},"geometry":{"type":"Point","coordinates":[139.851108,35.0268381]}}
{"type":"Feature","properties":{"highway":"traffic_signals","name":"自衛隊前"},"geometry":{"type":"Point","coordinates":[139.8416552,34.9843497]}}
{"type":"Feature","properties":{"highway":"traffic_signals","name":"宮城"},"geometry":{"type":"Point","coordinates":[139.8418161,34.9831903]}}
...
Tippecanoe を使ってベクトルタイルをビルドする
Tippecanoe は GeoJSON等 からベクトルタイルをビルドするためのオープンソースのツールセットです。以下の README に従ってインストールしておきます。
https://github.com/mapbox/tippecanoe
Tippecanoe には膨大な数のオプションがありますが、とりあえずGeoJSON をビルドするだけなら簡単です。README に従って以下のコマンドで mbtiles ファイルを生成します。 処理は5分ほどで終わりました。
$ tippecanoe -zg -o ./out.mbtiles --drop-densest-as-needed ./out.ndjson
TileServer GL を使って生成した mbtiles をプレビューする
TileServer GL はオープンソースのベクトルタイルサーバーです。README に従ってインストールしておきます。
https://github.com/maptiler/tileserver-gl
以下のコマンドでベクトルタイルをプレビューできます。
$ tileserver-gl ./out.mbtiles
8080 番ポートでプレビューサーバーが立ち上がります。

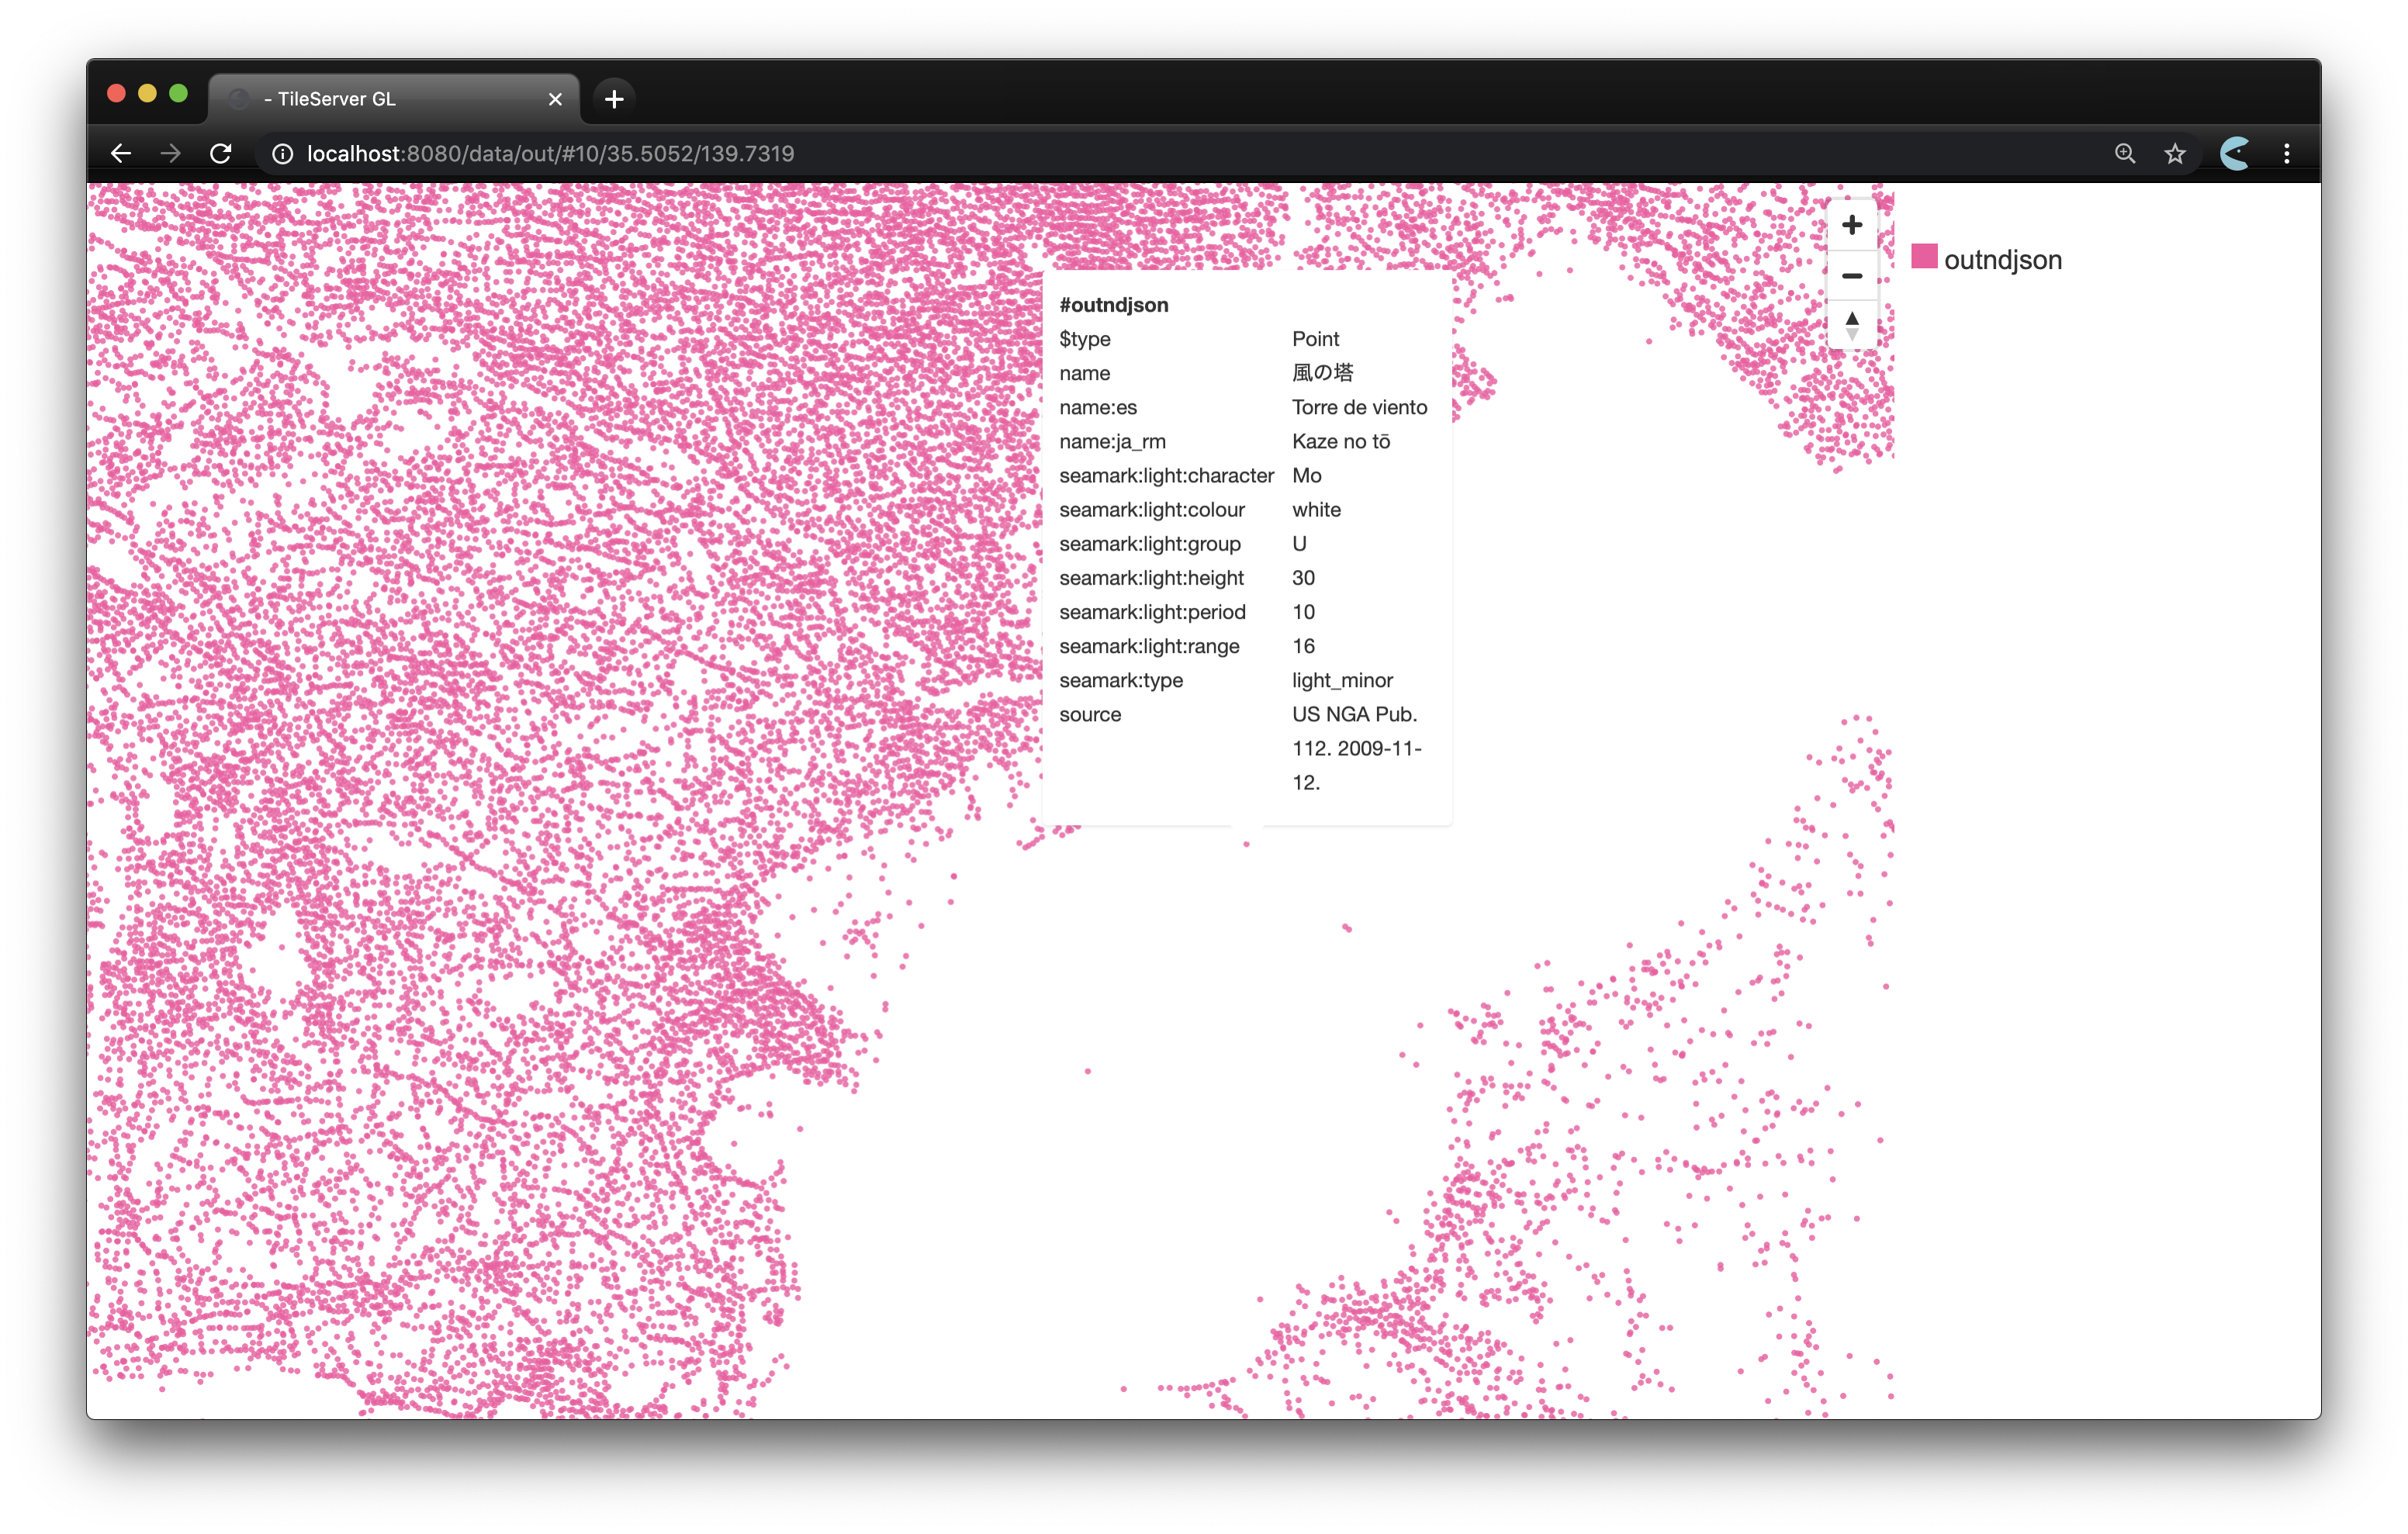
できました。
他のベクトルタイルと共存させるなど、いろいろな使い道が考えられますね。