はじめに
みなさん、精進する際にどの問題を解くか迷ったことはありませんか?
自分はまだ解いていない問題を見てしまうと、あれもこれも解かねば...と考え、無駄に労力を使ってしまうことがあります。そんな時、今から解く1問を無作為に決めてくれるbotがあれば、解く問題を決める時間を省けるのではないかと思い、botの作成に取り組むことにしました。
本記事では、作成したbotの仕様と開発した際の流れについて、まとめるものとします。
なお、執筆者は開発経験が浅く、また記事の初投稿でもありますので、拙い箇所がある可能性がありますが、その点ご了承いただければと思います。
目次
- botの仕様
- 開発環境
- 開発の流れ
1. botの仕様
今回作成したものは「AtCoderの問題を1問無作為に返すdiscord bot」です。
仕様は以下のように設定しました。
-
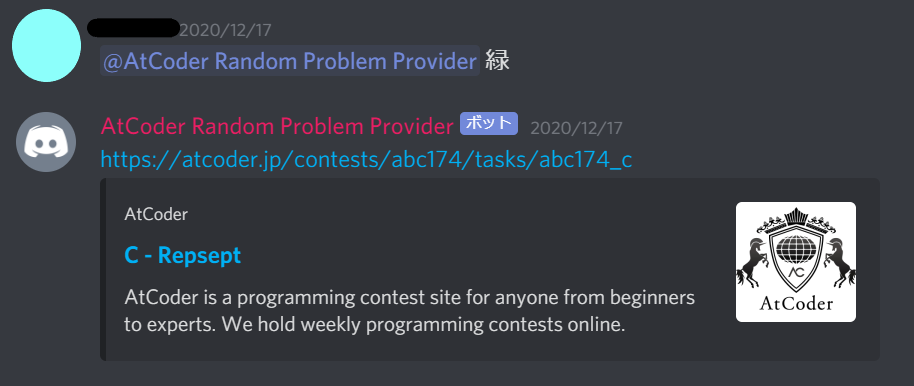
@でメンションすると、問題を1問選び、そのURLを返す - 返す問題はABC,ARC,AGCの中から選ばれる
- 引数で問題の難易度を指定できる
- 数値指定(下限, 上限の順 / 指定しない時はdef)
- 例.
@bot 300 800
- 例.
- 色指定(灰, 茶, 緑, 水,... / GRY, BWN, GRN, AQU, ... などの色の3文字略称も可)
- 例.
@bot 茶
- 例.
- 指定しない場合は全範囲から選ばれる
- 数値指定(下限, 上限の順 / 指定しない時はdef)
2. 開発環境
Ubuntu 18.04 (VirtualBox, ホストOSはWindows10)
Python 3.7.5
discord.py-1.5.1
3. 開発の流れ
開発は大まかに以下の流れで進めました。
- discord botの設定
- discord.pyのインストール
- 各種機能の実装
- herokuへのデプロイ
1. discord botの設定
はじめにDiscord側でbotアカウントを作成しました。
流れは以下のページの手順に沿っています。
https://qiita.com/1ntegrale9/items/cb285053f2fa5d0cccdf
簡単にまとめると、
- DEVELOPER PORTALにログイン
- botアカウントを作成
- botの初期設定
- アクセストークンの取得
のような流れで進めました。
2. discord.pyのインストール
ここからはPython側でbotの中身を実装していくことになります。
以降の流れは以下のページに沿って行いました。
https://qiita.com/1ntegrale9/items/9d570ef8175cf178468f
discord.pyのインストールは以下のように行いました。
$ python3 -m pip install -U "discord.py[voice]"
そして、原形となるコードを作成し、discordbot.pyという名前で保存しました。
import discord

TOKEN = '作成したBotのアクセストークン'

client = discord.Client()

# 起動時に動作する処理
@client.event
async def on_ready():
    print('login')

# メッセージ受信時に動作する処理
@client.event
async def on_message(message):
    # メッセージ送信者がBotだった場合は無視する
    if message.author.bot:
        return
    # 「/neko」と発言したら「にゃーん」が返る処理
    if message.content == '/neko':
        await message.channel.send('にゃーん')

# Botの起動とDiscordサーバーへの接続
client.run(TOKEN)
Botの起動確認は以下のようにして行います。
$ python3 discordbot.py
3. 各種機能の実装
- 問題選定
問題選定は、コンテストの種類(ABC, ARC, AGC)の決定、コンテスト番号(第何回か)の決定、問題番号(A~F問題)の決定、URLの生成の順に処理を行い、選定しています。
それぞれ対応する関数は以下のように作成しました。
def get_contest_kind():
  n = random.randint(1,10000)
  div = 6
  brg = n%div
  log(brg)

  contest_kind = 'a'
  if brg == 0:
    contest_kind += 'g'
  elif brg == 1 or brg == 2 :
    contest_kind += 'r'
  else:
    contest_kind += 'b'
  contest_kind += 'c'
  return contest_kind
def get_contest_number(kind):
  contest_num = 0
  if kind == 'abc':
    contest_num = random.randint(1,contest_max_abc)
  elif kind == 'arc':
    contest_num = random.randint(1,contest_max_arc)
  else:
    contest_num = random.randint(1,contest_max_agc)
  contest_num_string = str(contest_num)
  contest_num_string = contest_num_string.zfill(3)
  return contest_num_string
def get_problem_number():
  n = random.randint(0,5)
  problem_number = chr(ord('a')+n)
  return problem_number
def get_url(c_str,p_str):
  url = 'https://atcoder.jp/contests/' + c_str + '/tasks/' + p_str
  return url
コンテストの種類やコンテスト番号、問題番号は乱数で選択するようにしています。
コンテストの種類は0から10000の間の乱数を生成し、その数を6で割った余りによって場合分けをして決定しています。ABC, ARC, AGCのコンテスト数の比はおおよそ5:3.5:1.5であったため、このようにしています(もっと良い方法はあると思います)。
問題URLの生成では、AtCoderのURLの命名規則に沿って文字列を連結させています。
最終的にはこれらの処理をまとめて、generate関数にて問題選定を行っています。
def generate(message):
  json_load = data

  print(message.content)
  args = message.content.split()

  lower = -10000
  upper = 10000

  if len(args) >= 2:
    if args[1] == 'help' or args[1] == 'ヘルプ':
      return help

    if args[1] != 'def':
      if args[1] == 'GRY' or args[1] == '灰':
        upper = 399
      elif args[1] == 'BRN' or args[1] == '茶':
        lower = 400
        upper = 799
      elif args[1] == 'GRN' or args[1] == '緑':
        lower = 800
        upper = 1199
      elif args[1] == 'AQU' or args[1] == '水':
        lower = 1200
        upper = 1599
      elif args[1] == 'BLU' or args[1] == '青':
        lower = 1600
        upper = 1999
      elif args[1] == 'YEL' or args[1] == '黃':
        lower = 2000
        upper = 2399
      elif args[1] == 'ORN' or args[1] == '橙':
        lower = 2400
        upper = 2799
      elif args[1] == 'RED' or args[1] == '赤':
        lower = 2800
        upper = 3199
      elif args[1] == 'SIL' or args[1] == '銀':
        lower = 3200
        upper = 3599
      elif args[1] == 'GLD' or args[1] == '金':
        lower = 3600
      else:
        if args[1].isdecimal():
          lower = int(args[1])
    if len(args) >= 3:
      if args[2] != 'def':
        if args[2].isdecimal():
          upper = int(args[2])

  if lower > upper:
    error('difficulty setting error')
    return

  log('lower limit:'+str(lower))
  log('upper limit:'+str(upper))

  s = ''
  sc = ''
  search_count = 0
  search_limit = 1000
  search_flag = False
  while search_count < search_limit:
    sc = get_contest_kind()
    sc += get_contest_number(sc)
    sn = get_problem_number()
    s = sc + '_' + sn
    if s in json_load:
      difficulty = json_load[s].get('difficulty','not found')
      if difficulty == 'not found':
        log('difficulty not found')
        continue
      if lower <= difficulty and difficulty <= upper:
        print(json_load[s]['difficulty'])
        break
    else:
      log('problem not found')
    search_count += 1
    if search_count == search_limit:
      search_flag = True

  log('')

  if search_flag:
    return ''

  url = get_url(sc,s)
  print(url)

  return url
generate関数ではおおよそ、メッセージの内容に応じて選ぶ問題難易度の上限・下限を設定し、その後条件を満たす問題を乱択で探すという動作をしています。問題を探す回数は上限を決めており、上限数だけ探しても問題が見つからない場合は、何も返さないという動作をします。
- 入力受付
botがメッセージを受け取った際の処理は以下の関数で対応するようにしています。
# メッセージ受信時に動作する処理
@client.event
async def on_message(message):
    if client.user in message.mentions:
        await reply(message)
async def reply(message):
    url = generate(message)
    reply = url
    if reply != '':
      await message.channel.send(reply)
メッセージを受け取った際には、その内容を引数として自作のreply関数を呼び出しています。
reply関数内ではgenerate関数によってメッセージの内容に対応した文字列を生成し、その文字列が空文字列でなければチャンネルに送信するといった動作を設定しています。
- AtCoder Problems APIの取得
APIの取得は以下の自作関数により行いました。
def get_atcoder_problems_api():
  global data
  time.sleep(1)
  resp = requests.get('https://kenkoooo.com/atcoder/resources/problem-models.json')
  json_load = resp.json()
  data = resp.json()
この関数では、HTTPのGETメソッドによりAPIを取得し、取得したjson形式のデータをPythonの辞書型としてグローバル変数dataに格納しています。
4. herokuへのデプロイ
デプロイについても、上記のページに引き続き行いました。
該当箇所は以下の所からになります。
Botを24時間365日稼働させる
なお、Procfileは以下のように設定しています。
worker: python3.7 discordbot.py
Procfileはサーバが実行するプロセス名と実行されるコマンドの対を記すファイルです。このBotでは起動時にAtCoder ProblemsのAPIを読み込むため、プロセス名をworkerとする必要があります。プロセス名をwebとしても動作しましたが、アプリが頻繁にクラッシュしてしまうため、プロセス名をworkerとしています。
参考:https://stackoverflow.com/questions/51984638/discord-app-error-r10-when-deploying-with-heroku
終わりに
今回作成したbotは以下のリンクから招待することができます。
Discord Bot: AtCoder Random Provider
ご希望の方はぜひご利用ください。
また、詳細なソースコードはGitHubにありますので、興味のある方はご覧ください。
GitHub: AtCoder Random Provider
このbotにはまだまだ改善の余地があると思われるため、今後も改良を進めていく予定です。何かご意見等のある方がいましたら、ご連絡ください。
本記事を最後までご精読いただき、ありがとうございました。
参考文献
Discord上でのbot作成
https://note.com/exteoi/n/nf1c37cb26c41#s8rK8
https://qiita.com/1ntegrale9/items/cb285053f2fa5d0cccdf
各種機能の実装、デプロイ周り
https://qiita.com/1ntegrale9/items/9d570ef8175cf178468f
AtCoder Problemsのドキュメント
https://github.com/kenkoooo/AtCoderProblems/blob/master/doc/api.md
