この記事は ASP.NET マスターページをつかってページ遷移する
基本的なサービスを試します
やること
- ページを2枚用意して、マスターページのコントロールからお互いに遷移します。
使用環境
- OS : Windows 10 Home (1809 ,OS ビルド: 17763.864 )
- VisualStduio 2017
- .net Framework 4 以降
プロジェクトの準備
VisualStduio の「ファイル」メニューから
「新規作成」「プロジェクト」を選択します。
「新しいプロジェクト」ダイアログで
ASP.net Web アプリケーション(.NET Framework) を選択し
ファイルの保存先を適切に設定します。

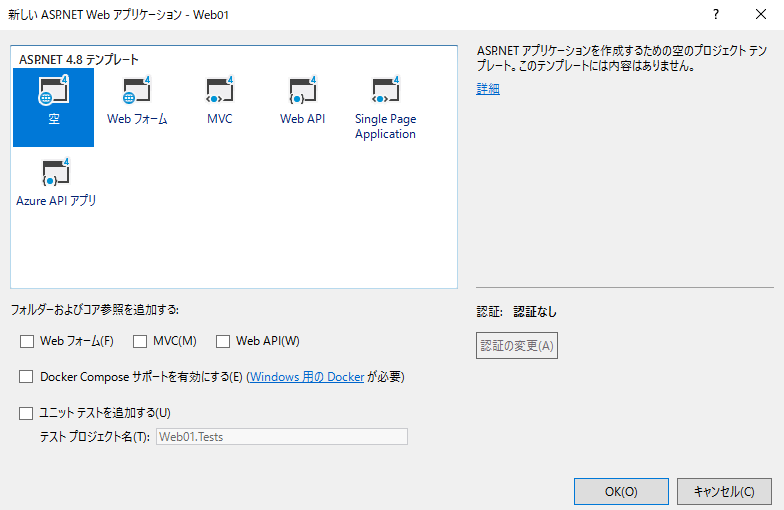
テンプレートの選択
新しいWebページのテンプレートは「空」を選択します。
マスターページの追加
ソリューションエクスプローラのプロジェクトを右クリックし、新しい項目の追加を選択します。
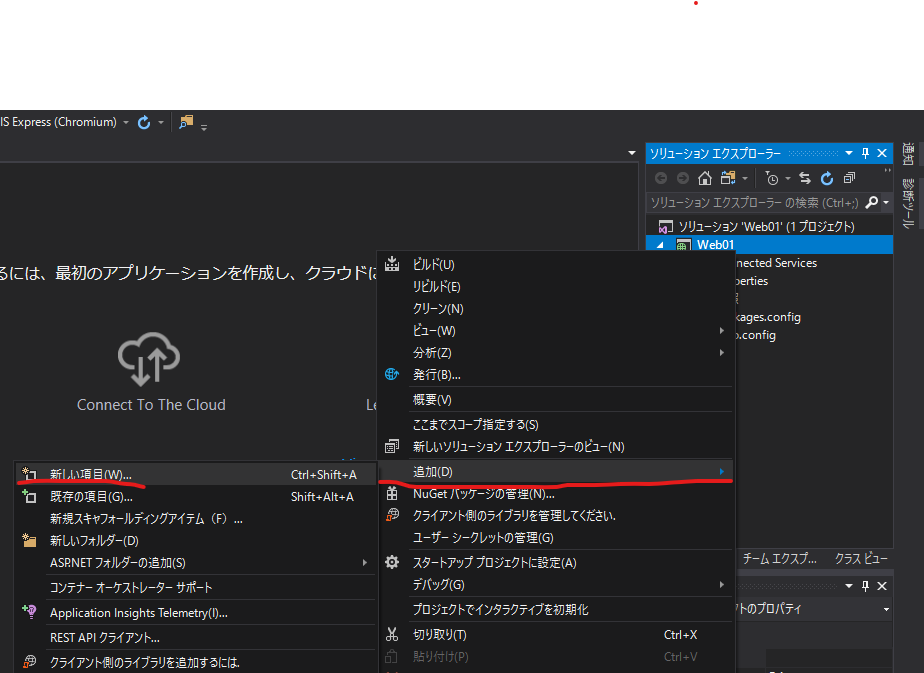
新しい項目の追加 で「Webフォームのマスターページ」を選択します

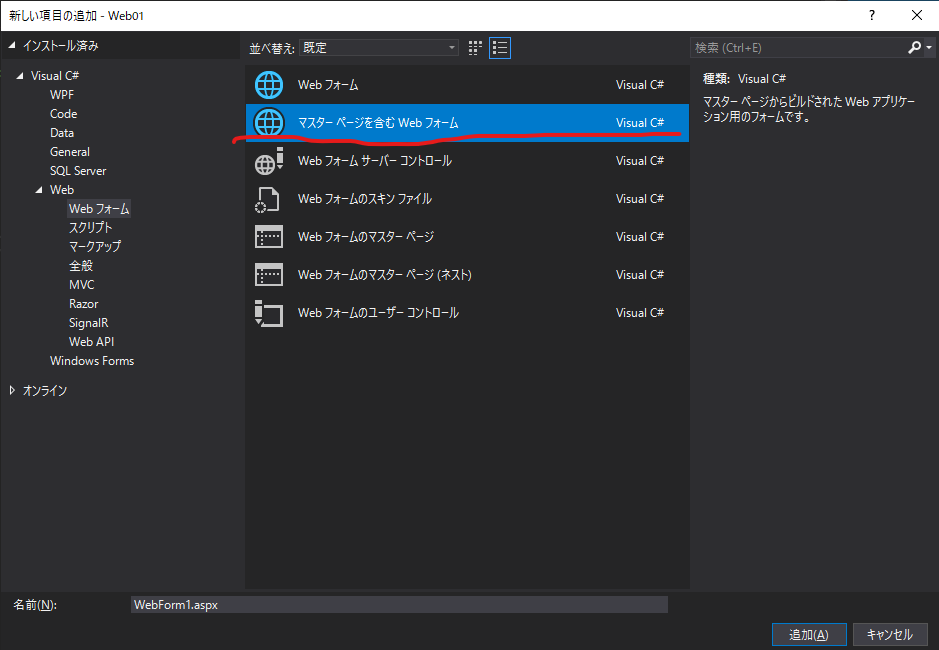
コンテンツの 追加
ソリューションエクスプローラのプロジェクトを右クリックし、新しい項目の追加を選択します。
新しい項目の追加で「マスターページを含む Web フォーム」を選択します
マスターページのソース変更
Site1.Master
<%@ Master Language="C#" AutoEventWireup="true" CodeBehind="Site1.master.cs" Inherits="Web01.Site1" %>

<!DOCTYPE html>

<html>
<head runat="server">
<meta http-equiv="Content-Type" content="text/html; charset=utf-8"/>
    <title></title>
    <asp:ContentPlaceHolder ID="head" runat="server">
    </asp:ContentPlaceHolder>
</head>
<body>
    <form id="form1" runat="server">
        マスターページ
        <hr />
        <asp:Button ID="Button1" runat="server" Text="ページ1" OnClick="Button1_Click" />
        <asp:Button ID="Button2" runat="server" Text="ページ2" OnClick="Button2_Click" />
        <hr />
        <div>
            <asp:ContentPlaceHolder ID="ContentPlaceHolder1" runat="server">
            </asp:ContentPlaceHolder>
        </div>
    </form>
</body>
</html>
Site1.Master.cs
using System;
using System.Collections.Generic;
using System.Linq;
using System.Web;
using System.Web.UI;
using System.Web.UI.WebControls;

namespace Web01
{
    public partial class Site1 : System.Web.UI.MasterPage
    {
        protected void Page_Load(object sender, EventArgs e)
        {

        }

        protected void Button1_Click(object sender, EventArgs e)
        {
            Response.Redirect("WebForm1.aspx");
        }

        protected void Button2_Click(object sender, EventArgs e)
        {
            Response.Redirect("WebForm2.aspx");
        }
    }
}
コンテンツのソース変更
WebForm1.aspx
<%@ Page Title="" Language="C#" MasterPageFile="~/Site1.Master" AutoEventWireup="true" CodeBehind="WebForm1.aspx.cs" Inherits="Web01.WebForm1" %>
<asp:Content ID="Content1" ContentPlaceHolderID="head" runat="server">
</asp:Content>
<asp:Content ID="Content2" ContentPlaceHolderID="ContentPlaceHolder1" runat="server">
    ページ1
</asp:Content>
WebForm2.aspx
<%@ Page Title="" Language="C#" MasterPageFile="~/Site1.Master" AutoEventWireup="true" CodeBehind="WebForm1.aspx.cs" Inherits="Web01.WebForm1" %>
<asp:Content ID="Content1" ContentPlaceHolderID="head" runat="server">
</asp:Content>
<asp:Content ID="Content2" ContentPlaceHolderID="ContentPlaceHolder1" runat="server">
    ページ2
</asp:Content>
実行
ボタン「ページ1」と「ページ2」をクリックすると
それぞれボタンの下に、
"ページ1" "ページ2" と表示されることを確認します
