必要なライブラリ
今回使うのは以下のライブラリで,animationを使って動画を生成します。なお,動画の保存にはImagemagickというソフトが必要なので,動画を保存したい場合はこちらを参考にすると良いです。
import numpy as np
import matplotlib.pyplot as plt
import matplotlib.animation as animation
from mpl_toolkits.mplot3d import Axes3D
from tqdm import tqdm
衛星コンステレーションクラス
以下がStarlinkのような衛星コンステレーションの位置を計算するクラスです。各変数は
- E_R : 地球半径
- E_O : 衛星高度
- num_Sat_per_orb : 1軌道あたりの衛星数
- num_Orb : 軌道数
- omega : 軌道傾斜角
- ite : 繰り返し数
- dt : タイムステップ
です。軌道としては,同じ赤道からの傾斜角を持ち昇交点赤経が等間隔で配置されている下図のような軌道を想定しています。(軌道面が3つの場合)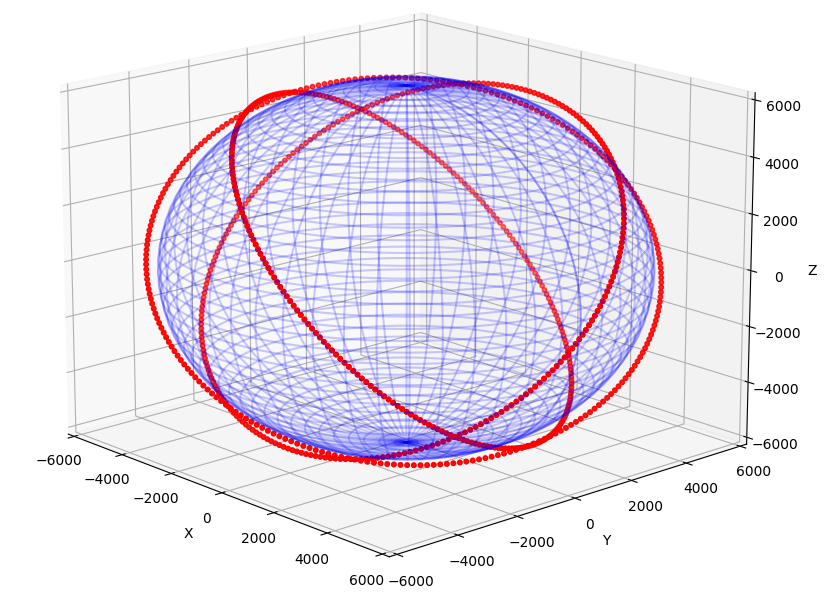
class SatConste():
    def __init__(self, E_R, EO, num_Sat_per_Orb, num_Orb, omega, ite, dt) -> None:
        self.EO_R            = E_R + EO
        self.E_mass          = 5.972e24
        self.G               = 6.67430e-20
        self.num_Sat_per_Orb = num_Sat_per_Orb
        self.num_Orb         = num_Orb
        self.omega           = omega
        self.theta           = np.pi / self.num_Orb
        self.rad_vel         = np.sqrt(self.G * self.E_mass / self.EO_R**3)
        self.ite             = ite
        self.dt              = dt

    def _sat_pos(self, sat_pos, t):
        v_t = np.zeros((self.num_Orb * self.num_Sat_per_Orb, 3))
        for i in range(self.num_Orb):
            for j in range(self.num_Sat_per_Orb):
                i_a, OMEGA, w = self.omega, self.theta * i, self.rad_vel * t + np.pi / self.num_Sat_per_Orb * j

                OMEGA_rot = np.array([[np.cos(OMEGA), -np.sin(OMEGA), 0],
                                      [np.sin(OMEGA), np.cos(OMEGA),  0],
                                      [0,             0,              1]])

                i_rot = np.array([[1, 0,           0],
                                  [0, np.cos(i_a), -np.sin(i_a)],
                                  [0, np.sin(i_a), np.cos(i_a)]])

                w_rot = np.array([[np.cos(w), -np.sin(w), 0],
                                  [np.sin(w), np.cos(w),  0],
                                  [0,         0,          1]])

                v_ang = np.array([-2 * self.EO_R * self.rad_vel * np.sin(2 * w),
                                  2 * self.EO_R * self.rad_vel * np.cos(2 * w),
                                  0])

                v_t[i * self.num_Sat_per_Orb + j] = OMEGA_rot @ i_rot @ w_rot @ v_ang

                x = self.EO_R * np.cos(w)
                y = self.EO_R * np.sin(w)

                sat_pos[i * self.num_Sat_per_Orb + j] = OMEGA_rot @ i_rot @ w_rot @ np.array([x, y, 0])

        return sat_pos, v_t

    def sat_con(self):
        sat_pos = np.zeros((self.num_Orb * self.num_Sat_per_Orb, 3))
        pos_rec = np.zeros((self.ite+1, self.num_Orb * self.num_Sat_per_Orb, 3))
        sat_pos, v_0 = self._sat_pos(sat_pos, 0)
        pos_rec[0] = sat_pos
        for i in tqdm(range(self.ite)):
            t = i * self.dt
            sat_pos, sat_v = self._sat_pos(sat_pos, t)
            """
            for j in range(self.num_Orb * self.num_Sat_per_Orb):
                if self._judge_close(sat_pos, j):
                   sat_v[j] += self._collision_avoid(sat_pos, j)
            """
            #velosityを使ってルンゲクッタで伝播させたい
            pos_rec[i+1] = sat_pos

        return pos_rec
各関数について
sat_posでは以下の2ステップに分けて処理しています。
- 1つの軌道面に注目し,その軌道面上での時刻tでの各衛星の配置を計算(計算回数はnum_Sat_per_Orb)し,回転行列を使って地球中心慣性座標系に変換
- それを各軌道面に対して行う(計算回数はnum_Orb)
単純に位置を時間の関数として出力するだけで摂動や地球が楕円体であることなどは考慮していません。(全て円軌道)
sat_conでは時刻tでの全衛星の位置をsat_posとして,全時刻でのsat_posをpos_recとして記録しています。
実行
以下のようにすると動画が生成されます。
E_R = 6371 #km
EO  = 550 #km
num_Sat_per_Orb = 22
num_Orb = 72
omega = np.pi/180 * 53
ite = 500
dt = 20

SC = SatConste(E_R, EO, num_Sat_per_Orb, num_Orb, omega, ite, dt)
pos_rec = SC.sat_con()

fig = plt.figure()
ax = fig.add_subplot(111, projection='3d')

u = np.linspace(0, 2*np.pi, 200)
v = np.linspace(0, np.pi, 200)
bx = E_R * np.outer(np.cos(u), np.sin(v))
by = E_R * np.outer(np.sin(u), np.sin(v))
bz = E_R * np.outer(np.ones(np.size(u)), np.cos(v))


# アニメーションフレームの更新関数
def update_frame(i):
    ax.clear()
    ax.set_xlabel('X')
    ax.set_ylabel('Y')
    ax.set_zlabel('Z')
    ax.set_xlim(-6000,6000)
    ax.set_ylim(-6000,6000)
    ax.set_zlim(-6000,6000)
    #ax.set_title('Time Step: {}'.format(i))

    # i番目の時間ステップの物体の3次元座標を取得
    coordinates = pos_rec[i]

    # 3次元座標のプロット
    ax.scatter(coordinates[:, 0], coordinates[:, 1], coordinates[:, 2], s = 10, color="red")
    ax.plot_wireframe(bx, by, bz, color="blue", alpha=0.2)

# アニメーションの作成
ani = animation.FuncAnimation(fig, update_frame, frames=range(ite), interval=70)
ani.save('SC.gif', writer='imagemagick')

# アニメーションの表示
plt.show()
このような動画ができていれば上手く動いています。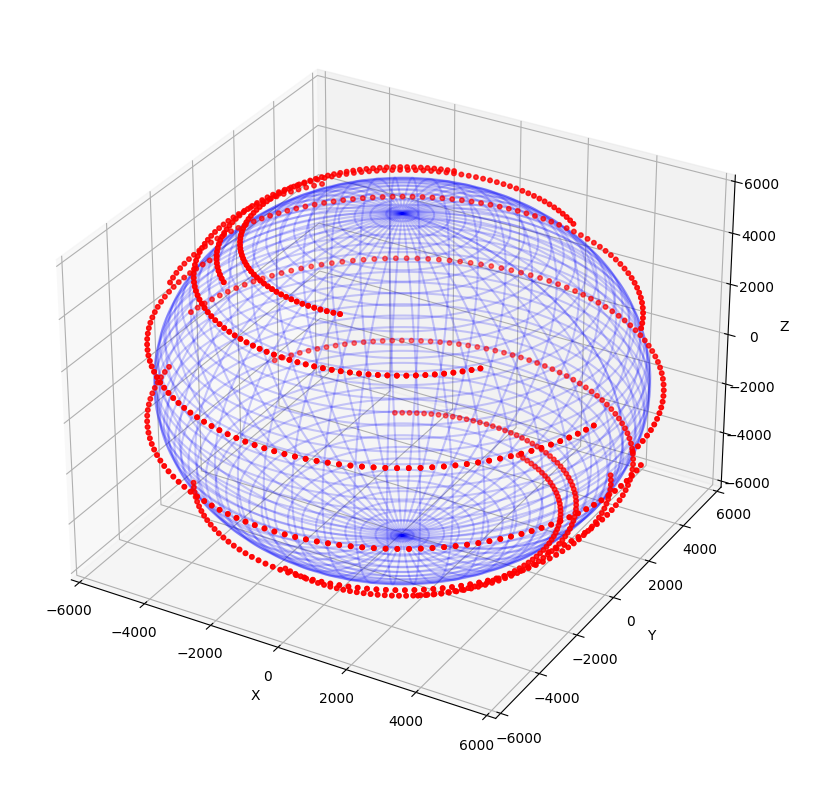
Starlinkは最終的に42000機の打ち上げを目標としているそうですが,1500機でもとても多いことが分かりました。