Arduino(に似たやつ)を使って2進数時計を作りました。
Arduino、回路ともに初心者なので温かい目で見ていただけると嬉しいです。
目次
・材料
・配線
・プログラム
・注意点
・まとめ
材料
・ELEGOO Arduino用UNO R3
・LED 赤 ×10
・抵抗器 1kΩ ×10
・ジャンパー線 ×21
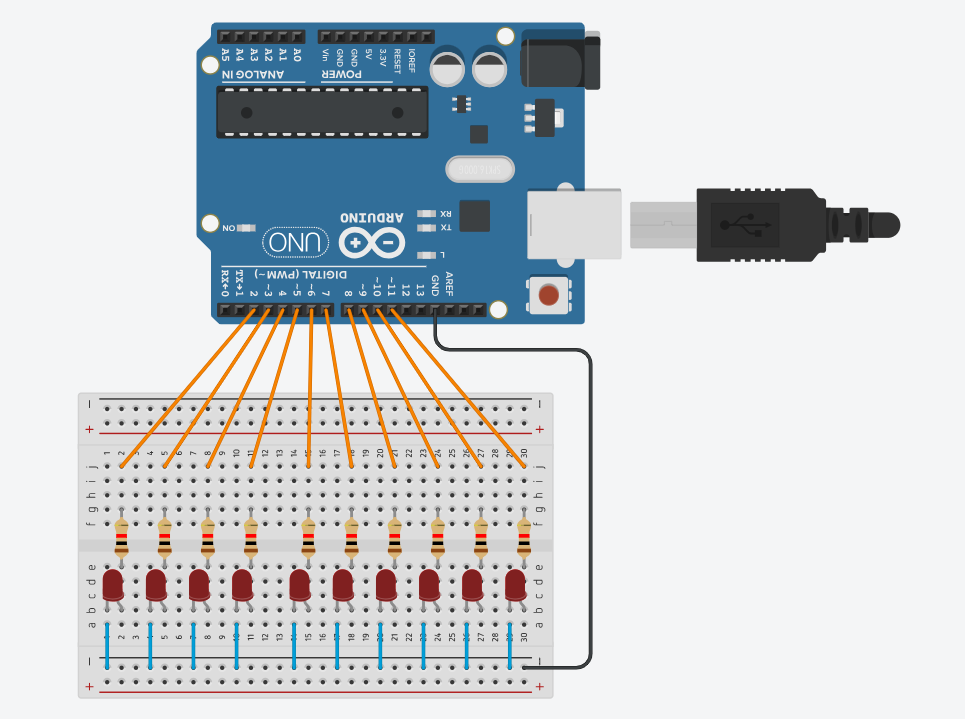
配線
配線は以下の通りです。
プログラム
Python側のプログラムは、現在時刻の時刻データを1秒ごとに送信するプログラムで、Arduino側のプログラムは、Pythonから送信された時刻データを2進数に変換しLEDに表示するプログラムです。
Arduino
String inputTime = "";
int hours = 0;
int minutes = 0;
int seconds = 0;
unsigned long previousMillis = 0;
const long interval = 1000;  // 1秒ごとの更新間隔
int hourPins[] = {2, 3, 4, 5};  // 時を表示するピン
int minutePins[] = {6, 7, 8, 9, 10, 11};  // 分を表示するピン

void setup() {
  Serial.begin(9600);
  // ピンモードを出力に設定
  for (int i = 0; i < 4; i++) {
    pinMode(hourPins[i], OUTPUT);
  }
  for (int i = 0; i < 6; i++) {  // 分を表示するためのピンを6つに設定
    pinMode(minutePins[i], OUTPUT);
  }
}

void loop() {
  // シリアル入力がある場合、時刻データを読み取る
  if (Serial.available() > 0) {
    inputTime = Serial.readStringUntil('\n');
    if (parseTime(inputTime)) {
      // 時刻が正しく解析された場合、LEDに表示
      int displayHour = convertTo12HourFormat(hours);  // 12時間制に変換
      displayBinary(displayHour, hourPins, 4);  // 12時間制で表示
      displayBinary(minutes, minutePins, 6);  // 分を表示
    }
  }
  // 1秒ごとの更新処理
  unsigned long currentMillis = millis();
  if (currentMillis - previousMillis >= interval) {
    previousMillis = currentMillis;
    seconds++;
    if (seconds >= 60) {
      seconds = 0;
      minutes++;
    }
    if (minutes >= 60) {
      minutes = 0;
      hours++;
    }
    if (hours >= 24) {
      hours = 0;  // 24時間制としてリセット
    }
  }
}
// 入力された時刻を解析して設定する関数
bool parseTime(String timeString) {
  timeString.trim();  // 不要な空白を削除
  int firstSpace = timeString.indexOf(' ');
  int secondSpace = timeString.indexOf(' ', firstSpace + 1);
  if (firstSpace == -1 || secondSpace == -1) {
    return false;  // フォーマットが正しくない場合
  }
  String hourString = timeString.substring(0, firstSpace);
  String minuteString = timeString.substring(firstSpace + 1, secondSpace);
  String secondString = timeString.substring(secondSpace + 1);
  hours = hourString.toInt();
  minutes = minuteString.toInt();
  seconds = secondString.toInt();
  // 時間、分、秒の範囲をチェック(24時間制で入力)
  return (hours >= 0 && hours < 24 && minutes >= 0 && minutes < 60 && seconds >= 0 && seconds < 60);
}
// 24時間制を12時間制に変換する関数
int convertTo12HourFormat(int hour24) {
  if (hour24 == 0) {
    return 12;  // 0時は12時として表示
  } else if (hour24 > 12) {
    return hour24 - 12;  // 13時以上は12を引いて12時間制にする
  } else {
    return hour24;  // 1~12時はそのまま表示
  }
}
// 2進数をLEDに表示する関数
void displayBinary(int value, int pins[], int length) {
  for (int i = 0; i < length; i++) {
    int bit = (value >> i) & 0x01;
    digitalWrite(pins[i], bit);  // ピンに反映
  }
}
Python
import serial
import time
from datetime import datetime

# Arduinoとのシリアル通信を初期化
arduino = serial.Serial('COM12', 9600)
time.sleep(2)  # Arduinoが起動するまで待機

while True:
    # 現在の時刻を取得
    now = datetime.now()
    current_time = now.strftime("%H %M %S")  # HH MM SSフォーマットに変換

    # 現在の時刻をArduinoに送信
    arduino.write(current_time.encode('utf-8') + b'\n')
    print(f"Sent Time: {current_time}")  # 送信した時刻を表示

    time.sleep(1)  # 1秒ごとに送信
githubにもプログラムを公開しています。
https://github.com/KabutoEbi/BinaryClock
注意点
・Pythonでシリアルポートを使用するため、ArduinoIDEでシリアルモニターを開いていると動作しません。ArduinoIDEのシリアルモニターは閉じるようにしましょう。
・現在時刻を表示し続けるためには、常にPythonのプログラムを動かし続ける必要があります。
まとめ
今回は現在時刻を2進数で表示する2進数時計を作りました。RTCモジュールを使用すればもっとコンパクトな回路になるのですが、少ない材料で作成できるようRTCモジュールは使用しませんでした。