概要
AnimatedVectorDrawableでアイコンが変形するアニメーションを実装する
- やりたいこと
- 実装方針
- VectorDrawableとは
- ShapeShifterを用いたAnimatedVectorDrawableの作成
- 実装方法
やりたいこと
drawable iconを切り替えるときにそのままだと味気ないので、変形しながら切り替わるアニメーションを使いたいと思い立ちました。
そこで、AnimatedVectorDrawableを用いるといい感じに実装できそうだったので、まとめました。
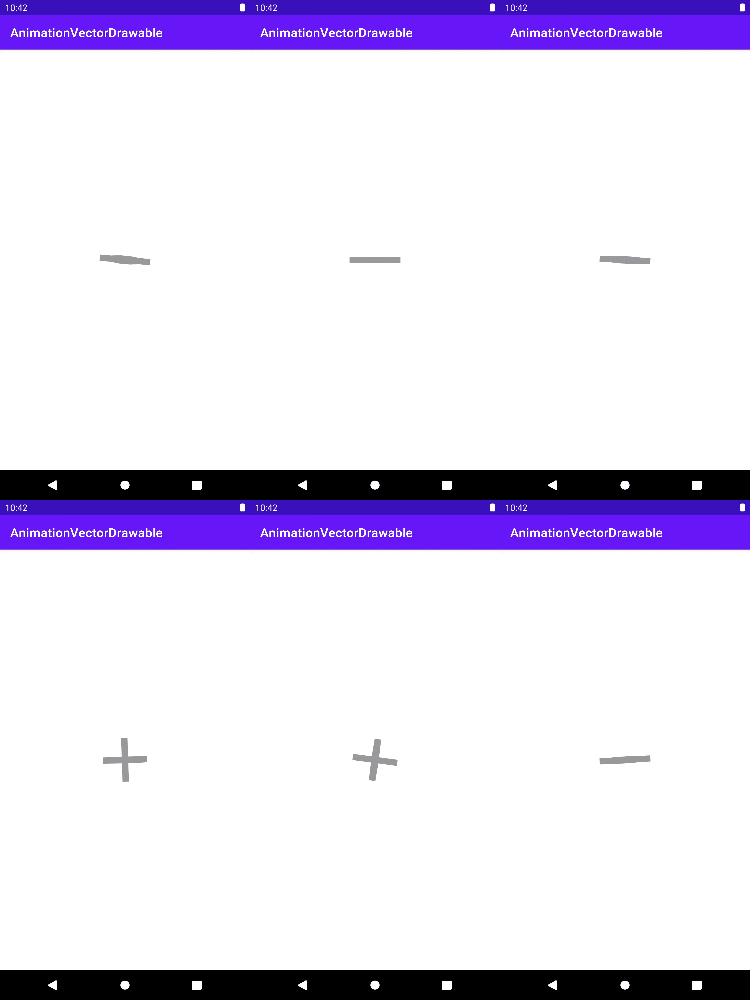
完成系はこんな感じです。
実装方針
drawableでアニメーションを行うには大きく2つの方法があります。
- AnimationDrawableを使用する
- AnimationVectorDrawableを使用する
1つめのAnimationDrawableはパラパラ漫画のように、複数の画像を用意して、それを順番に再生する方法です。
比較的簡単に実装できて汎用性がありますが、その反面パラパラ漫画なので、
どうしてもカクカクしたアニメーションになり、あまり綺麗ではありません。
2つめのAnimationVectorDrawableはパスデータを変更して別の画像へするため、連続的なアニメーションが再現できます。
反面、複雑な画像には向いておらず、パスデータを操作するのため実装が分かりにくく面倒にはなります。
ただ、後に紹介する「Shape Shifter」を利用することで簡単に実装できます。
今回はこちらの方法で実装をします。
VectorDrawableとは
VectorDrawable は、関連する色情報とともに点、線、曲線のセットとして XML ファイルで定義されたベクターグラフィックです。ベクター型ドローアブルを使用する主な利点は、画像の拡張性です。表示品質を損なわずに調整できるため、画質を低下させずに同じファイルをさまざまな画面密度に合わせてサイズ変更できます。
AndroidではSVGファイル(Scalable Vector Graphics)をXMLファイルのベクター型ドローアブル形式に変換して使用します。
拡大・縮小で劣化しないのが特徴で、アプリのアイコンもこれで作成しています。
VectorDrawableで描画する点と線を定義しているのが「pathオブジェクト」です。
"L x y"のようにコマンドとx座標、y座標でセットになっています。
"M(Move to)"がパスの始点、"L(Line to)"が現在地から新しい位置まで直線を引くコマンドです。
例として、24dp x 24dpの「+」"のvectorは以下のように表され、(x,y) = (11,5)から順番に直線を引いています。
<vector xmlns:android="http://schemas.android.com/apk/res/android"
    android:width="24dp"
    android:height="24dp"
    android:viewportWidth="24"
    android:viewportHeight="24">

    <path
        android:fillColor="#999999"
        android:pathData="M 11 5 L 13 5 L 13 19 L 11 19 M 5 11 L 19 11 L 19 13 L 5 13" />
</vector>

Shape Shifterとは
「Shape Shifter」はSVG形式のアイコンのアニメーションを作成するためのツールです。
このツールを用いることで、驚くほど簡単にAnimatedVectorDrawableを作成できます。神ツールすぎる。
手作業でVectorを書くのはかなりしんどいので、Shape Shifterを使って作成していきます。
1.VectorDrawableのインポート
Android Studioでは、res フォルダを右クリックして、[New] > [Vector Asset] で豊富なVectorDrawableを作成できます。
作成したVectorDrawableをShape Shifter にドラッグ&ドロップでインポートできます。
色がないので、fillColorから色を設定します。
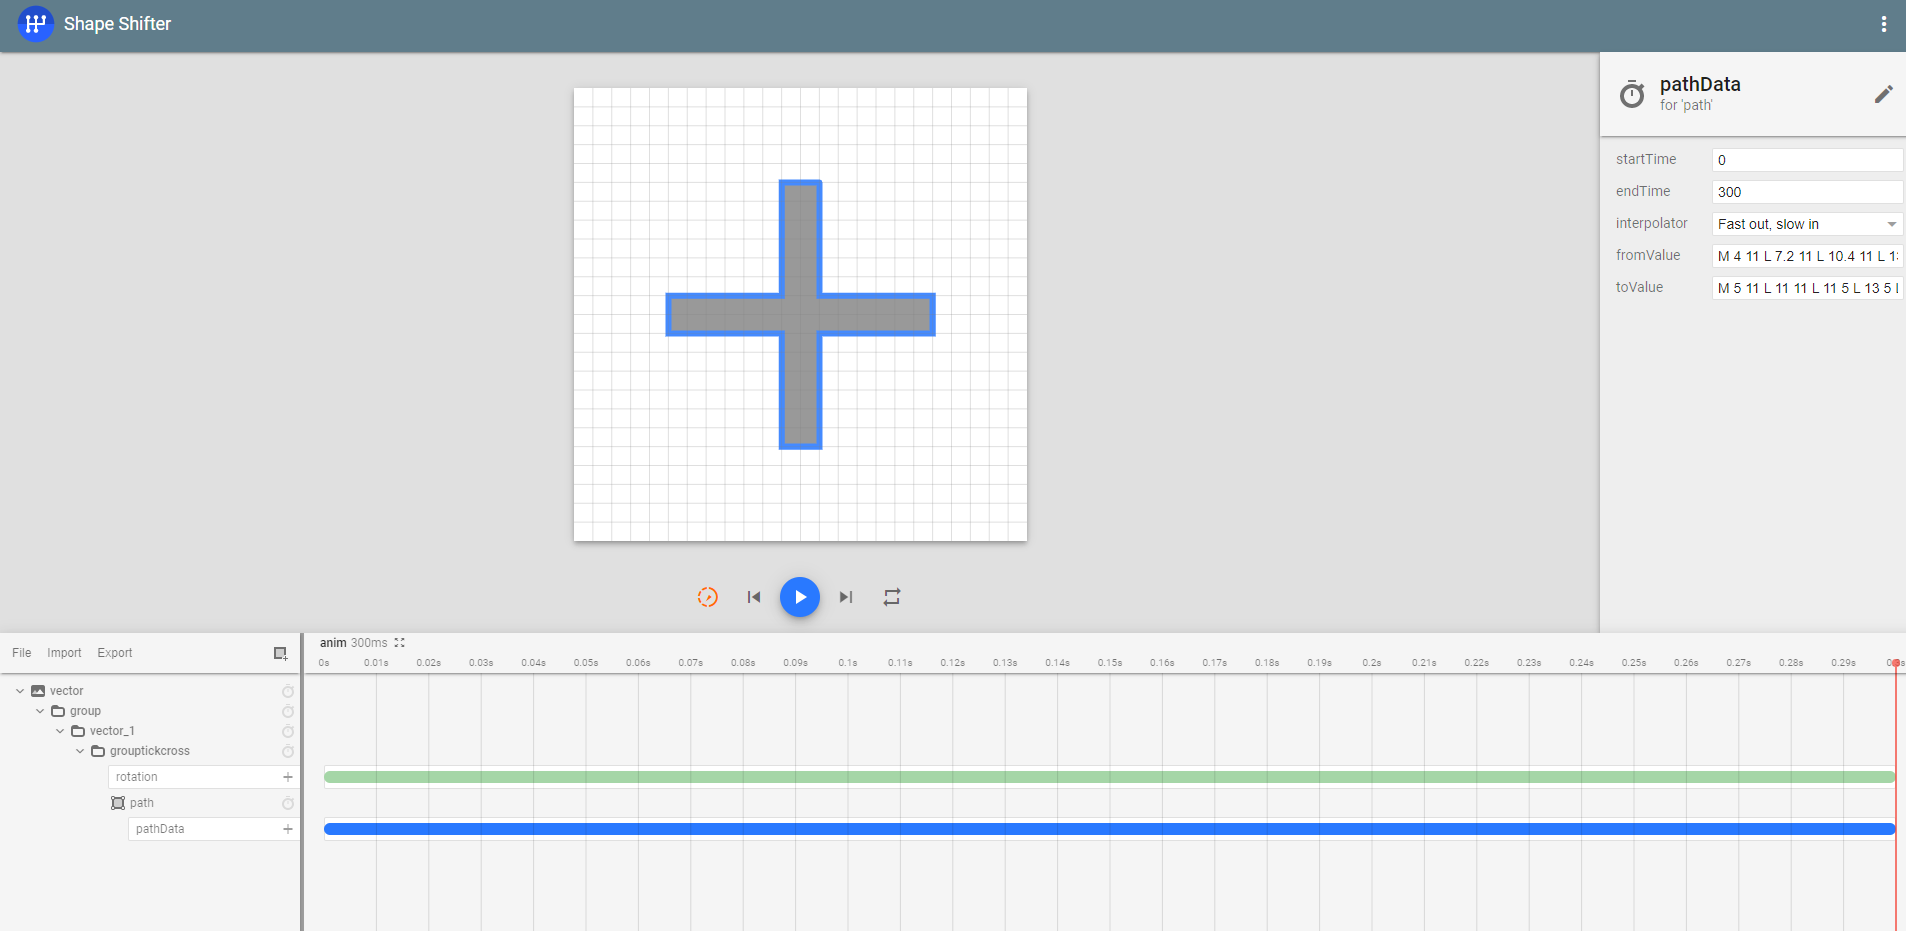
2.変形するアニメーションの設定
・pathの右側にあるタイマーアイコンの[pathData]からタイムラインに画像を追加する
・endTimeを300msに設定する(初期値だと早すぎてアニメーションが見えない)
・toValueに変形後の画像のpathDataを置換する
この時パスデータの点の数が、fromValue と toValue で一致している必要があります。
点が足りない場合はAuto fixで自動で補完してくれます。便利すぎる。
ただ、Auto fixでは想定していた挙動と異なる場合が多々あります。
その際はeditから[Split subpath]や[Pair subpath]を使うことでいい感じにできます。
ここでは割愛しますが、下記の動画が参考になります。
3.回転などのアニメーションの設定
回転させながら変形させるとイイ感じになります。とりあえず回転させとけ。
- [add layer]から[new group layer]を追加
*作成したgroupフォルダにpathを移動 - タイマーアイコンから[rotation]を設定
- toValueを90 or 180で設定
これをexportするとこんなコードが生成されるので、アプリに追加します。
同様に、逆のアニメーションも作成しましょう。
<animated-vector
    xmlns:android="http://schemas.android.com/apk/res/android"
    xmlns:aapt="http://schemas.android.com/aapt">
    <aapt:attr name="android:drawable">
        <vector
            android:name="vector"
            android:width="24dp"
            android:height="24dp"
            android:viewportWidth="24"
            android:viewportHeight="24">
            <group
                android:name="grouptickcross"
                android:pivotX="12"
                android:pivotY="12">
                <path
                    android:name="path"
                    android:pathData="M 4 11 L 20 11 L 20 13 L 4 13 Z"
                    android:fillColor="#999999"
                    android:fillType="evenOdd"/>
            </group>
        </vector>
    </aapt:attr>
    <target android:name="path">
        <aapt:attr name="android:animation">
            <objectAnimator
                android:propertyName="pathData"
                android:duration="300"
                android:valueFrom="M 4 11 L 7.2 11 L 10.4 11 L 13.6 11 L 16.8 11 L 20 11 L 20 12 L 20 13 L 16.8 13 L 13.6 13 L 10.4 13 L 7.2 13 L 4 13 L 4 11"
                android:valueTo="M 5 11 L 11 11 L 11 5 L 13 5 L 13 11 L 19 11 L 19 13 L 19 13 L 13 13 L 13 19 L 11 19 L 11 13 L 5 13 L 5 11"
                android:valueType="pathType"
                android:interpolator="@android:interpolator/fast_out_slow_in"/>
        </aapt:attr>
    </target>
    <target android:name="grouptickcross">
        <aapt:attr name="android:animation">
            <objectAnimator
                android:propertyName="rotation"
                android:duration="300"
                android:valueFrom="0"
                android:valueTo="90"
                android:valueType="floatType"
                android:interpolator="@android:interpolator/fast_out_slow_in"/>
        </aapt:attr>
    </target>
</animated-vector>
<animated-vector
    xmlns:android="http://schemas.android.com/apk/res/android"
    xmlns:aapt="http://schemas.android.com/aapt">
    <aapt:attr name="android:drawable">
        <vector
            android:name="vector"
            android:width="24dp"
            android:height="24dp"
            android:viewportWidth="24"
            android:viewportHeight="24">
            <group
                android:name="grouptickcross"
                android:pivotX="12"
                android:pivotY="12">
                <path
                    android:name="path"
                    android:pathData="M 4 11 L 20 11 L 20 13 L 4 13 Z"
                    android:fillColor="#999999"
                    android:fillType="evenOdd"/>
            </group>
        </vector>
    </aapt:attr>
    <target android:name="path">
        <aapt:attr name="android:animation">
            <objectAnimator
                android:propertyName="pathData"
                android:duration="300"
                android:valueTo="M 4 11 L 7.2 11 L 10.4 11 L 13.6 11 L 16.8 11 L 20 11 L 20 12 L 20 13 L 16.8 13 L 13.6 13 L 10.4 13 L 7.2 13 L 4 13 L 4 11"
                android:valueFrom="M 5 11 L 11 11 L 11 5 L 13 5 L 13 11 L 19 11 L 19 13 L 19 13 L 13 13 L 13 19 L 11 19 L 11 13 L 5 13 L 5 11"
                android:valueType="pathType"
                android:interpolator="@android:interpolator/fast_out_slow_in"/>
        </aapt:attr>
    </target>
    <target android:name="grouptickcross">
        <aapt:attr name="android:animation">
            <objectAnimator
                android:propertyName="rotation"
                android:duration="300"
                android:valueFrom="0"
                android:valueTo="180"
                android:valueType="floatType"
                android:interpolator="@android:interpolator/fast_out_slow_in"/>
        </aapt:attr>
    </target>
</animated-vector>
実装方法
AnimatedVectorDrawable はAPI21以上で導入されたため、minSdkVersion 21以上にして、supportLibraryを追加します。
    defaultConfig {
        minSdkVersion 21
        vectorDrawables.useSupportLibrary = true
    }
ImageViewの[app:srcCompat]に作成したAnimationVectorDrawableをセットします。
<?xml version="1.0" encoding="utf-8"?>
<androidx.constraintlayout.widget.ConstraintLayout xmlns:android="http://schemas.android.com/apk/res/android"
    xmlns:app="http://schemas.android.com/apk/res-auto"
    android:layout_width="match_parent"
    android:layout_height="match_parent">

    <ImageView
        android:id="@+id/avdImage"
        android:layout_width="120dp"
        android:layout_height="120dp"
        app:layout_constraintBottom_toBottomOf="parent"
        app:layout_constraintEnd_toEndOf="parent"
        app:layout_constraintStart_toStartOf="parent"
        app:layout_constraintTop_toTopOf="parent"
        app:srcCompat="@drawable/avd_anim_minus_to_plus"/>
</androidx.constraintlayout.widget.ConstraintLayout>
ImageViewに対応するAnimationVectorDrawableをセットして、start()するだけで動作します。
今回はisSelectedによって使い分けています。
class MainActivity : AppCompatActivity() {
    override fun onCreate(savedInstanceState: Bundle?) {
        super.onCreate(savedInstanceState)
        setContentView(R.layout.activity_main)

        avdImage.setOnClickListener {
            avdImage.isSelected = !avdImage.isSelected
            if (avdImage.isSelected) minusToPlus()
            else plusToMinus()
           }
    }

    private fun minusToPlus() {
        avdImage.setImageResource(R.drawable.avd_anim_minus_to_plus)
        val animation = avdImage.drawable as AnimatedVectorDrawable
        animation.start()
    }

    private fun plusToMinus() {
        avdImage.setImageResource(R.drawable.avd_anim_plus_to_minus)
        val animation = avdImage.drawable as AnimatedVectorDrawable
        animation.start()
    }
}
まとめ
- AnimatedVectorDrawableでリッチなアニメーションを実装できる
- Shape Shifterを使えば簡単にAnimatedVectorDrawableが作成できる
Shape Shifterのおかげで、AnimationVectorDrawableの汎用性がかなり上がりました。
groupを使えばかなり凝ったアニメーションも作成できるので楽しいですね。
アニメーションがあるだけで、アプリがリッチに見えるので、今後も取り入れていきたいです。
間違いや指摘がありましたら、コメントをお願いします!
参考記事

