イントロダクション
背景
複数の Google フォーム を作成する際、Google Apps Scripts を利用して、Google フォームの細かな共通の設定を変更したい。
目的 (Purpose)
Google フォームの Form Class の設定を変更する。
例えば
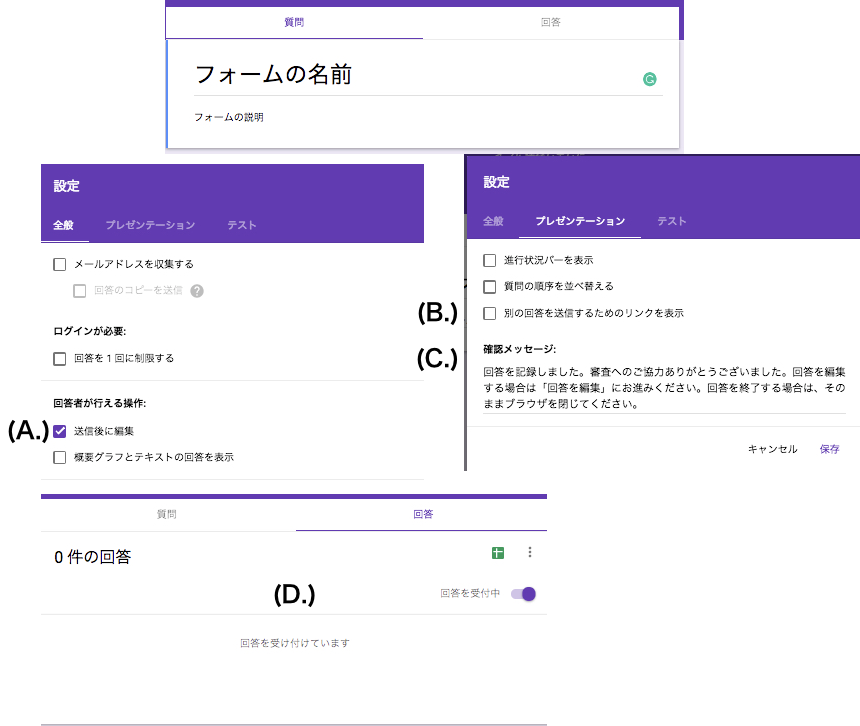
- 回答者が行える操作: 送信後に編集
- 別の回答を送信するためのリンクを表示
- 確認メッセージ
- 回答の受付
をデフォルトから変更する
目標 (Gole)
ソースコード (source cord)
Google フォームを作成したのち、下記のプログラムを実行してください。
function mySF() {
  // ID は 設定したいGoogle フォームのIDを入れる
  var form = FormApp.openById('ID'); // gyo1

  // 新たにGoogle フォームを作成したい場合は gyo1 を次に変更
  // var form = FormApp.create("無題のページ")

  form.setTitle('フォームの名前')
    .setDescription('フォームの説明')
    // (A.) 送信後に編集可能にする
    .setAcceptingResponses(true)
    // (B.) 別の回答を送信するためのリンクを表示する
    .setShowLinkToRespondAgain(false)
    // (C.) 確認メッセージの変更
    .setConfirmationMessage('回答を記録しました。審査へのご協力ありがとうございました。回答を編集する場合は「回答を編集」にお進みください。回答を終了する場合は、そのままブラウザを閉じてください。')
    // (D.) 回答を受け付けている状態に変更
    .setAllowResponseEdits(true);
}
参考文献
- Class Form, https://developers.google.com/apps-script/reference/forms/form, 2018/10/14 アクセス
