この記事はNode-RED Advent Calendar 2020の20日目の記事です。
今回は以前登壇したNode-RED UG勉強会 2020 年末オンラインLTパーティで行ったLTの補足、解説をしたいと思います。当日は時間の関係で概要的なお話しかできませんでしたが、サンプルソースを交えながらDockerでのNode-RED環境の構築方法を紹介します。
とりあえず動かす
まずは最低限Node-REDを動かすための方法を紹介します。公式ドキュメントでは、以下のようなコマンドになります。
docker run -it -p 1880:1880 --name mynodered nodered/node-red
ここでは、docker初心者のためにコマンドの内容の解説があるので、何が行われているのか理解できます。ただ毎回同じコマンドを実行するときにタイポする可能性が高い書き方です。毎回実行できるようにスクリプトを書いてもいいですが、ここはDockerらしく振る舞うためにDocker Composeを使ってみます。
Docker ComposeはYAMLでサービスを定義することで必要なファイルが出てきますが、アプリの実行をするためのコマンドがシンプルになります。先程の実行コマンドをYAMLに書き起こすと、以下の通りです。ファイル名は必ずdocker-compose.yamlにします。
services:
    mynodered:
        image: nodered/node-red
        ports:
            - "1880:1880"
行数は増えて記述が増えましたが、先程のコマンドよりも何をやっているのかがわかりやすくなったと思います。
作成したdocker-compose.yamlを適当なディレクトリに保存し、ターミナルでYAMLファイルの保存先に移動して、以下のコマンドを実行します。
cd COMPOSE/YAML/DIR
docker-compose up
これで、イメージのインストールから実行までを自動で行いNode-REDが使えるようになります。
コンテナを止めるときはCtrl + Cで停止できます。
設定ファイルを共有する
先程のやり方でNode-REDは使えるようになりますが、これだとコンテナを綺麗にすると今まで作ってきたフローやインストールしたノードが一緒に消えてしまうので辛いです。
そこで今度はDocker上でNode-REDの設定ファイルを保存しているディレクトリとホストOSの作業ディレクトリを共有して、手元に設定ファイルが残るようにします。
Node-REDの設定ファイルはdockerコンテナの/dataディクレクトリにあります。それを踏まえてdocker-compose.yamlを修正すると以下のようになります。
services:
  mynodered:
    image: nodered/node-red
    volumes:
      - .:/data
    ports:
      - "1880:1880"
先程のYAMLとの違いがvolumesオプションを入れているところです。
dockerコンテナの/dataディレクトリをdocker-compose.yamlと同じディレクトリ上と共有するという意味になります。
修正をしてdocker-compose upを実行すると、Node-REDの設定ファイルが生成(というより複製?)されます。
これでコンテナを壊しても手元に設定ファイルが残るようになります。
自作ノードの開発環境
DockerでNode-REDを動かすことができて、さらに設定ファイルが手元に残りました。
これで自作ノードの開発環境を構築できるようになりました。
Dockerを使えば環境依存に左右されることがないので自作ノードを作るときにはメリットになると思います。
むしろ自作ノードを開発する環境を構築したくてDockerを採用したわけです。
必要ファイルの用意
docker-compose.yamlと同じディレクトリ上に自作ノードの開発ディレクトリ(ここではnode-red-contrib-example-lower-case)を作成します。
あとは、Node-REDのドキュメントにあるはじめてのノード開発にある必要なファイルを用意します。
- package.json ※これは後で用意する方法を説明します
- lower-case.js
module.exports = function(RED) {
    function LowerCaseNode(config) {
        RED.nodes.createNode(this,config);
        var node = this;
        node.on('input', function(msg) {
            msg.payload = msg.payload.toLowerCase();
            node.send(msg);
        });
    }
    RED.nodes.registerType("lower-case",LowerCaseNode);
}
- lower-case.html
<script type="text/javascript">
    RED.nodes.registerType('lower-case',{
        category: 'function',
        color: '#a6bbcf',
        defaults: {
            name: {value:""}
        },
        inputs:1,
        outputs:1,
        icon: "file.png",
        label: function() {
            return this.name||"lower-case";
        }
    });
</script>

<script type="text/html" data-template-name="lower-case">
    <div class="form-row">
        <label for="node-input-name"><i class="icon-tag"></i> Name</label>
        <input type="text" id="node-input-name" placeholder="Name">
    </div>
</script>

<script type="text/html" data-help-name="lower-case">
    <p>A simple node that converts the message payloads into all lower-case characters</p>
</script>
package.jsonを用意
Node-REDのコンテナに入ってnpmのモジュールの内容を記載するpackage.jsonを作成します。
docker-compose upをしないとコンテナの中に入れないので、予め実行しておきます。
$ docker-compose exec mynodered bash
$ cd /data/node-red-contrib-example-lower-case
$ npm init
npm initを実行したらいくつか質問されますが、モジュール名はnode-red-contrib-example-lower-caseとし、残りはお好みで設定します。
package.jsonが生成されたら、ドキュメントの手順と同様に以下の内容を記載します。
{
    "name" : "node-red-contrib-example-lower-case",
    ...
    "node-red" : {
        "nodes": {
            "lower-case": "lower-case.js"
        }
    }
}
インストール
開発中のノードを動かすために作成したノードライブラリをNode-REDの設定ファイルのあるディレクトリに対してノードライブラリをインストールします。
公式では、~/.node-redに移動することになりますが、Dockerの場合は/dataディレクトリがNode-REDの設定ファイルが保存されているディレクトリになるので、以下のコマンドを実行します。
$ docker-compose exec mynodered bash
$ cd /data
$ npm install ./node-red-contrib-example-lower-case
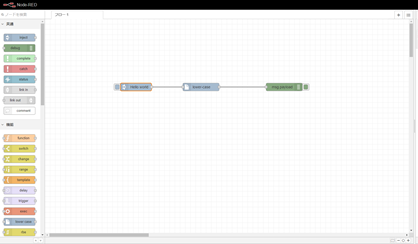
インストールを終えてコンテナを再起動してブラウザをリロードすると左側のノード一覧の中のfunction(機能)カテゴリ内にlower-caseが表示されていれば、自作ノードが動作確認できる状態になります。
宣伝
Dockerの開発環境で作成した自作のノードライブラリnode-red-contrib-telloを公開しました。
トイドローンでおなじみのTelloをNode-REDで簡単に操作できるようにしてみたので、Telloお使いの方はインストールしてみてください!
