初めに
Flutter のユーザ管理を FirebaseAuthentication で行うことになったので、その方法を記録しておきます。
なお、今回実装するのは新規登録画面のみで、その他のログイン画面等は紹介しませんのでご了承ください。
FirebaseAuthentication の設定
初めに Firebase で以下の項目を完了させます。
- Google アカウント作成
- Firebase 新規登録
- Flutter × Firebase 連携
- FirebaseAuthentication の「メール / パスワード」を有効にする
パッケージのインポート
以下の三つのパッケージを「pubspec.yaml」に追加し、Pub get します。
コードと表示結果
import 'package:firebase_auth/firebase_auth.dart';
import 'package:flutter/material.dart';
import 'package:flutter_riverpod/flutter_riverpod.dart';
final newUserEmailProvider = StateProvider((ref) => "");
final newUserPasswordProvider = StateProvider((ref) => "");
final infoTextProvider = StateProvider((ref) => "");
void showEmailDialog (BuildContext context) {
showDialog(
context: context,
builder: (_) {
return const AlertDialog(
title: Text("エラー", style: TextStyle(color: Colors.cyan),),
content: Text("メールアドレスが入力されていません", style: TextStyle(fontSize: 15),),
);
},
);
}
void showPasswordDialog (BuildContext context) {
showDialog(
context: context,
builder: (_) {
return const AlertDialog(
title: Text("エラー", style: TextStyle(color: Colors.cyan),),
content: Text("パスワードは8文字以上です"),
);
},
);
}
class FirebaseAuthExample extends ConsumerWidget {
const FirebaseAuthExample({Key? key}) : super(key: key);
@override
Widget build(BuildContext context, WidgetRef ref) {
final newUserEmail = ref.watch(newUserEmailProvider.notifier);
final newUserPassword = ref.watch(newUserPasswordProvider.notifier);
final infoText = ref.watch(infoTextProvider.notifier);
return Scaffold(
appBar: AppBar(
title: const Text("FirebaseAuthExample"),
),
body: Column(
children: <Widget>[
SizedBox(
height: MediaQuery.of(context).size.height * 0.2,
),
const Padding(
padding: EdgeInsets.symmetric(vertical: 30),
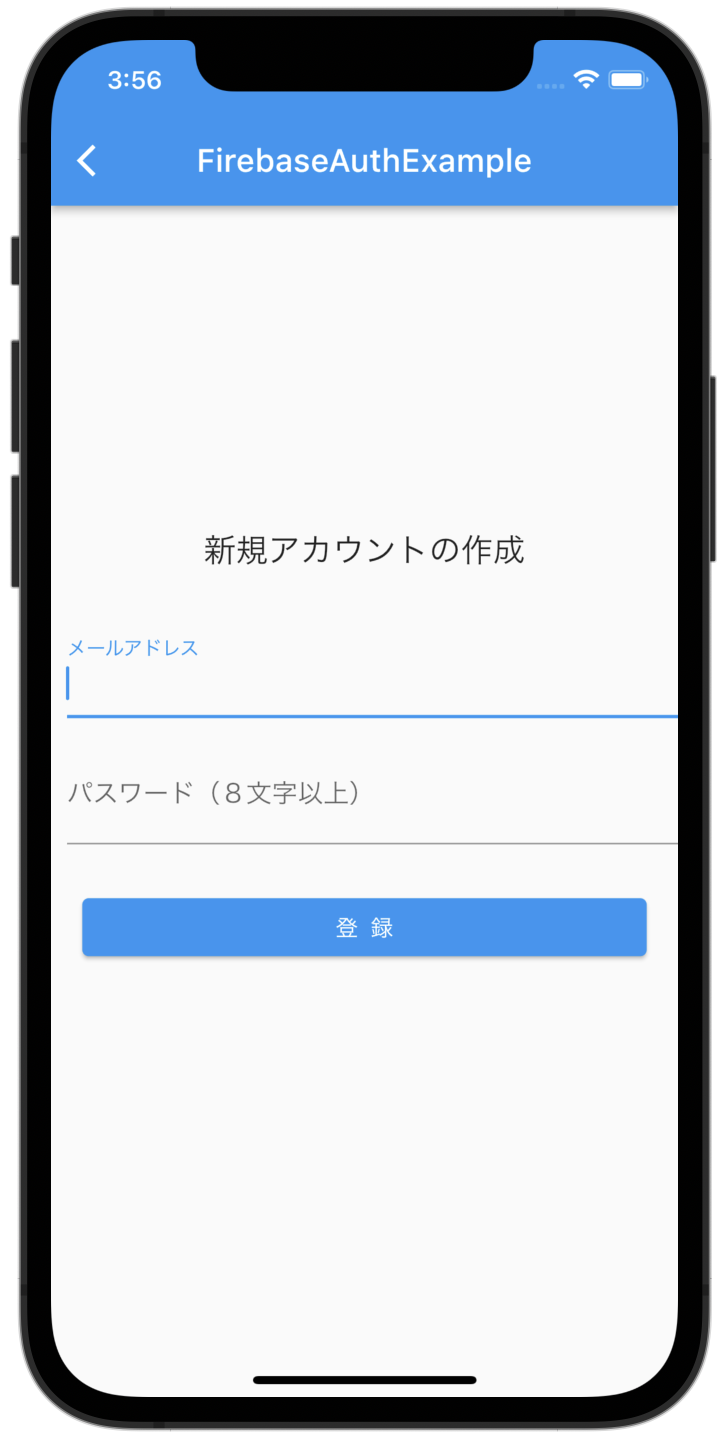
child: Text(
'新規アカウントの作成',
style: TextStyle(fontSize: 20,),
),
),
Padding(
padding: const EdgeInsets.only(left: 10.0, bottom: 20),
child: TextFormField(
autofocus: true,
// テキスト入力のラベルを設定
decoration: const InputDecoration(labelText: "メールアドレス"),
onChanged: (String value) {
newUserEmail.state = value;
},
),
),
Padding(
padding: const EdgeInsets.only(left: 10.0, bottom: 20),
child: TextFormField(
decoration: const InputDecoration(labelText: "パスワード(8文字以上)"),
// パスワードが見えないようにする
obscureText: true,
onChanged: (String value) {
newUserPassword.state = value;
},
),
),
Padding(
padding: const EdgeInsets.all(8.0),
child: ElevatedButton(
onPressed: () async {
if (newUserEmail.state == "" || newUserEmail.state == null) {
showEmailDialog(context);
}
if (newUserPassword.state.length < 8) {
showPasswordDialog(context);
}
if (newUserPassword.state.length > 8 && newUserEmail != "" && newUserEmail != null) {
try {
print(newUserEmail.state);
// メール/パスワードでユーザー登録
final FirebaseAuth auth = FirebaseAuth.instance;
final UserCredential result =
await auth.createUserWithEmailAndPassword(
email: newUserEmail.state,
password: newUserPassword.state,
);
// 登録したユーザー情報
final User user = result.user!;
infoText.state = "登録OK:${user.email}";
} catch (e) {
// 登録に失敗した場合
infoText.state = "登録NG:${e.toString()}";
}
}
},
style: ElevatedButton.styleFrom(
fixedSize: Size(MediaQuery.of(context).size.width * 0.9,20)
),
child: const Text(
'登 録',
style: TextStyle(color: Colors.white),
),
),
),
const SizedBox(height: 8),
Text(infoText.state)
],
),
);
}
}
解説
final newUserEmailProvider = StateProvider((ref) => "");
final newUserPasswordProvider = StateProvider((ref) => "");
final infoTextProvider = StateProvider((ref) => "");
このコードでは Riverpod の StateProvider を使用して、三つの Provider を監視した結果をそれぞれの変数に代入しています。
newUserEmailProvider はユーザのメールアドレスの状態を管理する StateProvider です。
newUserPasswordProvider はユーザのパスワードの状態を管理する StateProvider です。
infoTextProvider は新規登録が完了したかどうかを知らせるためのテキストの状態を管理する StateProvider です。
void showEmailDialog (BuildContext context) {
  showDialog(
    context: context,
    builder: (_) {
      return AlertDialog(
        title: const Text("エラー", style: TextStyle(color: Colors.cyan),),
        content: const Text("メールアドレスが入力されていません"),
        actions: <Widget>[
          ElevatedButton(
            child: const Text("OK"),
            onPressed: () => Navigator.pop(context),
          ),
        ],
      );
    },
  );
}
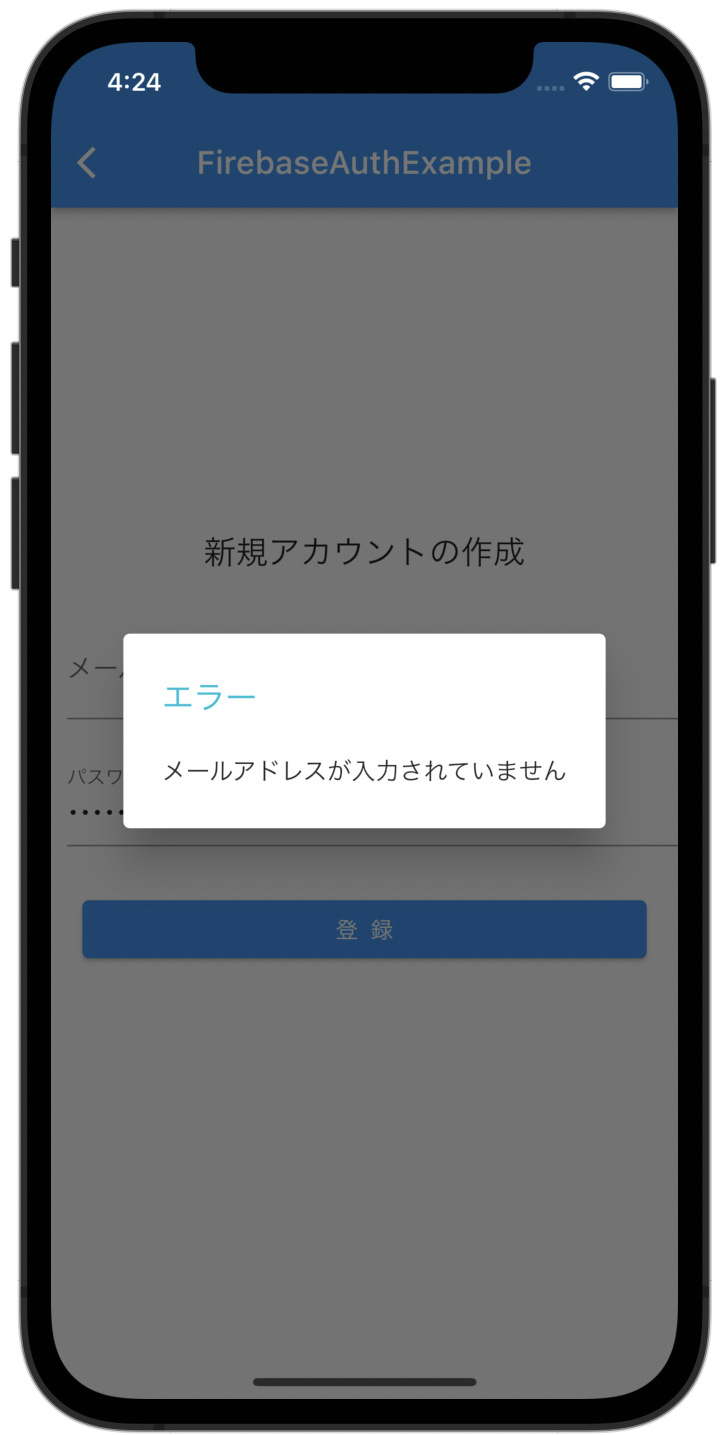
このコードではユーザがメールアドレスを入力せずに「登録」ボタンを押した場合に表示される AlertDialog の設定をしています。以下のような表示になります。
void showPasswordDialog (BuildContext context) {
  showDialog(
    context: context,
    builder: (_) {
      return const AlertDialog(
        title: Text("エラー", style: TextStyle(color: Colors.cyan),),
        content: Text("パスワードは8文字以上です"),
      );
    },
  );
}
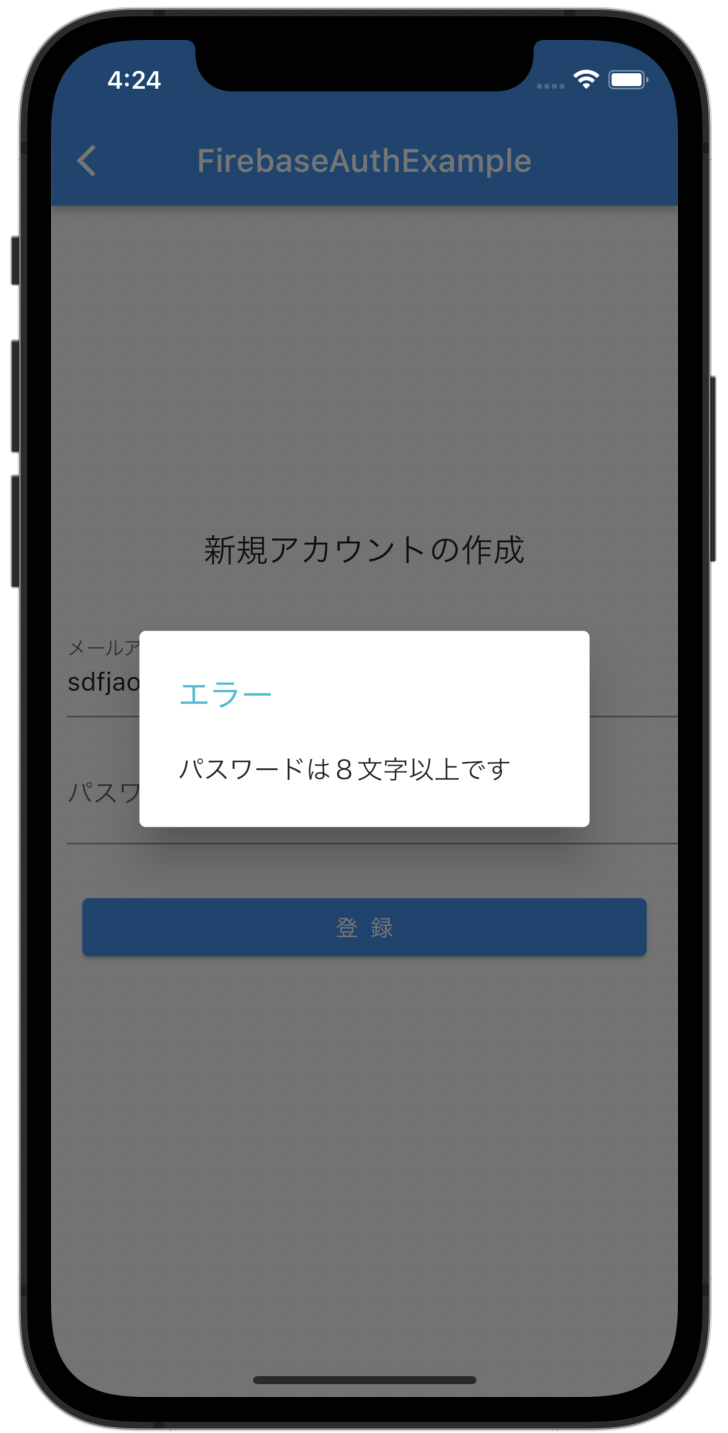
このコードではユーザが入力したパスワードが8文字未満だった場合に表示させる AlertDialog の設定をしています。以下のような表示になります。
    final newUserEmail = ref.watch(newUserEmailProvider.notifier);
    final newUserPassword = ref.watch(newUserPasswordProvider.notifier);
    final infoText = ref.watch(infoTextProvider.notifier);
このコードでは先ほど作成した三つの StateProvider を ConsumerWidget の中で使用するためにそれぞれの変数に代入しています。なお、 notifier として代入しているため、三つの変数の型は StateController<String>となっています。
TextFormField(
  autofocus: true,
  decoration: const InputDecoration(labelText: "メールアドレス"),
  onChanged: (String value) {
   newUserEmail.state = value;
  },
),
このコードではユーザがメールアドレスを入力するためのテキストフィールドを記述しています。
autofocus: true とすることでページが開かれたときには自動で focus が当たるようになっています。
onChanged の引数として String 型の value という変数を受け取り、その内容を newUserEmail.state に代入することで最初に定義した newUserEmailProvider の値が書き変わります。
メールアドレスのテキストフィールド直下のパスワードのテキストフィールドもほぼ同じ内容であるため省略します。
ElevatedButton(
  onPressed: () async {
    if (newUserEmail.state == "" || newUserEmail.state == null) {
      showEmailDialog(context);
    }
    if (newUserPassword.state.length < 8) {
      showPasswordDialog(context);
    }
    if (newUserPassword.state.length > 8 && newUserEmail != "" && newUserEmail != null) {
      try {
        print(newUserEmail.state);
        // メール/パスワードでユーザー登録
        final FirebaseAuth auth = FirebaseAuth.instance;
        final UserCredential result =
          await auth.createUserWithEmailAndPassword(
            email: newUserEmail.state,
            password: newUserPassword.state,
           );
        // 登録したユーザー情報
        final User user = result.user!;
        infoText.state = "登録OK:${user.email}";
      } catch (e) {
        // 登録に失敗した場合
        infoText.state = "登録NG:${e.toString()}";
      }
    }
  },
  style: ElevatedButton.styleFrom(
    fixedSize: Size(MediaQuery.of(context).size.width * 0.9,20)
  ),
  child: const Text(
    '登  録',
    style: TextStyle(color: Colors.white),
  ),
),
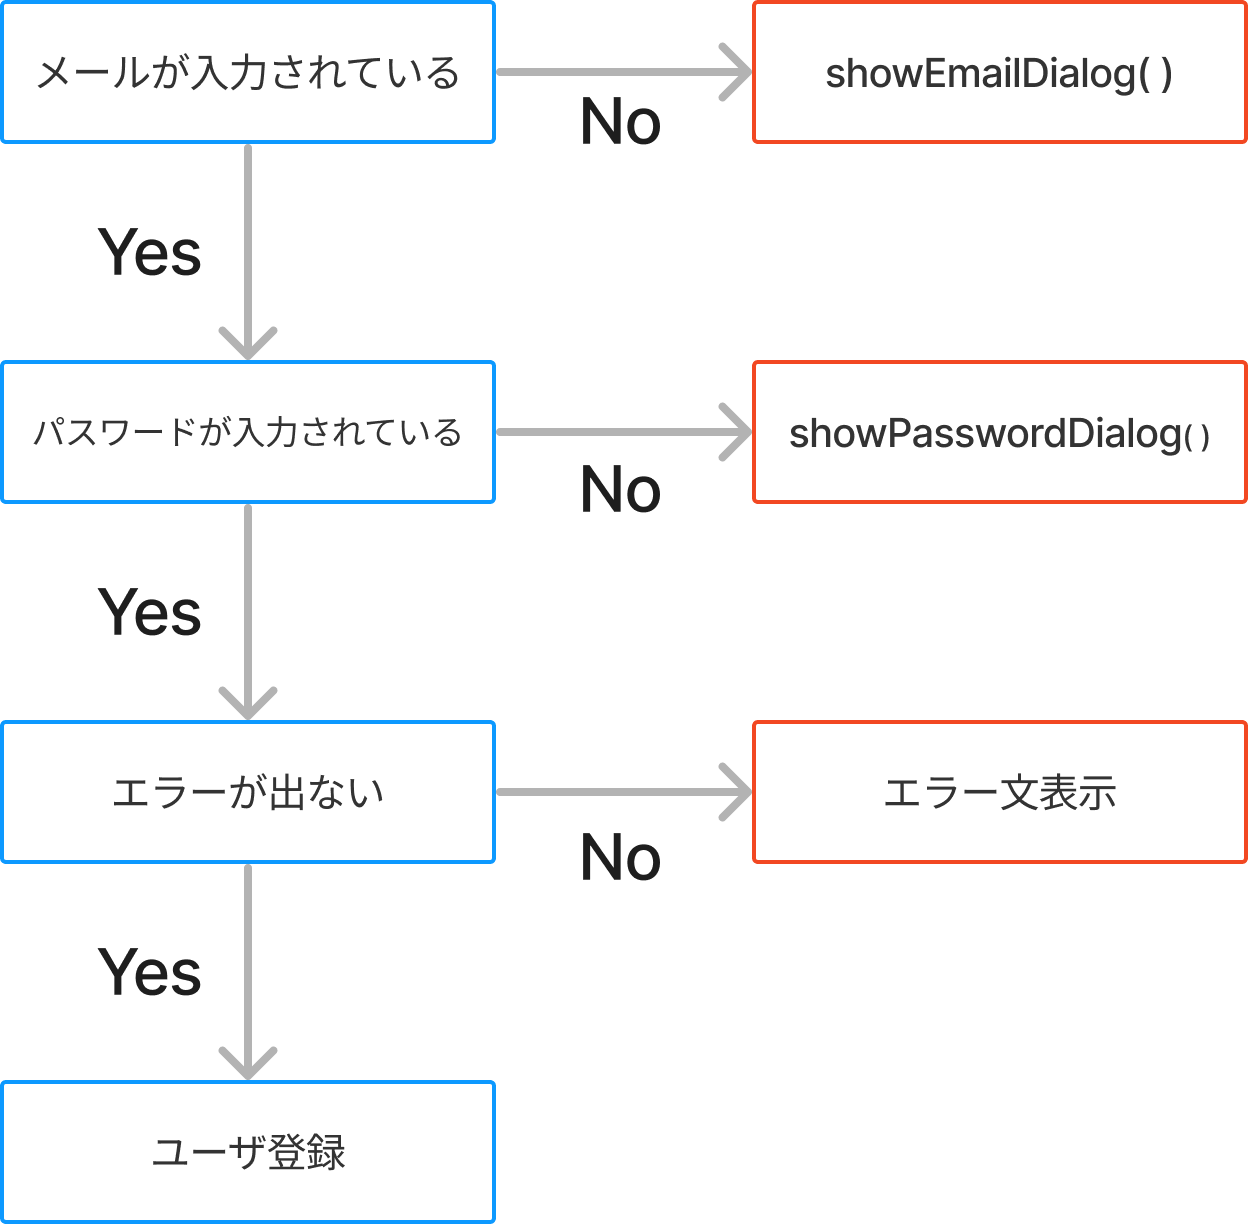
if 文と try, catch 文を用いて条件分岐を行なっています。 else if 等を使わず、if 文のみで記述しているため正確には異なりますが、図にするとおよそ以下のような条件分岐です。
final FirebaseAuth auth = FirebaseAuth.instance;
final UserCredential result =
  await auth.createUserWithEmailAndPassword(
    email: newUserEmail.state,
    password: newUserPassword.state,
);
このコードで FirebaseAuth へのユーザ登録を行なっています。
FirebaseAuth.instance.createUserWithEmailAndPassword( )
このコードで email と password を引数にとり、その内容をユーザ情報として登録しています。
そしてその情報を result という変数に代入することで登録したユーザの情報を後々使うことができます。実際にその後ユーザのメールアドレスをテキストで表示させています。
catch (e) {
  infoText.state = "登録NG:${e.toString()}";
}
このコードではユーザ登録に失敗した際のエラー文を infoText.state に代入しています。
以上です!
あとがき
今回は FirebaseAuthentication のメールアドレス、パスワード認証のうち、新規登録画面のみを Riverpod で実装しました。比較的シンプルな機能ではありますが、if 文、try / catch文、非同期処理、Riverpodなど様々な内容を扱うため、学習の一環として実装してみるのも良いかもしれません。
最後まで読んでいただきありがとうございました。
参考にしたサイト