初めに
この記事ではコンテンツを検索する際の簡単な検索機能を実装します。
検索機能はSNSなどをはじめ、様々なアプリに実装されており、自身で実装する機会もあるかと思います。ここでその実装方法を学習しましょう!
記事の対象者
- アプリに検索機能を実装したい方
- TextField の活用方法を学びたい方
- Riverpod を用いた動的な機能の実装方法を学びたい方
完成イメージ
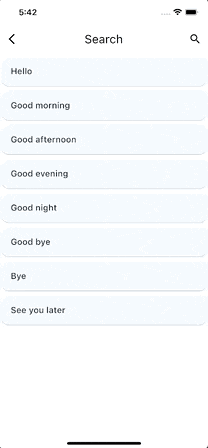
上のように、検索している時としていない時で AppBar のアイコンや ListView の表示する項目を変更しています。
また、 ListView のタイルを押すと次のページへ遷移するようにしています。
全体コード
全体のコードは以下の通りです。
import 'package:flutter/material.dart';
import 'package:flutter_riverpod/flutter_riverpod.dart';
import 'package:widget_example/widget_tools/search/search_detail_page.dart';

final List<String> wordList = [
  "Hello",
  "Good morning",
  "Good afternoon",
  "Good evening",
  "Good night",
  "Good bye",
  "Bye",
  "See you later",
];

final onSearchProvider = StateProvider((ref) => false);
final StateProvider<List<int>> searchIndexListProvider =
    StateProvider((ref) => []);

class SearchPage extends ConsumerWidget {
  const SearchPage({Key? key}) : super(key: key);

  @override
  Widget build(BuildContext context, WidgetRef ref) {
    final onSearchNotifier = ref.watch(onSearchProvider.notifier);
    final onSearch = ref.watch(onSearchProvider);
    final searchIndexListNotifier = ref.watch(searchIndexListProvider.notifier);

    return Scaffold(
      appBar: AppBar(
          title: onSearch
              ? _searchTextField(ref)
              : const Text("Search"),
          actions: onSearch
              ? [
                  IconButton(
                      onPressed: () {
                        onSearchNotifier.state = false;
                      },
                      icon: const Icon(Icons.clear)),
                ]
              : [
                  IconButton(
                      onPressed: () {
                        onSearchNotifier.state = true;
                        searchIndexListNotifier.state = [];
                      },
                      icon: const Icon(Icons.search)),
                ]),
      body: onSearch ? _searchListView(ref) : _defaultListView(),
    );
  }

  Widget _searchTextField(WidgetRef ref) {
    final searchIndexListNotifier = ref.watch(searchIndexListProvider.notifier);
    final List<int> searchIndexList = ref.watch(searchIndexListProvider);
    return TextField(
      autofocus: true,
      onChanged: (String text) {
        searchIndexListNotifier.state = [];
        for (int i = 0; i < wordList.length; i++) {
          if (wordList[i].contains(text)) {
            searchIndexListNotifier.state.add(i); // 今回の問題はここ!!!
          }
        }
      },
    );
  }

  Widget _searchListView(WidgetRef ref) {
    final searchIndexListNotifier = ref.watch(searchIndexListProvider.notifier);
    final searchIndexList = ref.watch(searchIndexListProvider);
    return ListView.builder(
        itemCount: searchIndexList.length,
        itemBuilder: (context, int index) {
          index = searchIndexListNotifier.state[index];
          return Card(
            child: ListTile(
              onTap: () {
                Navigator.push(
                    context,
                    MaterialPageRoute(
                        builder: (context) =>
                            SearchDetailPage(title: wordList[index])));
              },
              title: Text(wordList[index]),
            ),
          );
        });
  }

  Widget _defaultListView() {
    return ListView.builder(
      itemCount: wordList.length,
      itemBuilder: (context, index) {
        return Card(
          child: ListTile(
            onTap: () {
              Navigator.push(
                  context,
                  MaterialPageRoute(
                      builder: (context) =>
                          SearchDetailPage(title: wordList[index])));
            },
            title: Text(wordList[index]),
          ),
        );
      },
    );
  }
}
import 'package:flutter/material.dart';

class SearchDetailPage extends StatelessWidget {
  const SearchDetailPage({Key? key, required this.title}) : super(key: key);

  final String title;

  @override
  Widget build(BuildContext context) {
    return Scaffold(
      appBar: AppBar(
        title: Text(title),
      ),
      body: Center(
        child: Column(
          mainAxisAlignment: MainAxisAlignment.center,
          children: [
            const Icon(Icons.waving_hand,color: Colors.amber,size: 50,),
            Text(title, style: const TextStyle(fontSize: 20),),
          ],
        ),
      ),
    );
  }
}
search_page
それぞれのページについて解説していきます。
変数の定義
final List<String> wordList = [
  "Hello",
  "Good morning",
  "Good afternoon",
  "Good evening",
  "Good night",
  "Good bye",
  "Bye",
  "See you later",
];

final onSearchProvider = StateProvider((ref) => false);
final StateProvider<List<int>> searchIndexListProvider =
    StateProvider((ref) => []);
このコードでは、まずリストとして表示させる要素のタイトルとなるテキストをリストに入れ、 wordList という変数に代入しています。
本来であれば、Firebase からデータを取得して、そのデータのリストを作成したりするのですが、今回は Firebase 連携は行わないため、直接データを定義しています。
onSearchProvider は検索機能がオンになっているか、オフになっているかを監視するための StateProvider です。詳しくは後述しますが、この値が切り替わることで、 AppBar のアイコンが変更されたり、表示される ListView が変更されたりします。
初期状態では検索機能はオフになっているため、 false になります。
searchIndexListProvider は検索されている項目のインデックスを監視するための StateProvider です。この値が切り替わることで検索されている項目のみに絞って表示させられるようになります。
初期状態では検索されている項目はないため、空のリストになります。
StateProvider の読み取り
final onSearchNotifier = ref.watch(onSearchProvider.notifier);
final onSearch = ref.watch(onSearchProvider);
final searchIndexListNotifier = ref.watch(searchIndexListProvider.notifier);
このコードでは先ほど作成した onSearchProvider searchIndexListProvider を ConsumerWidget 内で使用するために、それぞれの StateProvider の読み取った値を変数に代入しています。
appBar
appBar: AppBar(
  title: onSearch
    ? _searchTextField(ref)
    : const Text("Search"),
このコードでは、 AppBar の title を onSearch の値によって切り替えています。
onSearch は boolean 型の変数であり、上のコードでは true の時には _searchTextField() を表示させ、 false の時にはテキストを表示させています。
※ 上のコードで onSearch は条件分岐に使用されており、値は変更されないため、 searchIndexListNotifier ではなく、 onSearch を使用しています。
actions
actions: onSearch
  ? [
    IconButton(
      onPressed: () {
        onSearchNotifier.state = false;
      },
      icon: const Icon(Icons.clear)),
     ]
  : [
    IconButton(
      onPressed: () {
        onSearchNotifier.state = true;
        searchIndexListNotifier.state = [];
      },
      icon: const Icon(Icons.search)),
]),
このコードでは、先程の AppBar 同様に、onSearch の値によって表示内容を変更しています。
onSearch が true の時は、バツのボタンを表示させ、ボタンが押された時には onSearchNotifier.state の値を false に切り替えています。
onSearch が false の時は、虫眼鏡のボタンを表示させ、ボタンが押された時には onSearchNotifier.state の値を true に切り替えています。
onSearch が切り替わることで以下のような見た目になります。
body
body: onSearch ? _searchListView(ref) : _defaultListView(),
このコードでは onSearch の値によって body の表示内容を変更しています。
_searchListView() _defaultListView() については後述します。
_searchTextField( )
Widget _searchTextField(WidgetRef ref) {
    final searchIndexListNotifier = ref.watch(searchIndexListProvider.notifier);
    final List<int> searchIndexList = ref.watch(searchIndexListProvider);
    return TextField(
      autofocus: true,
      onChanged: (String text) {
        searchIndexListNotifier.state = [];
        for (int i = 0; i < wordList.length; i++) {
          if (wordList[i].contains(text)) {
            searchIndexListNotifier.state.add(i); // 今回の問題はここ!!!
          }
        }
      },
    );
  }
このコードでは AppBar に表示される TextField を作成しています。
それぞれ細かくみていきましょう。
final searchIndexListNotifier = ref.watch(searchIndexListProvider.notifier);
final List<int> searchIndexList = ref.watch(searchIndexListProvider);
このコードで searchIndexListProvider の読み取った値を Widget 内で使用できるように変数を定義しています。
onChanged: (String text) {
  searchIndexListNotifier.state = [];
  for (int i = 0; i < wordList.length; i++) {
    if (wordList[i].contains(text)) {
      searchIndexListNotifier.state.add(i);
    }
  }
},
このコードで、 TextField の入力の値が変更された際の処理を記述しています。
まずは searchIndexListNotifier.state の値を空のリストにすることで、何も検索されていない初期の状態にします。
次に、contains() メソッド を使って、ユーザが入力した文字が wordList に含まれている場合のみ、 searchIndexListNotifier.state にインデックスを加えます。
そしてそれを for 文で wordList の要素の数だけ繰り返します。
※ contains() メソッド は以下のようなとき、A に B が含まれる場合は true、含まれない場合は false を返すメソッドです。
A.contains( B )
条件分岐を図にすると以下のようなイメージです。
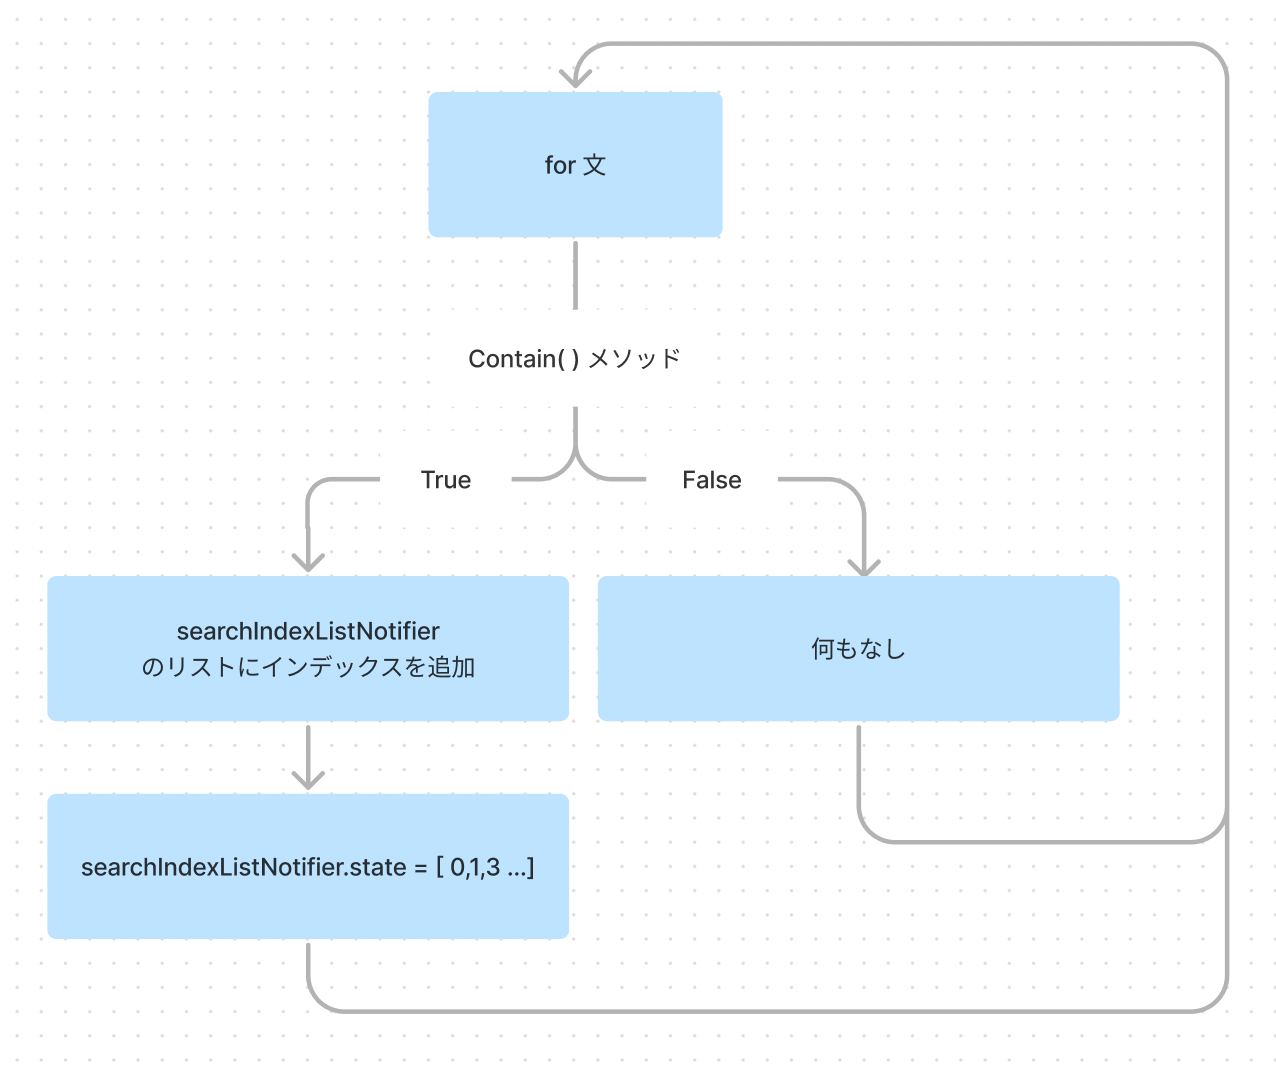
for 文を通して変更された searchIndexListNotifier.state は、「ユーザが入力した文字が含まれている要素のみのインデックのリスト」になります。
_searchListView( )
Widget _searchListView(WidgetRef ref) {
    final searchIndexListNotifier = ref.watch(searchIndexListProvider.notifier);
    final searchIndexList = ref.watch(searchIndexListProvider);
    return ListView.builder(
        itemCount: searchIndexList.length,
        itemBuilder: (context, int index) {
          index = searchIndexListNotifier.state[index];
          return Card(
            child: ListTile(
              onTap: () {
                Navigator.push(
                    context,
                    MaterialPageRoute(
                        builder: (context) =>
                            SearchDetailPage(title: wordList[index])));
              },
              title: Text(wordList[index]),
            ),
          );
        });
  }
このコードでは onSearch が true の時、つまり、ユーザが検索しているときに body に表示させる ListView を作成しています。
細かくみていきましょう。
final searchIndexListNotifier = ref.watch(searchIndexListProvider.notifier);
final searchIndexList = ref.watch(searchIndexListProvider);
このコードでは自身で作成する _searchListView( ) メソッド内で searchIndexListProvider の読み取った値を使うために、変数に代入しています。
searchIndexListNotifier には notifier を代入し、値の変更が必要な際に使用します。
searchIndexList には int のリストが代入されており、値の変更が必要ない時に使用します。
itemCount: searchIndexList.length,
itemBuilder: (context, int index) {
  index = searchIndexList[index];
itemCount を searchIndexList.length にすることで、 ListView で表示されるアイテムの数がsearchIndexList のリストの要素の数に指定されます。
index に searchIndexList の int を代入することで、_searchTextField() の onChanged で追加したインデックスのリストが index に代入されます。
つまり、先述したとおり、ユーザが入力した文字を含む単語のみのインデックスのリストが index に代入されるのです。
onTap: () {
  Navigator.push(
    context,
    MaterialPageRoute(
      builder: (context) =>
        SearchDetailPage(title: wordList[index])));
},
title: Text(wordList[index]),
このコードでは、これから作成する、SearchDetailPage に遷移するとともに、それぞれの wordList の単語を引数として渡しています。
例えば、「Hello」 という単語の Card がタップされた時には 「Hello」 が SearchDetailPage に渡されます。
title にテキストとして、それぞれ wordList の単語を指定することで、Card のタイトルが、それぞれの単語になります。
こうすることで、 wordList の全ての単語の Card が作成されます。
_defaultListView( )
Widget _defaultListView() {
    return ListView.builder(
      itemCount: wordList.length,
      itemBuilder: (context, index) {
        return Card(
          child: ListTile(
            onTap: () {
              Navigator.push(
                  context,
                  MaterialPageRoute(
                      builder: (context) =>
                          SearchDetailPage(title: wordList[index])));
            },
            title: Text(wordList[index]),
          ),
        );
      },
    );
  }
このコードでは、ユーザが検索していない時に表示される ListView を作成しています。
_searchListView() との違いは、itemCount が wordList.length に指定されている点です。
wordList の要素の数にすることで、検索していない状態では、リストにある全ての単語を表示させることができます。
search_detail_page
次は search_detail_page です。
  const SearchDetailPage({Key? key, required this.title}) : super(key: key);

  final String title;
このコードで、先ほど SearchPage から受け取った title を引数として受け取っています。
こうすることで、このページでも title が使用できるようになります。
Column(
  mainAxisAlignment: MainAxisAlignment.center,
  children: [
    const Icon(Icons.waving_hand,color: Colors.amber,size: 50,),
    Text(title, style: const TextStyle(fontSize: 20),),
  ],
),
このコードでは、 Column を使って Icon Text を縦に並べています。
Text の内容は、前のページから受け取った title の単語になります。
これで初めに提示した完成イメージと同じ表示になったと思います。
以上です。
あとがき
最後まで読んでいただきありがとうございました。
機会があれば、「ユーザが文字を入力して数秒後に絞り込みをする」など、別の方法も試してみたいと思います。
参考にしていただければ幸いです。
誤っている箇所があればご指摘いただければ幸いです。
参考にしたサイト