できることは一言で
GCPにdjango入れてweb公開します
※構築完了後にうろ覚えで書いているので抜けているところがあると思いますがご容赦ください。
設定環境
ローカルPC:windows10
サーバー:GCP Google Cloud Platform
アプリ:django
SSHツール:PuTTY
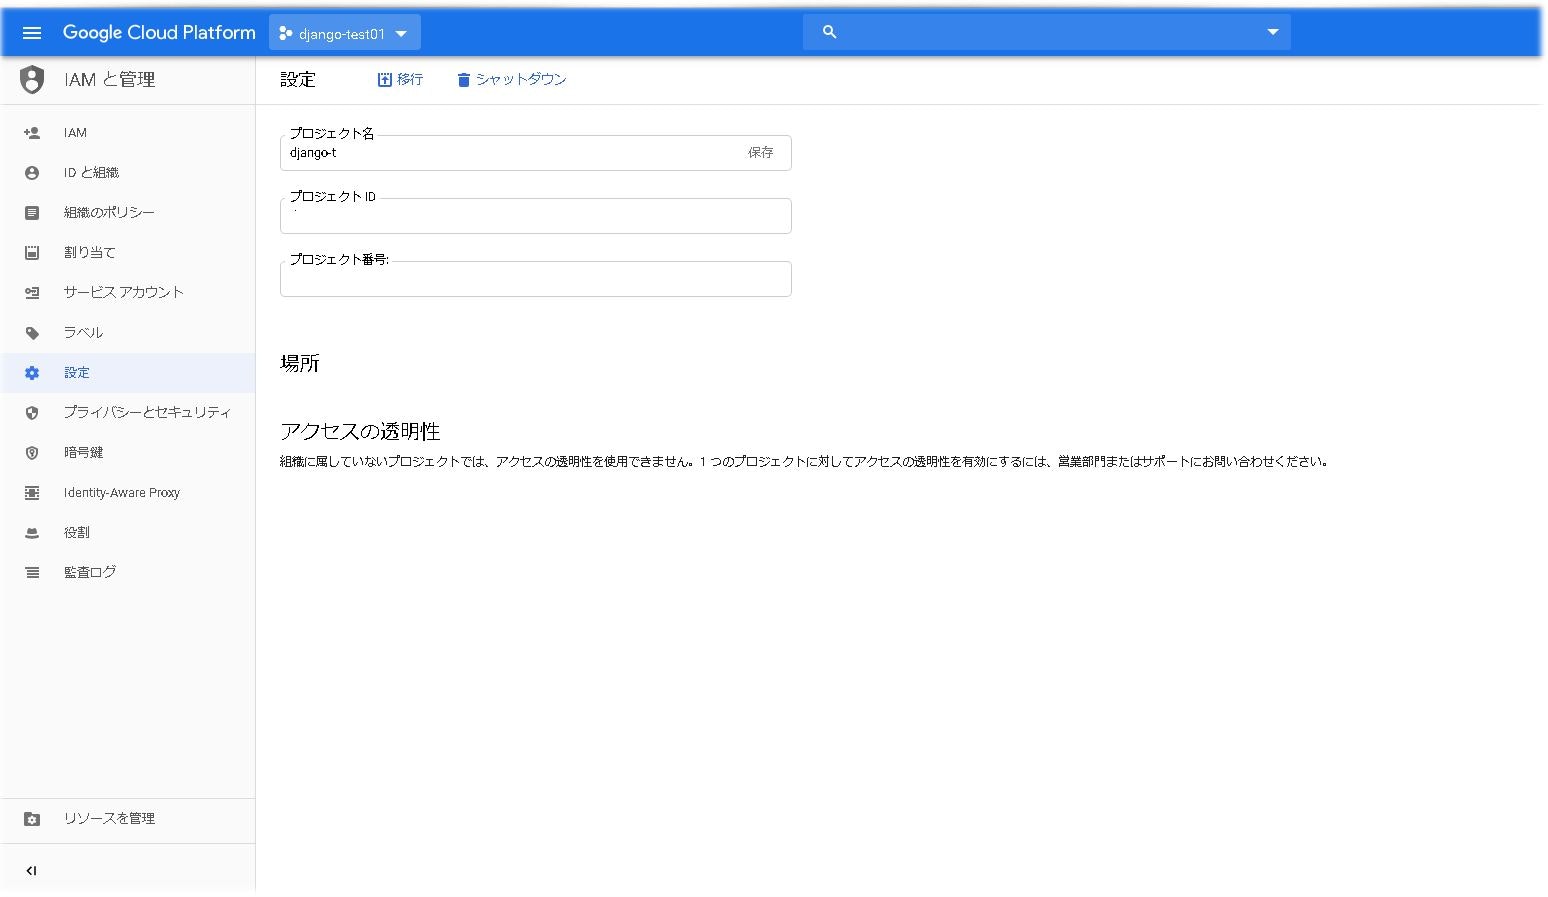
1GCP上にプロジェクトを作成します。
まずGoogle Cloud Platformにプロジェクトを作成しましょう。
「IAMと管理」またはナビゲーションメニューから新しいプロジェクトからプロジェクトを作成します。
プロジェクト名称:django-t
2VMインスタンス作成
続いてインスタンスを作成しましょう。
インスタンスの作成は Compute Engine > VMインスタンスから作成できます。
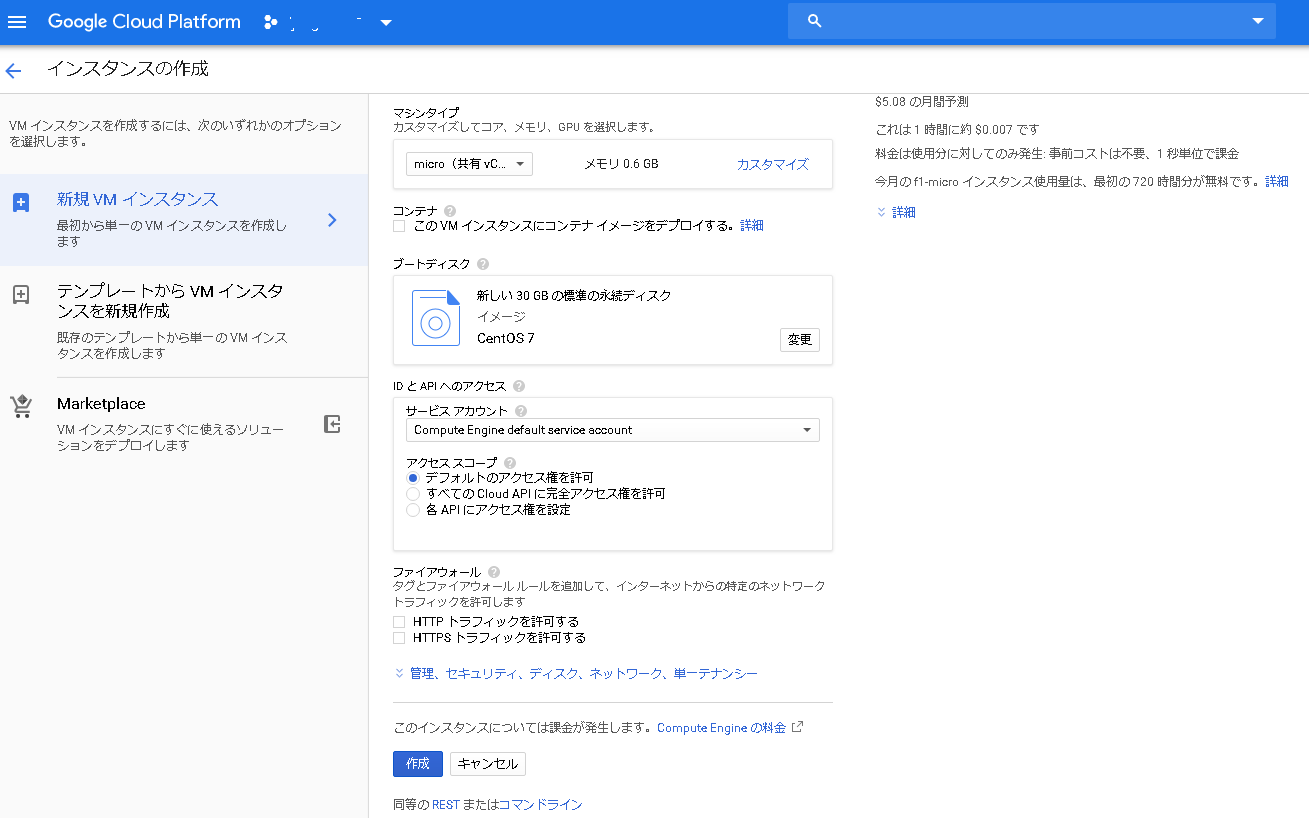
各設定項目については以下をご参考にしてください。
・ゾーン(リージョン)は米国のみ無料枠のため、USから始まるゾーンを選択します
・マシンタイプは無料枠のmicroを設定します
・ブートディスクはCentOS 標準の永続ディスク無料枠分30GBを設定します
・ファイアウォールは両方チェックします
HTTP トラフィックを許可する
HTTPS トラフィックを許可する
3gcloud接続確認
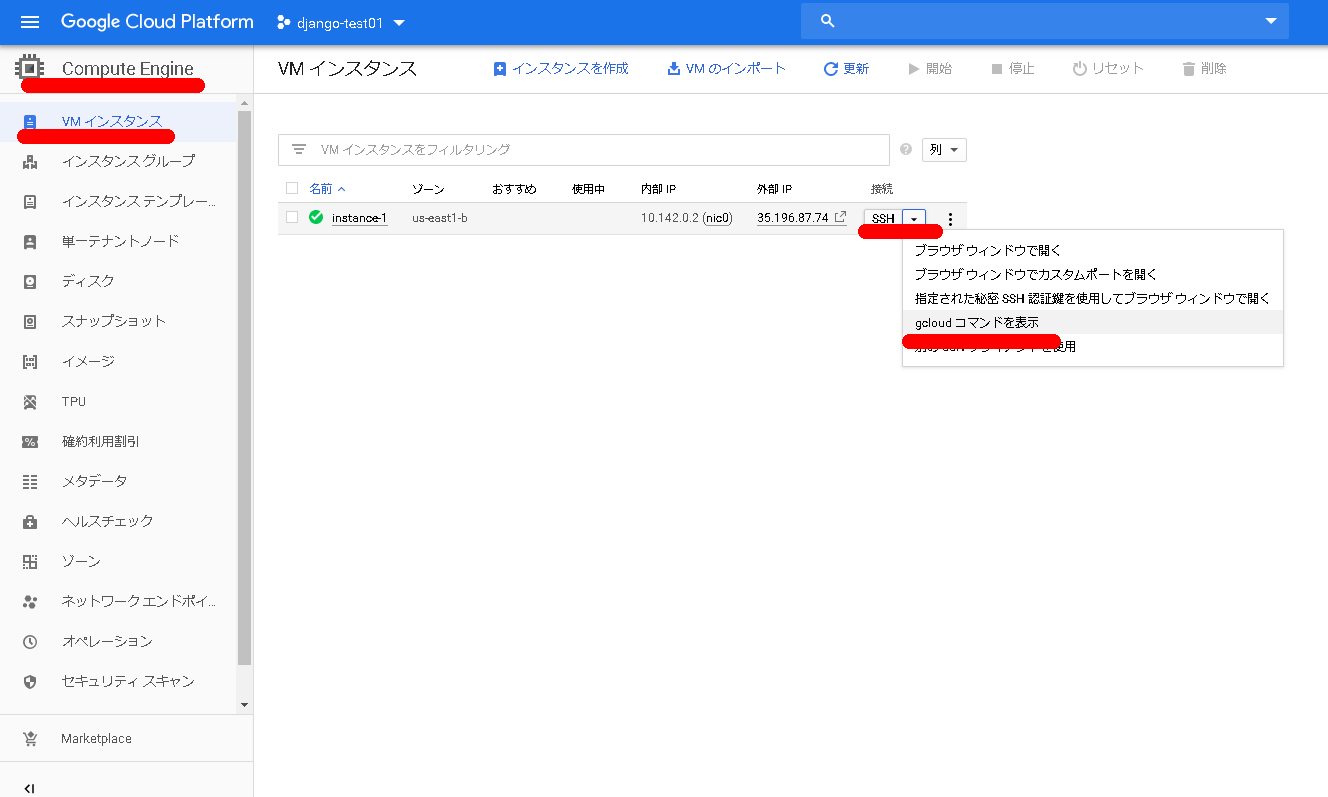
以下画像のとおりVMインスタンス上から「gcloudコマンドを表示」をクリックしてSSHクライアントを起動します。
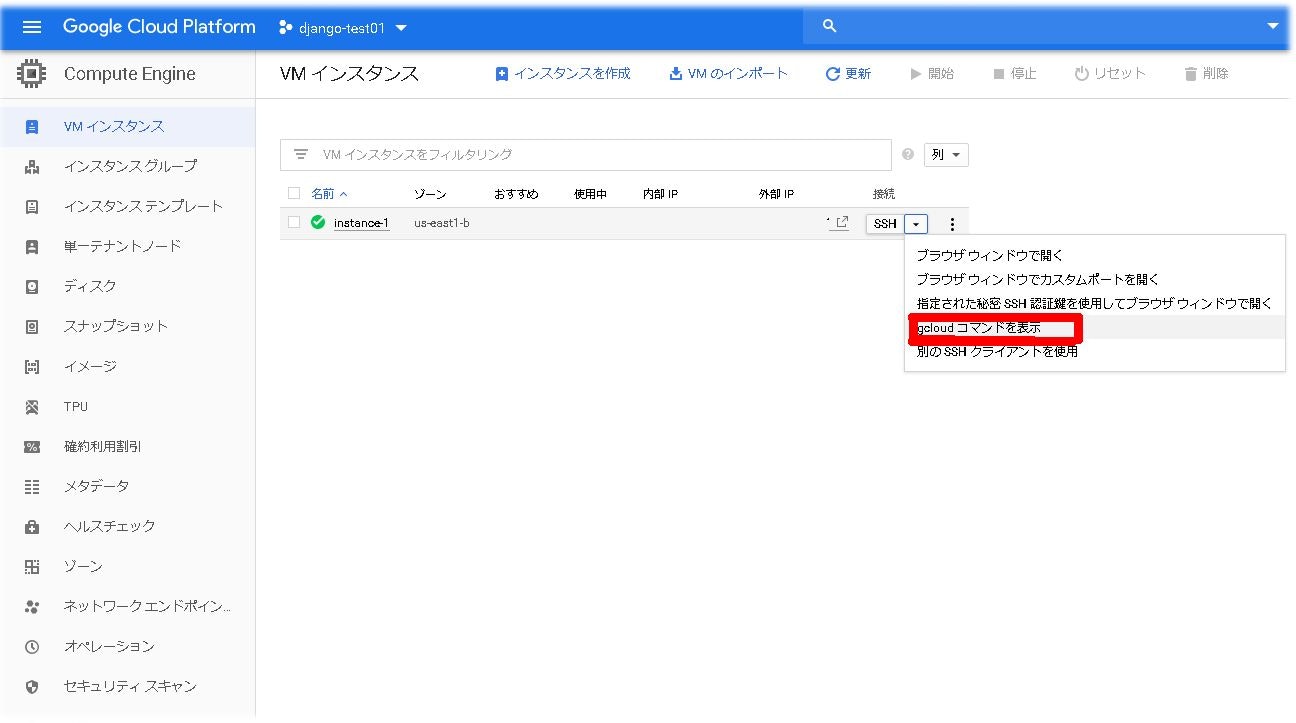
すると以下のような画面が出ます。

「CLOUD SHELLで実行する」をクリックします
SHELL画面が出てくれば成功です。ここから様々なコマンドを打っていきます。
4パス入力
まずはpassを設定しましょう。確認も含めて二回入力します。
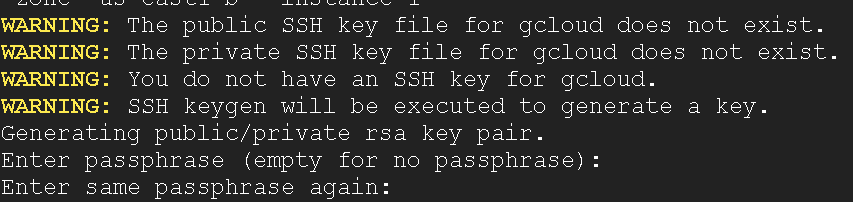
設定したpassを再度入力します。(三回目)

無事接続が出来ました。お疲れ様でした。
5 SSHのセキュリティ対策
デフォルトではポート番号22が使われていますが、
22番は悪意あるユーザに攻撃されやすい環境にあります。その為ポート番号を変更します
VPCネットワーク → ファイアウォールルール → 新しいファイアウォールルールを作成をクリックしてください
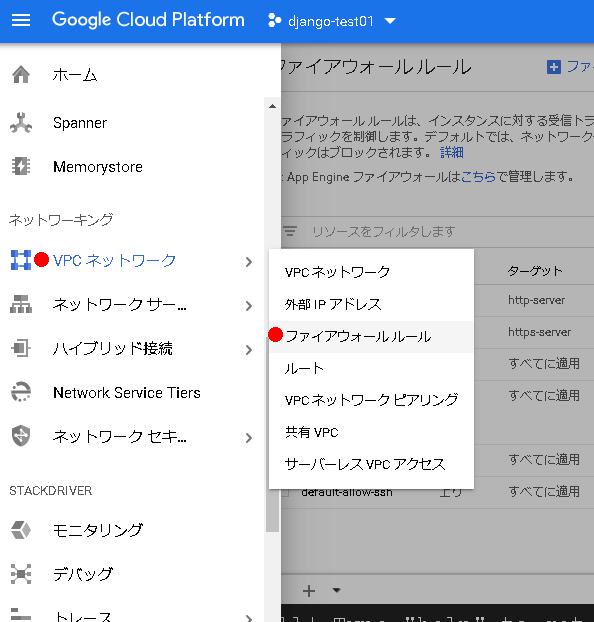
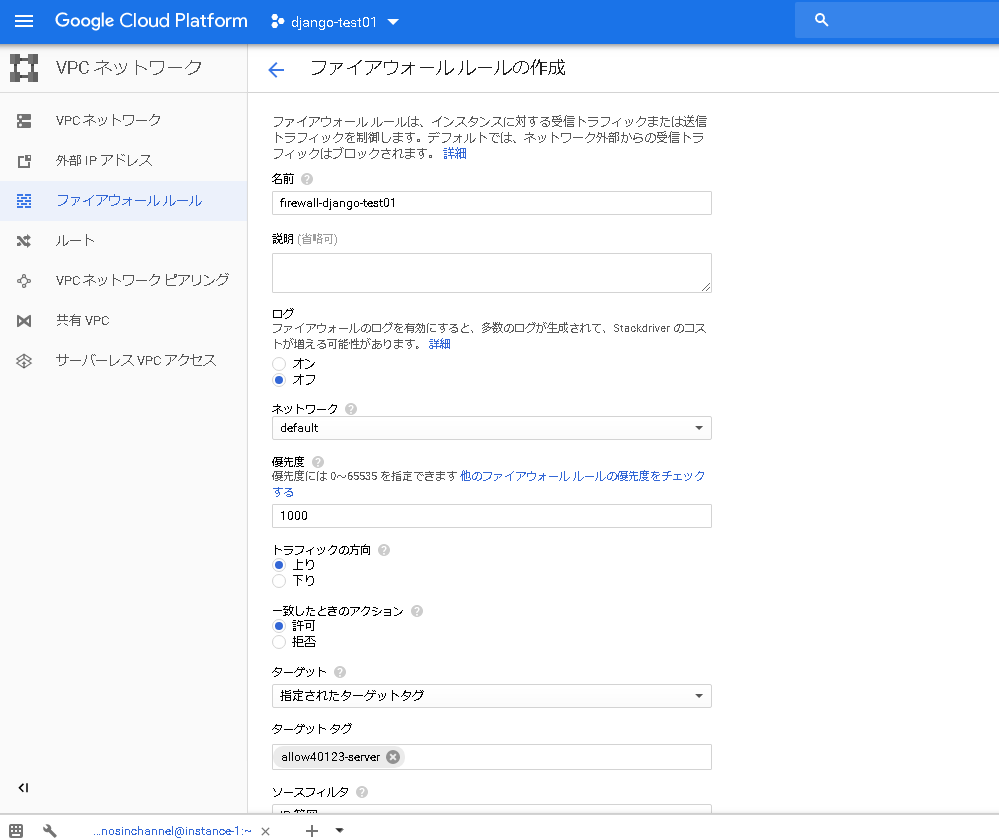
設定内容は以下を参考にしてください。
ターゲットタグ ※ご自身の好きなタグを記載してください。
allow40123-server
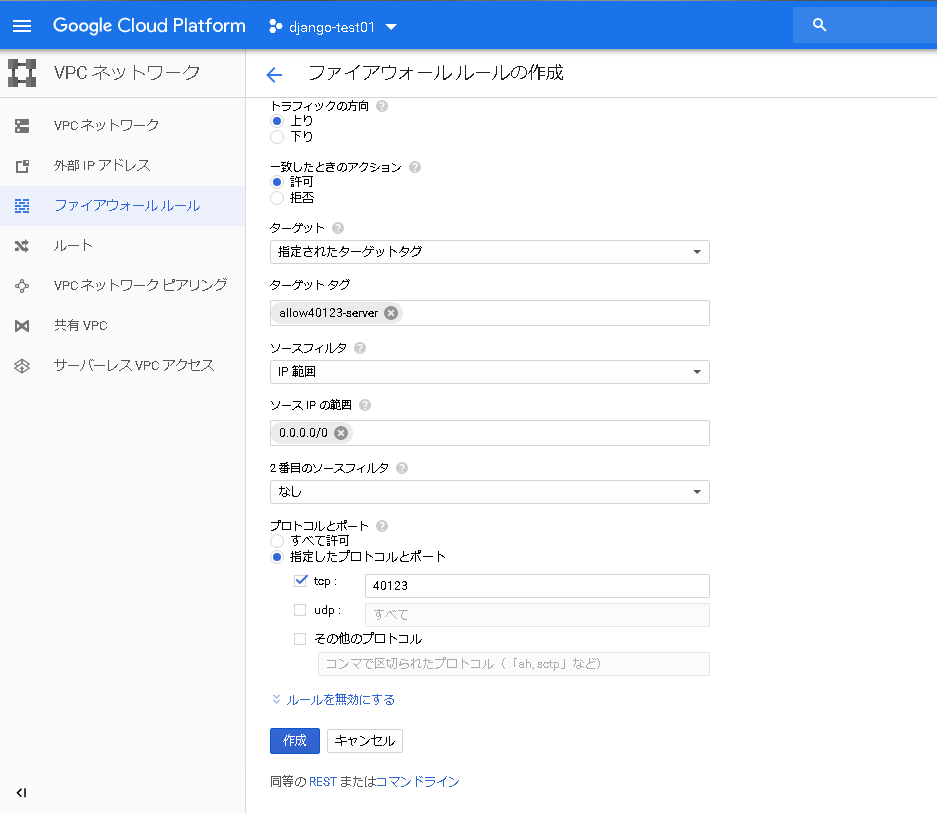
ソース IP の範囲
0.0.0.0/0
プロトコルとポート ※実際に入力する時は40123だけでオーケーです。40123はご自身の好きな番号をポート番号範囲内で設定してください
指定したプロトコルとポート
tcp:40123
該当ポートを許可設定
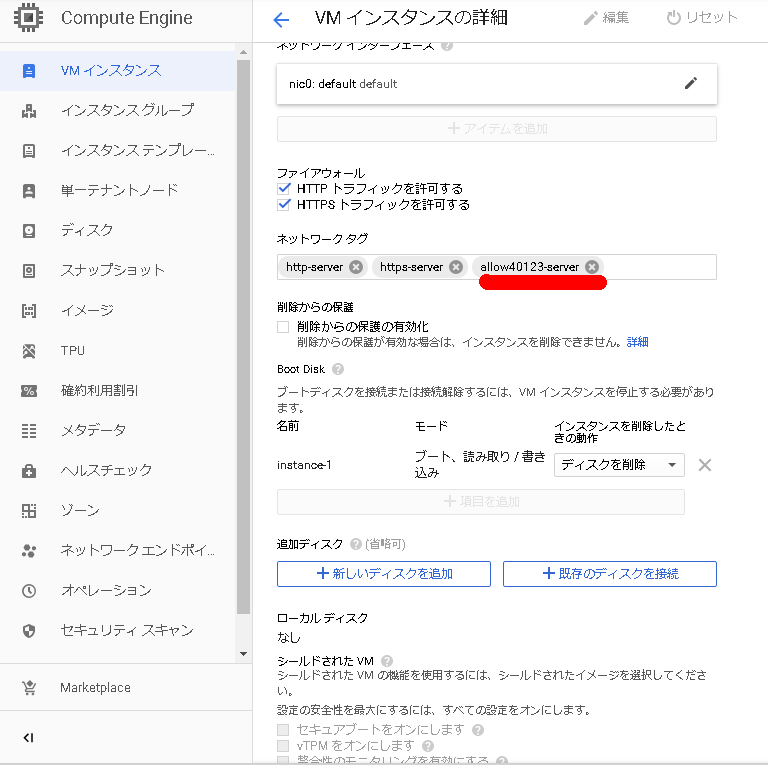
computeEngine → VMインスタンス →instance1 → 編集 をクリックします。
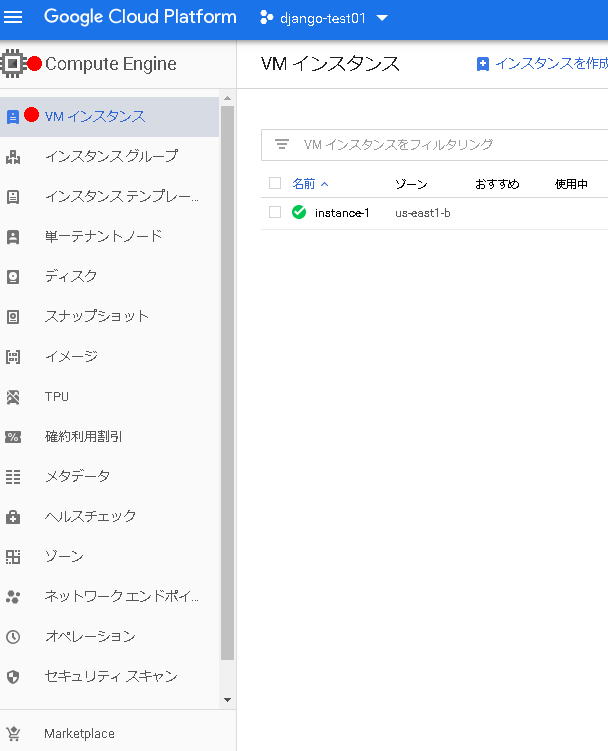
先程設定したターゲットタグ allow40123-server を ネットワークタグの中に入れて保存します。
ターゲットタグ allow40123-server
sshd_config のポート番号の設定を変更
gcloudに接続します。
以下コマンドを打つ
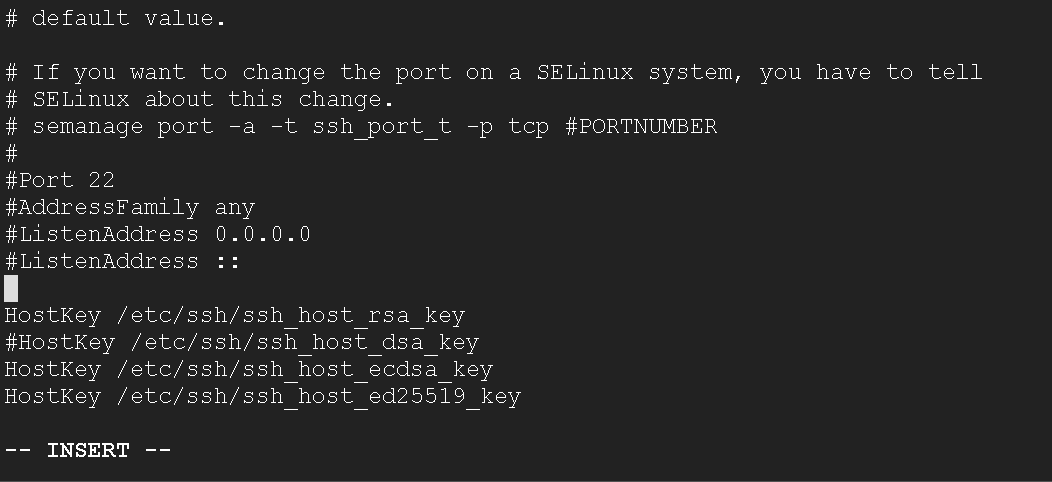
sudo vi /etc/ssh/sshd_config
vimがひらくので[i]を教えてINSERTモードにしてポートを22から40123へ変更する ※ご自身のポート番号を入力
Port 40123
変更前
変更後
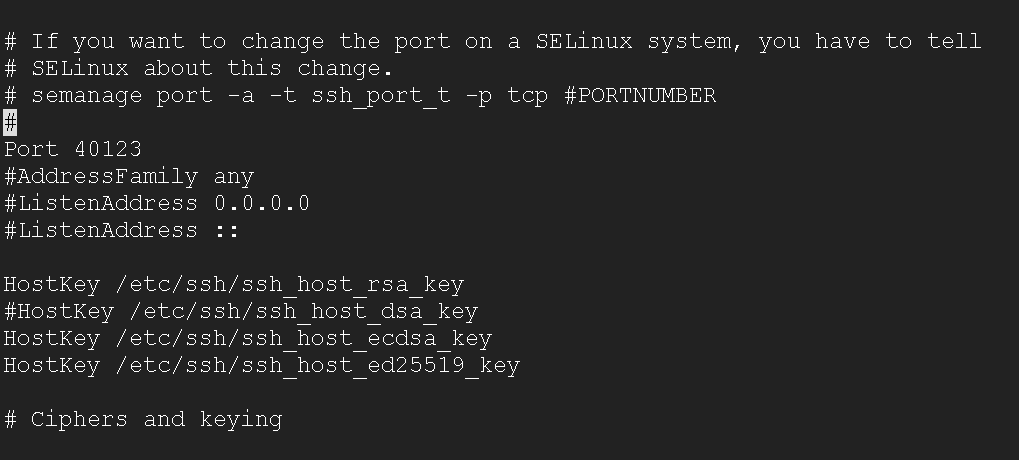
#
-#Port 22
+Port XXXX (XXXX は ご自身のポート番号を入力してください)
#AddressFamily any
#ListenAddress 0.0.0.0
#ListenAddress ::
```
vimに関してはescで編集モードを抜けたら「:wq」で保存して終了してください。
次のコマンドでroot権限でパスワード設定が必要な為、rootでパスを設定しない場合は設定しておきましょう。
```
sudo passwd root
```
rootのパスを設定したら、以下コマンドで再起動しましょう。
```
systemctl restart sshd
```
正常終了した場合は新しく設定したポート番号で待機するようになります。
注意 sshd_config の編集をしたターミナルは閉じずにそのままで
新しく設定したポートでログインできるかを新規に繋いで確認してください。
確認できたら閉じて下さい。

# ポート22 を閉じるルールを追加
新しいポートを開きましたので、続いてポート22を閉じていきます。


方法はポートを開けるときと同様です。設定内容は以下を参考にしてください。
・一致した時のリアクション
拒否
・ルールの名前はわかりやすいものが良いです。例えばallowと対としてdisallow-22に設定
disallow-22
・ソースIPの範囲
0.0.0.0/0
・ターゲットタグ
disallow22-server
# ポート22 を閉じるルールを、サーバにタグ付けします
computeEngine → VMインスタンス →instance1 → 編集 をクリック
先程設定したターゲットタグ disallow22-server を ネットワークタグの中に入れて保存します。
ターゲットタグ disallow22-server

# ポート80 と 443 を開けておきます。

# IPアドレスを固定しておきます。
サーバインスタンスが動いていれば、固定のIPアドレスも1つだけ無料なので利用しましょう。

# 6 請求アラートの設定
GoogleCloudPlatformは忘れた頃に金額請求をされるケースがあります。
トラブルを未然に防ぐ為請求発生時のアラートを検知できる請求アラートを設定しておきましょう。
GCPコンソールのナビゲーションメニューをクリックします。お支払いの[予算とアラート]を選択し、[予算を作成]ボタンをクリックします。

# 7 PuTTYでGCPのインスタンスにSSH接続しましょう
GcpCloudでも接続できますがローカルからSSH接続を出来るようにして直接サーバーに繋ぐ環境を作りましょう。
## PuTTYをインストール
PuTTYのサイトからインストーラーをダウンロード&インストールします。URLは以下を参考にしてください。
https://www.chiark.greenend.org.uk/~sgtatham/putty/latest.html
ご自身にあった環境でファイルをダウンロードします。赤線はwin10x64の事例です。

## puttygenで認証鍵を生成
windowsでPUTTYgenを開きます。

画面を開いたら「Generate」ボタンを押下します。
しばらく待つと、「key_comment」にデフォルトでテキストが入るのでそれを削除して
自分のGCPアカウントを入力する。ex)kenosinchannel

「Save private key」ボタンを押して好きな名前で秘密鍵を保存します。
なおファイルの形式は、ファイル名.ppkとなります。

# GCPに公開鍵を登録
GCPコンソールにアクセスし「Compute Engine」→「メタデータ」を選択します。

メタデータの画面で「SSH認証鍵」タブを選択し「編集」ボタンを押下します。

「項目を追加」ボタンを押下し、「2. puttygenで認証鍵を生成」でコピーしておいた公開鍵を貼り付けて保存する。

# PuTTYでSSH接続
__SESSION__
PuTTYを開き、接続したいGCPのインスタンスのIPもしくはホスト名を入力します。

HOSTName(orIPaddress)
インスタンスのIPはGCPのインスタンスの外部IPを設定してください。
Port
ポートは22ではなく先程ご自身で指定したポート番号を設定してください。

__CONNECTION__
CONNECTIONに移動してDATAをクリックします。
「Connection」→「Data」の「Auto-login username」に自分のGCPアカウントを入力してください。
この場合はkenosinchannel
「Connection」→「SSH」→「Auth」で「2. puttygenで認証鍵を生成」で保存しておいた秘密鍵を設定し、「Opne」ボタンを押してください
以下のように接続されればSSH接続成功です。
# 7 環境を構築
tensorflowの関係上この環境はpython3.5を入れています。
準備が整ったらdjangoをインストールしましょう
今回の開発環境
Python 3.5.3 (default, Sep 27 2018, 17:25:39)
django 2.2.2
[GCC 6.3.0 20170516] on linux
# 8 djangoインストール
```
python3 install django
```
install成功すると以下表記がでます。
```
Successfully installed django-2.2.2 pytz-2019.1 sqlparse-0.3.0
```
pipで正常にdjangoがインストールされているか確認しましょう。
```
pip3 list
Django (2.2.2)
```
djangoのバージョンが出ていれば正常に稼働出来ています。
# 9 スタートプロジェクトの作成 django-admin startproject
djangoのインストールが終了したら
startprojectコマンドを使ってプロジェクトを作成しましょう。
今回はabcprojectというプロジェクトを例にとります。
コマンドcd で一番トップまでディレクトリを移動します。
そして
```
django-admin startproject abcproject
```
```
1つ上のmanage.pyがある対象ディレクトリに移動しましょう
cd abcproject
```
移動したら以下コマンドでrunserver サーバを起動します。
```
py manage.py runserver
```
エラーが出なければ以下のような文がでます。
```
Performing system checks...
System check identified no issues (0 silenced).
You have 13 unapplied migration(s). Your project may not work properly until you apply the migrations for app(s): admin, auth, contentty
pes, sessions.
Run 'python manage.py migrate' to apply them.
June 28, 2019 - 10:01:32
Django version 1.11.21, using settings 'abcproject.settings'
Starting development server at http://127.0.0.1:8000/
Quit the server with CONTROL-C.
```
Starting development server at http://127.0.0.1:8000/
GCPでは http://127.0.0.1:8000/ がクリックできますのでURLをクリックしてください。
画面が出れば成功です。
# 10 settings.py SETUP
フォルダ構成は以下のようになっています。settings.pyがありますね。
cdで移動しましょう。
```
db.sqlite3
manage.py
abcproject
abcproject
__init__.py
settings.py <<<<<<<< TARGET FILE >>>>>>>>>>>>>
urls.py
wsgi.py
```
VIMでsetting.pyを開きましょう。
```
vim setting.py
```
データベースの設定は、mybook/settings.py にありますが、標準では、SQlite3を使うよう設定済ですのでいじらないでOKです。修正箇所は以下3点になります。それぞれ「ホストを許可」「タイムゾーン」「言語」です。
1つめ
```
# ALLOWED_HOSTS = []
ALLOWED_HOSTS = [ "*" ]
```
2つめ
```
# LANGUAGE_CODE = 'en-us'
LANGUAGE_CODE = 'ja'
```
3つめ
```
# TIME_ZONE = 'UTC'
TIME_ZONE = 'Asia/Tokyo'
```
以上3点を上記のように修正したら「:wq」で閉じましょう。
# 11 データベースマイグレート
そして以下コマンドでmanage.pyがあるディレクトリまで1つ上の階層に戻ります。
```
cd ../
```
manage.pyがある階層に戻ったら以下コマンドでDBをマイグレートしましょう。
```
python manage.py migrate
```
```
Operations to perform:
Apply all migrations: admin, auth, contenttypes, sessions
Running migrations:
Applying contenttypes.0001_initial... OK
Applying auth.0001_initial... OK
Applying admin.0001_initial... OK
Applying admin.0002_logentry_remove_auto_add... OK
Applying contenttypes.0002_remove_content_type_name... OK
Applying auth.0002_alter_permission_name_max_length... OK
Applying auth.0003_alter_user_email_max_length... OK
Applying auth.0004_alter_user_username_opts... OK
Applying auth.0005_alter_user_last_login_null... OK
Applying auth.0006_require_contenttypes_0002... OK
Applying auth.0007_alter_validators_add_error_messages... OK
Applying auth.0008_alter_user_username_max_length... OK
Applying sessions.0001_initial... OK
```
のような感じの出力結果であればOKです。
# 11 スーパーユーザの作成
以下コマンドで、スーパーユーザーを作成します。
```
$ python manage.py createsuperuser
Username (leave blank to use 'hoge'): admin
Email address: admin@example.com
Password: hoge
Password (again): hoge
Superuser created successfully.
```
# 12 サーバー起動
python manage.py runserver というコマンドで開発用サーバを起動しましょう。
```
python manage.py runserver
```

# 13 固定IPとサーバURLとの紐づけ
# 14 Google Cloud DNSの設定
GoogleCloudのDNSを設定し独自ドメインを設定しましょう。
独自ドメイン設定の流れはGCP側は大きく以下3つになります。
・DNSゾーンの作成
・Aレコードの追加
・レジストラへの登録
# DNSゾーンの作成
ダッシュボードの左ナビゲーションメニューより「ネットワークサービス」>「Cloud DNS」をクリックします。

GC DNS一覧画面で「ゾーンを作成」をクリックします。

ゾーンのタイプ、ゾーン名、DNS名、DNSSECを入力し作成を選択
ゾーンのタイプ:公開
ゾーン名:任意
DNS名:任意
DNSSEC:オン

Aレコードを追加します。
wwwを追加しました。DNS名を入力し作成を選択


# 15 ムームードメイン側の設定
GMOパペポ以外のネームサーバを使用するにチェックをいれ、Cloud DNSゾーン詳細のタイプNSにあるデータを1行づつ追加し、一番したの設定変更を選択。※コピペだと最後に「.」がついていてエラーになりました。「.」は外しましょう。

```
ns-cloud-c1.googledomains.com
ns-cloud-c2.googledomains.com
ns-cloud-c3.googledomains.com
ns-cloud-c4.googledomains.com
```
参考URL
https://qiita.com/tomy0610/items/adc839be9d100c0daf96
http://www.vlifestance.info/gcp-privatedomain/
# 99 以下エラーなどご参考 ◆◆◆◆◆◆◆◆◆◆◆◆◆◆◆◆◆◆◆◆◆◆◆◆◆◆◆◆◆◆◆◆◆◆◆◆◆◆◆◆◆◆
```
export PATH=$PATH:~/.local/bin
which django-admin
```
もう一度djangoの起動をかけます。
```
django-admin startproject abcproject
```
```
ls -al
Jun 27 20:59 abcproject
```
abcproject 該当ファイルが作成されている事を確認してください。
# 10 django各種ファイル設定
__setteing.py__
まずsetting.pyを開きます。
```
$ cd abcproject
$ ls -al
Jun 27 20:59 settings.py
$ vim settings.py
```
ALLOWED_HOSTSを探してあげて*を入れてあげて許可します。
```
# SECURITY WARNING: don't run with debug turned on in production!
DEBUG = True
ALLOWED_HOSTS = ['*']
# Application definition
```
:wqで閉じてrunserverを実行します。
```
python3 manage.py runserver
```
その為以下コマンドでまず仮想環境を入れてあげます。
testvenvの部分は仮想環境名称なのでご自身の好きな名前に変更してください。
```
python3 -m venv --without-pip testvenv
```
ディレクトりを移動してtestvenvの中でactivateしてあげます。
```
cd testvenv
source bin/activate
```
```
kenosinchannel@cloudshell:~ (django-test01-244918)$ ls -al →→→→ ファイル表示コマンド
kenosinchannel kenosinchannel 4096 Jun 27 20:11 testvenv →→→→ 先程作った仮想環境がありました。
kenosinchannel@cloudshell:~ (django-test01-244918)$ cd testvenv →→→→ cdで移動します
kenosinchannel@cloudshell:~/testvenv (django-test01-244918)$ source bin/activate →→→→ 移動したらactivateします
(testvenv) kenosinchannel@cloudshell:~/testvenv (django-test01-244918)$ →→→→ 左側に(testvenv) 仮想環境ですね!
```
source bin/activate で仮想環境の中に入ります。
以下のように()の中に環境名称が入っていれば仮想環境構築成功です。
```
(testvenv) xxx@cloudshell:~/testvenv (django-test01-244918)$
```
```
django-admin startproject コマンドで以下エラーが出ました。パスが通ってないようです。
```
-bash: django-admin: command not found
```
早速django-adminファイルを探しにいきましょう。まずdjango-admin ファイルがどこにあるかをコマンドで探りにいきます。それらしきDirを見つけました。
```
sudo find / | grep django-admin
/home/xxx/.local/bin/django-admin
/home/xxx/.local/bin/__pycache__/django-admin.cpython-35.pyc
/home/xxx/.local/bin/django-admin.py
```
実際に探りにいくとdjango-admin.pyがありました。
```
ls ~/.local/bin/
__pycache__ django-admin django-admin.py
```
該当ファイルdjango-adminを探しあてたら /usr/bin/ 配下にリンクを作成します。つまりパスを通してあげましょう
念の為、以下2つのコマンドで対象となるディレクトリを探ります。
1pip3 show django のコマンドをたたき上のロケーション
2ターミナルではなくpythonを開き >>> import sys; print(sys.path)上のパス
2つのコマンドをたたきました。それぞれ結果は以下です。
```
/home/xxx/.local/lib/python3.5/site-packages
/home/xxx/testvvv/lib/python3.5/site-packages
```
ディレクトリが微妙に違っていますね。
```
export PYTHONPATH="/home/xxx/.local/lib/python3.5/site-packages:$PYTHONPATH"
export PYTHONPATH="/home/xxx/testvvv/lib/python3.5/site-packages:$PYTHONPATH"
```
abcprojectのmanage.pyがあるフォルダまで移動してあげます。
```
(testvenv) kenosinchannel@cloudshell:~/testvenv (django-test01-244918)$ cd abcproject
(testvenv) kenosinchannel@cloudshell:~/testvenv/abcproject (django-test01-244918)$ dir
abcproject manage.py
(testvenv) kenosinchannel@cloudshell:~/testvenv/abcproject (django-test01-244918)$
```
もしも以下のようなエラーが出たら以下三つのどれかに原因があります。
```
ImportError: Couldn't import Django. Are you sure it's installed and available on your PYTHONPATH environment variable? Did you forget to activate a virtual environment?
```
1) [インポートエラー] Django がインポートできません
2) Djangoはインストールされていますか?そしてそれが 環境変数 PYTHONPATH している場所にありますか?
3) 仮想環境(virtualenv)を開始することを忘れていませんか?
```
Traceback (most recent call last):
File "manage.py", line 10, in main
from django.core.management import execute_from_command_line
ImportError: No module named 'django'
The above exception was the direct cause of the following exception:
Traceback (most recent call last):
File "manage.py", line 21, in <module>
main()
File "manage.py", line 16, in main
) from exc
ImportError: Couldn't import Django. Are you sure it's installed and available on your PYTHONPATH environment variable? Did you forget to activate a virtual environment?
```
virtualenvもしくはcondaの場合はそれぞれ以下コマンドをたたく
virtualenvの場合 (今回)
```
source ./bin/activate
source bin/activate
```
condaの場合
```
source activate projectname
```
現在のディレクトリの場所を確認して
```
@cloudshell:~/testvenv/bin (django-test01-244918)$ cd ./
@cloudshell:~/testvenv/bin (django-test01-244918)$ source activate
```
上記のいずれかの後にpython manage.py runserverを実施する
参考URL
https://teratail.com/questions/130346