要約
TerraformでGoogleアカウント管理する方法
- 実行用のサービスアカウントの作成
- Google Workspaceドメイン全体の委任の有効化
- OAuth 同意画面の設定
- Terraformコードの作成・デプロイ
背景
GCPを操作するアカウントはプリンシパルとされ以下の種類があります。
- Googleアカウント
- サービスアカウント
- Googleグループ
- Google Workspaceアカウント
- Cloud Identityドメインのドメイン名
このうち、人のが利用するアカウントは、Google アカウント、Googleグループ、Google Workspace(Cloud Identity)アカウントとなっています。
企業でGCPを使う場合、開発者のアカウントは個人のGoogleアカウント(Gメールアドレス)ではなく、Google Workspace(Cloud Identity)にてユーザー管理 (新規発行またはAD連携による発行など) します。
また、GCPのリソースの権限付与(IAM)は、Google Workspace アカウントではなく、Google WorkspceアカウントをまとめたGoogleグループに対して付与します。各個人の権限付与は、このGoogleグループへのアカウント追加、削除によりおこないます。これら一連のGoogle Workspaceのアカウント作成、Google グループに対しての操作は、Google Workspace上でおこなわれます。
当該記事では、Admin SDK APIを使いTerraformによって、Google Workspaceでのアカウント管理する方法を説明します。
(本記事での作業では、Google Workspaceの管理者およびプロジェクトに対してオーナー権限を有するユーザーで実施しています。)
Admin SDK APIによるGoogle Workspaceを操作する準備
Admin SDK APIを使いGoogle Workspaceを管理するには、Google Workspace Admin SDKのDirectory APIを使います。
利用方法は、以下の通りとなっています。
- 任意のGCPプロジェクトにて、APIを実行するアプリケーション用のサービスアカウントの作成
- Google Workspaceで「ドメイン全体の委任」への1のサービスアカウントの追加
- GCPでGoogle Workspace Marketplace OAuthクライアントの設定
以下では、2、3の手順を詳細に示します。1の手順であるサービスアカウントの作成は、省略します。サービスアカウント作成の具体的な方法は、公式ページを参照してください。
2.サービスアカウントへのドメイン全体の委任
ここでは作成したサービスアカウントへのドメイン全体の委任の方法について説明します。
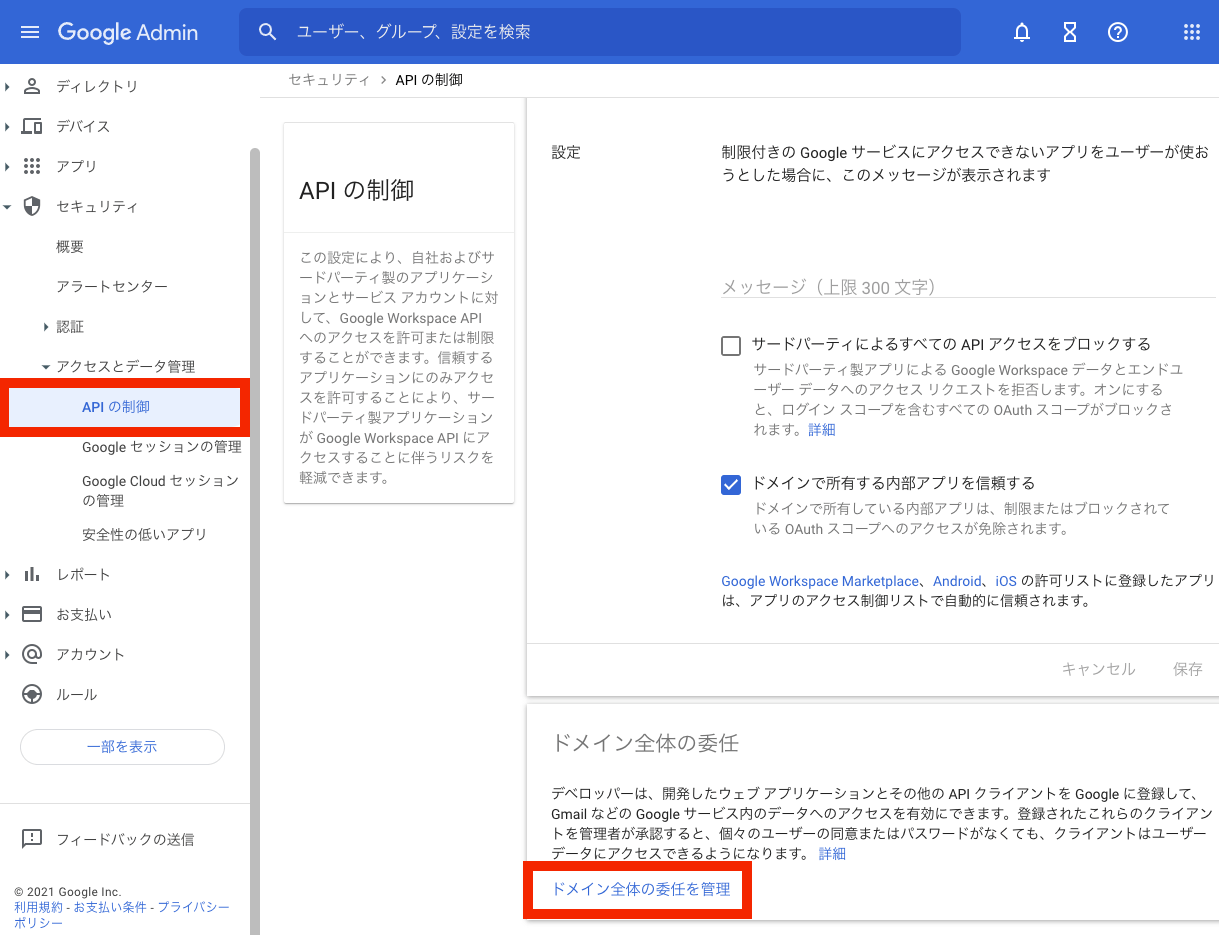
Google Workspaceの管理コンソールへログインし、セキュリティのアクセスとデータ管理のAPI制御からドメイン全体の委任を管理する画面へアクセスします。
ドメイン全体の委任画面で、新しいクライアントIDを追加します。クライアントIDにサービスアカウントの一意のID※を追加し、OAuthスコープに下記を追加します。
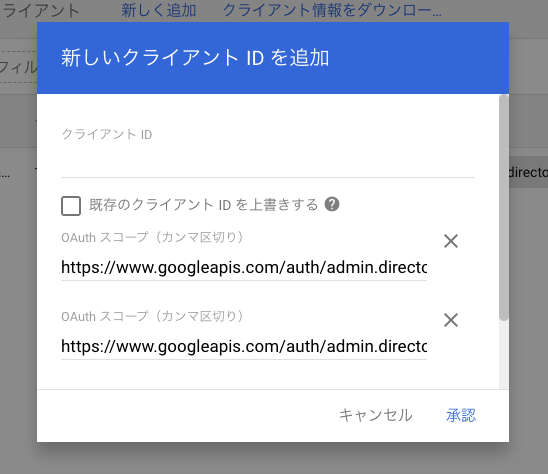
また、Google Workspaceのユーザー追加以外のリソースを操作するOAuthスコープは、当該ページを参照してください。
ドメイン全体の委任のAPIクライアント一覧に登録したAPIが追加されます。
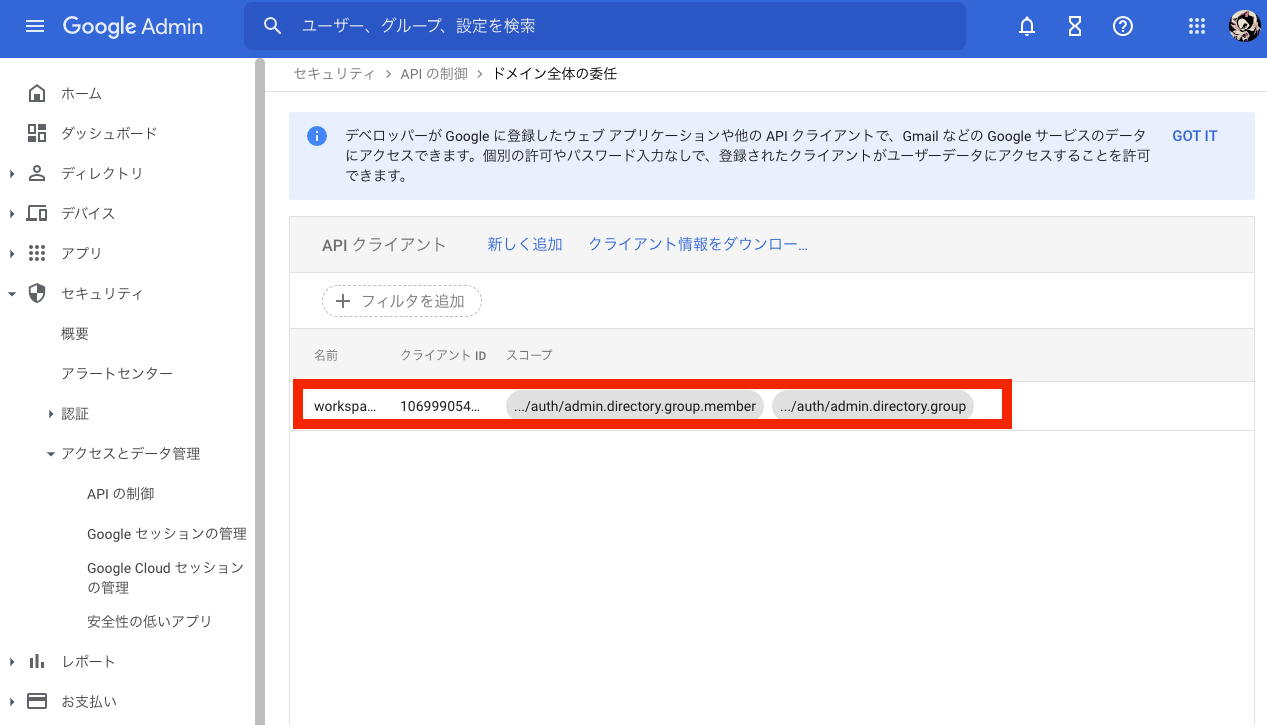
[追加するスコープ]
※サービスアカウントの一意は、サービスアカウントの詳細から確認ができます。
3.Google Workspace OAuthクライアントの作成
ここでサービスアカウントに対して、Google WorkspaceのOAuthクライアントを作成します。
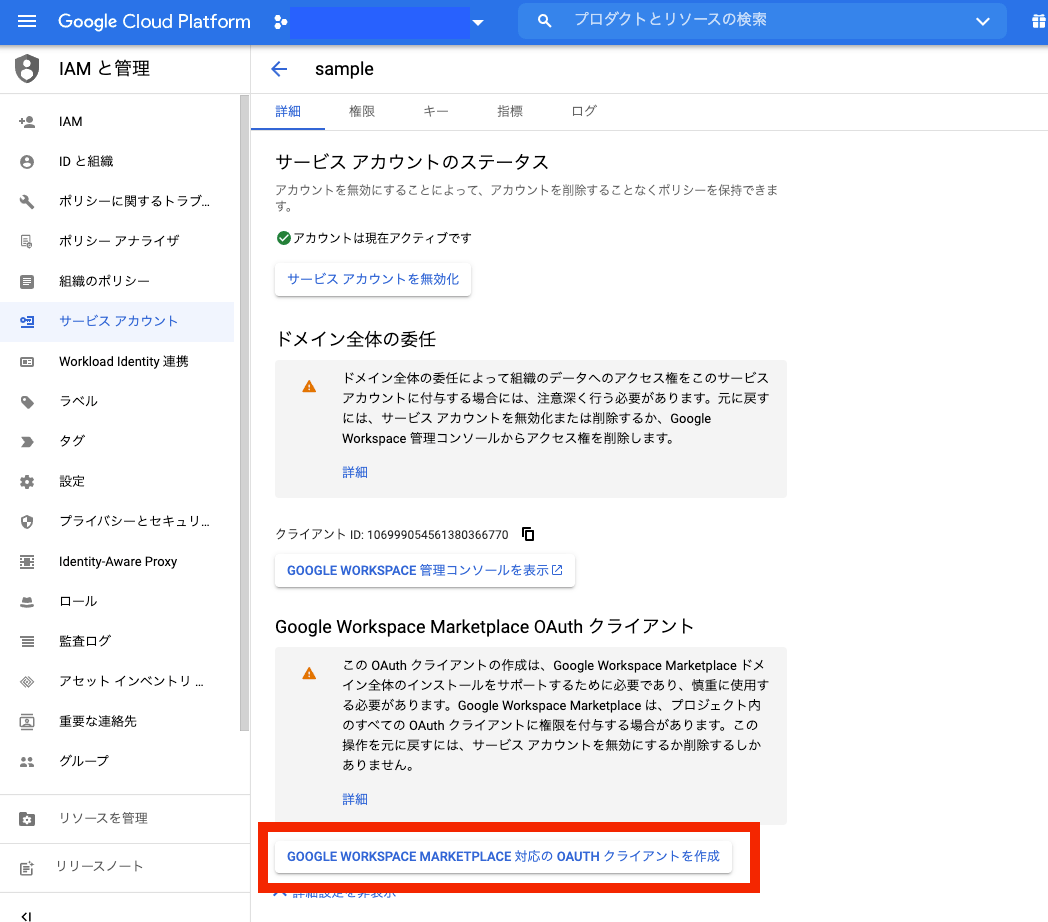
OAuthクライアントを作成するサービスアカウントの詳細ページから詳細設定を表示させます。
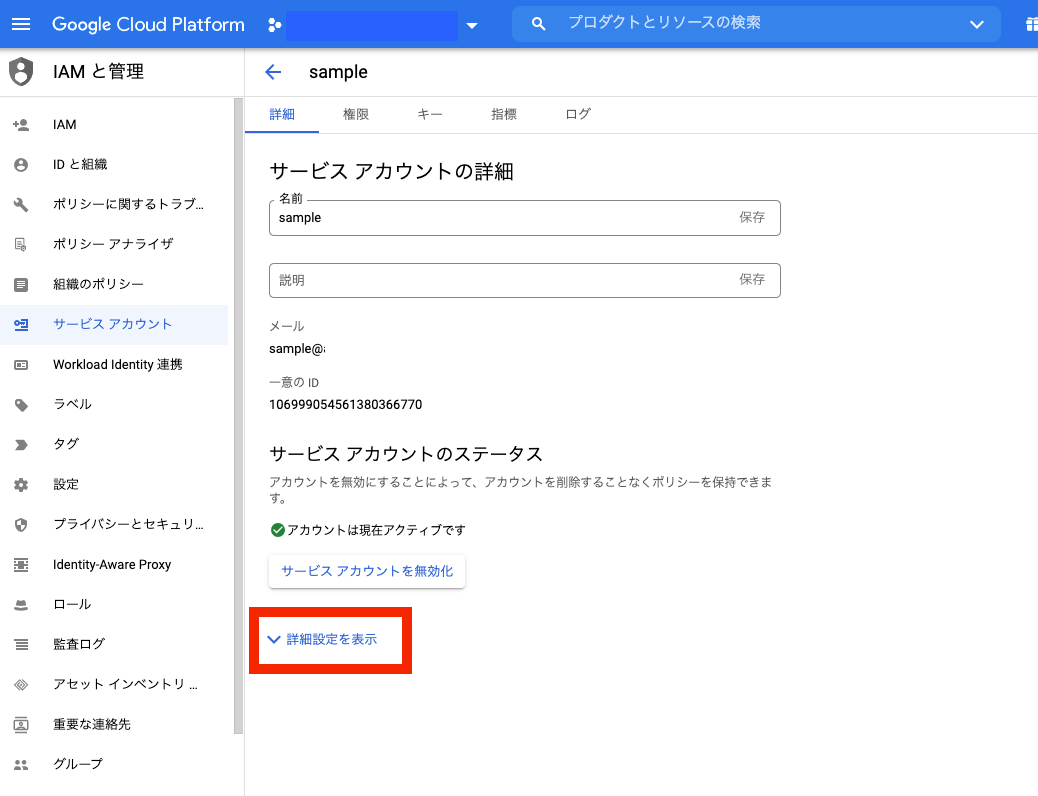
詳細設定のGoogle Workspace Marketplace OAuthクライアントから、OAuthクライアントの作成をします。
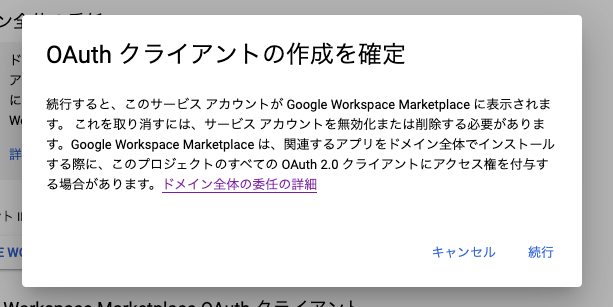
作成が完了すると、「Google Workspace Marketplace 対応の OAuth クライアントが作成されました。」と表示されます。
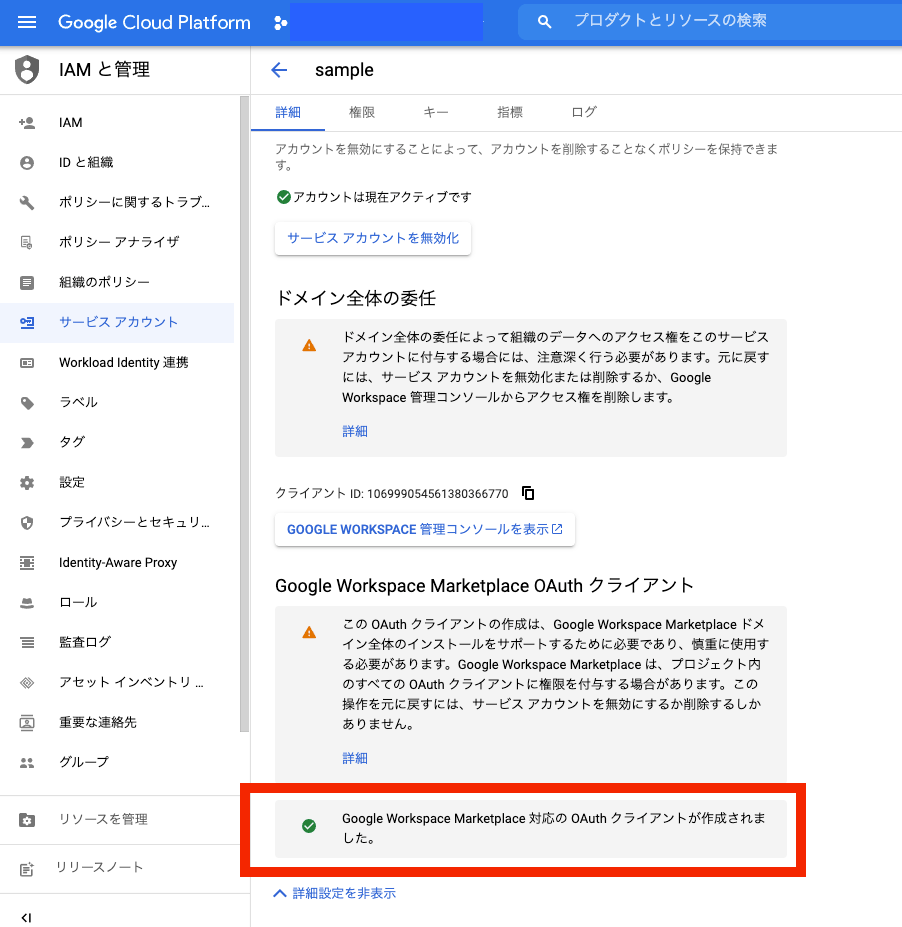
以上のサービスアカウントに対して、ドメイン全体の委任とOAuthクライアントの作成をすることで、設定したサービスアカウントでGoogle Workspaceの管理が可能となります。次に、当該設定をおこなったサービスアカウントを認証情報として、TerraformによってGoogle Workspaceを管理する方法を示します。
TerraformによるGoogle Workspaceの管理
ここでは、先のOAuthクライアントの設定をしたサービスアカウントを使い、TerraformでGoogle Workspaceでユーザーを作成する方法を示します。
まず始めにTerraformで実行するためのプロバイダの設定方法を説明し、その後サンプルのGoogle Workspaceユーザーを作成する方法を説明します。
ローカル環境でGoogle Workspaceを管理する方法
TerraformでGoogle Workspaceを認証させるにあたり、先のOAuthクライアントを設定したサービスアカウントを指定します。指定の方法は、以下の通りになります。
- サービスアカウントの鍵の追加と、ローカルの環境への鍵ファイルの保存
- 環境変数
GOOGLEWORKSPACE_CREDENTIALSへの鍵ファイルのパスの指定
Google Workspaceを管理するTerraformプロバイダは、Google Workspace Providerとなります。
Google Workspaceのプロバイダの設定では、以下の設定が必要となります。
- 顧客ID (customer_id)
- 実行ユーザーemailアドレス (impersonated_user_email)
- OAuth スコープ (oauth_scopes)
顧客IDは、Google Workspaceの顧客IDとなっており、Google Adminのアカウント設定より表示されます。
実行ユーザーemailアドレスは、環境変数GOOGLEWORKSPACE_IMPERSONATED_USER_EMAIL に指定することで代替が可能となります。
上記を指定したプロバイダのコードは、以下のようになります。
provider "googleworkspace" {
  customer_id             = "顧客ID"
  impersonated_user_email = "実行するemailアドレス"
  oauth_scopes = [ "ドメイン全体の委任のAPIクライアント一覧でクライアント追加したときのスコープ" ]
}
次にgoogleworkspace_userリソースを使って、sampleユーザーを作成するTerraformコードは下記の様になります。
resource "googleworkspace_user" "main" {
  primary_email = "アカウントのemailアドレス"
  name {
    family_name = "sample"
    given_name  = "test"
  }

  password = "アカウントのパスワード"
}
上記コードを実行すると、以下のようになります。
$terraform apply

Terraform used the selected providers to generate the following execution plan. Resource actions are indicated with the following symbols:
  + create

Terraform will perform the following actions:

  # googleworkspace_user.main will be created
  + resource "googleworkspace_user" "main" {
      + agreed_to_terms                    = (known after apply)
      + creation_time                      = (known after apply)
      + customer_id                        = (known after apply)
      + deletion_time                      = (known after apply)
      + etag                               = (known after apply)
      + id                                 = (known after apply)
      + include_in_global_address_list     = true
      + is_admin                           = (known after apply)
      + is_delegated_admin                 = (known after apply)
      + is_enforced_in_2_step_verification = (known after apply)
      + is_enrolled_in_2_step_verification = (known after apply)
      + is_mailbox_setup                   = (known after apply)
      + last_login_time                    = (known after apply)
      + non_editable_aliases               = (known after apply)
      + org_unit_path                      = (known after apply)
      + password                           = (sensitive value)
      + primary_email                      = "アカウントのemailアドレス"
      + suspension_reason                  = (known after apply)
      + thumbnail_photo_etag               = (known after apply)
      + thumbnail_photo_url                = (known after apply)

      + name {
          + family_name = "sample"
          + full_name   = (known after apply)
          + given_name  = "test"
        }
    }

Plan: 1 to add, 0 to change, 0 to destroy.
googleworkspace_user.main: Creating...
googleworkspace_user.main: Still creating... [10s elapsed]
googleworkspace_user.main: Still creating... [20s elapsed]
googleworkspace_user.main: Still creating... [30s elapsed]
googleworkspace_user.main: Still creating... [40s elapsed]
googleworkspace_user.main: Still creating... [50s elapsed]
googleworkspace_user.main: Creation complete after 56s [id=112234294381824266649]

Apply complete! Resources: 1 added, 0 changed, 0 destroyed.
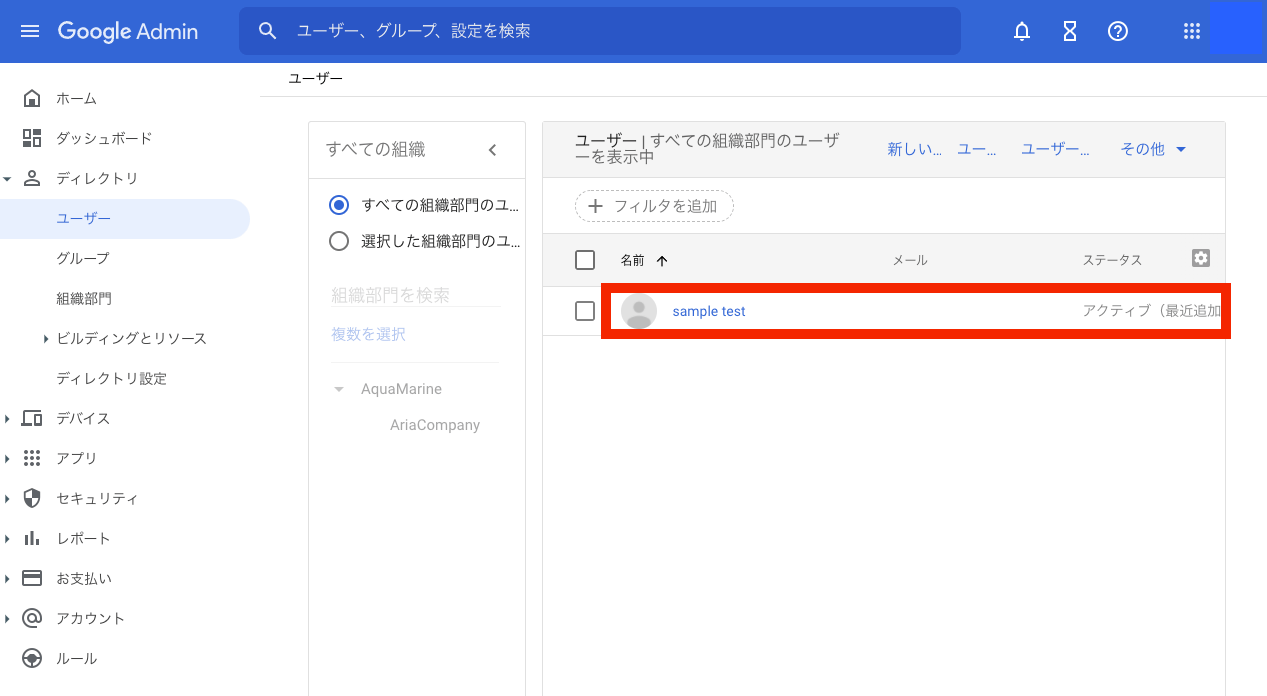
実行すると、Google Workspace上にアカウントが作成されています。
まとめ
本記事では、Admin SDK APIを使いGoogle Workspace上でGoogle Workspace アカウントを作成する方法を説明しました。
OAuthスコープにGoogle グループを作成するスコープとGoogle グループにアカウントを追加するスコープを追加することで、当該記事で説明した方法と同じようにTerraformでGoogleグループの作成および管理が可能となります。
また、Cloud Build上で実行できるように設定することで、Google Workspaceのアカウント管理をCIエージェントで管理が可能となります。
