actionbarのカスタマイズ
actionbarは非常に便利だけれども、カスタマイズが少し面倒。
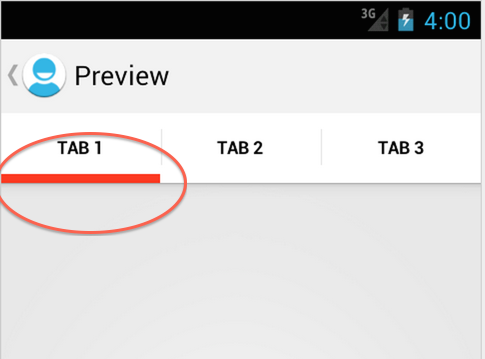
しかしactionbarのタブの背景色を変えたりとか、線の色を変えたりとかは実際ニーズとしてよくある。
ちなみにタブの線ってこれのことです。
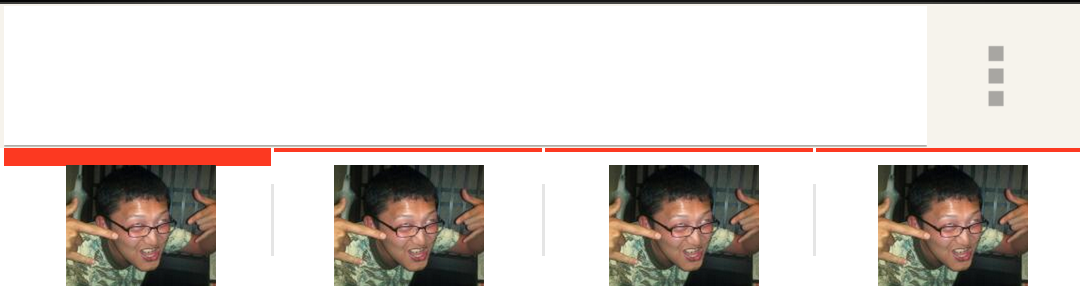
実際に実装してみた。
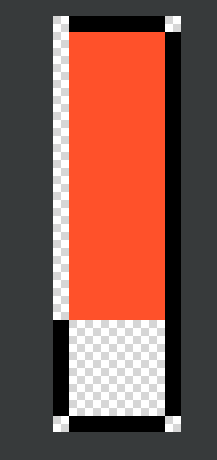
デフォルトテーマにおいての線の実体
SupportLibrary使用時のTabViewのスタイルは、AOSPコードの中の "frameworks/support/v7/appcompat/res/values/styles_base.xml" で定義されている。
    <style name="Widget.AppCompat.Base.ActionBar.TabView" parent="">
        <item name="android:background">@drawable/abc_tab_indicator_ab_holo</item>
        <item name="android:gravity">center_horizontal</item>
        <item name="android:paddingLeft">16dip</item>
        <item name="android:paddingRight">16dip</item>
        <item name="android:minWidth">80dip</item>
    </style>
このbackgroundに指定している"@drawable/abc_tab_indicator_ab_holo"が、選択時に線の画像を表示するというセレクタファイルになっている。
よってここからリンクされている "frameworks/support/v7/appcompat/res/drawable-xhdpi/abc_tab_hogehoge_holo.9.png" と言うファイルが、実体なので、これを上下逆さまにしてやると、線が上にくる。
画像の入手
Android Action Bar Style Generatorが非常に便利。
ここで画像データとかxmlがまとめて入手できるが、今回はtabの線だけ変えたいので、
- tab_selected.9.png
- tab_selected_focused.9.png
- tab_selected_pressed.9.png
- tab_unselected.9.png
- tab_unselected_focused.9.png
- tab_unselected_pressed.9.png
の画像データを入手する。
画像を上下反転
上で入手した画像データを上下反転する。
MacのプレビューとかでOK。
ただし、反転した際に、黒のカラーコードがおかしくなってしまう現象が起こることがあるようだ。
こうなった場合は面倒だが、Draw 9-path Toolで伸縮範囲を定めてあげる必要がある。
こんなかんじで。
スタイルの設定
Style Generatorに同封されていたactionbar_tab_indicator.xmlをdrawableフォルダに入れる。
中身はこんな感じ。
<selector xmlns:android="http://schemas.android.com/apk/res/android">

    <!-- STATES WHEN BUTTON IS NOT PRESSED -->

    <!-- Non focused states -->
    <item android:state_focused="false" android:state_selected="false"
        android:state_pressed="false"
        android:drawable="@drawable/tab_unselected" />
    <item android:state_focused="false" android:state_selected="true"
        android:state_pressed="false"
        android:drawable="@drawable/tab_selected" />

    <!-- Focused states (such as when focused with a d-pad or mouse hover) -->
    <item android:state_focused="true" android:state_selected="false"
        android:state_pressed="false"
        android:drawable="@drawable/tab_unselected_focused" />
    <item android:state_focused="true" android:state_selected="true"
        android:state_pressed="false"
        android:drawable="@drawable/tab_selected_focused" />


    <!-- STATES WHEN BUTTON IS PRESSED -->

    <!-- Non focused states -->
    <item android:state_focused="false" android:state_selected="false"
        android:state_pressed="true"
        android:drawable="@drawable/tab_unselected_pressed" />
    <item android:state_focused="false" android:state_selected="true"
        android:state_pressed="true"
        android:drawable="@drawable/tab_selected_pressed" />

    <!-- Focused states (such as when focused with a d-pad or mouse hover) -->
    <item android:state_focused="true" android:state_selected="false"
        android:state_pressed="true"
        android:drawable="@drawable/tab_unselected_pressed" />
    <item android:state_focused="true" android:state_selected="true"
        android:state_pressed="true"
        android:drawable="@drawable/tab_selected_pressed" />
</selector>
テーマの設定
<resources>
    <style name="AppTheme" parent="Theme.AppCompat.Light">
        <item name="android:actionBarTabStyle">@style/ActionBarTabs</item>

        <!-- API level 10以下用 -->
        <item name="actionBarTabStyle">@style/ActionBarTabs</item>
    </style>

    <!-- タブの線の色を赤にして、上部に表示する-->
    <style name="ActionBarTabs" parent="@style/Widget.AppCompat.ActionBar.TabView">
        <item name="android:background">@drawable/actionbar_tab_indicator</item>
        <!-- API level 10以下用 -->
        <item name="background">@drawable/actionbar_tab_indicator</item>
    </style>

</resources>
するとこんな感じになる。