はじめに
Azure Functions用のアプリケーションをローカルPC上で開発して、色々なデプロイ方法でAzure上にデプロイしてみたいと思います。参考にしたサイトは以下になります。
https://code.visualstudio.com/tutorials/functions-extension/getting-started
Functionsアプリケーション開発の準備
まずは、Visual Studio Code(以下、VS Code)を使って、Functions用のアプリケーションを開発します。ローカルPCに以下のものをインストールしておきます。
・node.js v8.9.4
・npm v5.6.0
・Azure Functions Core Tools
・Visual Studio Code拡張機能のAzure Functions extension
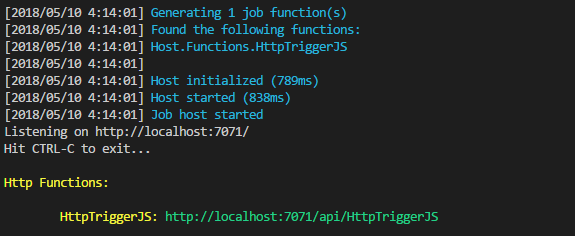
今回は、JavascriptのアプリケーションをAzure Functions上にデプロイします。ローカルPCでVS Codeを起動して、Azureにサインインします。次に、Azure Functions Core Toolsが動作するかを確認します。下のターミナルで「func」と入力すると、以下の画面が表示されます。

これで開発する準備ができましたので、新しいAzure Functionsのアプリケーションを作成します。ローカルPCで空のフォルダを作成して、プロジェクト作成を行います。すると、Functionsで使うプログラム言語選択リストが表示されます。選択できるのは、JavaScript、C#、Javaです。今回はJavaScriptを選択します。

次にプログラムソースを書きます。「Create Function」をクリックします。今回は、「HTTP Trigger」を選択します。

選択して「Enter」を押すと、Ahthorization levelを選択する画面がでますので、ここでは、「Anonymous」を選択します。

すると、「index.js」や「function.json」等のソースが自動生成されます。処理を加えたい場合、index.jsに編集を加えます。ローカルで動作確認したいので、一旦この状態でビルドしてみます。Index.jsが開いている状態で、「F5」を押すとビルドが実行されます。ビルドが成功すると、HTTP Trigger用のURLが表示されます。
では、ローカルPC上で動作確認してみましょう。この状態で、ブラウザに以下のように入力します。
Hello test
ローカルでFunctionsのアプリケーションが動作していることが確認できました。アプリケーションはできましたので、これをAzure上にデプロイします。「Deploy to Function Apps」をクリックして、今作成したローカルのフォルダを選択します。新しくFunctionsを作る場合、「Create New Function App」を選択して、URLの一部分になる文字列を入力します。ここで入力した文字列がURLの一部分に組み込まれます。URLがxxx.azurewebsites.netになります。このうち、xxxがグローバルで一意となるように値を入れます。入力時点でチェックがかかります。次にresource groupを選択します。新規に作成する時は、「Create New Resource Group」を選択します。

入力後、「Enter」を押すとデプロイが始まります。デプロイに成功すると最後にAzure上のURLが表示されます。

ローカルで行ったのと同じようにAzure上でも動作確認します。
"Hello test"
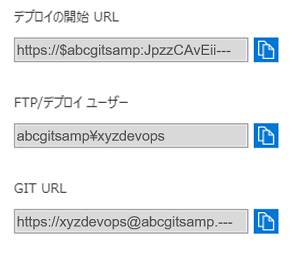
VS Codeではなく、ローカルのGitを使ってもデプロイ可能です。連携させたいAzure Functionsに移動して、「コードデプロイ」-「展開オプション」を選択します。デプロイ画面の上にある「セットアップ」をクリックして、「ソースの選択」から「ローカルGitリポジトリ」を選択します。ここでは特に設定することはなく、「OK」をクリックします。次に「デプロイ資格情報」で、Gitが使う資格用のアカウントを設定します。「全般設定」-「プロパティ」で、GitのURL情報を取得します。GitのURLが表示されます。
ローカルPC上で移送したいファイルのあるフォルダに移動して、以下のコマンドを入力します。
Initialized empty Git repository in C:/dev/repos/gitsamp/.git/
git remote add origin 確認したURL
git add .
git commit -m “commit comment”'
[master (root-commit) d08c4ec] 'commit_comment1'
 3 files changed, 36 insertions(+)
 create mode 100644 HttpTriggerJS/function.json
 create mode 100644 HttpTriggerJS/index.js
 create mode 100644 HttpTriggerJS/sample.dat
git push --set-upstream origin master
Counting objects: 6, done.
Delta compression using up to 4 threads.
Compressing objects: 100% (4/4), done.
Writing objects: 100% (6/6), 766 bytes | 383.00 KiB/s, done.
Total 6 (delta 0), reused 0 (delta 0)
remote: Updating branch 'master'.
remote: Updating submodules.
remote: Preparing deployment for commit id 'd08c4ec7ad'.
remote: Generating deployment script.
remote: Generating deployment script for function App
remote: Generated deployment script files
remote: Running deployment command...
remote: Handling function App deployment.
remote: Not using funcpack because SCM_USE_FUNCPACK is not set to 1
remote: Installing function extensions from nuget
remote: KuduSync.NET from: 'D:\home\site\repository' to: 'D:\home\site\wwwroot'
remote: Copying file: 'HttpTriggerJS\function.json'
remote: Copying file: 'HttpTriggerJS\index.js'
remote: Copying file: 'HttpTriggerJS\sample.dat'
remote: Restoring npm packages in "D:\home\site\wwwroot"
remote: Finished successfully.
remote: Running post deployment command(s)...
remote: Syncing 2 function triggers with payload size 217 bytes successful.
remote: Deployment successful.
To https://gitsamp.scm.azurewebsites.net:443/gitsamp.git
 * [new branch]      master -> master
Branch 'master' set up to track remote branch 'master' from 'origin'.
Azure Functions上にアップロードされますので、URLを記述して、画面が表示されることを確認します。
"Hello Git Sample test"
Githubと連携
個人で開発するにはこれでもいいのですが、チームで開発するときはGithubなどのリポジトリを使って開発すると思います。そこで、一度リポジトリにアップロードして、そこからデプロイも行ってみます。まず、アップロードするためのプログラムソースを作成します。そして、Azure FunctionsとGithubのリポジトリを連携させます。連携させたいAzure Functionsに移動して、先程と同じように「コードデプロイ」-「展開オプション」を選択します。デプロイ画面の上にある「セットアップ」をクリックして、「ソースの選択」からGitHubを選択します。各項目で必要な情報を入力して「OK」ボタンをクリックします。
これで、Githubとの連携が完了します。
では、Githubにファイルをアップロードしてみましょう。アップロード方法は省略しますが、Github上でファイルをアップロードを完了させます。すると、Azure上にもファイルが自動的に転送されていることが確認できます。URLを入力すると、Azure Functions上でGithubから移送したJavascriptが動作していることが確認できます。
"Hello Github Sample test"
GitやGithubと連携すれば、Azure Functionsのアプリケーション開発でDevOpsの環境を構築するのに、色々なCI/CDのパイプラインを組むことができます。