試しにやってみた
今回は、実験用なので設定がローカルで動かす専用のものとなっております。
Flutterのプロジェクトは作ったときは、version: 1.0.0+1になっているようです。これより高い数値を設定すれば、RemoteConfigで、強制アップデートのダイアログを出すことができます!

必要なパッケージを追加する
アプリのバージョンを調べるために、info_plusが必要ですのでこちらも追加します。
https://pub.dev/packages/package_info_plus/install
https://pub.dev/packages/firebase_core
https://pub.dev/packages/firebase_remote_config
Firebaseのコンソールの設定をする
やり方の手順は技術記事もみたいが、AIに聞いてみた👂
- Firebase コンソールにアクセス:
- https://console.firebase.google.com/ にアクセスし、プロジェクトを選択します。
- Remote Config に移動:
- 左側のメニューから "Engage" セクションの "Remote Config" を選択します。
- パラメータの追加:
- "パラメータを追加" ボタンをクリックします。
- パラメータの設定:
-
以下の2つのパラメータを追加します:
-
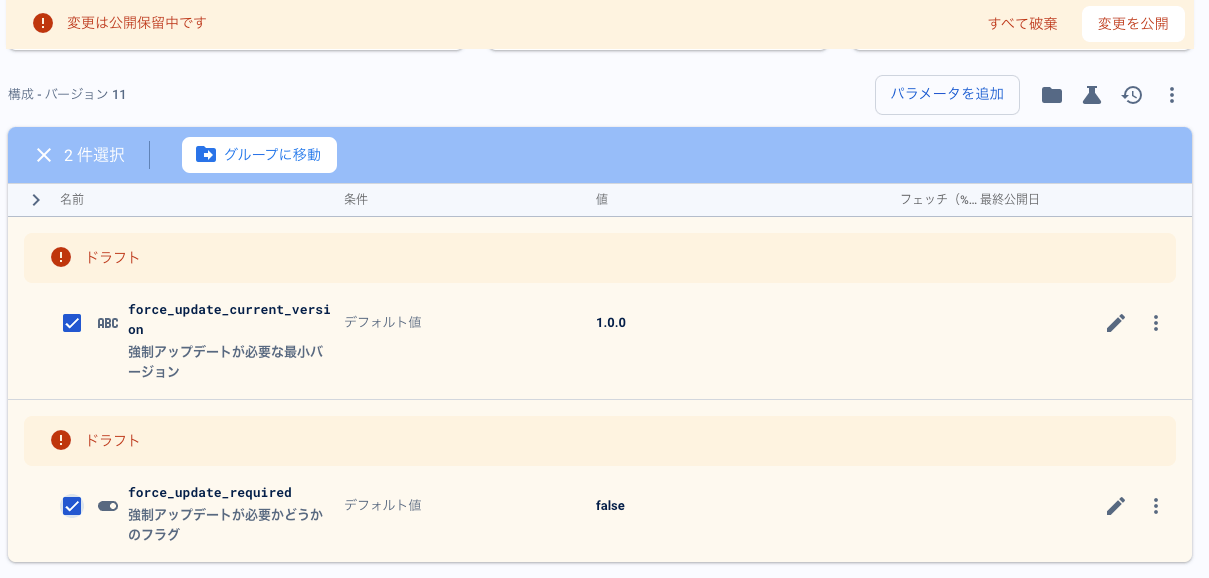
a) force_update_current_version
-
パラメータ名: force_update_current_version
-
データ型: String
-
デフォルト値: "1.0.0"
-
説明: 強制アップデートが必要な最小バージョン
-
b) force_update_required
-
パラメータ名: force_update_required
-
データ型: Boolean
-
デフォルト値: false
-
説明: 強制アップデートが必要かどうかのフラグ
- 条件の追加 (オプション):
- 特定の条件下で異なる値を設定したい場合は、"Add value for condition" をクリックします。
- 例えば、App バージョン、プラットフォーム(Android/iOS)、国などの条件を設定できます。
- 変更の公開:
- すべてのパラメータを追加したら、画面右上の "変更を公開" ボタンをクリックします。
- テストのための値の変更:
-
パラメータの値を変更するには、該当するパラメータの行をクリックします。
-
値を編集し、"変更を公開" をクリックして更新します。
-
テストシナリオの例:
- 通常動作のテスト:
- force_update_current_version: "1.0.0"
- force_update_required: false
2, 強制アップデートのテスト:
- force_update_current_version: "2.0.0"
- force_update_required: true
- バージョン比較のテスト:
-
force_update_current_version: "1.1.0"
-
force_update_required: true
-
これらの設定を変更することで、アプリの動作をテストできます。Remote Configの変更後、アプリ側でremoteConfig.fetchAndActivate()を呼び出すと、新しい設定が反映されます。
注意点: -
Remote Configの変更が反映されるまで少し時間がかかる場合があります(通常は数分以内)。
テスト中はminimumFetchIntervalを0に設定することで、頻繁に更新を確認できます。
実際の運用時は、minimumFetchIntervalを適切な値(例:1時間)に設定し、サーバーへの負荷を軽減することが重要です。
これらの手順に従って、Remote Configを設定し、強制アップデート機能をテストすることができます。


でも実は、値は1.0.1+1. trueにしないと失敗してた💦
今はよりバージョン高くて、 trueじゃないとダメなようだ。
鉛筆のボタンを押して編集して公開する。

こちらがサンプルコード。本来なら、ストアと連携した設定が必要みたい。押したら、URLで飛んでいくやつ。
import 'package:flutter/material.dart';
import 'package:firebase_core/firebase_core.dart';
import 'package:firebase_remote_config/firebase_remote_config.dart';
import 'package:package_info_plus/package_info_plus.dart';

void main() async {
  WidgetsFlutterBinding.ensureInitialized();
  await Firebase.initializeApp();
  runApp(const MyApp());
}

class MyApp extends StatelessWidget {
  const MyApp({Key? key}) : super(key: key);

  @override
  Widget build(BuildContext context) {
    return MaterialApp(
      title: 'Force Update Demo',
      theme: ThemeData(
        primarySwatch: Colors.blue,
      ),
      home: const ForceUpdateWrapper(
        child: MyHomePage(title: 'Force Update Demo Home Page'),
      ),
    );
  }
}

class ForceUpdateWrapper extends StatefulWidget {
  final Widget child;

  const ForceUpdateWrapper({Key? key, required this.child}) : super(key: key);

  @override
  _ForceUpdateWrapperState createState() => _ForceUpdateWrapperState();
}

class _ForceUpdateWrapperState extends State<ForceUpdateWrapper> {
  final FirebaseRemoteConfig _remoteConfig = FirebaseRemoteConfig.instance;

  @override
  void initState() {
    super.initState();
    _initializeRemoteConfig();
  }

  Future<void> _initializeRemoteConfig() async {
    await _remoteConfig.setConfigSettings(RemoteConfigSettings(
      fetchTimeout: const Duration(seconds: 10),
      minimumFetchInterval: Duration.zero, // テスト用に設定。実運用時は適切な間隔に設定すること。
    ));

    await _remoteConfig.fetchAndActivate();
    _checkForceUpdate();
  }

 void _checkForceUpdate() async {
  final currentVersion = await _getCurrentVersion();
  final requiredVersion = _remoteConfig.getString('force_update_current_version');
  final forceUpdate = _remoteConfig.getBool('force_update_required');

  debugPrint('Current Version: $currentVersion');
  debugPrint('Required Version: $requiredVersion');
  debugPrint('Force Update: $forceUpdate');
  debugPrint('Is version lower: ${_isVersionLower(currentVersion, requiredVersion)}');

  if (forceUpdate && _isVersionLower(currentVersion, requiredVersion)) {
    _showForceUpdateDialog();
  } else {
    debugPrint('Update not required or versions match');
  }
}

  Future<String> _getCurrentVersion() async {
    final packageInfo = await PackageInfo.fromPlatform();
    return packageInfo.version;
  }

  bool _isVersionLower(String current, String required) {
  // '+'以降を除去し、バージョン番号のみを取得
  final currentVersion = current.split('+')[0];
  final requiredVersion = required.split('+')[0];

  final currentParts = currentVersion.split('.').map((part) => int.tryParse(part) ?? 0).toList();
  final requiredParts = requiredVersion.split('.').map((part) => int.tryParse(part) ?? 0).toList();

  // 足りない部分を0で埋める
  while (currentParts.length < 3) {
    currentParts.add(0);
  }
  while (requiredParts.length < 3) {
    requiredParts.add(0);
  }

  for (int i = 0; i < 3; i++) {
    if (currentParts[i] < requiredParts[i]) return true;
    if (currentParts[i] > requiredParts[i]) return false;
  }

  return false;
}

  void _showForceUpdateDialog() {
    showDialog(
      context: context,
      barrierDismissible: false,
      builder: (BuildContext context) {
        return AlertDialog(
          title: const Text('アップデートが必要です'),
          content: const Text('新しいバージョンのアプリが必要です。現在のバージョンではアプリを使用できません。'),
          actions: <Widget>[
            TextButton(
              child: const Text('OK'),
              onPressed: () {
                // 実際のアプリではここでアプリを終了するロジックを実装します
                // 実験目的なので、ダイアログを閉じるだけにします
                Navigator.of(context).pop();
              },
            ),
          ],
        );
      },
    );
  }

  @override
  Widget build(BuildContext context) {
    return widget.child;
  }
}

class MyHomePage extends StatefulWidget {
  const MyHomePage({Key? key, required this.title}) : super(key: key);

  final String title;

  @override
  State<MyHomePage> createState() => _MyHomePageState();
}

class _MyHomePageState extends State<MyHomePage> {
  int _counter = 0;

  void _incrementCounter() {
    setState(() {
      _counter++;
    });
  }

  @override
  Widget build(BuildContext context) {
    return Scaffold(
      appBar: AppBar(
        title: Text(widget.title),
      ),
      body: Center(
        child: Column(
          mainAxisAlignment: MainAxisAlignment.center,
          children: <Widget>[
            const Text(
              'You have pushed the button this many times:',
            ),
            Text(
              '$_counter',
            ),
          ],
        ),
      ),
      floatingActionButton: FloatingActionButton(
        onPressed: _incrementCounter,
        tooltip: 'Increment',
        child: const Icon(Icons.add),
      ),
    );
  }
}
ダイアログで表示されれば実験は成功🙌

最後に
強制アップデートの機能って多分よく見かけるアプリについているので、つけた方がいいのだろうなと思いました。Firebaseってこんなことできるなんて便利ですね。