はじめに
ScrollViewのレイアウトの設定する際は、圧倒的にストーリーボードでのほうが楽ですが、
ときにはコードで設定しなければならない場面もあります。。。
どのような場面かと言うと、
動的にレイアウトを変更したいときです!
例えば、スクロールさせたいビューのレイアウトがデータベースのデータによって変わる場合には、スクロールビューのレイアウトを動的に変更させなければなりません。
本記事では、実際に私がハマったScrollViewのレイアウトのコーディングの議事録を書いていくことにします!
ScrollViewのサイズはどうやって決まるのか
ScrollViewのレイアウトをちゃんと設定してもスクロールされない場合があります。
それは、多くの場合ScrollView.contentSizeが設定されてないからだと思います。
そう、ScrollViewの大きさはScrollView.contentsizeで決まります。
ですから、表示したいオブジェクトによってスクロールビューのレイアウトが変わる場合、オブジェクトのサイズに合わせてcontentSizeも設定し直さなければなりません。
var dataNum: Int
//データの数が10個の時
dataNum = 10
scrollView.contentSize = CGSize(width: 100, height: 100 * dataNum)
このように書くことで、データの数に合わせてScrollViewのサイズが変わります。
ScrollViewにオブジェクトを配置する
ここまでで、ScrollViewのサイズをオブジェクトの数によって変更する方法がわかりました!
次は実際にオブジェクトをスクロールビューに加えて、レイアウトをコードで変更していきます!
今回はViewをスクロールビューに複数加えていきたいと思います。
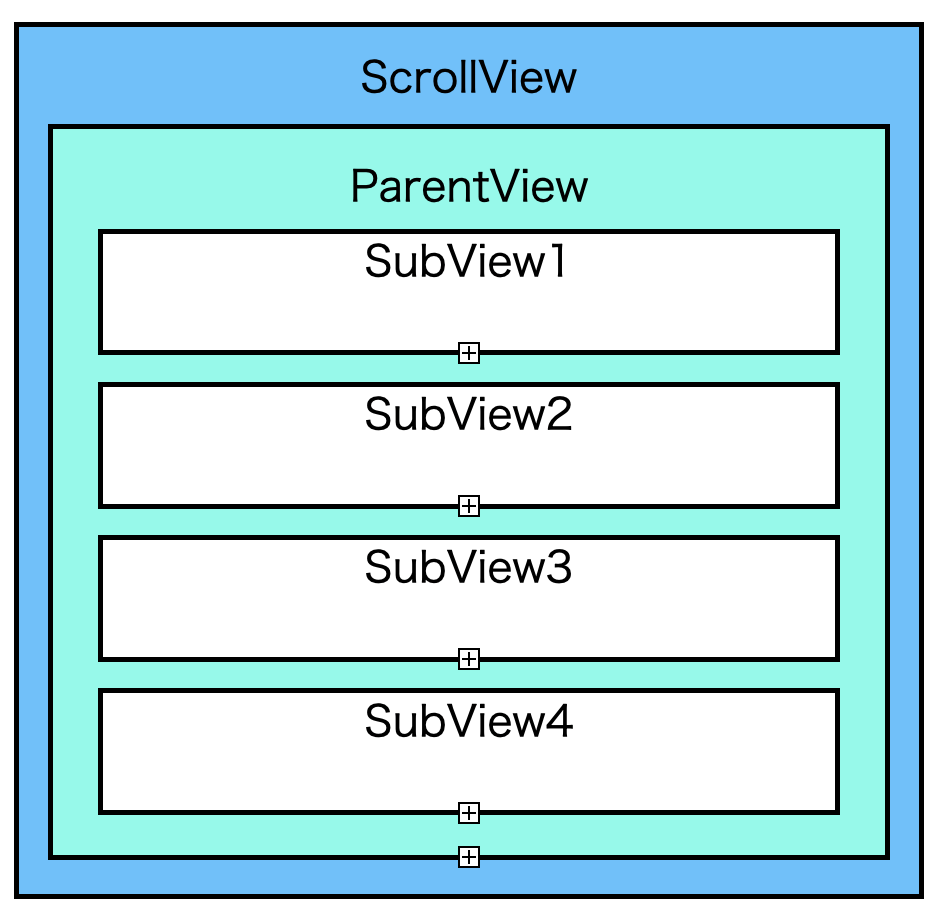
Viewの階層は、以下の図の通りとなっており、ストーリーボード上でScrollViewとParentViewは親子関係で紐付けられているとする。

まずはsubViewを生成する
//subViewの数
 let num = 10
//表示するviewの数(今回は10とする)

for _ in 1...num  {
  let subView = UIView()
  subView.translatesAutoresizingMaskIntoConstraints = false
  ParentView.addSubview(subView)
}
次にsubviewに制約をつけます
for subview in ParentView.subviews{

            //左側の設定
            subview.leadingAnchor.constraint(equalTo: ParentView.leadingAnchor, constant: 0).isActive = true
            //右側の設定
            subview.trailingAnchor.constraint(equalTo: ParentView.trailingAnchor, constant: 0).isActive = true

            //Topの設定
            //一番上のsubviewnのTopはParentViewのTopを基準にする
            if subview == ParentView.subviews.first {
                subview.topAnchor.constraint(equalTo: ParentView.topAnchor, constant: 0).isActive = true

                //高さはParentViewをviewの数分だけ分割したものとする
                subview.heightAnchor.constraint(equalTo: ParentView.heightAnchor, multiplier: CGFloat(1 / num)).isActive = true
            }else{
                if let firstView = ParentView.subviews.first {
                    //一番上のView以外は高さのみ設定する
                    subview.heightAnchor.constraint(equalTo: firstView.heightAnchor, multiplier: 1.0).isActive = true
                }
            }


            //Bottomの設定
            //一番したのViewはParentViewを基準に設定する
            if subview == ParentView.subviews.last {
                subview.bottomAnchor.constraint(equalTo: ParentView.bottomAnchor, constant: 0).isActive = true
            }else{
                //他のviewは次のsubview(1つ下のview)のtopを基準に設定する
                //ちなみに、after()はArryにextentionしてます
                if let nextView = ParentView.subviews.after(subview){
                    subview.bottomAnchor.constraint(equalTo: nextView.topAnchor, constant: 0).isActive = true
                }
            }
        }
最後にParentView制約をつける
ちなみにParentViewのsuperViewとしてscrollViewを置いてます。
        //ParentViewのフレームのアップデート
        if let scrollV = ParentView.superview as? UIScrollView {
            ParentView.translatesAutoresizingMaskIntoConstraints = false
            //ParentViweの幅をスクロールviewを基準とする
            ParentView.widthAnchor.constraint(equalToConstant: scrollV.frame.width).isActive = true
            //ParentViewの高さをクロールviewを基準とし、num倍する
            ParentView.heightAnchor.constraint(equalTo: scrollV.heightAnchor, multiplier: CGFloat(num)).isActive = true

            scrollV.contentOffset = CGPoint(x: 0, y: 0)
            scrollV.contentSize = ParentView.frame.size


        }
        //レイアウトの更新
        self.view.layoutIfNeeded()
最後に
Viewのレイアウトのライフサイクルがかなり関わってきていますが今回は説明していないので以下の記事を参考にしていただければと思います。