筆者追記:最近Arduinoがプレビュー版の新しいIDEを出したそうで、見た目が完全にVSCodeでした。しかしながら、使い慣れているツールで作業するのは大事だと思いますので、参考程度に御覧ください。
VSCode+PlatformIOでらくらく組み込み開発
Arduinoが普及して15年近く経つが,普段こう思う方はいらっしゃらないだろうか:
「Arduinoの本家IDEがめちゃくちゃ使いづらい」
🙅Arduino本家アプリのここがダメ🙅
- Emacsなどのエディタに慣れていると,好きなフォントやカラーテーマ,ショートカットなどが使えなくて苦痛
- TeensyなどのArduino互換ライブラリを使ったプロジェクトをgithubなりでcloneしても,依存関係を解決してからじゃないと使えない
- かといって色んな種類のボードのライブラリをインストールしてると起動にとんでもない時間がかかって苦痛(1分かかることもあるし,最後のウィンドウを閉じるとアプリ自体が終了するのでうっかり消しちゃうとすごく時間をとられる)
- Java 🙅🙅🙅
ネイティブのArduinoアプリにはシリアルプロッタなどの機能がついてて評価できる部分はあるが(結構後にでてきた機能であるが),入門用以上の魅力が無い上に,入門をし終えてからはずっと使っていくものでもない.上に記したダメポイントに一つでも当てはまる点があるなら,Arduino IDEに多くの時間を無駄にされているかもしれない.
とくにカスタムライブラリなどの利用では,Arduinoを使う上ではよくある__ワークショップや授業やらで大人数で開発するときにみんながインスコできないトラブル__が見過ごせない.多くのmaker界隈ではこういう経験があったりするのではないだろうか.
そんな諸兄諸姉のために,今後のマイコン開発の煩わしさを削ぐとともに,テストや複数ボードへの一括ビルドなどの機能を備えた,VSCodeユーザならすぐ使える拡張プラグインにしてIDE:「PlatformIO」を紹介したい.
PlatformIOとは?
PlatformIO公式の説明によると
This is cross-platform code builder and library manager with platforms like Arduino or MBED support. They took care of toolchains, debuggers, frameworks that work on most popular platforms like Windows, Mac and Linux. It supports more than 200 development boards along with more than 15 development platforms and 10 frameworks. [...] It’s been successfully used with other IDE’s like Eclipse or Visual Studio.
__PlatformIOはいろんなマイコンのいろんなフレームワークに対応した,高機能エディタにプラグインできる組み込み用IDE__であるとされている. Arduinoだけでなくmbedなど,デフォルトでIDE依存してしまっているものを一つのIDEで済ませてしまおうというもの.
加えて,テスト機能やデバッガ機能などもあり,
PlatformIOでLチカ!
インストール&起動
PlatformIOはVSCode(or atom , eclipse)の___Extensionから即インストールできる___.
以降VSCodeでインストールしたPlatformIOを用いる.
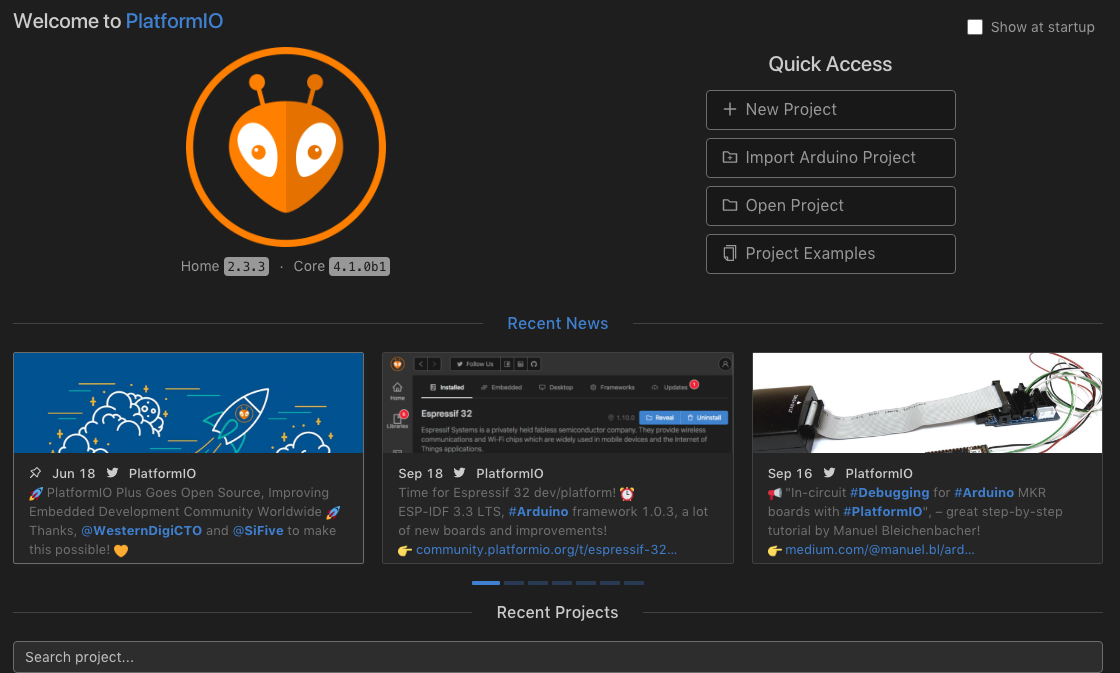
PlatformIOはインストールが完了すると,エディタ上にホーム画面が表示される(設定で起動時に出てこないようにすることも可能)
Arduino向けに新規プロジェクト
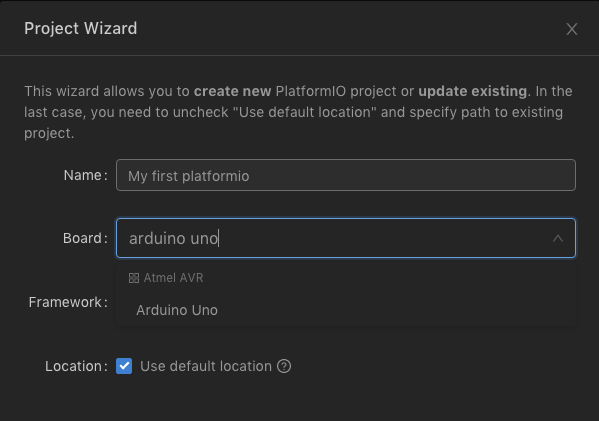
新しいプロジェクトは "New Project"から作成できる.
BoardにArduino Unoを選択しておく. デフォルトの保存場所がmacの場合~/Documents/となるので,好きな場所に保存したい場合はチェックを外してブラウズする.
プロジェクトを保存されると,おおよそ次のようなディレクトリ構成のプロジェクトが出来上がる(一部の隠しファイルは割愛):
.
├── .gitignore
├── .pio
├── .travis.yml
├── include
│   └── README
├── lib
│   └── README
├── platformio.ini
├── src
│   └── main.cpp
└── test
    └── README
このうちplatformio.iniという設定ファイルが,ビルドターゲットやオプションを指定するファイルである.
[env:uno]
platform = atmelavr
board = uno
framework = arduino
このブロックをさらに,たとえばTeensyやArduino Megaについて追記することで,複数のターゲットに対して一括ビルドすることが可能となる.
なおここで.travis.ymlが生成されている.PlatformIOの特徴としてテスト機能によるコードの健康度維持があり,組み込みプロジェクトの共有性を高められるきのうとなっている.
13番ポートは,点滅する(Lチカ)
Code
「Unoの13番ポート(PB5)でLチカ」は全員が通る道であるsrcファイルのmain.cppを件のごとく編集する.
# include <Arduino.h>

void setup() {
  // put your setup code here, to run once:
  delay(1000);
  pinMode(13, OUTPUT);
}

void loop() {
  // put your main code here, to run repeatedly:
  digitalWrite(13, HIGH);
  delay(200);
  digitalWrite(13, LOW);
  delay(200);
}
Build
コーディングを終えたのでビルドしよう.
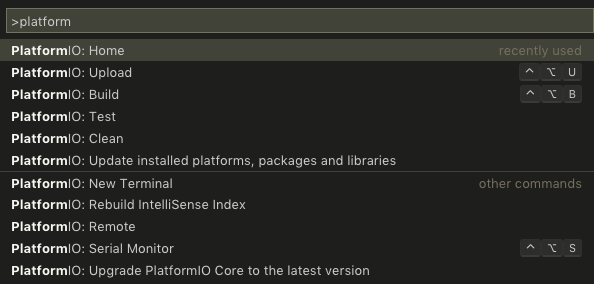
VSCodeユーザであれば,Command(Ctrl) + Shift + Pで,Extensionのコマンドを呼び出せる.そのうちの PlatformIO: Buildを選択する.
ビルドをするとターミナルに以下のメッセージが表示される.
> Executing task: platformio run <

Processing uno (platform: atmelavr; board: uno; framework: arduino)
---------------------------------------------------------------------
Verbose mode can be enabled via `-v, --verbose` option
Mkdir("/Users/jotaro/obenkyo/platformio/MyFirstProject/.pio/build/uno")
CONFIGURATION: https://docs.platformio.org/page/boards/atmelavr/uno.html
PLATFORM: Atmel AVR 1.15.0 > Arduino Uno
HARDWARE: ATMEGA328P 16MHz, 2KB RAM, 31.50KB Flash
PACKAGES: toolchain-atmelavr 1.50400.190710 (5.4.0), framework-arduinoavr 4.1.2
LDF: Library Dependency Finder -> http://bit.ly/configure-pio-ldf
LDF Modes: Finder ~ chain, Compatibility ~ soft
Found 5 compatible libraries
Scanning dependencies...
No dependencies
Archiving .pio/build/uno/libFrameworkArduinoVariant.a
Compiling .pio/build/uno/src/main.cpp.o
Compiling .pio/build/uno/FrameworkArduino/CDC.cpp.o
Indexing .pio/build/uno/libFrameworkArduinoVariant.a
Compiling .pio/build/uno/FrameworkArduino/HardwareSerial.cpp.o
Compiling .pio/build/uno/FrameworkArduino/HardwareSerial0.cpp.o
Compiling .pio/build/uno/FrameworkArduino/HardwareSerial1.cpp.o
Compiling .pio/build/uno/FrameworkArduino/HardwareSerial2.cpp.o
Compiling .pio/build/uno/FrameworkArduino/HardwareSerial3.cpp.o
Compiling .pio/build/uno/FrameworkArduino/IPAddress.cpp.o
Compiling .pio/build/uno/FrameworkArduino/PluggableUSB.cpp.o
Compiling .pio/build/uno/FrameworkArduino/Print.cpp.o
Compiling .pio/build/uno/FrameworkArduino/Stream.cpp.o
Compiling .pio/build/uno/FrameworkArduino/Tone.cpp.o
Compiling .pio/build/uno/FrameworkArduino/USBCore.cpp.o
Compiling .pio/build/uno/FrameworkArduino/WInterrupts.c.o
Compiling .pio/build/uno/FrameworkArduino/WMath.cpp.o
Compiling .pio/build/uno/FrameworkArduino/WString.cpp.o
Compiling .pio/build/uno/FrameworkArduino/abi.cpp.o
Compiling .pio/build/uno/FrameworkArduino/hooks.c.o
Compiling .pio/build/uno/FrameworkArduino/main.cpp.o
Compiling .pio/build/uno/FrameworkArduino/new.cpp.o
Compiling .pio/build/uno/FrameworkArduino/wiring.c.o
Compiling .pio/build/uno/FrameworkArduino/wiring_analog.c.o
Compiling .pio/build/uno/FrameworkArduino/wiring_digital.c.o
Compiling .pio/build/uno/FrameworkArduino/wiring_pulse.S.o
Compiling .pio/build/uno/FrameworkArduino/wiring_pulse.c.o
Compiling .pio/build/uno/FrameworkArduino/wiring_shift.c.o
Archiving .pio/build/uno/libFrameworkArduino.a
Indexing .pio/build/uno/libFrameworkArduino.a
Linking .pio/build/uno/firmware.elf
Building .pio/build/uno/firmware.hex
Checking size .pio/build/uno/firmware.elf
Memory Usage -> http://bit.ly/pio-memory-usage
DATA:    [          ]   0.4% (used 9 bytes from 2048 bytes)
PROGRAM: [          ]   3.0% (used 962 bytes from 32256 bytes)
[SUCCESS] Took 2.11 seconds
Terminal will be reused by tasks, press any key to close it.
ここでインストールできていないパッケージなどが確かめられ,もしパッケージが足りないときは自動でダウンロードできるようになっている.
Upload
Uploadも基本的にはExtensionのコマンド(Command+Shift+P)から実行する.__UnoをPCのUSBポートに接続して__Uploadする.
> Executing task: platformio run --target upload <

Processing uno (platform: atmelavr; board: uno; framework: arduino)
-------------------------------------------------------------------------------------------------------------------------------------------------------------------------------------------------------------------------------
Verbose mode can be enabled via `-v, --verbose` option
CONFIGURATION: https://docs.platformio.org/page/boards/atmelavr/uno.html
PLATFORM: Atmel AVR 1.15.0 > Arduino Uno
HARDWARE: ATMEGA328P 16MHz, 2KB RAM, 31.50KB Flash
PACKAGES: toolchain-atmelavr 1.50400.190710 (5.4.0), framework-arduinoavr 4.1.2, tool-avrdude 1.60300.190628 (6.3.0)
LDF: Library Dependency Finder -> http://bit.ly/configure-pio-ldf
LDF Modes: Finder ~ chain, Compatibility ~ soft
Found 5 compatible libraries
Scanning dependencies...
No dependencies
Checking size .pio/build/uno/firmware.elf
Memory Usage -> http://bit.ly/pio-memory-usage
DATA:    [          ]   0.4% (used 9 bytes from 2048 bytes)
PROGRAM: [          ]   3.0% (used 962 bytes from 32256 bytes)
Configuring upload protocol...
AVAILABLE: arduino
CURRENT: upload_protocol = arduino
Looking for upload port...
Auto-detected: /dev/cu.usbmodem143301
Uploading .pio/build/uno/firmware.hex

avrdude: AVR device initialized and ready to accept instructions

Reading | ################################################## | 100% 0.00s

avrdude: Device signature = 0x1e950f (probably m328p)
avrdude: reading input file ".pio/build/uno/firmware.hex"
avrdude: writing flash (962 bytes):

Writing | ################################################## | 100% 0.17s

avrdude: 962 bytes of flash written
avrdude: verifying flash memory against .pio/build/uno/firmware.hex:
avrdude: load data flash data from input file .pio/build/uno/firmware.hex:
avrdude: input file .pio/build/uno/firmware.hex contains 962 bytes
avrdude: reading on-chip flash data:

Reading | ################################################## | 100% 0.13s

avrdude: verifying ...
avrdude: 962 bytes of flash verified

avrdude: safemode: Fuses OK (E:00, H:00, L:00)

avrdude done.  Thank you.

================================================================================================= [SUCCESS] Took 2.71 seconds =================================================================================================

Terminal will be reused by tasks, press any key to close it.
avrdudeがちゃんとアップロードしてくれれば,手元のUNOちゃんはすでにチカチカしているはず.
PlatformIOでユニットテスト
テスト機能もPlatformIOの大きな特徴である. 独自のAssert機能を用いることで,コードがArduino側で正しく実行できているかをターミナル上で確かめられる.
テストスクリプトの作成
PlatformIOのAssertはDocsにある関数を用いることで実行できる.
テスト用のスクリプトは,unity.hをインクルードした上で,プロジェクトディレクトリのtestにtest_main.cppとして書く. 先程のコードに,Assert関数を入れ,無限に実行しないようにしたものを用いる.
# include <Arduino.h>
# include <unity.h>

// void setUp(void) {
// // set stuff up here
// }

// void tearDown(void) {
// // clean stuff up here
// }

void test_led_builtin_pin_number(void) {
    TEST_ASSERT_EQUAL(13, LED_BUILTIN);
}

void test_led_state_high(void) {
    digitalWrite(LED_BUILTIN, HIGH);
    TEST_ASSERT_EQUAL(HIGH, digitalRead(LED_BUILTIN));
}

void test_led_state_low(void) {
    digitalWrite(LED_BUILTIN, LOW);
    TEST_ASSERT_EQUAL(LOW, digitalRead(LED_BUILTIN));
}

void setup() {
    // NOTE!!! Wait for >2 secs
    // if board doesn't support software reset via Serial.DTR/RTS(ボードがsoftwareリセットに対応していない場合に必要なdelay.)
    delay(2000);

    UNITY_BEGIN();    // IMPORTANT LINE!
    RUN_TEST(test_led_builtin_pin_number);

    pinMode(LED_BUILTIN, OUTPUT);
}

uint8_t i = 0;
uint8_t max_blinks = 5;

void loop() {
    if (i < max_blinks)
    {
        RUN_TEST(test_led_state_high);
        delay(200);
        RUN_TEST(test_led_state_low);
        delay(200);
        i++;
    }
    else if (i == max_blinks) {
      UNITY_END(); // stop unit testing
    }
}
Test実行
Extensionのコマンド(Command+Shift+P)を用いてPlatformIO: Testを実行すると,自動的にBuild/Uploadして,Lチカを始めたと思ったら・・・
Testing...
If you don't see any output for the first 10 secs, please reset board (press reset button)

test/test_main.cpp:32:test_led_builtin_pin_number       [PASSED]
test/test_main.cpp:43:test_led_state_high       [PASSED]
test/test_main.cpp:45:test_led_state_low        [PASSED]
test/test_main.cpp:43:test_led_state_high       [PASSED]
test/test_main.cpp:45:test_led_state_low        [PASSED]
test/test_main.cpp:43:test_led_state_high       [PASSED]
test/test_main.cpp:45:test_led_state_low        [PASSED]
test/test_main.cpp:43:test_led_state_high       [PASSED]
test/test_main.cpp:45:test_led_state_low        [PASSED]
test/test_main.cpp:43:test_led_state_high       [PASSED]
test/test_main.cpp:45:test_led_state_low        [PASSED]
-----------------------
11 Tests 0 Failures 0 Ignored
================================================================================================= [PASSED] Took 10.02 seconds =================================================================================================

Test    Environment    Status    Duration
------  -------------  --------  ------------
*       uno            PASSED    00:00:10.020
このようなテスト結果を示したスクリプトが出力される.正しくLチカがされて(出力ポートの状態とテストケースで一致して)いるので,マイコンが正しく動作しているということとなる.丁寧な諸兄諸姉は,テストスクリプトを書いて組み込みプログラムの健康度を保ってほしい.
まとめ
今回はArduinoでのLチカによる例を紹介したが,PlatformIOはマルチターゲットやデバッグ機能など,紹介しきれないものも多い.今回の記事で強調しておきたい点としては,__組み込みプログラミングも向こうの都合でpoorなツールを使い続けるよりも,自分の好きな環境で,好きなエディタで開発したほうがいいよね__ということである.お世辞にもArduinoネイティブを2019年も使い続けるべきではないし,多くの人に必ず動くプロジェクトファイルを作って欲しいと感じたので,記事を書くに至った.
特に授業やワークショップで広く使われることを願う.うちのラボで授業でこれを使ったらかなり評判が良かったので,自分でもやって見たところ本当に良かったので紹介した次第である.
コメントやらツイッタに間違いや文句があればぜひ投稿してください.また,使ってみてどうだったという感想や,こういうマイコンでも試してみてほしいといった事があればぜひコメントください.


