Fusic アドベントカレンダー3日目です。
記念すべき 2日目は、@gorogoroyasuの力作でした。
ここだけの話ですが、@gorogoroyasuはハードルを下げると言いつつ
上げてしまって、少し書き辛いですが、
頑張ります。
ということで、Fusic アドベントカレンダー3日目です。
まずもってお前だれ?
・Fusicの2年目のチョです。
・出身:韓国。
・しかし、日本に馴染みすぎと言われます。
・会社のみんなからは「お前日本人やろ?」と言われています。
・だから?結構日本語話せるので、他のところで会ったら、楽しく話ししたいです!怖がらないで。。。😢
テーマ
今回のテーマは「やっていなかったことをやる」、「とりあえずハードルをあげる」というテーマで書きます。
普段なにやっているの?
Cakephp3やAWSなど色んなものを利用しWeb開発をやっています。
うちは言語と環境の制約がなく自由に仕事できて、
楽しくやってます!
なのであんまり触ることないゲームをやってみようと思って、
cocos2d-xを選択!
どうやってハードルをあげるつもり?
それはですね。
入社してからよく言われた話ですが、
どこかで発表するとき@debilityの話題を話すと
いいよと言われてました。
真面目といえばチョと呼ばれるような人間なので。
仕方なく@debilityの出現するゲームを作りました!
対象
cocos2d-xをとりあえず使ってみたい人
macを使っている人
いずれmacを使う人
どんなゲーム?
さて、ここから本番です。
最後の目標として、
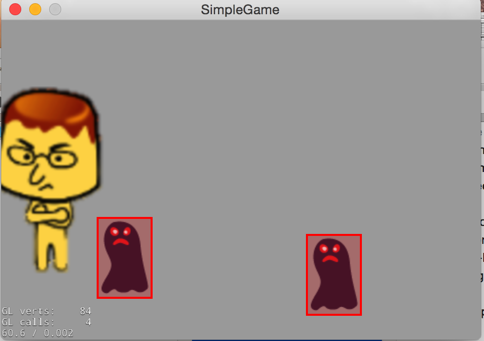
下記で表示されているゲームを作ります。
そもそもcocos2d-xとは?
・open sorce cocos2dエンジンのbranchの一つ。
・色んなプラットホームを提供する2dゲームの一つ。
提供されているプラットホームは何があるの?
・Mac OSX、IOS
・Android
・Windows、Windows Phone
・Linux Ubuntu
色々できそう。。。
長所は?
・Exampleが多くて、誰でも簡単にできる
・容量が少ないゲーム開発ができる!
cocos2Dの構成
▼背景
・一つ一つのSceneがあって、Sceneを重ねて作る感じ。
▼Layer
・Sceneに含まるObject
・ユーザーのイベントを受けられる
▼Sprite
・実際に動くキャラクターなど
▼Action
・cocos2Dノード属性を時間によって変更するClass
・Spriteにアニメーションの設定ができる!
奥が深い。。。
ここまで理解したら、実際にコードを書いて見ようじゃないか!
install
・http://www.cocos2d-x.org/download このサイトから Cocos2d-xの最新版をDownloadしよう!
・DownloadするとzipファイルがDownloadされるので、unzipしてください。
・で、unzipしたら一個のフォルダーができています。そこに入ってください。
・そのフォルダーには setup.py があるはずです。そのファイルをrunしましょう!因みに実行コマンドは python setup.py です。
・そうすると英語で色々聞かれると思いますが、全部Enterを押して結構です。
・で、最後に source ~/.bash_profile を叩いてください。
・ここまでがinstallです。あら素敵。
次はProjectを作りましょう!
・コマンドは cocos new -l cpp -d ~/Cocos2d-x-Tutorial SimpleGame です。
・上記のコマンドを叩くことで SimpleGame というprojectが出来上がります!あら簡単。
で、ここから一番楽しいコーディング!
- 今回はXcodeを使って進めます。
作ったProjectでとりあえず実装してみる
・Xcodeで先作ったProjectを開いてみましょう。
ある位置は ~/Cocos2d-x-Tutorial/SimpleGame/proj.ios_mac/ の中に SimpleGame.xcodeproj があります。それを入れてください。
・開くとこんな画面が出てきます。そこで実行するデバイスの設定を切り替えましょう。
・そのようにして、実行ボタンを押すと下記のような画面が開けます。
・これで開発環境は準備できました!
キャラクターを置いてみる!
・先ほど説明した Sprite を利用しキャラクターを画面に配置してみます。
・Sprite を使うためには cocos2d namespaceをusingする必要があります。
・HelloWorldScene.h の一番上に using namespace cocos2d; と書いてください。
・そして、Helloworld classの中に
using namespace cocos2d;

# ifndef __HELLOWORLD_SCENE_H__
# define __HELLOWORLD_SCENE_H__

# include "cocos2d.h"

class HelloWorld : public cocos2d::Layer
{
public:
    static cocos2d::Scene* createScene();

    virtual bool init();

    // a selector callback
    void menuCloseCallback(cocos2d::Ref* pSender);

    // implement the "static create()" method manually
    CREATE_FUNC(HelloWorld);
    void addMonster(float dt);
    bool onTouchBegan(Touch *touch, Event *unused_event);
    bool onContactBegan(PhysicsContact &contact);
private: //ここです。
    Sprite* _player;
};

# endif // __HELLOWORLD_SCENE_H__
を宣言します。
・宣言した_player変数を設定して配置してみます。
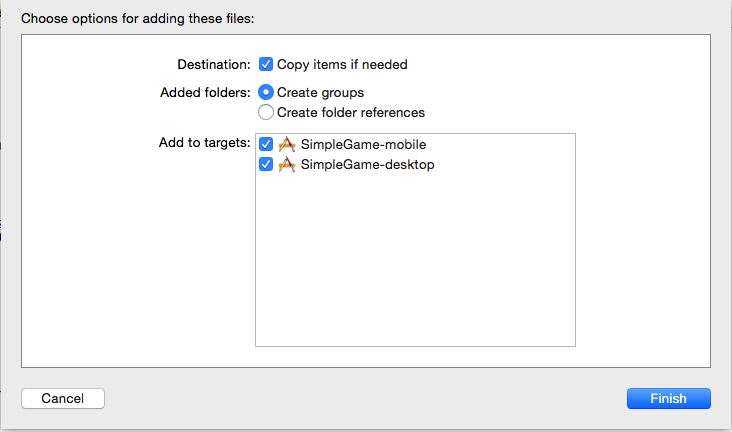
・表示したい画像をSimpleGame/Resourcesにdrag and dropしてください。
・用意する画像は「print.png」、「monster.png」、「projectile.png」です。
・そうすると下記のような画面が出てきて、下記の画面のように設定してください。

・HelloWorldScene.cppの中の HelloWorld::init の中に下記のコードを書いてください。
    // 1
    if ( !Layer::init() ) {
        return false;
    }
    // 2
    auto origin = Director::getInstance()->getVisibleOrigin();
    auto winSize = Director::getInstance()->getVisibleSize();
    // 3
    auto background = DrawNode::create();
    background->drawSolidRect(origin, winSize, Color4F(0.6,0.6,0.6,1.0));
    this->addChild(background);
    // 4
    _player = Sprite::create("prin.png");
    _player->setPosition(Vec2(winSize.width * 0.1, winSize.height * 0.5));
    this->addChild(_player);

    srand((unsigned int)time(nullptr));
    this->schedule(schedule_selector(HelloWorld::addMonster), 1.5);

    auto eventListener = EventListenerTouchOneByOne::create();
    eventListener->onTouchBegan = CC_CALLBACK_2(HelloWorld::onTouchBegan, this);
    this->getEventDispatcher()->addEventListenerWithSceneGraphPriority(eventListener, _player);

    auto contactListener = EventListenerPhysicsContact::create();
    contactListener->onContactBegin = CC_CALLBACK_1(HelloWorld::onContactBegan, this);
    this->getEventDispatcher()->addEventListenerWithSceneGraphPriority(contactListener, this);

    return true;
・このように書くことでキャラクターの配置ができます!
・これで、自分が尊敬している@debility先輩が出現しました!見てください。あの姿格好いいっしょ!
・で、感想はさておき。
モンスターが来るように書いてみましょう。
・PhysicsCategory を HelloWorldScene.cpp の一番上に書いておきます。
enum class PhysicsCategory {
    None = 0,
    Monster = (1 << 0),    // 1
    Projectile = (1 << 1), // 2
    All = PhysicsCategory::Monster | PhysicsCategory::Projectile // 3
};
・先のように void addMonster(float dt); を HelloWorldScene.h に宣言しておきます。
・そして、 HelloWorldScene.cpp で先宣言したaddMonsterの中身を作っていきます。中身は下記のように
    auto monster = Sprite::create("monster.png");

    // 1
    auto monsterContentSize = monster->getContentSize();
    auto selfContentSize = this->getContentSize();
    int minY = monsterContentSize.height/2;
    int maxY = selfContentSize.height - monsterContentSize.height/2;
    int rangeY = maxY - minY;
    int randomY = (rand() % rangeY) + minY;

    monster->setPosition(Vec2(selfContentSize.width + monsterContentSize.width/2, randomY));
    this->addChild(monster);

    // 2
    int minDuration = 2.0;
    int maxDuration = 4.0;
    int rangeDuration = maxDuration - minDuration;
    int randomDuration = (rand() % rangeDuration) + minDuration;

    // 3
    auto actionMove = MoveTo::create(randomDuration, Vec2(-monsterContentSize.width/2, randomY));
    auto actionRemove = RemoveSelf::create();
    monster->runAction(Sequence::create(actionMove,actionRemove, nullptr));

    // 1
    auto monsterSize = monster->getContentSize();
    auto physicsBody = PhysicsBody::createBox(Size(monsterSize.width , monsterSize.height),
                                              PhysicsMaterial(0.1f, 1.0f, 0.0f));
    // 2
    physicsBody->setDynamic(true);
    // 3
    physicsBody->setCategoryBitmask((int)PhysicsCategory::Monster);
    physicsBody->setCollisionBitmask((int)PhysicsCategory::None);
    physicsBody->setContactTestBitmask((int)PhysicsCategory::Projectile);

    monster->setPhysicsBody(physicsBody);
*すみません。今回はコードの説明はあんまりしません。ご了承ください。
次には押した時に攻撃できるようにしましょう。
・HelloWorldScene.hに宣言されている onTouchBegan を実装します。
コードの下記のとおり。
bool HelloWorld::onTouchBegan(Touch *touch, Event *unused_event) {
    // 1  - Just an example for how to get the  _player object
    //auto node = unused_event->getCurrentTarget();

    // 2
    Vec2 touchLocation = touch->getLocation();
    Vec2 offset = touchLocation - _player->getPosition();

    // 3
    if (offset.x < 0) {
        return true;
    }

    // 4
    auto projectile = Sprite::create("projectile.png");
    projectile->setPosition(_player->getPosition());
    this->addChild(projectile);

    // 5
    offset.normalize();
    auto shootAmount = offset * 1000;

    // 6
    auto realDest = shootAmount + projectile->getPosition();

    // 7
    auto actionMove = MoveTo::create(2.0f, realDest);
    auto actionRemove = RemoveSelf::create();
    projectile->runAction(Sequence::create(actionMove,actionRemove, nullptr));

    auto projectileSize = projectile->getContentSize();
    auto physicsBody = PhysicsBody::createCircle(projectileSize.width/2 );
    physicsBody->setDynamic(true);
    physicsBody->setCategoryBitmask((int)PhysicsCategory::Projectile);
    physicsBody->setCollisionBitmask((int)PhysicsCategory::None);
    physicsBody->setContactTestBitmask((int)PhysicsCategory::Monster);
    projectile->setPhysicsBody(physicsBody);

    return true;
}
次はあたったらモンスターが画面からなくなるように書いてみましょう。
・HelloWorld::createSceneを下記のように書いて、
Scene* HelloWorld::createScene()
{
    auto scene = Scene::createWithPhysics();
    scene->getPhysicsWorld()->setGravity(Vec2(0,0));
    scene->getPhysicsWorld()->setDebugDrawMask(PhysicsWorld::DEBUGDRAW_ALL);

    // 'layer' is an autorelease object
    auto layer = HelloWorld::create();

    // add layer as a child to scene
    scene->addChild(layer);

    // return the scene
    return scene;
}
・onContactBeganの中身を書くことで実現されます。
bool HelloWorld::onContactBegan(PhysicsContact &contact) {
  auto nodeA = contact.getShapeA()->getBody()->getNode();
  auto nodeB = contact.getShapeB()->getBody()->getNode();

  nodeA->removeFromParent();
  nodeB->removeFromParent();
  return true;
}
感想
・やっぱ、新しいことをするのは楽しい。
・これからもどんどんチャレンジしていきたい。
