光学文字識別(OCR)を実装する際、ソース画像の文字がかすんでると識別精度が著しく落ちてしまう事がよく見られる。今回かすんでる文字のサンプルを使って、OpenCVで色々な画像処理アルゴリズムを試してみました。
ソースコードが下記になります:
import cv2, os
import urllib.request as url
import numpy as np
from matplotlib import pyplot as plt

def main():
    # Load sample image from URL
    req = url.urlopen('https://i.pinimg.com/originals/d3/1b/31/d31b31653d7cc0d672fc72fb1de9bf7a.png')
    arr = np.asarray(bytearray(req.read()), dtype=np.uint8)
    img = cv2.imdecode(arr, -1) # 'Load it as it is'
    h, w, ch = img.shape

    print('Width: {}'.format(w))
    print('Height: {}'.format(h))
    print('Channel: {}'.format(ch))


    # If reading local image, use below:
    # img = cv2.imread('local_image.jpg')

    #### (1) Effect - Gamma Adjustment ####

    # Convert from RGB to gray scale
    gray = cv2.cvtColor(img,cv2.COLOR_RGB2GRAY)
    gamma = 0.4 # r<1 will increase bright contrast ratio

    # Gamma adjustment
    pic1 = gray.max() * (gray/gray.max()) ** (1/gamma)
    cv2.imwrite(os.path.join('output_image','1_gamma_adjusted.png'), pic1)

    #### (2) Effect - Adaptive Binary Thresholding ####
    pic2 = cv2.adaptiveThreshold(gray,20,cv2.ADAPTIVE_THRESH_MEAN_C,cv2.THRESH_BINARY,67,2)
    cv2.imwrite(os.path.join('output_image','2_binary_thresholding.png'), pic2)

    pic3 = cv2.adaptiveThreshold(gray,20,cv2.ADAPTIVE_THRESH_GAUSSIAN_C,cv2.THRESH_BINARY,33,2)
    cv2.imwrite(os.path.join('output_image','3_binary_thresholding_gaussian.png'), pic3)

    #### (3) Effect - Laplacian Filter ####
    pic4 = cv2.Laplacian(gray,cv2.CV_16SC1, ksize=29)
    cv2.imwrite(os.path.join('output_image','4_laplacian_filter.png'), pic4)

    ### Plot results
    titles = ['Original (Blurry Word)', 'Gamma Adjusted (r=0.4)','Adaptive Mean Thresholding (blocksize=67)',
                'Adaptive Gaussian Thresholding', 'Laplacian (kernel size=29)']
    images = [img, pic1, pic2, pic3, pic4]

    for i in range(len(images)):
        plt.subplot(-(-len(images)//2),2,i+1),plt.imshow(images[i],'gray')
        plt.title(titles[i])
        plt.xticks([]),plt.yticks([])
    plt.show()

if __name__ == '__main__':
    main()
[Python 3.5+で実行]
実行すると、左上のオリジナル画像と変換処理した結果が表示されます。
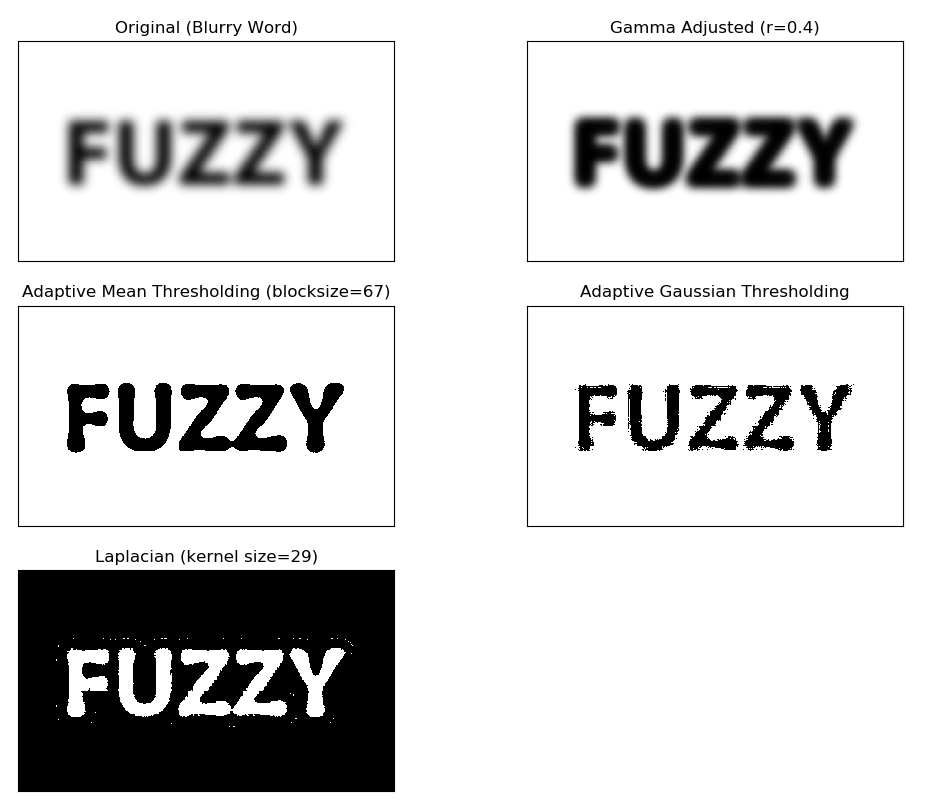
パラメータの調整は試行錯誤とある程度の経験にもよりますが、シンプルなコードで割とオーライな結果だと思います。