イントロ

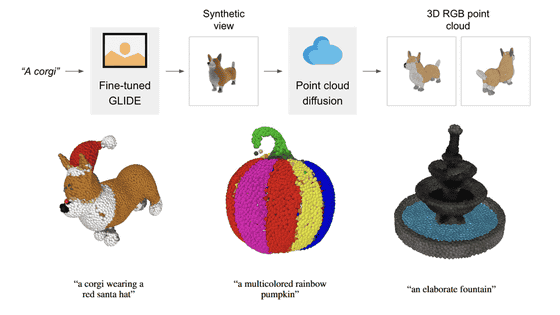
Openaiは12月に「point-e」のGithubを公開されて、テクストや2D画像から1~2分で3Dモデルを作成できます。

今回の記事のコードはすべてCollab内で利用できるものです。ぜひcollabのノートブックを使ってください
→リンク←
Point-E collabでセットアップする
最初にPoint-Eを設定しましょう。これは簡単です。githubのレポをダウンロードして、インストールするだけです。
!git clone https://github.com/openai/point-e.git
%cd point-e
!pip install -e .
AIで3Dモデルを作成
実にPoint-Eは二つのモデルです。最初に2Dの画像からPointCloud(点群)を作成するDiffusionModelです。二つ目は、PointCloudからメッシュを作成するSDFモデルです。論文参考: Nichol 2022 Point·E: A System for Generating 3D Point Clouds from Complex Prompts
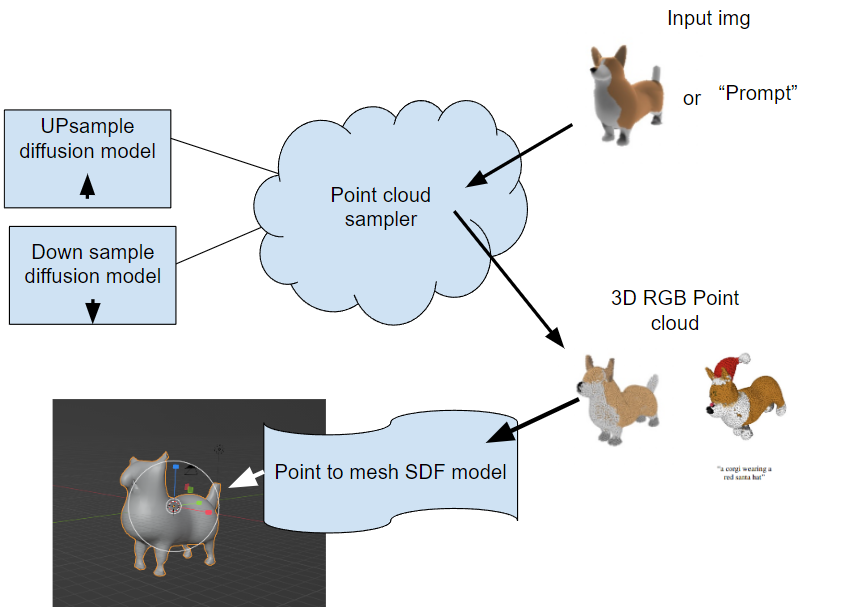
最初のセットアップがUPとDownのサンプルのモデルをセットアップすることです。このモデルはDiffusion種類のモデルです。ノイズからものを作れるモデルです(詳しい説明の記事のリンク)、最近のAIアートでよく利用しています
モデルのセットアップ
#Imports
from PIL import Image
import torch
from tqdm.auto import tqdm
from point_e.diffusion.configs import DIFFUSION_CONFIGS, diffusion_from_config
from point_e.models.download import load_checkpoint
from point_e.models.configs import MODEL_CONFIGS, model_from_config
from point_e.util.plotting import plot_point_cloud

device = torch.device('cuda' if torch.cuda.is_available() else 'cpu')
#Base down sampling moderl
print('creating base model...')

base_name = 'base40M' # use base300M or base1B for better results
#base40M-textvec text promt
base_model = model_from_config(MODEL_CONFIGS[base_name], device)
base_model.eval()
base_diffusion = diffusion_from_config(DIFFUSION_CONFIGS[base_name])
#Updasmpling model
print('creating upsample model...')
upsampler_model = model_from_config(MODEL_CONFIGS['upsample'], device)
upsampler_model.eval()
upsampler_diffusion = diffusion_from_config(DIFFUSION_CONFIGS['upsample'])

#Load state
print('downloading base checkpoint...')
base_model.load_state_dict(load_checkpoint(base_name, device))
print('downloading upsampler checkpoint...')
upsampler_model.load_state_dict(load_checkpoint('upsample', device))
最初に変更できる変数は「base_name」です。これはモデルの名前です。base40Mは標準ですが、もっと精度が高い結果が欲しければ、base300Mとbase1Bに変換できます。(Mは百万枚という意味です。40百万枚の画像で訓練してくれて、OpenAIさん ありがとうございます。)
ここには、textのプロンプトからモデルに変換できます。base_nameで、「-textvec」を加えば、モデルはテクストから3Dモデルを作成できます。
次のステップはPointCloudのモデルをセットアップです。「PointCloudSampler」というクラスを定義して、モデル変数とポイント数の設定があります。上に定義したBase_modelとupsample_modelとdiffusionのモデルを入り込みます。次はnum_pointsというパラメーターがあります。最初にこれはX,Y,Zの点だと思ったが、実にbase_modelのポイントとupsamplerのポイントです(参考 point-e/issues/7)。最後にテクストのプロンプトを使いたい場合は、model_kwargs_key_filterのコメントを削除してください
from point_e.diffusion.sampler import PointCloudSampler

sampler = PointCloudSampler(
    device=device,
    models=[base_model, upsampler_model],
    diffusions=[base_diffusion, upsampler_diffusion],
    num_points=[1024, 4096 - 1024]
    aux_channels=['R', 'G', 'B'],
    guidance_scale=[3.0, 3.0],
#model_kwargs_key_filter=('texts', ''), #text promt read
)
PointCloud(点群)を作成
samplerを定義した後で、次はsamplerのpointcloud(点群)を作成する関数を実行してみます。これは「sample_batch_progressiveです」です。複数の画像にも対応できます。その場合がsamplesはarrayに変更して、xを「np.append(x)」に変更してください。
img = Image.open('/content/point-e/point_e/examples/example_data/corgi.jpg')
samples = None
for x in tqdm(sampler.sample_batch_progressive(batch_size=1, model_kwargs=dict(images=[img]))):
    samples = x
上記の例は画像から予測の例です。テクストのプロンプトを使いたい場合は、imagesがtextsに変更して、そこでpromptを入り込んでください
#Prompt
prompt = "train"
samples = None
for x in tqdm(sampler.sample_batch_progressive(batch_size=1,model_kwargs=dict(texts=[prompt]))):
  samples=x
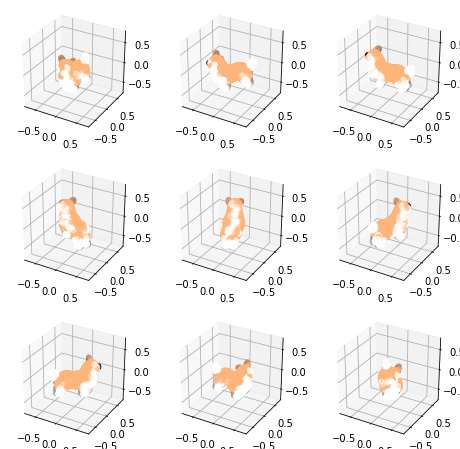
次は、この結果を表示しましょう。運があり、Point-Eのモジュール内では、plot_point_cloudの関数プロットがあります
pc = sampler.output_to_point_clouds(samples)[0]
fig = plot_point_cloud(pc, grid_size=3, fixed_bounds=((-0.75, -0.75, -0.75),(0.75, 0.75, 0.75)))
PointCloud(点群)からメッシュを作成
Pointcloudを作成した後で、次はメッシュを作ります。Point-Eでは、SDFモデルを利用して、PointCloudからメッシュに変換できます。下記のコードでは、modelの定義した後で、marching_cubes_meshの関数はメッシュへ変換の処理を行います。解像度を上げりたいなら、grid_sizeを上げってください。
from point_e.util.pc_to_mesh import marching_cubes_mesh
import skimage.measure #変な skimageのエラー対策

#Load model
print('creating SDF model...')
name = 'sdf'
model = model_from_config(MODEL_CONFIGS[name], device)
model.eval()
print('loading SDF model...')
model.load_state_dict(load_checkpoint(name, device))

#メッシュをサック性
# Produce a mesh (with vertex colors)
mesh = marching_cubes_mesh(
    pc=pc,
    model=model,
    batch_size=4096,
    grid_size=32, # increase to 128 for resolution used in evals
    progress=True,
)


# Write the mesh to a PLY file to import into some other program.
# Plyのファイルで保存する
prompt="corgy"
with open(f'{prompt.replace(" ","-")}_mesh.ply', 'wb') as f:
    mesh.write_ply(f)
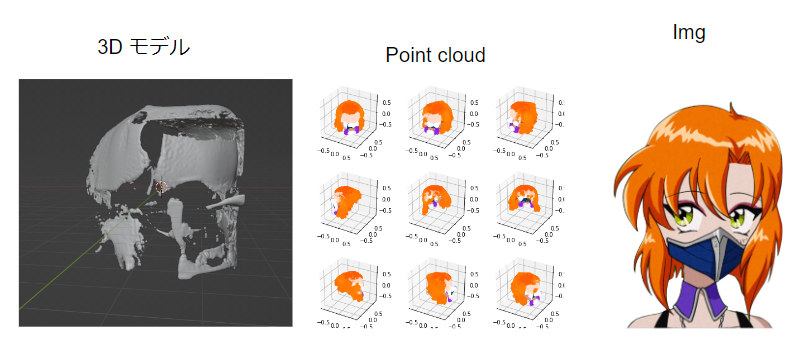
メッシュを作成した後で、.plyのファイルで保存して、blenderでインポートしてみましょう。
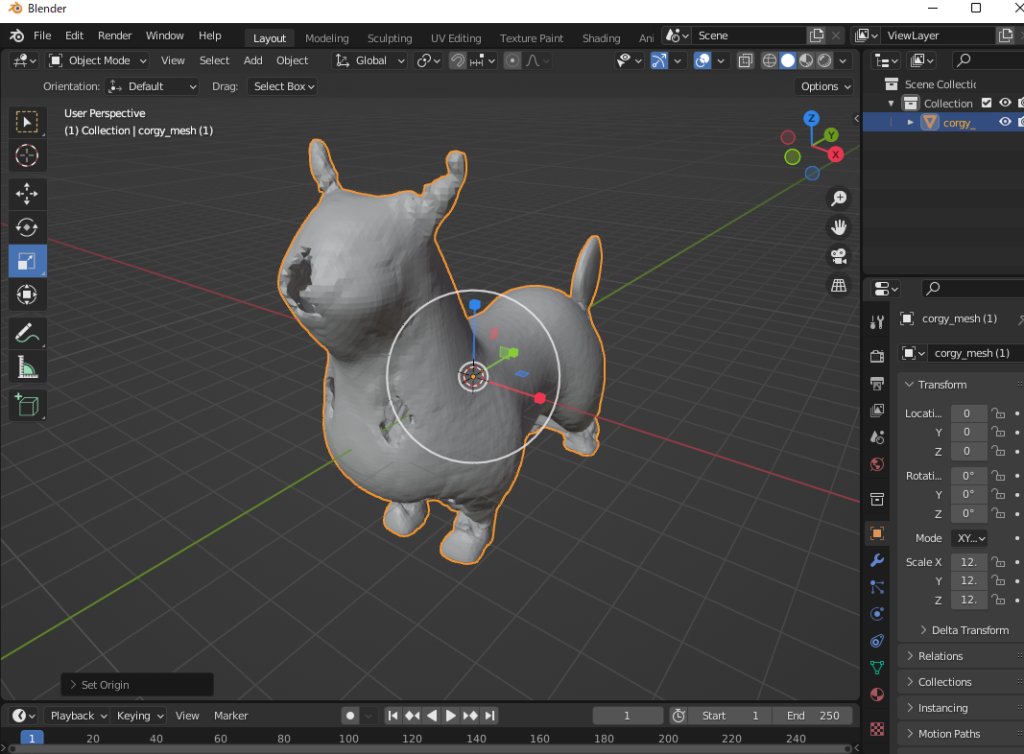

結果はひどいですね(笑)。 解像度を上げ、別のモデルを使ってみましたが、結果の精度を上げれません。この良くない結果は、github内でよくあるそうです point-e/issues/15。まだ開発中だからね。私よりうまく結果ができれば、共有してくださいね (@jarvissan22)。
クルミちゃんの3Dモデルの結果は?