#13 Spring エラーメッセージの表示
今回は数値型の入力欄に文字列型の値を入れてしまった場合などに画面にエラーメッセージを表示させる処理を行います。
文字数の制限などはバリデーションを用いて処理しますが、今回はその前段階の型変換で起きるエラーを処理します。
前提条件
この記事はSpringの最低限の知識が必要になります。
また、なるべく分かりやすく書くつもりですが、この記事の目的は自分の勉強のアウトプットであるため、所々説明は省略します。
前回まで
前回は画面に表示される固定文字を日本語以外に対応させる処理を行いました。
構築環境
-
各バージョン
Spring Boot ver 2.7.5 -
依存関係
成果物
今回行うこと
今回は以下の流れに沿って進めていきます。
-
事前準備
1. validationフォルダを作成し、フォルダ内にValidationMessageファイルを作成
2. application.properties内にパスを追加 -
ValidationMessagesファイルにエラーメッセージを記述
1. typeMismatch.Formクラス名.フィールド名=エラーメッセージ
2. typeMismatch.フィールド名=エラーメッセージ
3. typeMismatch.フィールドのデータ型=エラーメッセージ -
signup.htmlにエラーメッセージを表示させるためのタグ、属性を追加
1. #fields.hasErrors('XXXX')を用いた方法
2. Bootstrapを用いた方法
1. 事前準備
1. validationフォルダを作成し、フォルダ内にValidationMessageファイルを作成
src/main/resourcesフォルダの直下にvalidationフォルダを作成し、
その中にValidationMessages.properties, ValidationMessages_en.propertiesを作成する。

2. application.properties内にパスを追加
messages.propertiesファイルのときと同様にspring.messages.basenameを用いてsrc/main/resourcesからの相対パスを書きます。
spring.messages.basenameは複数記述することができないため、複数のパスを記述したい場合は,で区切り記述します。
#DataSource
spring.datasource.url=jdbc:oracle:thin:@localhost:1521:XE
spring.datasource.username=system
spring.datasource.password=5931
spring.datasource.driver-class-name=oracle.jdbc.driver.OracleDriver

#Message, Validation
spring.messages.basename=messages/messages, validation/ValidationMessages
2. ValidationMessagesファイルにエラーメッセージを記述
# ========================
# バインドエラーメッセージ
# ========================

# パターン1
typeMismatch.signupForm.age=数値を入力してください
typeMismatch.signupForm.birthday2=yyyy/MM/dd形式で入力してください

# パターン2
#typeMismatch.age=数値を入力してください
#typeMismatch.birthday=yyyy/MM/dd形式で入力してください

# パターン3
#typeMismatch.java.lang.Integer=数値を入力してください
#typeMismatch.java.util.Date=yyyy/MM/dd形式で入力してください
エラーメッセージの書き方は大きく分けて3パターンあります。
1. typeMismatch.Formクラス名.フィールド名=エラーメッセージ
1つ目はFormクラスのフィールド名毎にエラーメッセージを設定するパターンです。
今回の場合は、SignupFormクラスのageとbirthday2に対してエラーメッセージが出るように設定しています。
2. typeMismatch.フィールド名=エラーメッセージ
2つ目はフィールド名に毎にエラーメッセージを設定するパターンです。
今回の場合は、Formクラスに関係なく指定した全てのフィールド名にエラーメッセージが出るように設定します。
3. typeMismatch.フィールドのデータ型=エラーメッセージ
3つ目はデータ型毎にエラーメッセージを設定するパターンです。
今回の場合、エラーメッセージを指定したageとbirthday2の定義元であるFormクラスでは以下のように設定しています。
@Data
public class SignupForm {

    // 省略
	@DateTimeFormat(pattern="yyyy/MM/dd")
	private Date birthday2;

	private Integer age;
    // 省略
}
よって、この2つのデータ型であるDateとIntegerに対してエラーメッセージが出るように設定しています。
ちなみに今回はパターン1を使用します。
英語エラーメッセージ用のValidationMessages_en.propertiesに関してはエラーメッセージの内容を英語にする以外は全て同じなので説明は省略します。
# ========================
# バインドエラーメッセージ
# ========================

# パターン1
typeMismatch.signupForm.age=Please enter a number
typeMismatch.signupForm.birthday2=Please enter in yyyy/MM/dd format

# パターン2
#typeMismatch.age=Please enter a number
#typeMismatch.birthday=Please enter in yyyy/MM/dd format

# パターン3
#typeMismatch.java.lang.Integer=Please enter a number
#typeMismatch.java.util.Date=Please enter in yyyy/MM/dd format
3. signup.htmlにエラーメッセージを表示させるためのタグ、属性を追加
今回、型変換にエラーメッセージを表示させるのはageとbirthday2の2つであるためこの項目に対して必要なタグと属性を追加します(最終的には全ての項目に同様の内容を記述する)。
    <!-- 省略 -->
	<form id="signup-form" method="post" action="/user/signup" class=form-signup th:object="${signupForm}" enctype="multipart/form-data">
    <!-- 省略 -->
	<!-- 誕生日2(date,textのどちらが入力しやすいか検討中) -->
		<div class="form-group">
			<label for="birthday" th:text="#{user.signup.Birthday} + 2"></label>
            <div class="text-error" th:if="${#fields.hasErrors('birthday2')}"
                th:errors="*{birthday2}"  style="color:red"></div>
		</div>
		<!-- 年齢(誕生日から自動算出する予定) -->
		<div class="form-group">
			<label for="age" th:text="#{user.signup.Age}"></label>
			<input type="text" class="form-control" th:field="*{age}" th:errorclass="is-invalid">
			<div class="invalid-feedback" th:errors="*{age}"></div>
		</div>
    <!-- 省略 -->
	</form>
</body>
</html>
1. #fields.hasErrors('XXXX')を用いた方法
		<div class="form-group">
			<label for="birthday" th:text="#{user.signup.Birthday} + 2"></label>
            <div class="text-error" th:if="${#fields.hasErrors('birthday2')}"
                th:errors="*{birthday2}"  style="color:red"></div>
		</div>
1つ目が#fields.hasErrors('XXXX')を用いた方法です。
th:if="${#fields.hasErrors('birthday2')}"を用いてエラーが発生した場合、text-errorクラスが追加され、th:errors=により指定されたエラーメッセージが表示されます。
2. Bootstrapを用いた方法
		<div class="form-group">
			<label for="age" th:text="#{user.signup.Age}"></label>
			<input type="text" class="form-control" th:field="*{age}" th:errorclass="is-invalid">
			<div class="invalid-feedback" th:errors="*{age}"></div>
		</div>
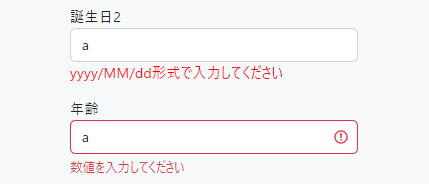
2つ目がBootstrapのCSSクラスを用いた方法です。 エラーメッセージが表示される仕組み 
上の誕生日2が#fields.hasErrors('birthday2')を用いた方法です。
下の年齢がBootstrapを用いた方法です。
個人的にはBootstrapのほうがデザインが設定されているので良いと感じました。
最後に
今回はエラーメッセージの設定を行いました。
次回ではより細かいエラー設定を行うための設定を行います。