24 Spring Mybatisを利用したデータベース操作[3. SELECT 1件]
今回はMybatisを用いてSELECT文に加え、WHERE文を使用して指定したデータ1件のみを取得します。
前提条件
この記事はSpringの最低限の知識が必要になります。
また、なるべく分かりやすく書くつもりですが、この記事の目的は自分の勉強のアウトプットであるため所々説明は省略します。
前回まで
前回はMybatisを利用してデータを複数件取得しました。
構築環境
-
各バージョン
Spring Boot ver 2.7.5
mybatis-spring-boot-starter ver 2.2.2
Model Mapper ver 3.1.0
jquery ver 3.6.1
bootstrap ver 5.2.2
webjars-locator ver 0.46
thymeleaf-layout-dialect ver 3.0.0 -
依存関係

成果物

今回行うこと(手順)
今回は以下の流れに沿って進めていきます。
- SQLの記述
1. マッパー(UserMapper.java)にメソッドを追加
2. UserMapper.xmlにマッピング定義を追加
3. UserMapper.xmlにSELECT文を追加 - サービスの記述
1. UserService.java
2. UserServiceImpl.java - Formクラス(UserDetailFrom.java)の作成
- コントローラー(UserDetailController.java)の作成
1. 動的URL
2. accountIcon - HTML(detail.html)の作成
1. SQLの記述
1. マッパー(UserMapper.java)にメソッドを追加
package com.example.repository;

import java.util.List;

import org.apache.ibatis.annotations.Mapper;

import com.example.model.MUser;

@Mapper
public interface UserMapper {

	/* ユーザー登録 */
	public int insertOne(MUser user);

	/* ユーザー表示(複数件の場合はリスト型で返す) */
	public List<MUser> findAllMUser();

	/* ユーザー取得(1件) */
	public MUser findOneMUser(String UserId);
}
	/* ユーザー取得(1件) */
	public MUser findOneMUser(String UserId);
WHERE文で対象のデータ1行を取得する際、UserIdでデータを紐付けるため引数にはUserIdを設定します。
2. UserMapper.xmlにマッピング定義を追加
<?xml version="1.0" encoding="UTF-8"?>
<!DOCTYPE mapper PUBLIC "-//mybatis.org//DTD Mapper 3.0//EN"
"http://mybatis.org/dtd/mybatis-3-mapper.dtd">

<!-- Mapperとxmlのマッピング -->
<mapper namespace="com.example.repository.UserMapper">
<!-- マッピング定義(ユーザー) -->
<resultMap type="com.example.model.MUser" id="muser">
	<id column="user_id" property="userId"/>
	<result column="phone_number" property="phoneNumber"/>
	<result column="postal_number1" property="postalNumber1"/>
	<result column="postal_number2" property="postalNumber2"/>
	<result column="address" property="address"/>
	<result column="user_name" property="userName"/>
	<result column="birthday1" property="birthday1"/>
	<result column="birthday2" property="birthday2"/>
	<result column="age" property="age"/>
	<result column="account_icon" property="accountIcon"/>
	<result column="gender" property="gender"/>
</resultMap>

	<!-- ユーザー1件登録 -->
	<insert id="insertOne">
        <!-- 省略 -->
	</insert>

	<select id="findAllMUser" resultType="MUser">
		SELECT * FROM M_USER
	</select>

	<select id="findOneMUser" resultMap="muser">
		SELECT * FROM M_USER WHERE user_id = #{userId}
	</select>
</mapper>
<!-- マッピング定義(ユーザー) -->
<resultMap type="com.example.model.MUser" id="muser">
	<id column="user_id" property="userId"/>
	<result column="phone_number" property="phoneNumber"/>
	<result column="postal_number1" property="postalNumber1"/>
	<result column="postal_number2" property="postalNumber2"/>
	<result column="address" property="address"/>
	<result column="user_name" property="userName"/>
	<result column="birthday1" property="birthday1"/>
	<result column="birthday2" property="birthday2"/>
	<result column="age" property="age"/>
	<result column="account_icon" property="accountIcon"/>
	<result column="gender" property="gender"/>
</resultMap>
resultMapタグはSELECT結果とJavaクラスをマッピングするために使用されます。
複雑なSELECT文が使用される場合、resultMapタグを使用します。
各属性の説明
- type:パッケージ名を含めたクラス名を記述します
- id:任意の値を設定します
- column:SELECT結果のカラム名を設定します(テーブル(M_USER)のカラム名)
- property:Javaクラスのフィールド名(エンティティクラス(MUser.java)のフィールド名)
id columnとresult columnの違い
- id column:カラム値がユニークになるよう戻り値が設定される⇒マッパーから返される値は1件しない
- result column:1件獲得したら1件返す
| user_id | user_name |
|---|---|
| sample@example.com | sampleMan1 |
| sample@example.com | sampleMan1 |
↓
| index | userId | userName |
|---|---|---|
| 1 | sample@example.com | sampleMan1 |
3. UserMapper.xmlにSELECT文を追加
2. UserMapper.xmlにマッピング定義を追加で追加したresultMapタグを使用する場合、記述するSQL文にid=muserを設定します。
    <!-- 省略 -->

    <!-- resultMapには先ほど設定したidの値を記述 -->
	<select id="findOneMUser" resultMap="muser">
		SELECT * FROM M_USER WHERE user_id = #{userId}
	</select>
前回の記事(#22)で設定したSELECT文にはresultMapタグを使用しなくともmybatis.configuration.map-underscore-to-camel-case=trueが設定されていたため、自動でテーブル(M_USER)とエンティティ(MUser.java)のマッピングが行われていました。
今回resultMapタグを用いたのはテーブル結合等に利用するためであり、1つのテーブルしか用いないSELECT文ならばresultMapタグは必要ないと思います。
また、前回はresultTypeタグを用いて戻り値のデータ型を指定していましたが、今回はresultMapタグ内のtype属性により戻り値の型を指定しています。
2. サービスの記述
次にサービスに内容を記述していきます。
1. UserService.java
package com.example.service;

import java.util.List;
import java.util.Locale;
import java.util.Map;

import org.springframework.web.multipart.MultipartFile;

import com.example.model.MUser;

public interface UserService {

	/* 性別のMapを生成する */
	public Map<String, Integer> getGenderMap(Locale locale);

	/* ユーザー登録 */
	public void signUp(MUser muser);

	/* ユーザー取得 */
	public List<MUser> getAllMUser();

	/* ユーザー取得(1件) */
	public MUser getOneMUser(String UserId);
	/* ユーザー取得(1件) */
	public MUser getOneMUser(String UserId);
抽象メソッドを記述します。
2. UserServiceImpl.java
package com.example.service.impl;

/* 省略 */

@Service
public class UserServiceImpl implements UserService {

	/* messages.propertiesのDIを注入 */
	@Autowired
	private MessageSource messagesource;

	/* レポジトリー(UserMapper.java)のDIを注入 */
	@Autowired
	private UserMapper mapper;

	/* 性別のMapを生成する */
	@Override
	public Map<String, Integer> getGenderMap(Locale locale) {
		Map<String, Integer> genderMap = new LinkedHashMap<>();
		String male = messagesource.getMessage("male", null, locale);
		String female = messagesource.getMessage("female", null, locale);
		genderMap.put(male, 1);
		genderMap.put(female, 2);
		return genderMap;
	}

	/* データの挿入 */
	@Override
	public void signUp(MUser user) {
		mapper.insertOne(user);
	}

	/* ユーザー情報取得 */
	@Override
	public List<MUser> getAllMUser() {
		return mapper.findAllMUser();
	}

	/* ユーザー情報取得(1件) */
	@Override
	public MUser getOneMUser(String UserId) {
		return mapper.findOneMUser(UserId);
	}
}
	/* ユーザー情報取得(1件) */
	@Override
	public MUser getOneMUser(String UserId) {
		return mapper.findOneMUser(UserId);
	}
先ほど記述した抽象メソッドを実装します。メソッドの戻り値は1. SQLの記述で記述したfindOneMUserメソッドを使用します。
3. Formクラス(UserDetailFrom.java)の作成
続いてユーザー詳細画面用のFormクラスを作成します。
package com.example.form;

import java.util.Date;

import org.springframework.web.multipart.MultipartFile;

import lombok.Data;

@Data
public class UserDetailForm {

	private String userId;
	private String phoneNumber;
	private Integer postalNumber1;
	private Integer postalNumber2;
	private String address;
	private String userName;
	private String password;
	private Date birthday1;
	private Date birthday2;
	private Integer age;
	private MultipartFile accountIcon;
	private Integer gender;
}
4. コントローラー(UserDetailController.java)の作成
package com.example.controller;

/* 省略 */

@Controller
@RequestMapping("/user")
public class UserDetailController {

	@Autowired
	private UserService userservice;

	@Autowired
	private ModelMapper modelMapper;

	/* ユーザーの詳細情報を表示 */
	@GetMapping("/detail/{userId:.+}")
	public String getUser(UserDetailForm form, Model model, @PathVariable("userId") String UserId) {

		// ユーザーを1件取得
		MUser user = userservice.getOneMUser(UserId);

		// MUserをformに変換
		form = modelMapper.map(user, UserDetailForm.class);

		// Modelに登録
		model.addAttribute("userDetailForm", form);

		// ユーザー詳細情報を表示
		return "user/detail";
	}
}
1. 動的URL
	@GetMapping("/detail/{userId:.+}")
	public String getUser(UserDetailForm form, Model model, @PathVariable("userId") String UserId) {
        /* 省略 */
    }
URLの一部を受け取るために動的URLを使用します。そのために変数をURLに入れます。
URL内の変数を受け取るために、@PathVariableアノテーションを使います。このアノテーションの値には、URL内の変数名を使用します。今回の場合、ユーザーIDがメールアドレス形式になっているため、/detail/{userId}だけでは上手く値を受け取れない場合があります。例えば、sample@example.co.jpという値が渡されると、sample@example.coしか受け取れません。それに対応するために上記のような正規表現を使用した書き方をしています。メールアドレス形式でなければ/detail/{userId}で問題ありません。
2. accountIcon
今回、画像データが入っているaccoountIconに関してはこのままでは値を取得することができないため、別の記事で書きます。今回はaccountIconの値を全てnullとして進めて行きます。
5. HTML(detail.html)の作成
今回はSELECT文を用いて特定の行のデータが取得できていれば良いので、detail.htmlは簡単にまとめます。
<!DOCTYPE html>
<html xmlns:th="http://www.thymeleaf.org"
xmlns:layout="http://www.ultraq.net.nz/thymeleaf/layout"
layout:decorate="~{layout/layout}">
<head>
<title>ユーザー詳細</title>
<!-- CSS読込 -->
<link rel="stylesheet" th:href="@{/css/user/list.css}">
</head>
<body>
	<div layout:fragment="content">
		<div class="header border-bottom">
			<h1 class="h2">ユーザー詳細</h1>
		</div>
		<form id="user-detail-form" method="post" th:action="@{/user/detail}" class="form-signup" th:object="${userDetailForm}">
			<!-- ユーザー詳細情報 -->
			<table class="table table-striped table-bordered table-hover">
				<tbody>
					<tr>
						<th class="w-25">ユーザーID</th>
						<td th:text="*{userId}"></td>
					</tr>
					<tr>
						<th>電話番号</th>
						<td th:text="*{phoneNumber} == null ? '登録されていません' : *{phoneNumber}"></td>
					</tr>
					<tr>
						<th>郵便番号</th>
						<td th:text="*{postalNumber1} == null ? '登録されていません' : |*{postalNumber1} - *{postalNumber2}|"></td>
					</tr>
					<tr>
						<th>パスワード</th>
						<td>
							<input type="text" class="form-control" th:field="*{password}"/>
						</td>
					</tr>
					<tr>
						<th>ユーザー名</th>
						<td>
							<input type="text" class="form-control" th:field="*{userName}"/>
						</td>
					</tr>
					<tr>
						<th>誕生日</th>
						<td th:text="*{birthday2} == null ? '登録されていません' : *{#dates.format(birthday2, 'YYYY/MM/dd')}"></td>
					</tr>
					<tr>
						<th>年齢</th>
						<td th:text="*{age} == null ? '登録されていません' : *{age}"></td>
					</tr>
					<tr>
						<th>性別</th>
						<div th:switch="*{gender}">
							<td th:case= 0 th:text='男性'>
							<td th:case= 1 th:text='女性'>
							<td th:case= "*" th:text='登録されていません'>
						</div>
					</tr>
				</tbody>
			</table>
		</form>
	</div>
</body>
</html>
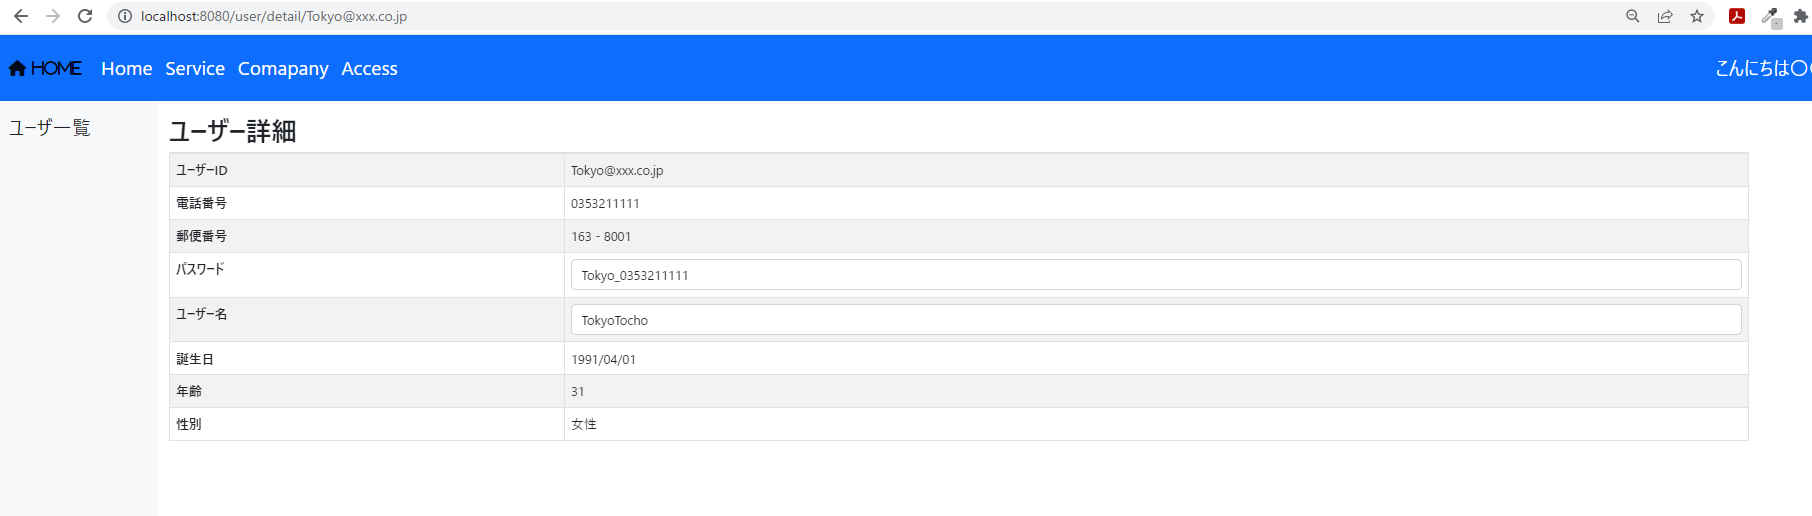
最後に
以上で全て終了になります。
詳細画面は以下のようになりました。