前回まで
前回はSpringとMySQLの接続設定を行い、登録・更新機能を実装するところまで行いました!
前回の記事を読んでいない人は是非そちらを先に読むことをおすすめします!
第2回目となる今回の記事は、前回作成した機能の修正、新たな機能を追加を行っていきます。
成果物
今回作成した成果物で前回との変更点を記載します。

登録完了のメッセージ表示

更新完了のメッセージ表示

削除機能の追加と削除完了のメッセージ表示

エラーメッセージの表示
修正・追加する機能
-
修正機能
1.1. 主キー「id」を自動生成できるようにする -
追加機能
2.1. 削除機能
2.2. メッセージ表示機能
2.3. データベースに項目追加
修正の変更点は少ない気がしますが、今回はこの内容で進めて行きます。
1.修正機能
1.1. 主キー「id」を自動生成できるようにする
前回までのプログラムの登録・更新機能で値を入力する際に、主キー「id」も自分で入力していましたが、今回は自動で「id」を入力するように変更します。
変更の手順は以下になります。
- MySQL Workbenchにて主キー「id」のデータ型を変更する
- 主キーの値が「1」から始まるように変更する
- Repositroy、Serviceのメソッドを変更する
1. MySQL Workbenchにて主キー「id」のデータ型を変更する
これは主キー「id」の「AI(=auto increment)」を追加するだけです。

2. 主キーの値が「1」から始まるように変更する
既にデータがテーブル内にある場合、データを削除して新たなデータを挿入しても、「id」が1から始まりません。
なので、以下のDELETE後に以下のSQL文を実行してください。
ALTER TABLE `sampledb`.'sample' auto_increment = 1; // `sampledb`.`sample`=`データベース名`.`テーブル名`
参考サイト
補足ですが、MySQL Workbenchでエラーが発生してしまいテーブルが作れなくなってしまった際は、以下の際とを参考にしてみてください
3. Repositroy、Serviceのメソッドを変更する
前回までは主キー「id」が「CrudRepositoryインターフェース」の「saveメソッド」を利用してINSERTを行おうとしていましたが、主キーである「id」がNOT NULL条件であったため、「saveメソッド」を用いてINSERTができませんでした。しかし、「Id」に「AI(=auto increment)」を追加したので、「saveメソッド」を利用することができるようになりました。よって、前回「SampleCrudRepositoryインターフェース」に定義したオリジナルのメソッドを削除して、「saveメソッド」を用いた処理に変更します。
package com.example.demo.repository;

import org.springframework.data.jdbc.repository.query.Modifying;
import org.springframework.data.jdbc.repository.query.Query;
import org.springframework.data.repository.CrudRepository;
import org.springframework.data.repository.query.Param;

import com.example.demo.entity.Sample;

public interface SampleCrudRepository extends CrudRepository<Sample, Integer> {
/* --------------------------ここから下は削除--------------------------------- */
	@Modifying
	@Query(value = "INSERT INTO sample VALUES(:id, :name, :gender, :age)")
	void InsertData(@Param("id") Integer id,
			       @Param("name") String name,
			       @Param("gender") Integer gender,
			       @Param("age") Integer age);
/* --------------------------ここから上は削除--------------------------------- */
}
package com.example.demo.service;

import java.util.Optional;

import org.springframework.beans.factory.annotation.Autowired;
import org.springframework.stereotype.Service;
import org.springframework.transaction.annotation.Transactional;

import com.example.demo.entity.Sample;
import com.example.demo.repository.SampleCrudRepository;

@Service
@Transactional
public class SampleServiceImpl implements SampleService {

	@Autowired
	SampleCrudRepository repository;

	@Override
	public Iterable<Sample> SelectAll() {
		return repository.findAll();
	}

	@Override
	public Optional<Sample> SlectOneById(Integer id) {
		return repository.findById(id);
	}

	@Override
	public void InsertSample(Sample sample) {
    /*-------------ここから下を削除-------------*/
		repository.InsertData(sample.getId(),
							  sample.getName(),
							  sample.getGender(),
							  sample.getAge());
     /*-------------ここから上を削除-------------*/
        repository.save(sample); // 追加
	}

	@Override
	public void UpdateSample(Sample sample) {
		repository.save(sample);
	}

	@Override
	public void DeleteSampleById(Integer id) {
		repository.deleteById(id);

	}
}
「id」を自動生成してくれるので、画面の入力フォームもいらなくなりました。show.htmlも変更しましょう。
input type="number" th:field="{id}"でこれまで入力していたフォームを削除し、
代わりに input th:if="${id}" type="hidden" th:field="{id}"を設定します。
<!DOCTYPE html>
<html xmlns:th="http://thymeleaf.org">
<head>
<meta charset="UTF-8">
<title>サンプル</title>
</head>
<body>
	<table border="1" th:unless="${#lists.isEmpty(list)}" style="table-layout: fixed;">
		<tr>
			<th>ID</th>
			<th>名前</th>
			<th>性別</th>
			<th>年齢</th>
			<th>編集</th>
			<th>削除</th>
		</tr>
		<tr th:each="obj : ${list}" align="center">
			<td th:text="${obj.id}"></td>
			<td th:text="${obj.name}"></td>
			<td th:text="${obj.gender} == 0? '男性' : '女性'"></td>
			<td th:text="${obj.age}"></td>
			<td>
				<form method="get" th:action="@{sample/{id}(id=${obj.id})}">
					<input type="submit" value="編集">
				</form>
			</td>
			<td>
				<form method="post" th:action="@{sample/delete}">
					<input type="hidden" name="id" th:value="${obj.id}">
					<input type="submit" value="削除">
				</form>
			</td>
		</tr>
	</table>
	<form method="post"
	       th:action="${sampleForm.NewSample}? @{/sample/insert} : @{/sample/update}"
	       th:object="${sampleForm}">
	       <hr>
           <!-- ------------------------------ここから下を削除--------------------------------- -->
	       <label>ID :</label>
	       <input type="number" th:field="*{id}">
	       <br>
           <!-- ------------------------------ここから上を削除--------------------------------- -->
	       <label>名前:</label>
	       <input type="text" th:field="*{name}">
	       <br>
	       <label>男性:</label>
	       <input type="radio" value=0 th:field="*{gender}">
	       <label>女性:</label>
	       <input type="radio" value=1 th:field="*{gender}">
	       <br>
	       <label>年齢:</label>
	       <input type="number" th:field="*{age}">
	       <br>
           <input th:if="${id}" type="hidden" th:field="*{id}">  <!-- 追加 -->
 	       <input type="submit" value="送信">
	</form>
	<p th:unless="${sampleForm.newSample}">
		<a href="#" th:href="@{/sample}">一覧画面へ戻る</a>
	</p>
</body>
</html>
自動で「id」を生成してくれるので、「SampleFormクラス」のバリデーションも削除しましょう。
package com.example.demo.form;

import javax.validation.constraints.Min;
import javax.validation.constraints.NotBlank;
import javax.validation.constraints.NotNull;

import org.hibernate.validator.constraints.Length;
import org.hibernate.validator.constraints.Range;

import lombok.Data;
@Data
public class SampleForm {
    /* --ここから下を削除-- */
	@NotNull
	@Min(0)
    /* --ここから上を削除-- */
	private Integer id;

	@NotBlank
	@Length(min=1, max=100)
	private String name;

	private Integer gender;

	@NotNull
	@Range(min=0, max=120)
	private Integer age;

	private Boolean NewSample;
}
「SampleControllerクラス」も「id」は受け取らないため以下の箇所は削除しましょう。
@PostMapping("/insert")
	public String insert(@Validated SampleForm sampleForm, BindingResult bindingResult,
			Model model, RedirectAttributes redirectAttributes) {
		Sample sample = new Sample();
		sample.setId(sampleForm.getId()); // 削除
		sample.setName(sampleForm.getName());
		sample.setGender(sampleForm.getGender());
		sample.setAge(sampleForm.getAge());
		if( !bindingResult.hasErrors()) {
			service.InsertSample(sample);
			return "redirect:/sample";
		} else {
			return ShowList(sampleForm, model);
		}
	}

	private Sample MakeSample(SampleForm sampleForm) {
		Sample sample = new Sample();
        sample.setId(sampleForm.getId()); // 削除
		sample.setName(sampleForm.getName());
		sample.setGender(sampleForm.getGender());
		sample.setAge(sampleForm.getAge());
		return sample;
	}
これで変更は完了しました。
2. 追加機能
2.1. 削除機能
これまでの登録・更新機能に加え、削除機能も追加していきます。
追加の手順は以下になります。
- 「SampleService」インターフェースに抽象メソッドを追加
- 「SampleServiceImpl」クラスに実装メソッドを追加
- 「show.html」に削除ボタンを追加
- 「SampleController」クラスにメソッドを追加
1. 「SampleService」インターフェースに抽象メソッドを追加
2. 「SampleServiceImpl」クラスに実装メソッドを追加
1と2に関しては内容がそれほど無いため、1つにまとめて記述します。
package com.example.demo.service;

import java.util.Optional;

import com.example.demo.entity.Sample;

public interface SampleService {

	Iterable<Sample> SelectAll();

	Optional<Sample> SlectOneById(Integer id);

    void InsertSample(Sample sample);

    void UpdateSample(Sample sample);

    /* データを削除する */
    void DeleteSampleById(Integer id); // 追加
}
package com.example.demo.service;

import java.util.Optional;

import org.springframework.beans.factory.annotation.Autowired;
import org.springframework.stereotype.Service;
import org.springframework.transaction.annotation.Transactional;

import com.example.demo.entity.Sample;
import com.example.demo.repository.SampleCrudRepository;

@Service
@Transactional
public class SampleServiceImpl implements SampleService {

	@Autowired
	SampleCrudRepository repository;

	@Override
	public Iterable<Sample> SelectAll() {
		return repository.findAll();
	}

	@Override
	public Optional<Sample> SlectOneById(Integer id) {
		return repository.findById(id);
	}

	@Override
	public void InsertSample(Sample sample) {
		repository.save(sample);
	}

	@Override
	public void UpdateSample(Sample sample) {
		repository.save(sample);
	}

    /*--------------- 追加 ----------------- */
	@Override
	public void DeleteSampleById(Integer id) {
		repository.deleteById(id);
	/*-------------------------------------- */
	}
}
これまでと同じような内容なので特に追加で説明することもないですが、「CrudRepository」インターフェースの「CURD」メソッド利用できるため、その中の「deleteById(id)」メソッドを利用します。これにより指定した「id」のエンティティを削除することができます。
3. 「show.html」に削除ボタンを追加
次に画面に削除ボタンを追加していきます。
<table border="1" th:unless="${#lists.isEmpty(list)}" style="table-layout: fixed;">
		<tr>
			<th>ID</th>
			<th>名前</th>
			<th>性別</th>
			<th>年齢</th>
			<th>編集</th>
			<th>削除</th>
		</tr>
		<tr th:each="obj : ${list}" align="center">
			<td th:text="${obj.id}"></td>
			<td th:text="${obj.name}"></td>
			<td th:text="${obj.gender} == 0? '男性' : '女性'"></td>
			<td th:text="${obj.age}"></td>
			<td>
				<form method="get" th:action="@{sample/{id}(id=${obj.id})}">
					<input type="submit" value="編集">
				</form>
			</td>
			<!-- 削除ボタン -->
			<td>
				<form method="post" th:action="@{sample/delete}">
					<input type="hidden" name="id" th:value="${obj.id}">
					<input type="submit" value="削除">
				</form>
			</td>
            <!--------------->
		</tr>
	</table>
th:value="${obj.id}"によりボタンが押れた際に、その行データの「id」の値がコントローラー受け渡されます。
4. 「SampleController」クラスにメソッドを追加
最後にコントローラーに記述していきます。
@PostMapping("/delete")
	public String delete(@RequestParam("id") String id, Model model,
			RedirectAttributes redirectAttributes) {
		service.DeleteSampleById(Integer.parseInt(id));
		return "redirect:/sample";
	}
@RequestParamの後に「ビュー」側で記述していた入力値の「name属性」と「同名の変数」を引数に使用することで、「リクエストパラメータ」が変数に設定されます。
また、Integer.parseInt(id)を使用することで「id」がInteger型に変換可能であれば、Integer型に変更できます。
リダイレクトに関しては、この後で説明されています。
これで削除機能は一通り完成しました。
2.2. メッセージ表示機能
これまでは入力エラー等が発生しても何も表示されませんでしたが、それだと使う側が分かりづらいため、メッセージを表示できるよう設定していきます。
変更の手順は以下になります。
- 「messages.properties」を作成し、メッセージを作成
- 「show.html」にメッセージを表示する変数を追加
- 「ValidationMessages.properties」を作成し、バリデーションに対するメッセージを作成
- 登録、更新、削除時のメッセージを表示
1.「messages.properties」を作成し、メッセージを作成
今回「messages.properties」を用いて作成する箇所、タイミングとしては、
- タイトル
- データ一覧
resourcesフォルダ直下に「messages.properties」というファイルを作成し、以下のコードを入力します。
title=テストプログラム
YesTable=データ一覧
NoTable=データがありません
私が参考にしている本にはLimy プロパティー・エディターで開き文字を入力しないと文字化けすると書いてあったのですが、普通に開いても文字化けはしませんでした。もしかしたら参考書のバージョンが少し古いのかも知れないです。
2. 「show.html」にメッセージを表示する変数を追加
次に画面に表示させるために「show.html」に変更を加えます。
全部を乗せると長くなってしまうので、1部抜粋して掲載します。
<!DOCTYPE html>
<html xmlns:th="http://thymeleaf.org">
<head>
<meta charset="UTF-8">
<title th:text="#{title}"></title> <!-- 追加 -->
</head>
<body>
	<h1 th:text="#{title}"></h1>
	<p th:unless="${#lists.isEmpty(list)}" th:text="#{YesTable}"></p> <!-- 追加 -->
	<p th:if="${#lists.isEmpty(list)}" th:text="#{NoTable}"></p> <!-- 追加 -->
特徴としては"#{title}"のように先ほどファイルに記載した内容を"#{~~~}"で囲むことで表示できます。
	<p th:unless="${#lists.isEmpty(list)}" th:text="#{YesTable}"></p> <!-- データがあれば「YesTable」を表示 -->
	<p th:if="${#lists.isEmpty(list)}" th:text="#{NoTable}"></p> <!-- データがなければ「NoTable」を表示 -->
「YesTable」、「NoTable」に関しては、ここでしか使わない変数なので、わざわざこの2行のために用意するのは意味がないように感じますが、勉強のために書きました。
実際に画面に表示すると下のようになります。

データがあるとき

データがないとき
3. 「ValidationMessages.properties」を作成し、バリデーションに対するメッセージを作成
前回の記事で作成した「SampleFormクラス」のバリデーションに対してメッセージを作成します。
先ほどと同様にesourcesフォルダ直下に「ValidationMessages.properties」というファイルを作成し、以下のコードを入力します。
#単項目チェック用メッセージ
javax.validation.constraints.NotBlank.message={0}が未入力です。
javax.validation.constraints.NotNull.message={0}が未入力です。
org.hibernate.validator.constraints.Length.message={0}は{min}~{max}の範囲で入力してください!
org.hibernate.validator.constraints.Range.message={0}は{min}~{max}の範囲で入力してください!

#型変換チェック用メッセージ
typeMismatch.java.lang.Integer={0}は整数で入力してください
単項目チェックとは、入力項目一つ一つに対して設定する入力チェック機能です。
相関項目チェックと呼ばれる複数のフィールドを混合してチェックを行う機能です。
「#型変換チェック用メッセージ」に関して、今回の入力フォームは「type=number, radio」など数値でしか値を受け取れないようにしているので、使いませんが一応記述しておきます。
「ValidationMessages.properties」にエラーメッセージを記述したら、次に画面にエラーメッセージを表示するために「show.html」に記述します。
<form method="post"
	       th:action="${sampleForm.NewSample}? @{/sample/insert} : @{/sample/update}"
	       th:object="${sampleForm}">
           <!-- 追加 -->
	       <ul th:if="${#fields.hasErrors('*')}">
	       		<li th:each="err : ${#fields.errors('*')}" th:text="${err}"></li>
	       </ul>
           <!---------->
	       <hr>
	       <label>名前:</label>
	       <input type="text" th:field="*{name}">
	       <br>
	       <label>男性:</label>
	       <input type="radio" value=0 th:field="*{gender}">
	       <label>女性:</label>
	       <input type="radio" value=1 th:field="*{gender}">
	       <br>
	       <label>年齢:</label>
	       <input type="number" th:field="*{age}">
	       <br>
	       <input th:if="${id}" type="hidden" th:field="*{id}">
	       <input type="submit" value="送信">
	</form>
「formタブ」の中のエラーを表示したい箇所に追加します。
「#fields.hasErrors」メソッドでエラーがあるか判定します。
「#fields.errors」メソッドでエラーメッセージを配列で返すため、「th:each属性」を利用して表示を行います。
全てのフィールドのエラーを取得する場合は「#fields.errors」メソッドの引数に「*」を渡しますが、個別のエラーを取得したい場合は引数に「フィールド名」を渡します。
上記のような記述をした場合、何も入力しないと以下のようなメッセージが出ます。

どうせなら個別のエラーを取得できるように修正します。
<form method="post"
	       th:action="${sampleForm.NewSample}? @{/sample/insert} : @{/sample/update}"
	       th:object="${sampleForm}">
	       <hr>
	       <label>名前:</label>
	       <input type="text" th:field="*{name}">
	       <p th:each="err : ${#fields.errors('*{name}')}" th:text="${err}"></p>
	       <br>
	       <label>男性:</label>
	       <input type="radio" value=0 th:field="*{gender}">
	       <label>女性:</label>
	       <input type="radio" value=1 th:field="*{gender}">
	       <br>
	       <label>年齢:</label>
	       <input type="number" th:field="*{age}">
	       <p th:each="err : ${#fields.errors('*{age}')}" th:text="${err}"></p>
	       <br>
	       <input th:if="${id}" type="hidden" th:field="*{id}">
	       <input type="submit" value="送信">
	</form>
こんな感じになりました。
先ほどはth:if="${#fields.hasErrors('*')を使ってエラーが発生しているかの判定を行っていましたが、これがなくても最初からエラーが表示されるようなことはありませんでした。
4. 登録、更新、削除時のメッセージを表示
最後に各処理が行われた際に、メッセージを表示するよう書きます。
第1回の記述した「SampleController」クラスに変更を加えていきます。
	@PostMapping("/insert")
	public String insert(@Validated SampleForm sampleForm, BindingResult bindingResult,
			Model model, RedirectAttributes redirectAttributes) {
		Sample sample = new Sample();
		sample.setName(sampleForm.getName());
		sample.setGender(sampleForm.getGender());
		sample.setAge(sampleForm.getAge());
		if( !bindingResult.hasErrors()) {
			service.InsertSample(sample);
            redirectAttributes.addFlashAttribute("complete", "登録が完了しました!"); // 追加
			return "redirect:/sample";
		} else {
			return ShowList(sampleForm, model);
		}
	}


	@PostMapping("/update")
	public String update(@Validated SampleForm sampleForm, BindingResult result,
						 Model model, RedirectAttributes redirectAttributes) {
		Sample sample = MakeSample(sampleForm);
		if(!result.hasErrors()) {
			service.UpdateSample(sample);
            redirectAttributes.addFlashAttribute("complete", "更新が完了しました!"); // 追加
			return "redirect:/sample/" + sample.getId();
		} else {
			makeUpdateModel(sampleForm, model);
			return "show";
		}
	}

    @PostMapping("/delete")
	public String delete(@RequestParam("id") String id, Model model,
			RedirectAttributes redirectAttributes) {
		service.DeleteSampleById(Integer.parseInt(id));
        redirectAttributes.addFlashAttribute("complete", "削除が完了しました!"); // 追加
		return "redirect:/sample";
	}
}
変更するのは登録、更新、削除処理を行っている3つのメソッドです。
「RedirectAttributes」を引数に設定し、「redirectAttributes.addFlashAttribute("-----", "~~~~~");」と記述することでリダイレクト先に渡したい値を設定しています。これは、「Flash Scope」という「スコープ」になり、1回のリダイレクトで飲み有効な「スコープ」になります。
リダイレクトとフォワードの違いが分からない方は上記のサイトを参考にしてみてください。
最後に画面に表示するために、「show.html」に「complete」を記述します。
<!-- 追加 -->
<p th:if="${complete}" th:text="${complete}" style="color:blue"></p>
<!---------->
	<form method="post"
	       th:action="${sampleForm.NewSample}? @{/sample/insert} : @{/sample/update}"
	       th:object="${sampleForm}">
	       <ul th:if="${#fields.hasErrors('*')}">
	       		<li th:each="err : ${#fields.errors('*')}" th:text="${err}" style="color:red"></li>
	       </ul>
	       <hr>

	       <label>名前:</label>
	       <input type="text" th:field="*{name}">
	       <br>
	       <label>男性:</label>
	       <input type="radio" value=0 th:field="*{gender}">
	       <label>女性:</label>
	       <input type="radio" value=1 th:field="*{gender}">
	       <br>
	       <label>年齢:</label>
	       <input type="number" th:field="*{age}">
	       <br>
	       <input th:if="${id}" type="hidden" th:field="*{id}">
	       <input type="submit" value="送信">
	</form>
	<p th:unless="${sampleForm.newSample}">
		<a href="#" th:href="@{/sample}">一覧画面へ戻る</a>
	</p>
最後に正しく表示されるか実際に動かして確認します。


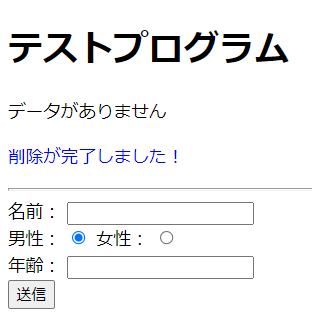
無事に全てが表示されました。
最後に
以上で全ての項目が終了しました。
次は、相関項目チェックを利用したログイン機能の実装などを考えています。
ここまで見てくれてた方はありがとうございました。