はじめに
React Hook Form (react-hook-form) と Material-UI (MUI) を組み合わせて、効率的で美しいサインアップフォームを作成する方法について解説します。具体的なコードを使いながら、フォームのセットアップから各入力フィールドの管理までを整理します。
参考
作成の例
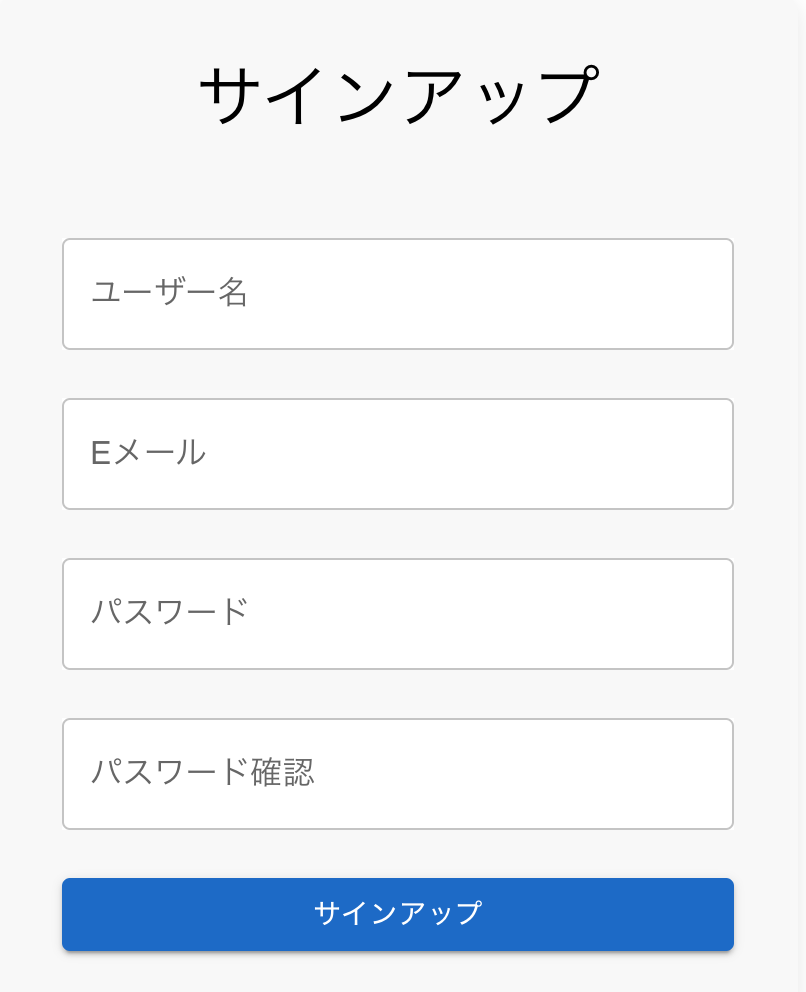
画面のイメージ
以下のコードは Next.js で react-hook-form と MUI を使ったサインアップフォームの例です。
import { NextPage } from 'next';
import { useForm, Controller } from 'react-hook-form';
import { TextField, Button, Typography, Box } from '@mui/material';

interface SignUpFormData {
  username: string;
  email: string;
  password: string;
  confirmPassword: string;
}

const SignUpForm: NextPage = () => {
  // フォームのセットアップ
  const { control, handleSubmit, watch } = useForm<SignUpFormData>({
    defaultValues: {
      username: '',
      email: '',
      password: '',
      confirmPassword: '',
    },
  });

  // フォーム送信時の処理
  const onSubmit = (data: SignUpFormData) => {
    console.log('サインアップデータ:', data);
  };

  // パスワードと確認パスワードが一致しているかチェック
  const password = watch('password');
  const confirmPassword = watch('confirmPassword');

  return (
    <Box
      sx={{
        maxWidth: 400,
        margin: 'auto',
        padding: 4,
        backgroundColor: '#f9f9f9',
        borderRadius: '10px',
        boxShadow: '0 4px 12px rgba(0, 0, 0, 0.1)',
      }}
    >
      <Typography variant="h4" sx={{ color:'black',textAlign: 'center', mb: 4 }}>
        サインアップ
      </Typography>
      <form onSubmit={handleSubmit(onSubmit)}>
        {/* ユーザー名 */}
        <Controller
          name="username"
          control={control}
          render={({ field }) => (
            <TextField
              {...field}
              label="ユーザー名"
              variant="outlined"
              fullWidth
              margin="normal"
              sx={{ backgroundColor: 'white' }}
            />
          )}
        />
        <Controller
          name='email'
          control={control}
          render = {({field}) =>
            <TextField
              {...field}
              label = 'Eメール'
              variant = 'outlined'
              fullWidth
              margin='normal'
              sx={{bgcolor:'white'}}
              />
          }
        />

        {/* パスワード */}
        <Controller
          name="password"
          control={control}
          render={({ field }) => (
            <TextField
              {...field}
              type="password"
              label="パスワード"
              variant="outlined"
              fullWidth
              margin="normal"
              sx={{ backgroundColor: 'white' }}
            />
          )}
        />

        {/* パスワード確認 */}
        <Controller
          name="confirmPassword"
          control={control}
          render={({ field }) => (
            <TextField
              {...field}
              type="password"
              label="パスワード確認"
              variant="outlined"
              fullWidth
              margin="normal"
              sx={{ backgroundColor: 'white' }}
              error = {password !== confirmPassword}
              helperText={
                password !== confirmPassword
                ? 'パスワードが一致しません'
                : ''
              }

            />
          )}
        />

        {/* 送信ボタン */}
        <Button
          type="submit"
          variant="contained"
          color="primary"
          fullWidth
          sx={{ mt: 2 }}
          disabled={password !== confirmPassword}
        >
          サインアップ
        </Button>
      </form>
    </Box>
  );
};

export default SignUpForm;
各部分の解説
useForm フック
useForm は react-hook-form から提供され、フォーム全体の状態管理を簡単にします。control はフォームフィールドを管理するオブジェクトで、handleSubmit はフォーム送信時に使用する関数です。
Controller コンポーネント
- Controller は react-hook-form が提供するコンポーネントで、外部の UI ライブラリ(今回は MUI)とフォームの状態管理を連携させる役割を果たします
- name プロパティ: 入力フィールドの名前を指定します
- control プロパティ: useForm フックから取得した control オブジェクトを渡します
- render プロパティ: 実際の入力フィールドを描画するための関数を指定します。field には入力フィールドの状態やイベントハンドラーが含まれています
TextFieldコンポーネント
MUI の TextField コンポーネントは、フォームの入力フィールドを作成するために使用されます。{...field} によって、react-hook-form の状態管理機能を展開します。
Controller と field の理解
- Controller コンポーネントを使うことで、MUI の TextField と react-hook-form の状態管理がスムーズに連携します
- {...field}: field には value, onChange, onBlur などのプロパティが含まれており、これを展開して TextField に渡すことで、入力の状態が自動で管理されます
バリデーションと送信
- フォーム送信時は、handleSubmit を使ってデータを受け取り、onSubmit 関数で処理します
- watch 関数を使って、入力値をリアルタイムで監視し、パスワードの一致をチェックしています
終わりに
- react-hook-form と MUI を組み合わせることで、簡単に美しいフォームを作成できます
- Controller コンポーネントの使い方を理解することで、外部 UI ライブラリとの連携がスムーズになります