(2021-9-9 色々追記しました)
都市OS FIWARE の勉強をしながら、環境を、GCP の Compute Engine 無料枠で作ろうとしていたのですが、ちょっとスペック的に厳しく、動かしきれませんでした。
代わりを探したところ、WebARENA がコスパ高そうということで、今回、環境を作ってみたというお話です。
WebARENA
VPSクラウド、という選択肢もあります。
メモリ2GBを条件とすると、
CPU 仮想2コア
SSD 30GB
メモリ 2GB
792円
のコースになります。
一方、Indigoは、
メモリ 2GB
CPU 2vCPU
SSD 40GB
NW 100Mbps
上限
699円
ディスク10GB分お得で、100円安い。
かつ、VPSクラウドの方は、CentOSのバージョンが古い(6か7)し、今後が心配という面もある。
ということで、Indigoにします。
Googleでサインアップして、ダッシュボードにログインできるのは良いけど、状態がよくわからない。
サービスを開くと、Indigoサービスがあるのはわかる。
アクション欄の「アクセスする」アイコンクリック。
英語の画面か、と思ったら、日本語切り替えは可能。
インスタンスは0/10となっている。
インスタンス作成ボタンを押すと、イメージの選択や、サイズの選択。
なるほど。
こちらに手順がありました。
まずは、CentOS と Ubuntu どちらにするか
やはり、まだ、業務では RHEL が多い気がするけど、内部サーバは Ubuntu だったりもする・・
一応、CentOS にしておこうか。
CentOS 8.1 と Stream8 の違いは?随時最新化されていく。
Stream8 でよいかな。
SSH鍵を作成すると、
private_key.txt
がダウンロードされる。
SSH鍵には今作成したものが表示される。
リージョンは日本Tokyoのみ。
インスタンスの作成。
インスタンスの一覧に戻り、OSインストールを実行中ですと表示される。
SSH鍵のところは、こちらの情報を参考にさせていただきました。
$ ssh indigo
The authenticity of host 'xxx' can't be established.
ECDSA key fingerprint is SHA256:xxx.
Are you sure you want to continue connecting (yes/no/[fingerprint])?

yes
最初は聞かれるんですね。
無事繋がりました。
$ pwd
/home/centos
CentOS への Docker インストール
何はともあれ、Dockerを入れます。
yumだと思ったら、最近はdnfなのか・・・ついて行けてないですね。
ネットで色々調べる各種情報も、yumとdnfが混じっていて、何か不安。
混じってないこちらを、参考にさせていただきました。
$ dnf repolist

$ sudo su -

# dnf config-manager --add-repo https://download.docker.com/linux/centos/docker-ce.repo

# dnf -y install --nobest docker-ce docker-ce-cli

# systemctl start docker
# systemctl enable docker

# docker --version
Docker version 20.10.8, build 3967b7d

# docker compose up
docker: 'compose' is not a docker command.
最新のDockerを入れたら、docker-compose ではなく、docker compose が使えると思っていたら、そうではないのですね。下記も必要です。
ls ~/.docker
mkdir -p ~/.docker/cli-plugins/
curl -SL https://github.com/docker/compose-cli/releases/download/v2.0.0-rc.1/docker-compose-linux-amd64 -o ~/.docker/cli-plugins/docker-compose
chmod +x ~/.docker/cli-plugins/docker-compose
OKっぽい。
けど、su でやってしまったので、通常ユーザでやり直し。
同じことをやって、OKでした。
git インストール
sudo dnf install -y git-all
git --version
特に問題なし。
FIWAREチュートリアル環境構築
まずは最初の入門環境が動くかどうか。
$ cd /home
$ sudo mkdir fiware
$ cd fiware/

$ sudo git clone https://github.com/FIWARE/tutorials.Getting-Started.git
$ cd tutorials.Getting-Started
$ sudo docker compose up -d

$ curl -X GET \
  'http://localhost:1026/version'
上記のように、内部からlocalhostで見えており、
いきなり、外部からも
http://x.x.x.x:1026/version
で見えている。
では本題。
一番面白そうだけど、重すぎてまともに動かなかったチュートリアル。
$ sudo docker compose down

$ sudo git clone https://github.com/FIWARE/tutorials.Application-Mashup.git
$ cd tutorials.Application-Mashup
$ sudo ./services create
$ sudo ./services start
すごい。起動した。サクサクとはいえませんが、エラーにならないならOKです。
(2021-9-9 追記)
ただ、これで取得されるままだと、ある程度継続的に学習環境として使う場合に不都合があります。
- 再起動後自動的に起動しないサービスがある。
- データが毎回初期化される。
なので、ちょっと修正しました。
docker-compose.yml
は、restart: always が付いていないサービスに追記していきました。
# !/bin/bash
#
#  Command Line Interface to start all services associated with the Getting-Started Tutorial
#
#  For this tutorial the commands are merely a convenience script to run ${dockerCmd}#

set -e

dockerCmd="docker compose"
if (( $# == 2 )); then
    dockerCmd="docker-compose"
fi

if (( $# < 1 )); then
    echo "Illegal number of parameters"
    echo "usage: services [create|start|stop]"
    exit 1
fi

loadData () {
	docker run --rm -v $(pwd)/import-data:/import-data \
		--network fiware_default \
		-e ORION_PORT="${ORION_PORT}" \
		-e TUTORIAL_APP_PORT="${TUTORIAL_APP_PORT}" \
		--entrypoint /bin/ash curlimages/curl import-data
	waitForIoTAgent
	docker run --rm -v $(pwd)/provision-devices:/provision-devices \
		--network fiware_default \
		-e ORION_PORT="${ORION_PORT}" \
		-e TUTORIAL_APP_PORT="${TUTORIAL_APP_PORT}" \
		-e TUTORIAL_DUMMY_DEVICE_PORT="${TUTORIAL_DUMMY_DEVICE_PORT}" \
		-e IOTA_NORTH_PORT="${IOTA_NORTH_PORT}" \
		--entrypoint /bin/ash curlimages/curl provision-devices
	echo ""
}

waitForKeyrock () {
	echo -e "⏳ Waiting for \033[1;31mKeyrock\033[0m to be available\n"

	while ! [ `docker inspect --format='{{.State.Health.Status}}' fiware-keyrock` == "healthy" ]
	do
		echo -e "Keyrock HTTP state: " `curl -s -o /dev/null -w %{http_code} 'http://localhost:3005/version'` " (waiting for 200)"
		sleep 5
	done
	echo -e " \033[1;32mdone\033[0m"
}

waitForWirecloud () {
	echo -e "⏳ Waiting for \033[1;35mWirecloud\033[0m to be available\n"

	while [ `curl -s -o /dev/null -w %{http_code} 'http://localhost:8000/api/features'` -eq 000 ]
	do
		echo -e "Wirecloud HTTP state: " `curl -s -o /dev/null -w %{http_code} 'http://localhost:8000/api/features'` " (waiting for 200)"
		sleep 5
	done
	echo -e " \033[1;32mdone\033[0m"
}

waitForMongo () {
	echo -e "\n⏳ Waiting for \033[1mMongoDB\033[0m to be available\n"
	while ! [ `docker inspect --format='{{.State.Health.Status}}' db-mongo` == "healthy" ]
	do
		sleep 1
	done
}

waitForOrion () {
	echo -e "\n⏳ Waiting for \033[1;34mOrion\033[0m to be available\n"

	while ! [ `docker inspect --format='{{.State.Health.Status}}' fiware-orion` == "healthy" ]
	do
	  echo -e "Context Broker HTTP state: " `curl -s -o /dev/null -w %{http_code} 'http://localhost:1026/version'` " (waiting for 200)"
	  sleep 1
	done
}

waitForIoTAgent () {
	echo -e "\n⏳ Waiting for \033[1;36mIoT-Agent\033[0m to be available\n"
	while ! [ `docker inspect --format='{{.State.Health.Status}}' fiware-iot-agent` == "healthy" ]

	do
	  echo -e "IoT Agent HTTP state: " `curl -s -o /dev/null -w %{http_code} 'http://localhost:4041/version'` " (waiting for 200)"
	  sleep 1
	done
}

addDatabaseIndex () {
	printf "Adding appropriate \033[1mMongoDB\033[0m indexes for \033[1;34mOrion\033[0m  ..."
	docker exec  db-mongo mongo --eval '
	conn = new Mongo();db.createCollection("orion");
	db = conn.getDB("orion");
	db.createCollection("entities");
	db.entities.createIndex({"_id.servicePath": 1, "_id.id": 1, "_id.type": 1}, {unique: true});
	db.entities.createIndex({"_id.type": 1});
	db.entities.createIndex({"_id.id": 1});' > /dev/null

	docker exec  db-mongo mongo --eval '
	conn = new Mongo();db.createCollection("orion-openiot");
	db = conn.getDB("orion-openiot");
	db.createCollection("entities");
	db.entities.createIndex({"_id.servicePath": 1, "_id.id": 1, "_id.type": 1}, {unique: true});
	db.entities.createIndex({"_id.type": 1});
	db.entities.createIndex({"_id.id": 1});' > /dev/null
	echo -e " \033[1;32mdone\033[0m"

	printf "Adding appropriate \033[1mMongoDB\033[0m indexes for \033[1;36mIoT-Agent\033[0m  ..."
	docker exec  db-mongo mongo --eval '
	conn = new Mongo();
	db = conn.getDB("iotagentul");
	db.createCollection("devices");
	db.devices.createIndex({"_id.service": 1, "_id.id": 1, "_id.type": 1});
	db.devices.createIndex({"_id.type": 1});
	db.devices.createIndex({"_id.id": 1});
	db.createCollection("groups");
	db.groups.createIndex({"_id.resource": 1, "_id.apikey": 1, "_id.service": 1});
	db.groups.createIndex({"_id.type": 1});' > /dev/null
	echo -e " \033[1;32mdone\033[0m"
}


startContainers () {
	echo ""
	export IDM_HTTPS_ENABLED="$1"
	${dockerCmd} up -d --remove-orphans
	echo ""
}

# 追記
continueContainers () {
	echo ""
	export IDM_HTTPS_ENABLED="$1"
	${dockerCmd} up -d
	echo ""
}

stoppingContainers () {
	echo "Stopping running containers"
	${dockerCmd} down -v --remove-orphans
}

# 追記
pauseContainers () {
	echo "Stopping running containers"
	${dockerCmd} down
}

command="$1"
case "${command}" in
	"help")
        echo "usage: services [create|start|stop]"
        ;;
	"start")
		export $(cat .env | grep "#" -v)
		stoppingContainers
		echo -e "Starting containers: \033[1;34mOrion\033[0m, \033[1;36mIoT-Agent\033[0m, \033[1;31mKeyrock\033[0m, \033[1;35mWirecloud\033[0m, \033[1mTutorial\033[0m"
		echo -e "Along with the following databases: \033[1mMongoDB\033[0m, \033[1mPostGres\033[0m and \033[1mMySQL\033[0m"
		echo -e "and microservices: \033[1mElasticSearch\033[0m, \033[1mMemCache\033[0m and \033[1;35mNGSI Proxy\033[0m\n"
		echo -e "- \033[1;34mOrion\033[0m is the context broker"
		echo -e "- \033[1;36mIoT-Agent\033[0m is configured for the UltraLight Protocol"
		echo -e "- \033[1mTutorial\033[0m acts as a series of dummy IoT Sensors over HTTP"
		echo -e "- \033[1;31mKeyrock\033[0m is an Identity Management Front-End"
		echo -e "- \033[1;35mWirecloud\033[0m is a Dashboard Utility"
		echo -e "- \033[1;35mNGSI Proxy\033[0m creates a server that is capable of redirecting Orion notifications to web pages"
		startContainers false
		waitForMongo
		addDatabaseIndex
		waitForOrion
		loadData
		waitForWirecloud
		waitForKeyrock
		echo -e "Now open \033[4mhttp://localhost:8000\033[0m"
		;;
	# 追記
	"continue")
		export $(cat .env | grep "#" -v)
		# stoppingContainers
		echo -e "CONTINUEING containers: \033[1;34mOrion\033[0m, \033[1;36mIoT-Agent\033[0m, \033[1;31mKeyrock\033[0m, \033[1;35mWirecloud\033[0m, \033[1mTutorial\033[0m"
		continueContainers false
		waitForMongo
		# addDatabaseIndex
		waitForOrion
		# loadData
		waitForWirecloud
		waitForKeyrock
		echo -e "Now open \033[4mhttp://localhost:8000\033[0m"
		;;
	"stop")
		export $(cat .env | grep "#" -v)
		stoppingContainers
		;;
	# 追記
	"pause")
		export $(cat .env | grep "#" -v)
		pauseContainers
		;;
	"create")
		export $(cat .env | grep "#" -v)
		echo "Pulling Docker images"
		docker pull curlimages/curl
		${dockerCmd} pull
		;;
	*)
		echo "Command not Found."
		echo "usage: services [create|start|stop]"
		exit 127;
		;;
esac
追記
と書いたところに追記し、
sudo ./services stop
sudo ./services start
ではなく、
sudo ./services pause
sudo ./services continue
で終了、起動するようにしました。
ブラウザ上では
Refused to load the font '<URL>' because it violates the following Content Security Policy directive: "default-src 'self' img-src 'self' data:". Note that 'font-src' was not explicitly set, so 'default-src' is used as a fallback.

login:1 Refused to load the script 'https://jira.fiware.org/s/4d99dfea096a41baa8a46feda6f85823-T/en_GBek2res/6346/29/1.4.16/_/download/batch/com.atlassian.jira.collector.plugin.jira-issue-collector-plugin:issuecollector/com.atlassian.jira.collector.plugin.jira-issue-collector-plugin:issuecollector.js?locale=en-GB&collectorId=a188b867' because it violates the following Content Security Policy directive: "script-src 'self' 'unsafe-inline'". Note that 'script-src-elem' was not explicitly set, so 'script-src' is used as a fallback.
のエラーが出ていますが、これは出てても動きます。
チュートリアルでは、まず、Wirecloud画面(port:8000)を開きます。
おさらい。
WireCloud
- データ可視化のための GE
- ポータル
- マーケットプレイスに接続して、Widget をインストール
最初は何もないので、ここにウィジェットを追加していきます。そのために、サインインします。
が、サインインリンクをクリックすると、遷移先がlocalhost:3005になっています。
docker-compose.yml を見てみると、直書きされているので、置換して再実行。
それでも、エラー。
$ sudo docker logs -f fiware-keyrock
mysql-db:3306 - Connection refused
が発生しているので、MySQL の設定を変更。
$ sudo docker exec -it db-mysql /bin/bash
# mysql -u root -p

mysql> SELECT user, host FROM mysql.user;
+---------------+------------+
| user          | host       |
+---------------+------------+
| root          | 172.18.1.5 |
| mysql.session | localhost  |
| mysql.sys     | localhost  |
| root          | localhost  |
+---------------+------------+
4 rows in set (0.04 sec)

mysql> RENAME USER root@172.18.1.5 to root@'%';
Query OK, 0 rows affected (0.01 sec)

mysql> SELECT user, host FROM mysql.user;
+---------------+-----------+
| user          | host      |
+---------------+-----------+
| root          | %         |
| mysql.session | localhost |
| mysql.sys     | localhost |
| root          | localhost |
+---------------+-----------+
4 rows in set (0.00 sec)
これは良くないと思いますが、解決できていないので暫定処置。
しかし、まだダメ。
画面に下記エラー。
Invalid client: redirect_uri does not match client value
redirect_uriが、「http://localhost:8000/complete/fiware/ 」になっており、
しかし、実際は、「http://x.x.x.x:8000/complete/fiware/ 」に遷移しようとしているので、ダメだと言われています。
アプリケーションの設定として、下記データが登録されています。
INSERT INTO `oauth_client` VALUES
('wirecloud-dckr-site-0000-00000000000','FIWARE Wirecloud',
  'FIWARE Wirecloud','wirecloud-docker-000000-clientsecret',
  'http://localhost:8000','http://localhost:8000/complete/fiware/',NULL,'default',
  'authorization_code','code',NULL,NULL,NULL,'bearer', NULL);
これを事前に変えておく必要があります。
画面からも、
http://xxx:3005/idm/applications
→アプリケーション の FIWARE Wirecloud
で、変えられると思うのですが、
internal error
コード: 500
となりました。
仕方ないので、
tutorials.Application-Mashup/mysql-data/backup.sql
を修正して、再起動。
ログインできて、リソース追加用のボタンも表示されました。
で、チュートリアルの
NGSI Browser Widget
のところで、+ ボタンをクリックして追加すると、
InvalidResponse: Unexpected error code: 401
Javascriptエラーは
Failed to load resource: the server responded with a status of 401 (Unauthorized)
追加したウィジェットの設定を見ると、
NGSI server URL
http://orion.lab.fiware.org:1026/
になっています。そのURLを開こうとすると、確かに、
Failed to load resource: the server responded with a status of 401 (Unauthorized)
となる。
ここも
http://x.x.x.x:1026/
に変更します。
でた!
チュートリアル・アプリケーション(port:3000)の方でランプONにしたら、ONになった。
ただ、Actionsの編集ボタンを押したら、エラー・・・
TypeError: invalid widget ref
    at Object.addWidget (DashboardManagementAPI.js?v=facbb2e9fed2b8ba81cfb9f90f33af3eb843bb2a:171)
    at NGSIBrowser.openEditorWidget (main.js:131)
    at NGSIBrowser.<anonymous> (main.js:278)
    at Event.dispatch (Event.js:96)
    at new_class.<computed>.dispatchEvent (ObjectWithEvents.js:74)
    at new_class.<computed>.clickCallback (Button.js:44)
なかなか楽ではない。まあ、そこはチュートリアルでも触れられていないので、スルーしておきます。
地図との連携も、動きました。良い感じですね。
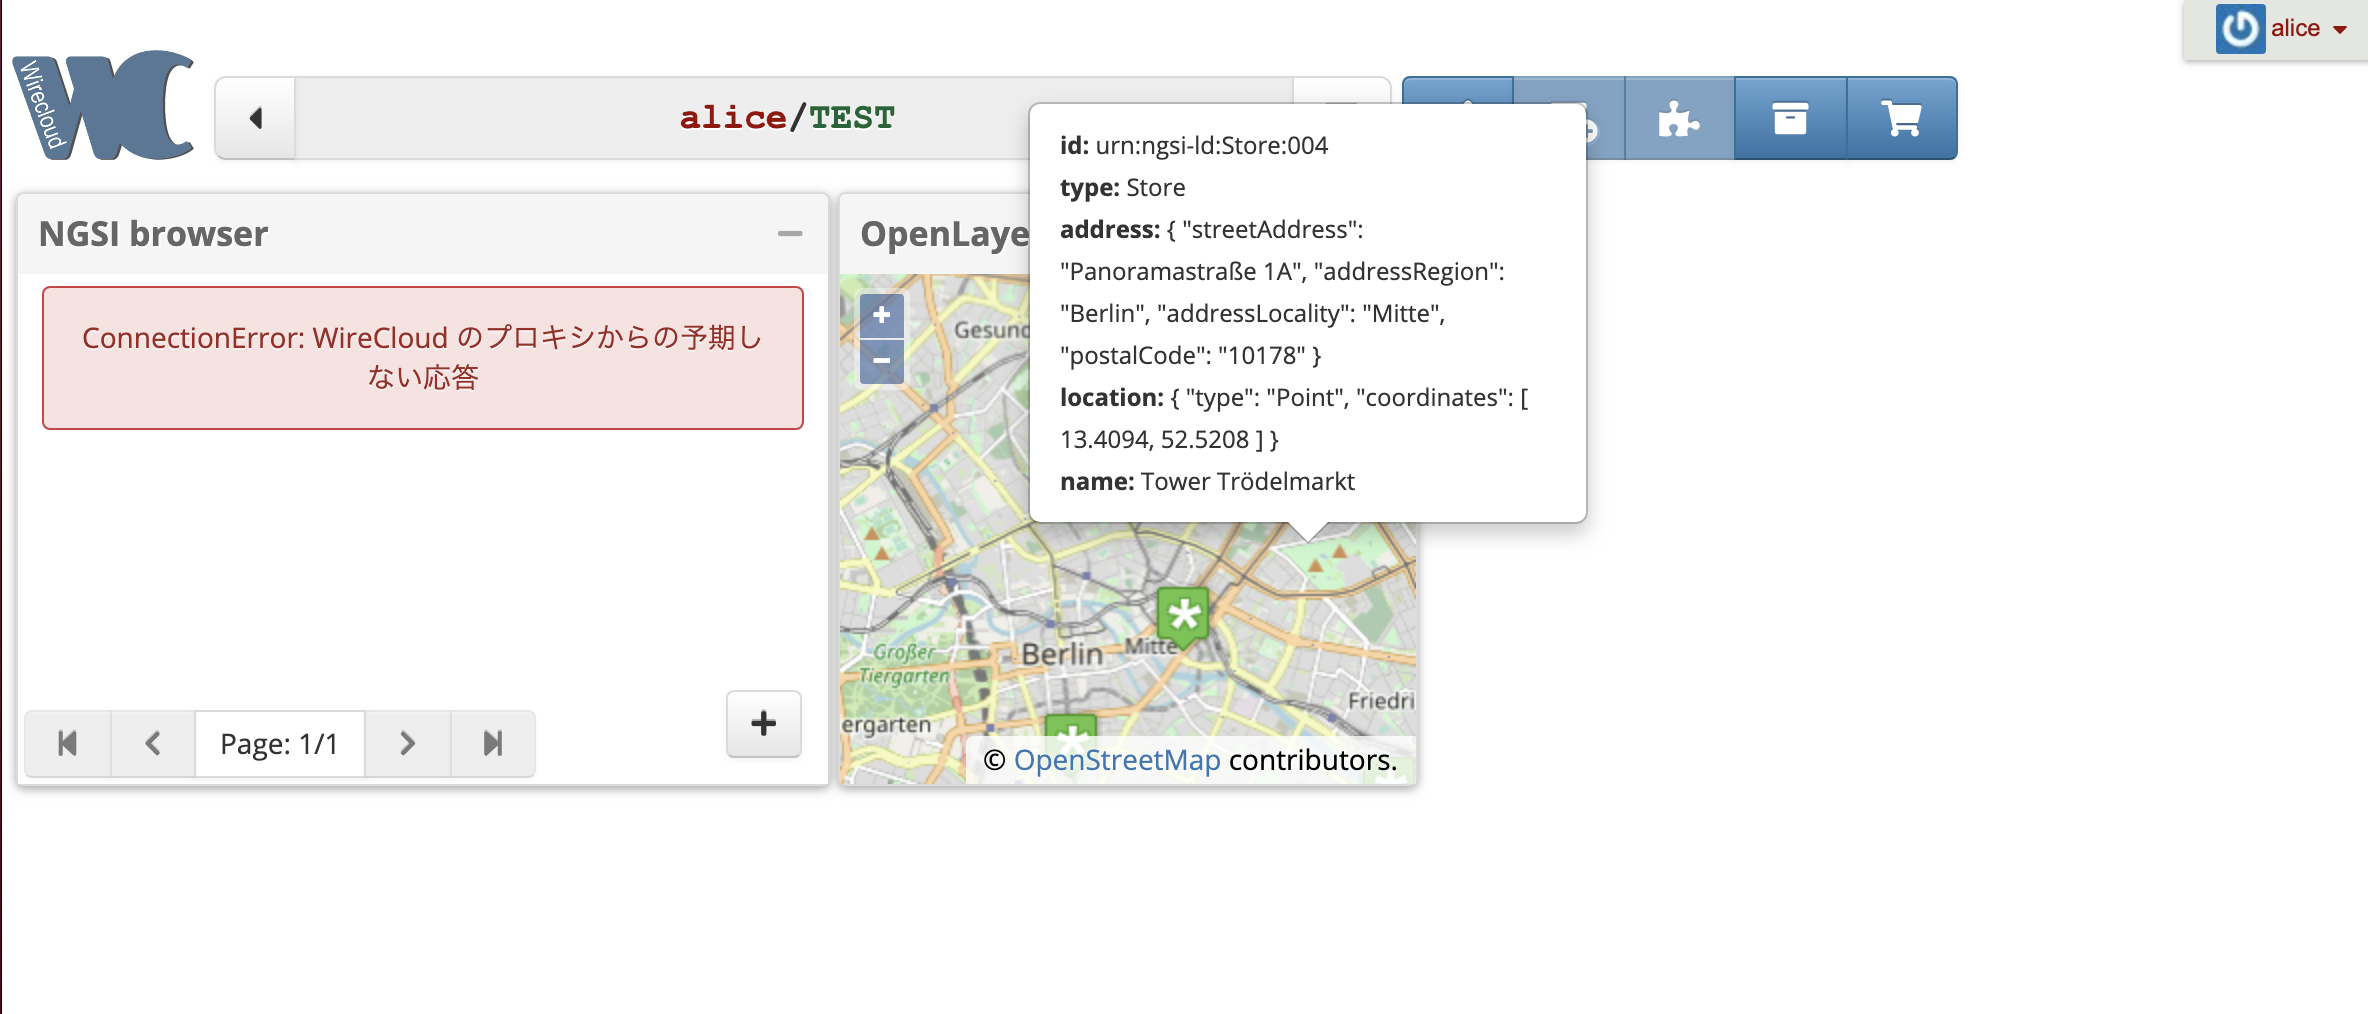
ただ、しばらくおいて接続すると、やはり遅いなとは思います。
気づいたらランプ情報取得がエラーになってるし。地図の方は良い感じです。
メモリ2GBクラスだと、勉強はできるようにはなるけど、運用には厳しいですね。
(2021-9-9 追記)
その後は、そんなに重さも感じていません。
別のチュートリアルをやったのですが、何を見ながらやったのか失念・・・
こんな感じのものが動いています。