はじめに
CustomUIで配置するボタンのイメージ指定の実装方法を記載実装方法
ボタンのイメージ設定する方法は下記の2つ
1. コントロール「button」のプロパティ「imageMso」を指定する
Microsoft Officeの組み込みアイコンとして定義されたidを指定することにより、idに対応したイメージを使用することが可能
imageMsoのidは下記サイトで探すのがおすすめ
idはイメージの意味に由来するため、キーワード検索でボタンの役割の応じたイメージを探しやすい
例
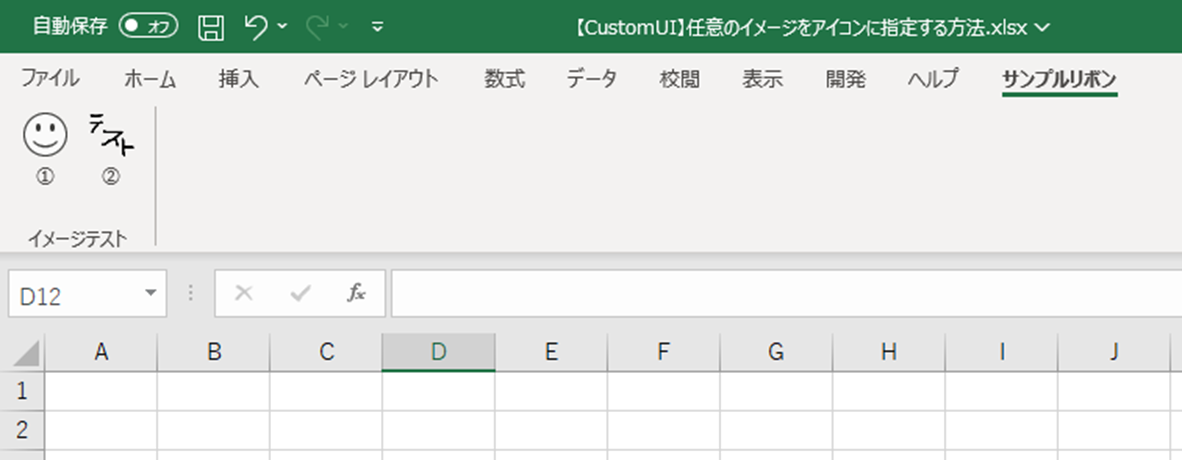
<button id="testImageMso" label="①" size="large" imageMso="HappyFace" onAction="btnTestImageMso_Click" />
表示結果

2. コントロール「button」のプロパティ「Image」を指定する
PC内に格納されたイメージを使用することが可能
筆者の知る限りでは実装方法が2種類あるが、簡単な方だけ記載する
記載しない方は属性「customUI」にプロパティ「loadImage」を記述し、VBAモジュールに実装したプロシージャからイメージを1件ずつ読み込みする方法である。
読み込むパスにイメージが端末内に存在しないと実行時エラーが起きるため、他人に配布したい場合には向かず実装もやや面倒。
[手順]
※Custom UI Editor使用、ツール不使用の手順は後述1. イメージ追加したいファイルを開き、ボタン「Insert Icons」を押下
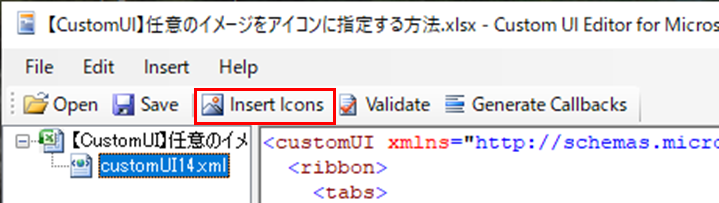
2. イメージを選択

3. イメージが追加される
追加されたイメージ名がidとなるため、コントロール「button」のプロパティ「image」で指定する
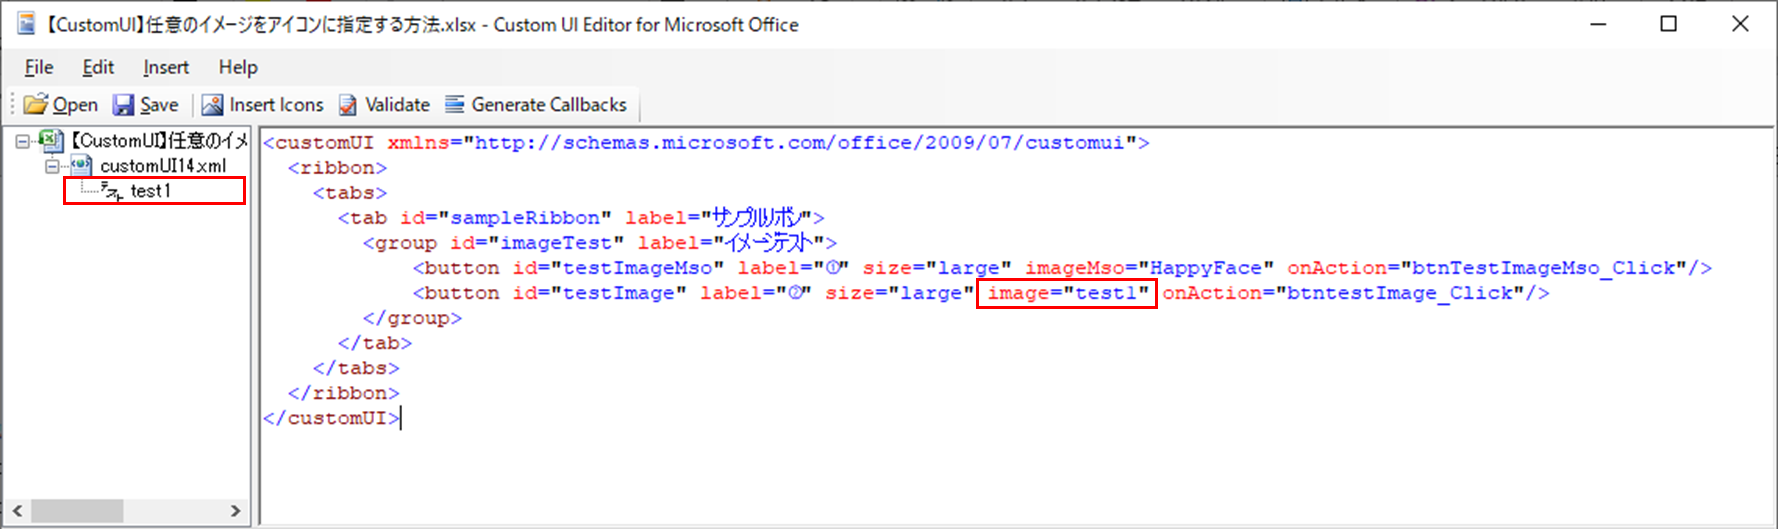
例
<button id="testImage" label="②" size="large" image="test1" onAction="btnTestImage_Click"/>
表示結果

実装例
<customUI xmlns="http://schemas.microsoft.com/office/2009/07/customui">
  <ribbon>
    <tabs>
      <tab id="sampleRibbon" label="サンプルリボン">
        <group id="imageTest" label="イメージテスト">
            <button id="testImageMso" label="①" size="large" imageMso="HappyFace" onAction="btnTestImageMso_Click"/>
            <button id="testImage" label="②" size="large" image="test1" onAction="btntestImage_Click"/>
        </group>
      </tab>
    </tabs>
  </ribbon>
</customUI>
ツール無しでの実装方法
実装例と同じ内容をツール無しで1から実装する
1. 空白のブックを作成(下記は新規作成してからブック名だけ変更)

2. 拡張子を「.zip」に変更

3. 解凍する

4. フォルダ配下のファイルを編集する

フォルダ
	├[trash]
	│ └0000.dat
	├_rels
	│ └.rels	       -4.1.で編集
    ├4.3.の手順でcustomUIを追加
	├docProps
	│ ├app.xml
	│ └core.xml
	├xl
	│ ├_rels
	│ ├theme
	│ ├worksheets
	│ ├styles.xml
	│ └workbook.xml
	└[Content_Types].xml    -4.2.で編集
4.1. > _rels > .rels の編集
下記内容に書き換える
<?xml version="1.0" encoding="UTF-8" standalone="yes"?>
<Relationships xmlns="http://schemas.openxmlformats.org/package/2006/relationships">
<Relationship Id="rId3" Type="http://schemas.openxmlformats.org/officeDocument/2006/relationships/extended-properties" Target="docProps/app.xml"/>
<Relationship Id="rId2" Type="http://schemas.openxmlformats.org/package/2006/relationships/metadata/core-properties" Target="docProps/core.xml"/>
<Relationship Id="rId1" Type="http://schemas.openxmlformats.org/officeDocument/2006/relationships/officeDocument" Target="xl/workbook.xml"/>
<Relationship Id="rId0" Type="http://schemas.microsoft.com/office/2007/relationships/ui/extensibility" Target="customUI/customUI14.xml"/>
</Relationships>
編集内容について
属性「Relationships」の中に下記を追記する
<Relationship Id="rId0" Type="http://schemas.microsoft.com/office/2007/relationships/ui/extensibility" Target="customUI/customUI14.xml"/>
丸ごと書き換えではなく自身で編集する場合、まず事前に値の置換すると見やすくなる
検索対象「><」、置換文字列「>\r\n<」 ※正規表現有で検索、属性ごとに改行される
4.2. > [Content_Types].xml の編集
下記内容に書き換える
<?xml version="1.0" encoding="UTF-8" standalone="yes"?>
<Types xmlns="http://schemas.openxmlformats.org/package/2006/content-types">
<Default Extension="rels" ContentType="application/vnd.openxmlformats-package.relationships+xml"/>
<Default Extension="bin" ContentType="application/vnd.openxmlformats-officedocument.spreadsheetml.printerSettings"/>
<Default Extension="ico" ContentType="image/ico"/>
<Default Extension="bmp" ContentType="image/bmp"/>
<Default Extension="png" ContentType="image/png"/>
<Default Extension="jpg" ContentType="image/jpg"/>
<Default Extension="tif" ContentType="image/tif"/>
<Default Extension="xml" ContentType="application/xml"/>
<Override PartName="/xl/workbook.xml" ContentType="application/vnd.openxmlformats-officedocument.spreadsheetml.sheet.main+xml"/>
<Override PartName="/xl/worksheets/sheet1.xml" ContentType="application/vnd.openxmlformats-officedocument.spreadsheetml.worksheet+xml"/>
<Override PartName="/xl/theme/theme1.xml" ContentType="application/vnd.openxmlformats-officedocument.theme+xml"/>
<Override PartName="/xl/styles.xml" ContentType="application/vnd.openxmlformats-officedocument.spreadsheetml.styles+xml"/>
<Override PartName="/docProps/core.xml" ContentType="application/vnd.openxmlformats-package.core-properties+xml"/>
<Override PartName="/docProps/app.xml" ContentType="application/vnd.openxmlformats-officedocument.extended-properties+xml"/>
</Types>
編集内容について
属性「Types」内に下記の属性を追記する
<Default Extension="bin" ContentType="application/vnd.openxmlformats-officedocument.spreadsheetml.printerSettings"/>
<Default Extension="ico" ContentType="image/ico"/>
<Default Extension="bmp" ContentType="image/bmp"/>
<Default Extension="png" ContentType="image/png"/>
<Default Extension="jpg" ContentType="image/jpg"/>
<Default Extension="tif" ContentType="image/tif"/>
Extention="bin"以外の属性について、使用しない拡張子は記載不要だが、あっても困らないので記載している
4.3. フォルダ階層(> customUI)の追加
3.で解凍したフォルダの直下に下記のフォルダ階層、ファイルを作成する
フォルダ
└ customUI
├_rels
│ └customUI14.xml.rels
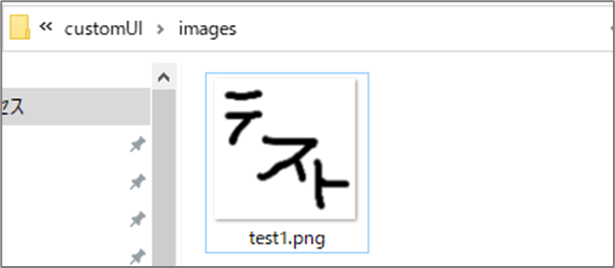
├ images
│ └ test1.png
└customUI14.xml
4.3.1. > _rels > customUI14.xml.rels の編集
必ずUTF-8で保存する
<?xml version="1.0" encoding="utf-8"?>
<Relationships xmlns="http://schemas.openxmlformats.org/package/2006/relationships">
<Relationship Type="http://schemas.openxmlformats.org/officeDocument/2006/relationships/image" Target="images/test1.png" Id="test1" />
</Relationships>
4.3.2. > images にアイコンを配置
> _rels > customUI14.xml.rels の参照情報に紐づけされているのでファイル名に注意
(ファイル名は属性「Relationship」のプロパティ「Target」で指定されている)
4.3.3. > customUI14.xml の追加
こちらも必ずUTF-8で保存する
<customUI xmlns="http://schemas.microsoft.com/office/2009/07/customui">
  <ribbon>
    <tabs>
      <tab id="sampleRibbon" label="サンプルリボン">
        <group id="imageTest" label="イメージテスト">
            <button id="testImageMso" label="①" size="large" imageMso="HappyFace" onAction="btnTestImageMso_Click"/>
            <button id="testImage" label="②" size="large" image="test1" onAction="btnTestImage_Click"/>
        </group>
      </tab>
    </tabs>
  </ribbon>
</customUI>
4.4. フォルダ階層を全選択し、圧縮する

↓
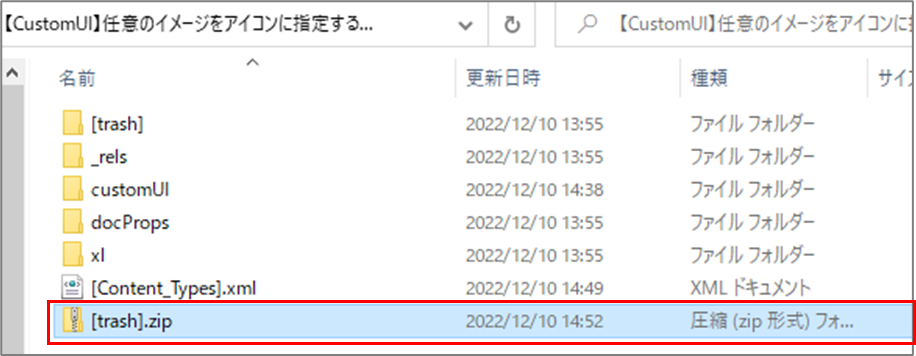
4.5. 圧縮したファイルの拡張子を「*.xlsx」に戻して開く
※下記は「[trash].zip」を「【CustomUI】任意のイメージをアイコンに指定する方法_aft.xlsx」に名前変更している

完成

Custom UI Editor無しで実装する場合は、各手順で些細なミスがあるだけで表示されなくなることが多々ある
よくある作業ミスは下記のとおり
- zipファイルの解凍を端折る(zipファイルに直接編集後ファイルを入れる)
- プロパティ名を誤る(大文字小文字の区別もあります)
- 文字コードを誤って保存する
- 存在しないidをプロパティ「image」で指定する
おまけ
自作アイコンの背景透過させる方法は次のリンクを参照ツール無しでも可能なのがありがたい
今回作成したファイルは下記に配置してるので、参考までに