2019/9/6(金)追記
本記事はOracle Cloud Infrastructure Classic (OCIC)が対象のものとなります。
現行のOCI環境で実施したものではありません。
#今さらの追記…
始めに
職場のOracle DBのバージョンアップとOracle Cloud移行が現実味を帯びてきたこともあり、
事前にRAT(Real Application Testing)使用方法を確立しておこう、と勢い込んで作業を始めたところ、
思わぬ(と言うか上ばっか見て足元お留守の典型・・・)落とし穴にハマってしまいました。
※RATの概要についてはこちらのURLを参照。
事の始まりはオンプレミス(11.2環境)でSQLチューニング・セットの取得し、
OracleCloud(DBaaS 12.2環境)にインポートしようとEMにログインしたところ、
UIが参考にしていた画面とまるで違う!という事でした。
よくよく画面を見てみると、DBaaSにバンドルされてるのはRATが使用できるCloud Controlではなく、
簡易版のEM Expressだった、というオチです。
と言うことで、Cloud ContorolをインストールすべくまずはGUIを実行できる環境にするため、
VNC Serverの導入を試した際の手順を載せておきます。
ちなみにSQLチューニング・セットはPL/SQLでも別DBに移動させる事はできるっぽいです。
詳しくはMy Oracle SupportのNOTE#2266888.1を参照。
自分は試していないので説得力0ですが・・・。
VNC Server導入(サーバー側作業)
- TigerVNCのパッケージインストール
こちらはrootユーザーで実行
[opc@test122 ~]$ sudo -s
[root@test122 opc]#
[root@test122 opc]# yum install vnc vnc-server tigervnc-server
Loaded plugins: security, ulninfo
Setting up Install Process
ksplice-uptrack                                                                                  |  951 B     00:00
ksplice-uptrack/primary                                                                          | 5.2 kB     00:00
ksplice-uptrack                                                                                                   21/21
ol6_UEKR3_latest                                                                                 | 1.2 kB     00:00
ol6_UEKR3_latest/primary                                                                         |  37 MB     00:02
ol6_UEKR3_latest                                                                                                919/919
ol6_UEKR4                                                                                        | 1.2 kB     00:00
ol6_UEKR4/primary                                                                                |  38 MB     00:02
ol6_UEKR4                                                                                                       732/732
ol6_UEK_latest                                                                                   | 1.2 kB     00:00
ol6_UEK_latest/primary                                                                           |  38 MB     00:02
ol6_UEK_latest                                                                                                  792/792
ol6_latest                                                                                       | 1.4 kB     00:00
ol6_latest/primary                                                                               | 6.2 MB     00:00
ol6_latest                                                                                                  10996/10996
Package tigervnc-1.1.0-24.el6.x86_64 already installed and latest version
Resolving Dependencies
--> Running transaction check
---> Package tigervnc-server.x86_64 0:1.1.0-24.el6 will be installed
--> Processing Dependency: xorg-x11-fonts-misc for package: tigervnc-server-1.1.0-24.el6.x86_64
---> Package tigervnc-server-module.x86_64 0:1.1.0-24.el6 will be installed
--> Running transaction check
---> Package xorg-x11-fonts-misc.noarch 0:7.2-11.el6 will be installed
--> Finished Dependency Resolution

Dependencies Resolved

========================================================================================================================
 Package                              Arch                 Version                       Repository                Size
========================================================================================================================
Installing:
 tigervnc-server                      x86_64               1.1.0-24.el6                  ol6_latest               1.0 M
 tigervnc-server-module               x86_64               1.1.0-24.el6                  ol6_latest               213 k
Installing for dependencies:
 xorg-x11-fonts-misc                  noarch               7.2-11.el6                    ol6_latest               5.8 M

Transaction Summary
========================================================================================================================
Install       3 Package(s)

Total download size: 7.0 M
Installed size: 10 M
Is this ok [y/N]: y   <--★「y」を入力してEnter
Downloading Packages:
(1/3): tigervnc-server-1.1.0-24.el6.x86_64.rpm                                                   | 1.0 MB     00:00
(2/3): tigervnc-server-module-1.1.0-24.el6.x86_64.rpm                                            | 213 kB     00:00
(3/3): xorg-x11-fonts-misc-7.2-11.el6.noarch.rpm                                                 | 5.8 MB     00:00
------------------------------------------------------------------------------------------------------------------------
Total                                                                                   6.5 MB/s | 7.0 MB     00:01
Running rpm_check_debug
Running Transaction Test
Transaction Test Succeeded
Running Transaction
Warning: RPMDB altered outside of yum.
  Installing : xorg-x11-fonts-misc-7.2-11.el6.noarch                                                                1/3
  Installing : tigervnc-server-1.1.0-24.el6.x86_64                                                                  2/3
  Installing : tigervnc-server-module-1.1.0-24.el6.x86_64                                                           3/3
  Verifying  : xorg-x11-fonts-misc-7.2-11.el6.noarch                                                                1/3
  Verifying  : tigervnc-server-1.1.0-24.el6.x86_64                                                                  2/3
  Verifying  : tigervnc-server-module-1.1.0-24.el6.x86_64                                                           3/3

Installed:
  tigervnc-server.x86_64 0:1.1.0-24.el6                   tigervnc-server-module.x86_64 0:1.1.0-24.el6

Dependency Installed:
  xorg-x11-fonts-misc.noarch 0:7.2-11.el6

Complete!
[root@test122 opc]#
- X Window SystemやDesktopkのインストール
こちらもrootユーザーで実行
groupinstallオプションで関連する諸々も一緒にインストール
[root@test122 opc]#
[root@test122 opc]#  yum groupinstall "X Window System" "Desktop" "Desktop Platform"
Loaded plugins: security, ulninfo
Setting up Group Process
ol6_latest/group                                                                                 | 1.1 MB     00:00
<<中略>>
--> Finished Dependency Resolution

Dependencies Resolved

========================================================================================================================
 Package                               Arch          Version                                    Repository         Size
========================================================================================================================
Installing:
<<中略>>
Updating:
<<中略>>
Installing for dependencies:
<<中略>>
Updating for dependencies:
<<中略>>

Transaction Summary
========================================================================================================================
Install     150 Package(s)
Upgrade       8 Package(s)

Total download size: 87 M
Is this ok [y/N]:y   <--★「y」を入力してEnter
Downloading Packages:
(1/158): DeviceKit-power-014-3.el6.x86_64.rpm                                                    |  90 kB     00:00
<<中略>>
(158/158): xorg-x11-server-common-1.17.4-17.0.1.el6.x86_64.rpm                                   |  51 kB     00:00
------------------------------------------------------------------------------------------------------------------------
Total                                                                                   2.1 MB/s |  87 MB     00:40
Running rpm_check_debug
Running Transaction Test
Transaction Test Succeeded
Running Transaction
  Updating   : glib2-2.28.8-10.el6.x86_64                                                                         1/166
 <<中略>>
  Cleanup    : glib2-2.28.8-5.el6.x86_64                                                                        166/166
  Verifying  : dosfstools-3.0.9-4.el6.x86_64                                                                      1/166
 <<中略>>
  Verifying  : 1:dbus-1.2.24-8.0.1.el6_6.x86_64                                                                 166/166

Installed:
 <<中略>>
Dependency Installed:
   <<中略>>
Updated:
   <<中略>>
Dependency Updated:
   <<中略>>

Complete!
[root@test122 opc]#
- VNC Serverの起動
VNC Serverを起動させたいユーザーにスイッチして、起動させる。
[root@test122 opc]# exit
exit
[opc@test122 ~]$
[opc@test122 ~]$ so   <--★ 個人設定のalias使ってoracleユーザーにスイッチ
[oracle@test122 ~]$
[oracle@test122 ~]$ vncserver :1 <--★ VNC SereverをDisplay番号1で起動

You will require a password to access your desktops.

Password: <--★ 初回起動はパスワードの設定を求められる
Verify:  <--★ パスワード再入力
xauth:  file /home/oracle/.Xauthority does not exist

New 'test122:1 (oracle)' desktop is test122:1

Creating default startup script /home/oracle/.vnc/xstartup
Starting applications specified in /home/oracle/.vnc/xstartup
Log file is /home/oracle/.vnc/test122:1.log

[oracle@test122 ~]$
VNC Clientでの接続(クライアント側対応)
-
事前対応
Oracle CloudのMy Serviceにログインして、該当のDBaaS環境のポート5901のアクセスルールを設定しておくこと。
ポートを空けていないと接続できないので注意。 -
VNC Clientのインストール
こちらのURLからUltraVNCをDL -
DL後exeを押下してそのままインストールシーケンスを進めていく。
-
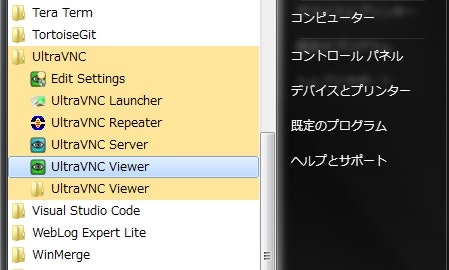
インストール後、スタートメニューにUiltraVNCのフォルダが作成される。
そのフォルダの下に[UltraVNC Viewer]というアイコンがあるので、それを押下。
-
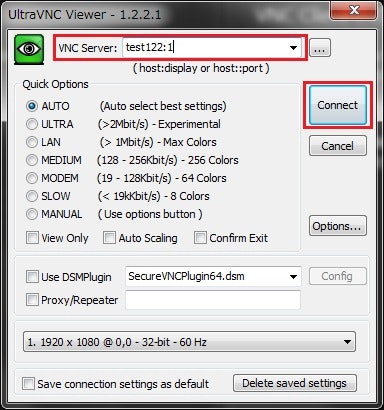
接続先サーバーのIP(ホスト名)と起動時に指定したDisplay番号を入力して、Connectを押下。
-
接続されると接続先サーバーのDesktop画面がローカルPC上に表示されるので、その画面上にて操作を行う。