はじめに
Arduino IoT Cloudを課金プランにすることでNode-REDで操作できることを確認したので、今回はNode.jsからそのまま操作できるか確かめた。
結論
wrapperコードを使いつつもLチカで動作確認できた。
準備
重要:APIキーを取得する都合から、今回はArduino IoT Cloudの課金プランを使用する。最低でも400円/月弱の課金が必要。
2021/12/11確認にて、Entryプランの月払いができなくなったようです。Entryプランであれば年払いで$24程度必要です。
一応課金プランからFreeプランに戻すのは可能。
- Arduino IoT Cloudアカウント(Entryプラン以上)
- Arduino MKR Wifi 1010
- ブレッドボード
- 抵抗付きLED(秋月電子通商)
- node.jsが使える環境(今回はv14.17.3を使用した。nodebrew/nodist等で切り替えて使用してもOK)
知識的な前提
- Freeプランでも一度Arduino IoT Cloudを使ったことがある。
- npm initして自分でnode環境を構築することができる。
下記の手順にすすむ前に、予めにArduino MKR Wifi 1010をArduino IoT CloudのDeviceに登録する。Entryプラン以上であれば10個以上のデバイスを登録することが可能(2021/11/11(木)現在)。
Arduino IoT CloudのAPIについて
Integrationsメニューを選択するとAPIキーの生成が表示されます。また、課金プランにすることでCREATE API KEYが有効になる。
作成したAPIのClient IDとSecret Keyは必ず控えること。
ちなみにDownload PDFをクリックすると下記のようにキーを控えてくれる。
(写真はNode-REDとの連携に関して検証した際に生成したキーです。近いうちに別の記事で連携について
話します。。!)

今回はarduino/node-red-contrib-arduino-iot-cloudの実装の一部のコードであるarduino-iot-cloud-api-wrapper.jsを使ってコードを書いていく。
ちなみにwrapperの元になっているAPIリファレンスはこちら。
https://www.arduino.cc/reference/en/iot/api/?_gl=1*1267s7v*_ga*MjEyNDk3MDE1Ni4xNjE0MTY5MDA0*_ga_NEXN8H46L5*MTYzNTY1NzY3NC4zNy4xLjE2MzU2NTg4OTMuMA
Arduino IoT Cloud側の設定
登録したDeivceからThingsを作成する。
作成するVariablesはLチカ用に一つだけ用意する。
今回の設定はこちら。
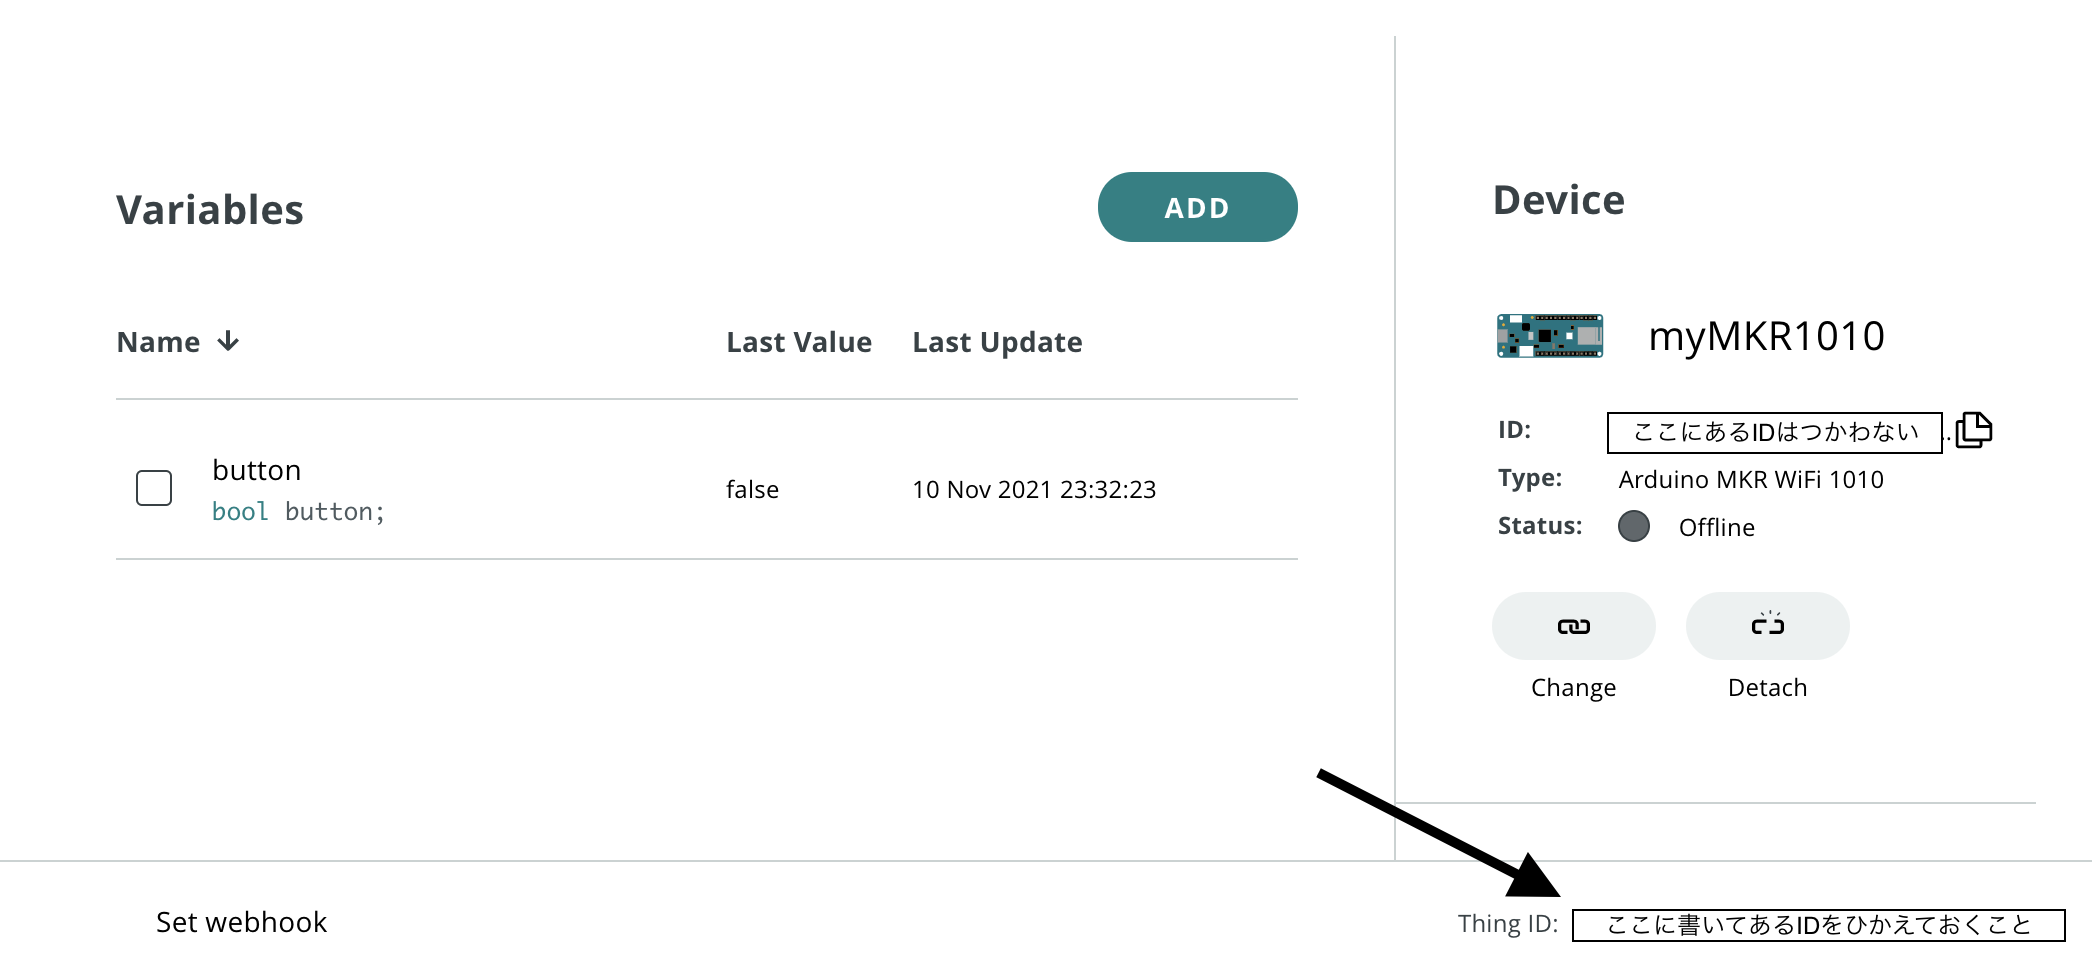
Variableの設定
ButtonというValiableを一つだけ用意した。なぜButtonかというと、ダッシュボードで確認したときのものをそのままつかったため。
ここに書いてあるIDは後の工程で使うため控えておく。

また、作成したThingsのIDを使用するため控えておく。
Arduinoボード側の用意
配線はこちら。LEDのアノード側(長い方)が13ピン、カソード側(短い方)がGNDにつながるようにする。
また、今回は抵抗付きLEDをつかっているため通常のLEDを使う際には抵抗を用意すること。

Arduino MKR Wifi 1010に書き込むコードはこちら。
一部は自動で作成されるため、追記する形になるはず。
# include "thingProperties.h"

void setup() {
  // Initialize serial and wait for port to open:
  Serial.begin(9600);
  // This delay gives the chance to wait for a Serial Monitor without blocking if none is found
  delay(1500);

  // Defined in thingProperties.h
  initProperties();

  // Connect to Arduino IoT Cloud
  ArduinoCloud.begin(ArduinoIoTPreferredConnection);

  setDebugMessageLevel(2);
  ArduinoCloud.printDebugInfo();

  pinMode(13,OUTPUT);
}

void loop() {
  ArduinoCloud.update();
}

void onButtonChange()  {
  // Add your code here to act upon Button change
  if(button)
    digitalWrite(13,HIGH);
  else
    digitalWrite(13,LOW);
}
書き込みはThingsメニューのSketchから行う。
node.jsに関する用意
npm init後、packages.jsonのdependencyを下記ソースを参考に修正する。
修正後はnpm installをする。
{
  "name": "任意のプロジェクト名",
  "version": "1.0.0",
  "description": "",
  "main": "test.js",
  "scripts": {
    "test": "echo \"Error: no test specified\" && exit 1"
  },
  "author": "",
  "license": "ISC",
  "dependencies": {
    "@arduino/arduino-iot-client": "^1.3.8",
    "request": "^2.88.2",
    "request-promise": "^4.2.6"
  }
}
実際に実行するコード(test.js)はこちら
const ArduinoClientHttp = require("./arduino-iot-cloud-api-wrapper");
var rp = require("request-promise");

async function getToken() {
  var options = {
    method: "POST",
    url: "https://api2.arduino.cc/iot/v1/clients/token",
    headers: { "content-type": "application/x-www-form-urlencoded" },
    json: true,
    form: {
      grant_type: "client_credentials",
      client_id: "キー取得時のクライアントIDを入れる",
      client_secret:
        "キー取得時のシークレットキーを入れる",
      audience: "https://api2.arduino.cc/iot",
    },
  };

  try {
    const response = await rp(options);
    return response["access_token"];
  } catch (error) {
    console.error("Failed getting an access token: " + error);
  }
}

async function run() {
  let token = await getToken();
  clientHttp = new ArduinoClientHttp.ArduinoClientHttp(token);

  let thing_id = "控えたThingのIDを入れる";
  let property_id = "控えたpropertyのIDを入れる";

  const _sleep = (ms) => new Promise((resolve) => setTimeout(resolve, ms));

  let retStr = "";

  for (let i = 0; i < 10; i++) {
    retStr = clientHttp.setProperty(thing_id, property_id, true);
    console.log("retStr:", JSON.stringify(retStr));
    await _sleep(1000);
    retStr = clientHttp.setProperty(thing_id, property_id, false);
    console.log("retStr:", JSON.stringify(retStr));
    await _sleep(1000);
  }
}

run();
また、test.jsと同じ階層にこのコードをダウンロードする。
arduino-iot-cloud-api-wrapper.js
動作確認
test.jsを実行するとLEDが1秒ごとに点灯/消灯する。
以上です。