はじめに
ニコニコのスナップショット検索API v2をこれまではOkHttpで直接getしてJSONに変換して...とやっていましたが、コードの複雑さにようやくRetrofitを使う決心をしました。
その手順を備忘録的に書きます。
1. データ用のObjectを作成
検索結果(json)をパースするため、データ用のObjectを作成します。
サンプルデータから手動で作成するのはあまりにも時間がかかるので、
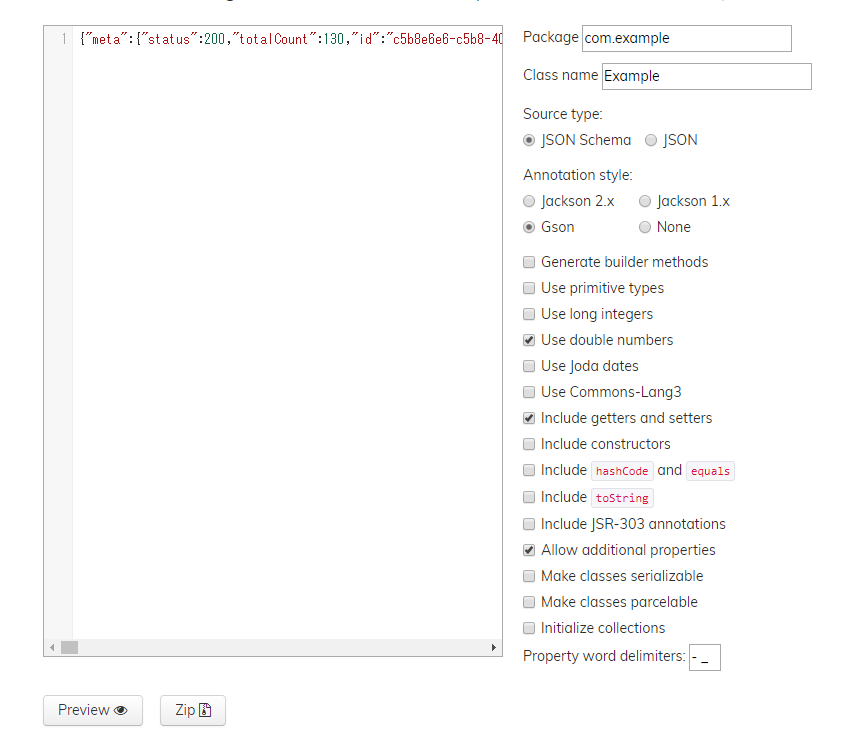
jsonschema2pojoを使いました。
{
   "meta":{
      "status":200,
      "totalCount":130,
      "id":"c5f7ed94-e188-4fff-bf72-1b1323e7d2e6"
   },
   "data":[
      {
         "startTime":"2015-06-18T23:03:57+09:00",
         "description":"「本当に君たちには失望したよ…この3日間、寄って集って20万回も女の子のスカートの中を覗きにくるだなんてね…」 目指すのは100万( ˘ω˘ )",
         "tags":"艦これ 艦隊これくしょん 夕立(艦これ) 時雨(艦これ) デイリーパンツ 静画殿堂入り いいスジしてる 伝説の始まり パンツ!パンツです!",
         "mylistCounter":12738,
         "categoryTags":"艦これ",
         "viewCounter":823962,
         "contentId":"im4980983",
         "title":"君には失望したよ…",
         "commentCounter":13557,
         "thumbnailUrl":"http://lohas.nicoseiga.jp/thumb/4980983z"
      }
      //...
    ]
}
上のような結果が返ってきます。
これをjsonschema2pojoに貼り付けます。
この時の注意:
- source typeはJSON SchemaではなくJSONを選択
- annotation styleを使っているJSONライブラリによって変える(筆者はGSONを選択)
そうするとPOJOが生成されるので、classとして作成しましょう。
public class SearchResult {

    @SerializedName("meta")
    @Expose
    private SearchResultMeta meta;
    @SerializedName("data")
    @Expose
    private List<SearchItem> data = null;

    public SearchResultMeta getMeta() {
        return meta;
    }

    public void setSearchResultMeta(SearchResultMeta meta) {
        this.meta = meta;
    }

    public List<SearchItem> getData() {
        return data;
    }

    public void setData(List<SearchItem> data) {
        this.data = data;
    }

    //検索結果のアイテム
    public static class SearchItem {

        @SeriaizedName("startTime")
        @Expose
        private String startTime;
        @SerializedName("description")
        @Expose
        private String description;
        @SerializedName("tags")
        @Expose
        private String tags;
        @SerializedName("mylistCounter")
        @Expose
        private Integer mylistCounter;
        @SerializedName("categoryTags")
        @Expose
        private String categoryTags;
        @SerializedName("viewCounter")
        @Expose
        private Integer viewCounter;
        @SerializedName("contentId")
        @Expose
        private String contentId;
        @SerializedName("title")
        @Expose
        private String title;
        @SerializedName("commentCounter")
        @Expose
        private Integer commentCounter;
        @SerializedName("thumbnailUrl")
        @Expose
        private String thumbnailUrl;


        //getter, setterなど
    }

    //メタデータ
    public static class SearchResultMeta {

        @SerializedName("status")
        @Expose
        private Integer status;
        @SerializedName("totalCount")
        @Expose
        private Integer totalCount;
        @SerializedName("id")
        @Expose
        private String id;

        //getter, setterなど
    }
}
2. Interfaceを作成
public interface NiconicoSearchApiInterface {
    String APP_CONTEXT = "nicopix";
    String END_POINT = "http://api.search.nicovideo.jp/";

    //検索したいサービスによってURLを変える
    @GET("api/v2/illust/contents/search")
    Call<SearchResult> getSearchResult(
            @Query("q") String query,
            @Query("targets") String targets,
            @Query("fields") String fields,
            @Query("filters") String filters,
            @Query("_sort") String _sort,
            @Query("_offset") Integer _offset,
            @Query("_limit") Integer _limit,
            @Query("_context") String _context);

}
パラメータは(http://site.nicovideo.jp/search-api-docs/snapshot.html) に基づいています。
上はニコニコ静画の場合ですが、違うサービスの場合はURLを変えておきましょう。
APP_CONTEXTには自分のアプリ名など入れておけば良さそうです(なんだかよくわかってない)。
3. リクエストを作成->実行
毎回Serviceを作成して実行してもいいのですが、パラメータが多いため、SearchUtils.searchでパラメータを減らすようにしました。
public static Call<SearchResult> search(SearchType searchType, String query, Sort sort, int offset, int limit) {
    Retrofit retrofit = new Retrofit.Builder()
            .baseUrl(NiconicoSearchApiInterface.END_POINT)
            .addConverterFactory(GsonConverterFactory.create())
            .build();
    NiconicoSearchApiInterface service = retrofit.create(NiconicoSearchApiInterface.class);


    String targets = "";
    switch (searchType) {
        case KEYWORD:
            targets = "title,description,tags";
            query = query.replaceAll("\\s+", "+");
            break;
        case TAG:
            targets = "tags";
            query = "\"" + query + "\"";
            break;
    }
    List<String> fields = new ArrayList<>();
    fields.add("title");
    fields.add("description");
    fields.add("contentId");
    fields.add("viewCounter");
    fields.add("mylistCounter");
    fields.add("commentCounter");
    fields.add("startTime");
    return service.getSearchResult(
            query,
            targets,
            android.text.TextUtils.join(",", fields),
            null /*filterは今回使わないので省略*/,
            sort.getValue(),
            offset,
            limit,
            NiconicoSearchApiInterface.APP_CONTEXT);
}
public enum SearchType {
    KEYWORD("キーワード検索"),
    TAG("タグ検索");

    private final String description;

    SearchType(String description) {
        this.description = description;
    }

    public static List<String> getDescriptions() {
        List<String> descriptionsList = new ArrayList<>();
        for (SearchType searchType : values()) {
            descriptionsList.add(searchType.getDescription());
        }
        return descriptionsList;
    }

    public static SearchType valueOfDescription(String description) {
        for (SearchType searchType : values()) {
            if (description.equals(searchType.getDescription())) {
                return searchType;
            }
        }
        throw new IllegalArgumentException("no such enum object for the description: " + description);
    }

    public String getDescription() {
        return this.description;
    }
}
public enum Sort {
    VIEW_COUNT_MINUS("閲覧数が多い順", "-viewCounter"),
    VIEW_COUNT_PLUS("閲覧数が多い順", "%2BviewCounter"),
    COMMENT_COUNT_MINUS("コメント数が多い順", "-commentCounter"),
    COMMENT_COUNT_PLUS("コメント数が少ない順", "%2BcommentCounter"),
    LAST_COMMENT_TIME_MINUS("コメントが新しい順", "-lastCommentTime"),
    LAST_COMMENT_TIME_PLUS("コメントが古い順", "%2BlastCommentTime"),
    MYLIST_COUNT_MINUS("お気に入り数が多い順", "-mylistCounter"),
    MYLIST_COUNT_PLUS("お気に入り数が少ない順", "%2BmylistCounter"),
    START_TIME_MINUS("投稿が新しい順", "-startTime"),
    START_TIME_PLUS("投稿が古い順", "%2BstartTime");

    private final String description;
    private final String value;

    Sort(String description, String value) {
        this.description = description;
        this.value = value;
    }
    //...
    public String getValue() {
        return this.value;
    }
    //...
}
あとはsearchメソッドを実行するだけでresponce.body.getData()からSearchItemのリストが取得できます!
SearchUtils.search(SearchType.KEYWORD, query, sort, page * 100, 100/* 一度に取得できるアイテムは100まで */)
        .enqueue(new Callback<SearchResult>() {
            @Override
            public void onResponse(Call<SearchResult> call, Response<SearchResult> response) {
                SearchResult body = response.body();
                if (body != null) {
                    List<SearchResult.SearchItem> data = body.getData();
                    //楽!!!
                }
            }

            @Override
            public void onFailure(Call<SearchResult> call, Throwable t) {
            }
        });
おわりに
これまでretrofitはよくわからず避けていましたが、使ってみるとかなり楽に使えました。
一番面倒だとおもっていたObject作成ですが、一瞬でした... jsonschama(ry凄い...
ちなみに初記事なので、不備等ありましたらコメントでどうぞm(_ _)m
