はじめに
しばらく使っていたSpringFoxでアプリケーションが実行できなくなる問題が発生していたので、Springdocへ乗り換え。ついでにOpenAPI2.0->OpenAPI3.0へ移行したのでまとめる。
概要
Springdocを使ってSwagger.yamlを生成。これを経由してSwaggerCodegenでマークダウン形式のAPIドキュメントを作成する。APIクライアントも作成されると思うが、今回はドキュメントのみチェック。
やったこと
アプリケーションについて
@OpenAPIDefinition(
    info = @Info(
        title = "サンプルAPIのタイトルです",
        version = "1.0",
        description = "サンプルAPIの説明です",
        license = @License(name = "ライセンス名", url = "https://qiita.com/Ikeponias"),
        contact = @Contact(url = "https://qiita.com/Ikeponias", name = "Ikeponias", email = "Ikeponias@Ikeponias.com")),
    tags = {},
    externalDocs = @ExternalDocumentation(description = "外部ドキュメント"),
    security = {},
    servers = {
        @Server(
            description = "サーバ説明",
            url = "https://qiita.com/Ikeponias",
            variables = {})
    })

@SpringBootApplication
public class SwaggercodegenApplication {

	public static void main(String[] args) {
		SpringApplication.run(SwaggercodegenApplication.class, args);
	}

}
@RestController
@RequestMapping("sample")
public class SampleRestController {

    @Operation(summary = "サンプルgetAPIの概要です",
    tags = {},
    security = {},
    responses = {
            @ApiResponse(
               content = @Content(mediaType = "application/json",
                       schema = @Schema(implementation = SampleResponse.class))),
            @ApiResponse(responseCode = "400", description = "Invalid ID supplied"),
            @ApiResponse(responseCode = "404", description = "Pet not found"),
            @ApiResponse(responseCode = "405", description = "Validation exception") }
)
    @GetMapping
    SampleResponse getResponse() {
        return new SampleResponse(1, new UserResponse("Sample Name", "aaa@bbb.com"));
    }


    @Operation(summary = "サンプルpostAPIの概要です",
        tags = {},
        security = {},
        responses = {
            @ApiResponse(responseCode = "200",description = "200コードの説明"),
            @ApiResponse(responseCode = "400", description = "400コードの説明"),
            @ApiResponse(responseCode = "403", description = "403コードの説明"),
            @ApiResponse(responseCode = "404", description = "404コードの説明")
        })
    @PostMapping
    void postRequest(@RequestBody(
                        description = "リクエスト説明",
                        required = true,
                        content = @Content(schema = @Schema(implementation = SampleRequest.class))) SampleRequest sampleRequest) {
    }
}
@Value
public class SampleRequest {

    @Schema(required = true, description = "idの説明", minimum = "1", maximum = "100")
    Integer id;

    @Schema(required = true, description = "userRequestの説明")
    UserRequest userRequest;
}
@Value
public class SampleResponse {

    @Schema(description = "idの説明")
    Integer id;

    @Schema(description = "userResponseの説明")
    UserResponse userResponse;
}
Springdocによるswagger.yaml生成
pom.xml の依存関係にSpringdocを追加。
		<dependency>
			<groupId>org.springdoc</groupId>
			<artifactId>springdoc-openapi-ui</artifactId>
			<version>1.6.6</version>
		</dependency>
あとはアプリケーションを実行する。
swagger-ui/index.html へアクセスすることで、↓のページを確認できる。OpenAPI3.0様式であることもわかる。
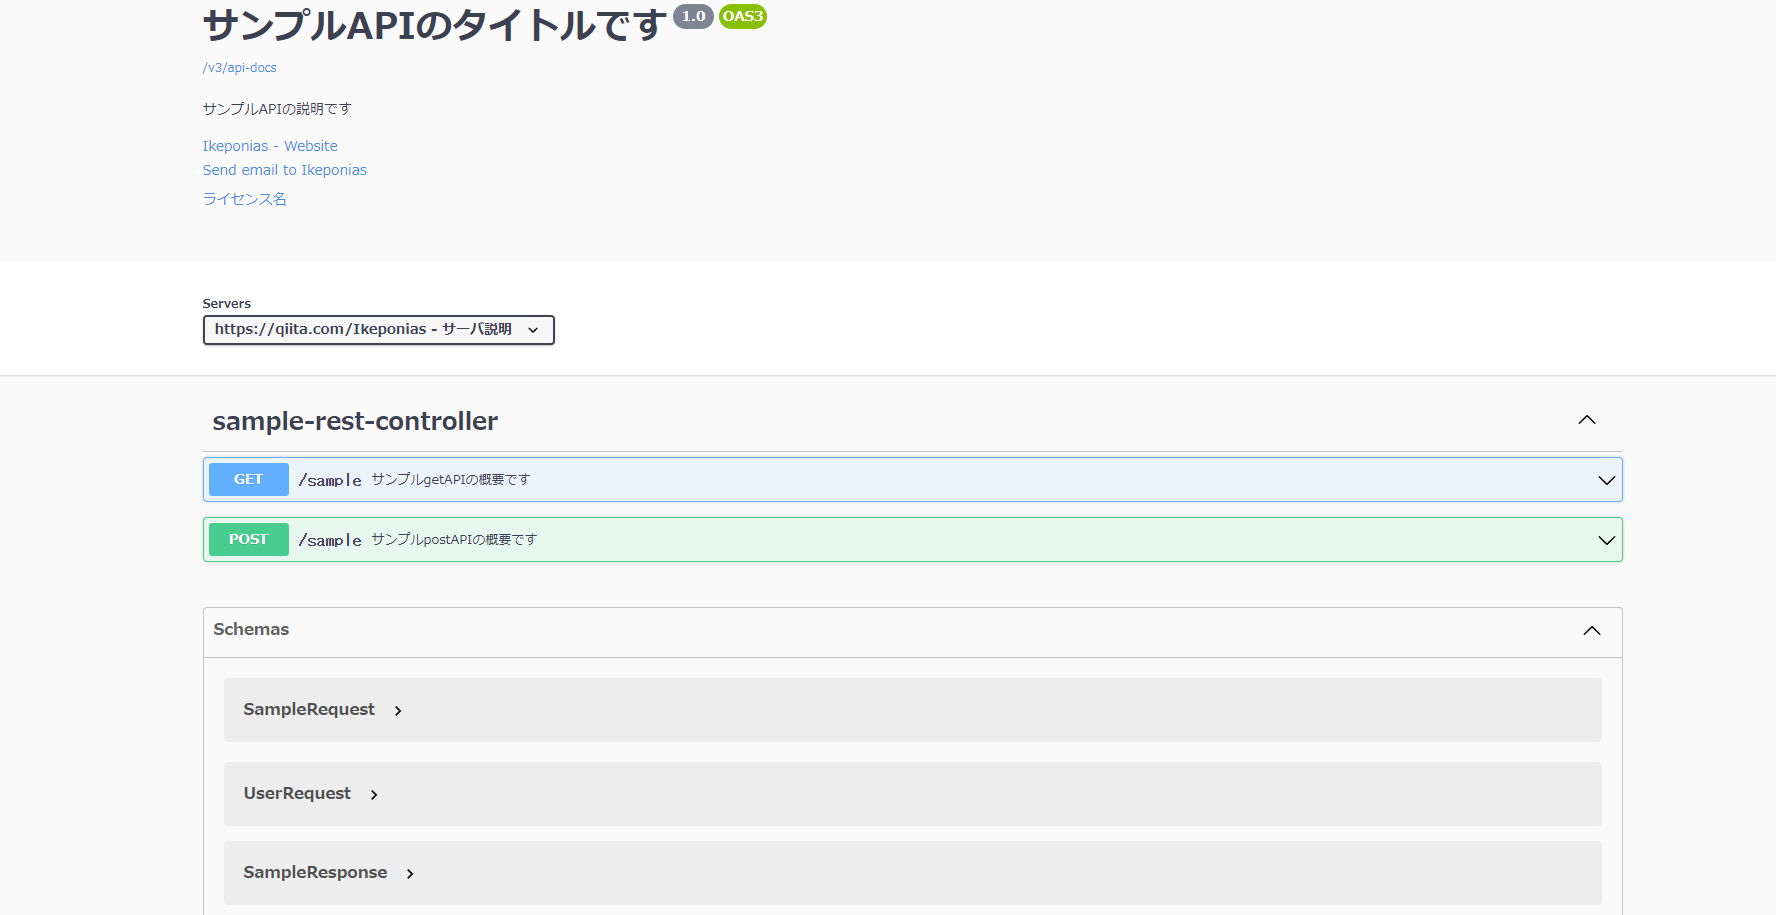
また、/v3/api-docs.yaml へアクセスすることで swagger.yaml をダウンロードできる。アクセスパスは設定で変更可能。
ただ、CI等で使う際は少々扱いづらいので、今回は単体テスト経由でダウンロードする。
今回はあのLINE様がこれに関する記事を出してくださっていたのでこれをパク…リスペクトした。
    @Autowired
	WebApplicationContext context;

    @Test
    public void generateOasFile() throws Exception {
        MockMvc mockMvc = MockMvcBuilders.webAppContextSetup(context).build();

        mockMvc.perform(MockMvcRequestBuilders.get("/v3/api-docs.yaml"))
                .andDo(result -> FileUtils.write(
                        new File("swagger.yaml"),
                        new String(result.getResponse().getContentAsByteArray(), StandardCharsets.UTF_8),
                        StandardCharsets.UTF_8));
    }
これでCIを導入していれば、単体テスト実行時に swagger.yaml が生成されている。
今回生成された swagger.yaml は以下。
openapi: 3.0.1
info:
  title: サンプルAPIのタイトルです
  description: サンプルAPIの説明です
  contact:
    name: Ikeponias
    url: https://qiita.com/Ikeponias
    email: Ikeponias@Ikeponias.com
  license:
    name: ライセンス名
    url: https://qiita.com/Ikeponias
  version: "1.0"
externalDocs:
  description: 外部ドキュメント
servers:
- url: https://qiita.com/Ikeponias
  description: サーバ説明
paths:
  /sample:
    get:
      tags:
      - sample-rest-controller
      summary: サンプルgetAPIの概要です
      operationId: getResponse
      responses:
        default:
          description: default response
          content:
            application/json:
              schema:
                $ref: '#/components/schemas/SampleResponse'
        "400":
          description: Invalid ID supplied
          content:
            '*/*':
              schema:
                $ref: '#/components/schemas/SampleResponse'
        "404":
          description: Pet not found
          content:
            '*/*':
              schema:
                $ref: '#/components/schemas/SampleResponse'
        "405":
          description: Validation exception
          content:
            '*/*':
              schema:
                $ref: '#/components/schemas/SampleResponse'
    post:
      tags:
      - sample-rest-controller
      summary: サンプルpostAPIの概要です
      operationId: postRequest
      requestBody:
        description: リクエスト説明
        content:
          application/json:
            schema:
              $ref: '#/components/schemas/SampleRequest'
        required: true
      responses:
        "200":
          description: 200コードの説明
        "400":
          description: 400コードの説明
        "403":
          description: 403コードの説明
        "404":
          description: 404コードの説明
components:
  schemas:
    SampleRequest:
      required:
      - id
      - userRequest
      type: object
      properties:
        id:
          maximum: 100
          minimum: 1
          type: integer
          description: idの説明
          format: int32
        userRequest:
          $ref: '#/components/schemas/UserRequest'
    UserRequest:
      required:
      - mail
      type: object
      properties:
        name:
          maxLength: 100
          minLength: 1
          type: string
          description: nameの説明
        mail:
          maxLength: 50
          minLength: 1
          type: string
          description: mailの説明
      description: userRequestの説明
    SampleResponse:
      type: object
      properties:
        id:
          type: integer
          description: idの説明
          format: int32
        userResponse:
          $ref: '#/components/schemas/UserResponse'
    UserResponse:
      type: object
      properties:
        name:
          type: string
          description: nameの説明
        mail:
          type: string
          description: mailの説明
      description: userResponseの説明
Swagger Codegenによるマークダウン形式のAPIドキュメント生成
Windowsの私は、今回OpenAPI3.0なので作業フォルダの中で以下のコマンドをPowerShellで実行。
wget https://repo1.maven.org/maven2/io/swagger/codegen/v3/swagger-codegen-cli/3.0.31/swagger-codegen-cli-3.0.31.jar -O swagger-codegen-cli.jar
手元に swagger-codegen-cli-jar がダウンロードできていることを確認する。
その後、以下のコマンドをPowerShellで実行。パスはよしなに変える。
しれっとテンプレートも変更しているが、これは別に書ければ書く…書ければ…書く
java -jar swagger-codegen-cli.jar generate -i swagger.yaml -l java -o generated -t templates
実行後、-i オプションで指定したswagger.yamlから -o オプションで指定したフォルダ(ここでは generated )が生成され、中にswagger関連のファイルがあることを確認する。
最後に出力されたフォルダ内の doc フォルダの中に md 拡張子のAPIドキュメントが作成されていればOK。
ちなみに今回作成したAPIエンドポイントとリクエストのドキュメントは以下。
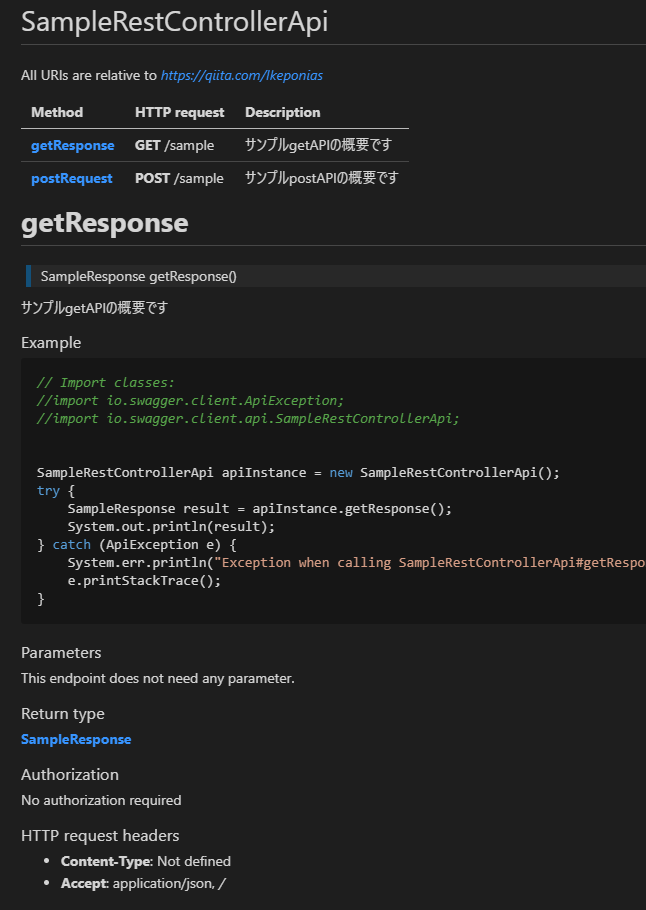

あとはお好きにカスタマイズすると良いと思う。