概要
前回は説明変数がすべて連続値だったが、今回は離散値の扱いについて考察したときの備忘録である。特に説明変数のEncodeの違いによる精度変化について。
一部下記を参照している。
- 実施期間: 2021年10月
- 環境:Colab
- パケージ:XGBoost
Dataset
今回使用するデータは乳がんの各種所見と再発診断結果である。データセットはこちらをcsvで保存して使用する。
ただしこのままcsvにすると各データが"'hoge'"のように" "と' 'で二重に括られて扱いにくいので、生データ中の' 'は削除しcsvファイルとした。この部分はPythonで処理していない。
各列の説明
- age: 10-19, 20-29, 30-39, 40-49, 50-59, 60-69, 70-79, 80-89, 90-99
- menopause: lt40, ge40, premeno
- tumor-size: 0-4, 5-9, 10-14, 15-19, 20-24, 25-29, 30-34, 35-39, 40-44, 45-49, 50-54, 55-59
- inv-nodes: 0-2, 3-5, 6-8, 9-11, 12-14, 15-17, 18-20, 21-23, 24-2, 27-29, 30-32, 33-35, 36-39
- node-caps: yes, no
- deg-malig: 1, 2, 3
- breast: left, right
- breast-quad: left-up, left-low, right-up, right-low, central
- irradiat: yes, no
- Class: no-recurrence-events, recurrence-events
全説明変数が離散値であることがわかる。deg-maligは悪性のdegreeはので連続値ではない。
Datasetのロード
import pandas as pd
import numpy as np
import xgboost as xgb
import seaborn as sns
import matplotlib.pyplot as plt
from sklearn import model_selection
from sklearn.model_selection import train_test_split
from sklearn.metrics import accuracy_score
from sklearn.preprocessing import LabelEncoder
from xgboost import XGBClassifier
from xgboost import plot_importance
from matplotlib import pyplot
import re

# headerがないので付ける。
clmn = ['age', 'menopause', 'tumor-size', 'inv-nodes', 'node-caps', 'deg-malig', 'breast', 'breast-quad', 'irradiat', 'Class']
df = pd.read_csv('breast-cancer.csv', names=clmn)
print(df.info())
print(df.tail())

# split data into X and y
X = np.array(df.iloc[:,0:9])
X = X.astype(str)
df_str = df.astype(str)
Y = np.array(df.iloc[:,9])
2変数にNaNがあるようなので一応確認する。
print(df['node-caps'].unique())
print(df['breast-quad'].unique())
['yes' 'no' nan]
['left_up' 'central' 'left_low' 'right_up' 'right_low' nan]
確かにNaNはあるがXGBoostがよろしく処理してくれるので今は放置する。
モデル
Trainingするモデルを定義しておく。
def xgb_train(X, Y):
    # split data into train and test sets
    seed = 27
    test_size = 0.33
    X_train, X_test, y_train, y_test = train_test_split(X, Y, test_size=test_size, random_state=seed)

    eval_set = [(X_test, y_test)]

    # fit model on training data
    model = XGBClassifier()
    eval_set = [(X_test, y_test)]
    model.fit(X_train, y_train, early_stopping_rounds=10, eval_metric="logloss", eval_set=eval_set, verbose=True)

    # make predictions for test data
    y_pred = model.predict(X_test)
    predictions = [round(value) for value in y_pred]

    # evaluate predictions
    accuracy = accuracy_score(y_test, predictions)
    print("Accuracy: %.2f%%" % (accuracy * 100.0))

    _, ax = plt.subplots(figsize=(12, 4))
    plot_importance(model, ax=ax,
                    importance_type='weight',
                    show_values=True)
    plt.show()
離散値の前処理
GBDT(Gradient Boosting Decision Tree)で気になっている離散値処理の3通りを確認する。
元データにNaNが数点あるがそのままsklearnにencodeしてもらい、1,2,3を確認する。その後NaNを持つインスタンスを削除して1,2,3を再確認する。
- 全離散説明変数をOneHotEncode
- 順番に意味のある説明変数はOrdinalEncode、その他はOneHotEncode
- 順番に意味のある説明変数はOrdinalEncode、その他はLabelEncode
age, tumor-size, inv-nodesは元は連続値だったものをbinningして離散値にしているし、deg-maligもdegreeの大小関係に意味があるので2.を調べてみる。
3.については下記の良書のP.234にOneHotEncodeする必要がないのがGBDTの特徴と、ホントかそれ?的なことが書かれてあったのでやってみる。
つまり合計6前処理パターンについて精度確認する。
説明変数:OneHotEncodeのみ, NaNあり
前処理
これはJason先生のブログ通り、全説明変数についてLaberEncode後、OneHotEncodeする。
XGBoostモデル用に成形する。
# 説明変数をLaberEncodeし、続けてOneHotEncodeする。
encoded_x = None    # 初回はconcatenate出来ないため。
for i in range(0, X.shape[1]):
	label_encoder = LabelEncoder()
	feature = label_encoder.fit_transform(X[:,i])

    # どのデータがどの整数に変換されたか表示
    labels = list(df_str.iloc[:,i].unique())
    print(labels)
    labels = label_encoder.transform(labels)
    print(labels)

	feature = feature.reshape(X.shape[0], 1)
	onehot_encoder = OneHotEncoder(sparse=False, categories='auto')
	feature = onehot_encoder.fit_transform(feature)
	if encoded_x is None:
		encoded_x = feature
	else:
		encoded_x = np.concatenate((encoded_x, feature), axis=1)

print("X shape: : ", encoded_x.shape)

# 目的変数をLaberEncode
label_encoder = LabelEncoder()
label_encoder = label_encoder.fit(Y)
label_encoded_y = label_encoder.transform(Y)
Origin: ['40-49', '50-59', '60-69', '30-39', '70-79', '20-29']
Encode: [2 3 4 1 5 0]
Origin: ['premeno', 'ge40', 'lt40']
Encode: [2 0 1]
Origin: ['15-19', '35-39', '30-34', '25-29', '40-44', '10-14', '0-4', '20-24', '45-49', '50-54', '5-9']
Encode: [ 2 6 5 4 7 1 0 3 8 10 9]
Origin: ['0-2', '3-5', '15-17', '6-8', '9-11', '24-26', '12-14']
Encode: [0 4 2 5 6 3 1]
Origin: ['yes', 'no', 'nan']
Encode: [2 1 0]
Origin: ['3', '1', '2']
Encode: [2 0 1]
Origin: ['right', 'left']
Encode: [1 0]
Origin: ['left_up', 'central', 'left_low', 'right_up', 'right_low', 'nan']
Encode: [2 0 1 5 4 3]
Origin: ['no', 'yes']
Encode: [0 1]
X shape: : (286, 43)
9つあった説明変数が43個に拡張された。もちろん全データは0/1となっている。
Training
# fit model on training data
xgb_train(encoded_x, label_encoded_y)
説明変数:OrdinalEncode + OneHotEncode, NaNあり
前処理
下記の説明変数は順番に意味を持たないためOneHotEncodeし、それ以外はOrdinalEncodeとする。
idx
1: menopause: lt40, ge40, premeno
4: node-caps: yes, no
6: breast: left, right
7: breast-quad: left-up, left-low, right-up, right-low, central
8: irradiat: yes, no
コードを流用するため、実際はLabelEncodeを使うが機能はOrdinalEncodeと同じ。
ただし、LabelEncodeもOrdinalEncodeも、ユニークなラベルの文字をASCIIコード順に並べて順位付けしているので、元データのままだとうまく順位通りに整数を振ってくれない。
例えば、ひとの理解する順位は下記だが、
'0', '5', '10', '15'
Encoderの順位は下記となる。
'0', '10', '15', '5'
文字の先頭からASCIIコード順に評価して順位付けしている(っぽい)ため、ひとの理解とは異なる結果となる。つまり下記のような文字変換を事前にしなければならない。
'00', '05', '10', '15'
ココでは変換すべきデータ種が下記の6つと少ないのでベタに書き換えた。
df = df.replace({'tumor-size': {"^0-4$": "00-04", "^5-9$": "05-09"}}, regex=True)
print(df.loc[:10, 'tumor-size'])
df = df.replace({'inv-nodes': {"^0-2$": "00-02", "^3-5$": "03-05", \
                               "^6-8$": "06-08", "^9-11$": "09-11"}}, regex=True)
print(df.loc[:10, 'inv-nodes'])

# 読み直し
X = np.array(df.iloc[:,0:9])
X = X.astype(str)
df_str = df.astype(str)
Y = np.array(df.iloc[:,9])
一部をOrdinalEncode、その他をOneHotEncodeする。
# 説明変数をLaberEncode(OrdinalEncode)し、続けてindex=[1,4,6,7,8]はOneHotEncodeする。
no_order = [1,4,6,7,8]
encoded_x = None
for i in range(0, X.shape[1]):
    label_encoder = LabelEncoder()
    feature = label_encoder.fit_transform(X[:,i])

    # どのデータがどの整数に変換されたか表示
    labels = list(df_str.iloc[:,i].unique())
    print(f"Origin: {labels}")
    labels = label_encoder.transform(labels)
    print(f"Encode: {labels}")

    feature = feature.reshape(X.shape[0], 1)
    if i in no_order:
        onehot_encoder = OneHotEncoder(sparse=False, categories='auto')
        feature = onehot_encoder.fit_transform(feature)

    if encoded_x is None:
        encoded_x = feature
    else:
        encoded_x = np.concatenate((encoded_x, feature), axis=1)
print("X shape: : ", encoded_x.shape)

# 目的変数をLaberEncode
label_encoder = LabelEncoder()
label_encoder = label_encoder.fit(Y)
label_encoded_y = label_encoder.transform(Y)
Origin: ['40-49', '50-59', '60-69', '30-39', '70-79', '20-29']
Encode: [2 3 4 1 5 0]
Origin: ['premeno', 'ge40', 'lt40']
Encode: [2 0 1]
Origin: ['15-19', '35-39', '30-34', '25-29', '40-44', '10-14', '00-04', '20-24', '45-49', '50-54', '05-09']
Encode: [ 3 7 6 5 8 2 0 4 9 10 1]
Origin: ['00-02', '03-05', '15-17', '06-08', '09-11', '24-26', '12-14']
Encode: [0 1 5 2 3 6 4]
Origin: ['yes', 'no', 'nan']
Encode: [2 1 0]
Origin: ['3', '1', '2']
Encode: [2 0 1]
Origin: ['right', 'left']
Encode: [1 0]
Origin: ['left_up', 'central', 'left_low', 'right_up', 'right_low', 'nan']
Encode: [2 0 1 5 4 3]
Origin: ['no', 'yes']
Encode: [0 1]
X shape: : (286, 20)
説明変数は20個となり、少し分かりづらいがtumor-sizeとinv-nodesはデータの小さい順に整数が振られている。
Training
# fit model on training data
xgb_train(encoded_x, label_encoded_y)
説明変数:OrdinalEncode + LabelEncode, NaNあり
前処理
知っているひとが見ると同じことじゃん、ってなるが、そのとおり同じこと。ただ連続値と離散値を区別したいので、OrdinalEncodeとLabelEncodeを区別して書いた。
下記のコメントアウト部が違うだけ。
# 説明変数をLaberEncode(OrdinalEncode)し、続けてindex=[1,4,6,7,8]はOneHotEncodeする。
no_order = [1,4,6,7,8]
encoded_x = None
for i in range(0, X.shape[1]):
    label_encoder = LabelEncoder()
    feature = label_encoder.fit_transform(X[:,i])

    # どのデータがどの整数に変換されたか表示
    labels = list(df_str.iloc[:,i].unique())
    print(f"Origin: {labels}")
    labels = label_encoder.transform(labels)
    print(f"Encode: {labels}")

    feature = feature.reshape(X.shape[0], 1)
#    if i in no_order:
#        onehot_encoder = OneHotEncoder(sparse=False, categories='auto')
#        feature = onehot_encoder.fit_transform(feature)

    if encoded_x is None:
        encoded_x = feature
    else:
        encoded_x = np.concatenate((encoded_x, feature), axis=1)
print("X shape: : ", encoded_x.shape)

# 目的変数をLaberEncode
label_encoder = LabelEncoder()
label_encoder = label_encoder.fit(Y)
label_encoded_y = label_encoder.transform(Y)
Origin: ['40-49', '50-59', '60-69', '30-39', '70-79', '20-29']
Encode: [2 3 4 1 5 0]
Origin: ['premeno', 'ge40', 'lt40']
Encode: [2 0 1]
Origin: ['15-19', '35-39', '30-34', '25-29', '40-44', '10-14', '00-04', '20-24', '45-49', '50-54', '05-09']
Encode: [ 3 7 6 5 8 2 0 4 9 10 1]
Origin: ['00-02', '03-05', '15-17', '06-08', '09-11', '24-26', '12-14']
Encode: [0 1 5 2 3 6 4]
Origin: ['yes', 'no', 'nan']
Encode: [2 1 0]
Origin: ['3', '1', '2']
Encode: [2 0 1]
Origin: ['right', 'left']
Encode: [1 0]
Origin: ['left_up', 'central', 'left_low', 'right_up', 'right_low', 'nan']
Encode: [2 0 1 5 4 3]
Origin: ['no', 'yes']
Encode: [0 1]
X shape: : (286, 9)
OneHotがなくなったので説明変数は元の9個になる。精度結果は下記のとおり。
説明変数:OneHotEncodeのみ, NaNなし
前処理
nanを含む行を削除する。
# nanを含む行を削除
df = df.dropna(how='any')
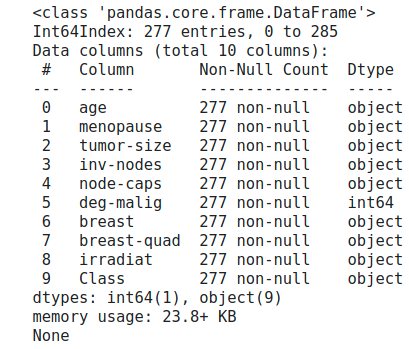
print(df.info())

NaNを除くとインスタンス数は286から277に9個減った。大きく減るようであればNaNは取れないが9個減るくらいならいいんじゃない?
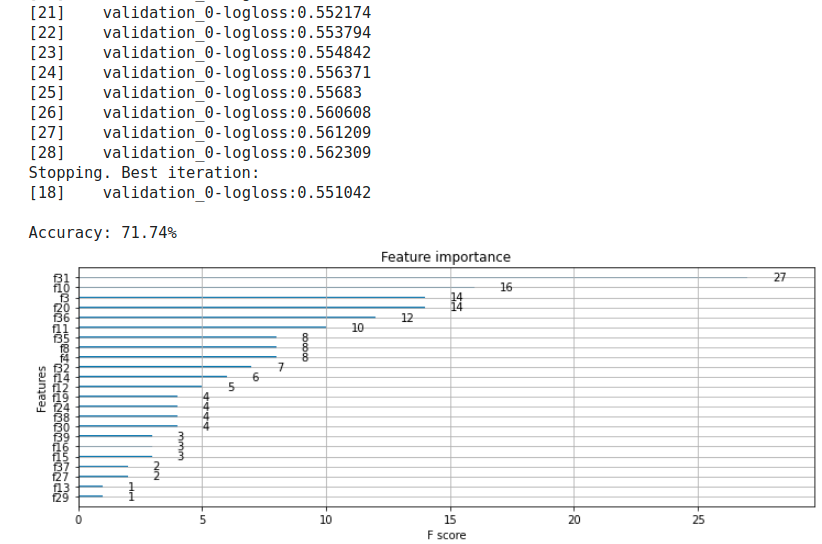
あとは先述と同じなので結果だけ貼り付け

説明変数:OrdinalEncode + OneHotEncode、NaNなし
先述の組み合わせのみなのでここも結果だけ。
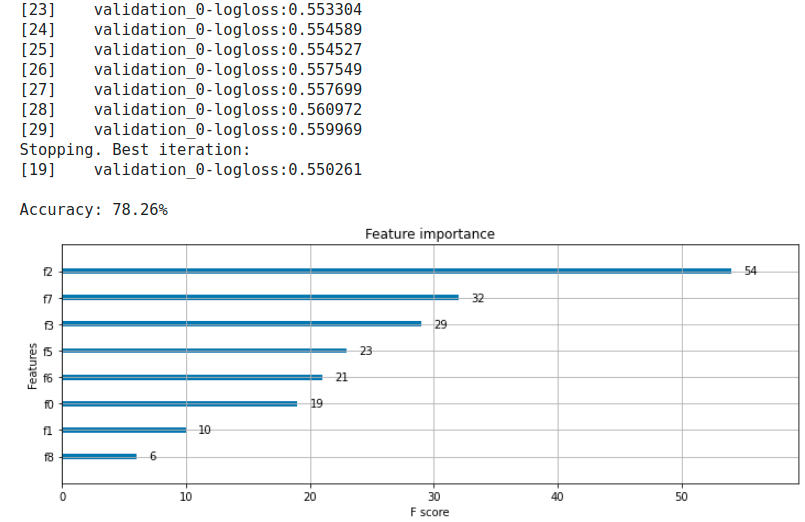
説明変数:OrdinalEncode + LabelEncode、NaNなし
先述の組み合わせのみなのでここも結果だけ。
まとめ
下表のようにとてもまとまらない結果となった。
No.6が一番良いが、いつもNaNを削除できるとも限らずデータ数を減らすのは得策ではないので、これは参考値程度だろう。
そうするとNo.1が良いことになるが、MLの予測はデータに依存するところが非常に大きく、今回のように説明変数の数をゴロゴロ変えると精度もあわせて変わってしまう。
つまり、Encodeは一通り試してみるべし、ということか…
| # | 前処理条件 | 説明変数 | XGBoostの精度 |
|---|---|---|---|
| 1 | OneHotEncodeのみ、NaNあり | 286 x 43 | 72.63% |
| 2 | OrdinalEncode + OneHotEncode、NaNあり | 286 x 20 | 68.42% |
| 3 | OrdinalEncode + LabelEncode、NaNあり | 286 x 9 | 71.58% |
| 4 | OneHotEncodeのみ、NaNなし | 277 x 41 | 71.74% |
| 5 | OrdinalEncode + OneHotEncode、NaNなし | 277 x 18 | 72.83% |
| 6 | OrdinalEncode + LabelEncode、NaNなし | 277 x 9 | 78.26% |
以上


