はじめに
AWSでLambda + APIGatewayという、よくやる組み合わせの記事です。どういう順番で何を見ながら作ればよいかということに重きをおいて解説します。
何を作るのか
この記事の目標成果物ですが、タイトル通りSlackからググります。
具体的にはSlackのスラッシュコマンドと呼ばれる機能(/remindみたいなやつ)を作ります。
Slack上で/google AWS Lambdaとかすると、検索結果がダーッと返ってくるようなやつですね。
開発の方針を決める
ときたまアジャイルを行き当たりばったりと捉えてそうな人もいますが、アジャイルでも設計は大事です。
流れについて
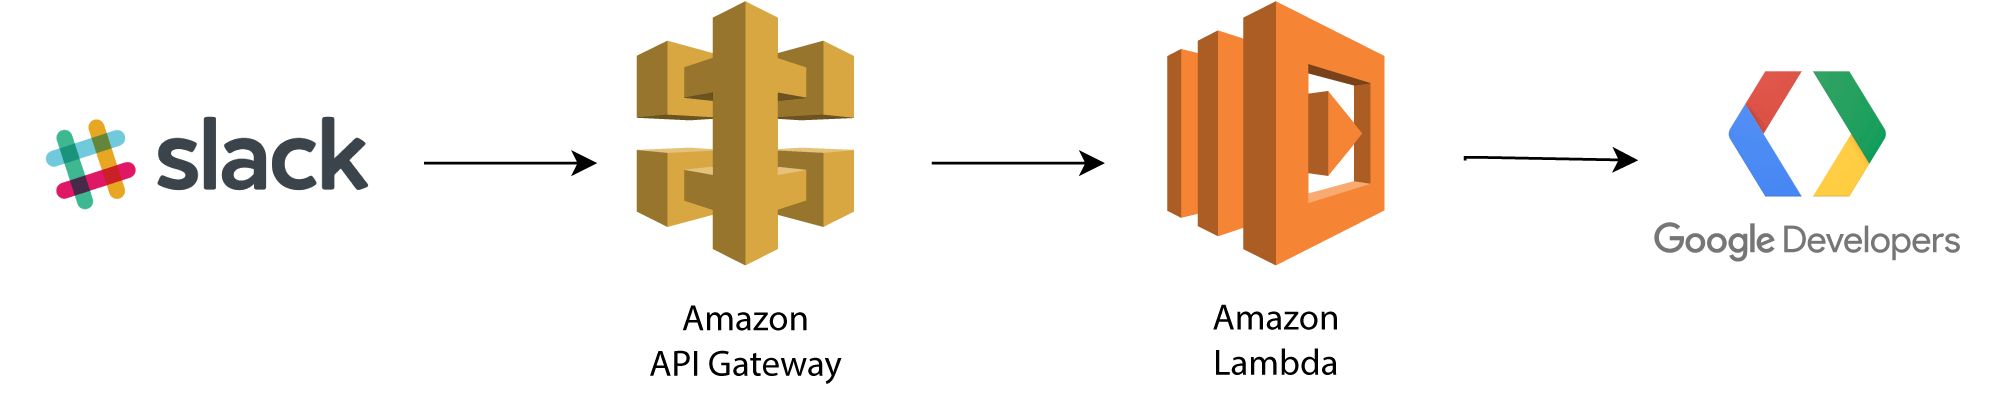
- Slackでのslashコマンドを発行するとAPIGatewayにトランザクションが飛ぶ
- APIGatewayはLambdaにパラメータを渡す
- Lambdaはパラメータを基に
- ぐぐる
- ググった結果を整形して返す
データの受け渡しについて
機能をまたぎますので、データの受け渡しについては最初にまとめておいたほうが良いです。
Slack to API Gateway
Slackがどういうデータを投げるかを調べるために、公式を参照します。
重要なのは、
-
POSTで投げるよ - Content-Typeは
application/x-www-form-urlencodedだよ - データに何が入ってるか表にしておくよ
の3点ですね。
参考: https://api.slack.com/slash-commands#app_command_handling
API Gateway to Lambda
LambdaにはJSONで渡す必要があります。
Lambda to Google custom search
ぐぐるのにREST APIがあります。
参考: https://developers.google.com/custom-search/json-api/v1/using_rest
Lambda to Slack
API Gatewayを通じてSlackに結果を返す必要があります。細かいフォーマットは色々あるけど、{ "text": "xxx" }というのが一番シンプルな形だと書いてあります。
参考: https://api.slack.com/slash-commands#responding_immediate_response
処理について
上記を受けて、設定・処理しなくてはいけないことをまとめてみると、
- Slack
- Slack appにSlash commandを作成、ここにはAPI Gatewayエンドポイントなどの設定をする必要がある
- API Gateway
- API Gatewayでは、起動するLambdaを設定し、さらに
application/x-www-form-urlencodedをJSONにマップする必要がある - Lambda
- Lambdaでは、うけとったJSONを基にGoogle Custom SearchのREST APIを叩き、メッセージを整形して返す必要がある
ということになります。
実装していく
Slackの設定にはAPI Gatewayのエンドポイントが、API GatewayにはLambdaが、LambdaのコードにはGoogle custom searchの設定が必要ですので、今回は内側から実装していきます。つまり、
- Google Custom Search
- Lambda
- API Gateway
- Slack
という順番でおこなっていきます。
Google Custom Search
APIを叩くためのAPI KeyとCustom search engine IDなるものが必要です。
まずは、ここでAPI Keyを手に入れましょう。
GET A KEYというボタンを押すと、ダイアログが出てきます。Create a new projectを選択して、適当なプロジェクト名(For slackとか)を設定するとAPI Keyが表示されますので、これをコピーしておきます。
次にCustom search engine IDです。ここで取得できます。
このあとの流れが、いまいち釈然としないのですが、カスタム検索はWeb全体からの検索を一発で設定できないため、一度適当なカスタム検索を設定してから、全体に変更という手順になるようです。
Addボタンを押して設定画面に進みます。検索するサイトには適当なURL(どうせ消すので)を、検索エンジンの名前をwwwとでもしておきます。作成ボタンを押すと、カスタム検索が作成されます。
左のペインの[検索エンジンを編集]の[設定]を開き、先程追加したサイトを削除し、[ウェブ全体を検索]をオンにしましょう。
検索エンジンIDというボタンをクリックしてデてくるのがCustom search engine IDです。
これで、必要なデータがとれましたので、curlで情報が取れるかを確かめてみましょう。検索ワードは+でつなぐことで、複数指定することができます。
hoge:~$ curl "https://www.googleapis.com/customsearch/v1?key=your-api-key&cx=your-cusrom-search-engne-id&q=qiita+slack+google"
うまくいっていれば、JSONデータが返ってくるはずです。
Lambda
さて次はLambdaです。今回のLambdaでは、渡ってきたデータを基にREST APIを叩くだけです。
まずロールを作る
適切なIAMロールがなければ予め作っておきましょう。
ServicesからIAMを探し出して、IAM Management Consoleを開きます。左カラムにあるRolesを選び、Create roleをクリックしロール作成画面を表示します。
Create roleをクリックすると、どのマネージドサービスのためのロールなのかを選ばされますので、Lambdaを選択しましょう。
ポリシーはAWSLambdaBasicExecutionRoleをアタッチしておきましょう。これをアタッチしておけばCloudWatch logsへの書き込み権限が付きます。
最後にRole nameをきめることとなりますので、lambdaMinimumRoleという名前をつけておきましょう。
Lambdaを作る
では、Lambdaを作りましょう。ServicesからLambdaを探し出して、Create Functionします。Function NameはsearchByGoogleとでもしておきましょう、言語は今回はPython3.6でやります。Existing roleから、上記で作成したlambdaMinimumRoleを選択しましょう。
requestsはホントはアップロードしたほうがいいと思いますが、面倒ですのでbotocoreの中のやつを使いまわしましょう。ソースは次のような感じになります。
from botocore.vendored import requests

def lambda_handler(event, context):
    # textにコマンドの後ろの文字が全部はいってる。半角スペースで分解
    words = [e for e in event['text'].split(' ')]

    # Google custom search apiを叩いて、検索結果を抽出
    items = requests.get(
        url='https://www.googleapis.com/customsearch/v1',
        headers={ 'Accept': 'application/json' },
        params={
            'key': 'your-api-key',
            'cx': 'your-cusrom-search-engne-id',
            'q': '+'.join(words)
        }).json()['items']

    # タイトルを太字にしてとリンクと改行で良い感じで繋ぐ
    result = '\n\n'.join(['*{}*\n{}\n'.format(e['title'], e['link']) for e in items])

    # 検索ワードがなんだったのかも含めて{ "text": "xxx" }の形で返却
    return {
        "text": '\n\n\n'.join(['*検索ワード*: {}'.format(' '.join(words)), result])
    }
短く書くために、やや汚いコードになってますが、コメントアウトにもある通り、
- 検索ワードを抽出して
- API叩いて
- メッセージを整形して
- 返却
という流れになっています。
テストイベントを作ってみて、Testしてみましょう。入力するデータは、ちゃんと{ "text": "xxx yyy" }の形にしましょう。エラーが起きなければ成功です。
API Gateway
さてLambdaはできましたので、エンドポイントを作ります。
ServicesからAPI Gatewayを選び、Get Startedボタンを押します。New APIを選択し、API nameをslackSearchByGoogleとしてCreateします。ActionsからCreate methodを選択し、POSTを作成しましょう。Lambda functionにsearchByGoogleを指定しSaveします。これでLambdaの指定までは完了です。
次にapplication/x-www-form-urlencodedをJSONにマップする部分です。Integration RequestのMapping Templatesを開きましょう。真ん中の「When there are no templates defined (recommended)」を選択し、Add mapping templateボタンを押し、Content-Typeにapplication/x-www-form-urlencodedを入力し、チェックボタンをクリックします。
さらに画面の下にマッピングテンプレートを追加する画面が出てきます。このマッピングはAPI Gateway特有のDSLを使っての記述が必要で、やたらハードルが高いです。今回は、ここのフォーラムの回答をまるっとコピーします。
## convert HTML POST data or HTTP GET query string to JSON

## get the raw post data from the AWS built-in variable and give it a nicer name
# if ($context.httpMethod == "POST")
 #set($rawAPIData = $input.path("$"))
# elseif ($context.httpMethod == "GET")
 #set($rawAPIData = $input.params().querystring)
 #set($rawAPIData = $rawAPIData.toString())
 #set($rawAPIDataLength = $rawAPIData.length() - 1)
 #set($rawAPIData = $rawAPIData.substring(1, $rawAPIDataLength))
 #set($rawAPIData = $rawAPIData.replace(", ", "&"))
# else
 #set($rawAPIData = "")
# end

## first we get the number of "&" in the string, this tells us if there is more than one key value pair
# set($countAmpersands = $rawAPIData.length() - $rawAPIData.replace("&", "").length())

## if there are no "&" at all then we have only one key value pair.
## we append an ampersand to the string so that we can tokenise it the same way as multiple kv pairs.
## the "empty" kv pair to the right of the ampersand will be ignored anyway.
# if ($countAmpersands == 0)
 #set($rawPostData = $rawAPIData + "&")
# end

## now we tokenise using the ampersand(s)
# set($tokenisedAmpersand = $rawAPIData.split("&"))

## we set up a variable to hold the valid key value pairs
# set($tokenisedEquals = [])

## now we set up a loop to find the valid key value pairs, which must contain only one "="
# foreach( $kvPair in $tokenisedAmpersand )
 #set($countEquals = $kvPair.length() - $kvPair.replace("=", "").length())
 #if ($countEquals == 1)
  #set($kvTokenised = $kvPair.split("="))
  #if ( ( $kvTokenised[0].length() > 0 ) && ( $kvTokenised[1].length() > 0 ) )
   ## we found a valid key value pair. add it to the list.
   #set($devNull = $tokenisedEquals.add($kvPair))
  #end
 #end
# end

## next we set up our loop inside the output structure "{" and "}"
{
# foreach( $kvPair in $tokenisedEquals )
  ## finally we output the JSON for this pair and append a comma if this isn't the last pair
  #set($kvTokenised = $kvPair.split("="))
 "$util.urlDecode($kvTokenised[0])" : #if($kvTokenised.size() > 1 && $kvTokenised[1].length() > 0)"$util.urlDecode($kvTokenised[1])"#{else}""#end#if( $foreach.hasNext ),#end
# end
}
これをSaveして、ActionsからDeploy APIを選択しましょう。Stage nameにprodを設定しデプロイすれば完成です。エンドポイントが表示されますので、これまたcurlでテストしてみましょう。
hoge:~$ curl -X POST -H 'Content-Type: application/x-www-form-urlencoded' -d 'text=qiita+slack+google' https://your-end-point-prefix.execute-api.ap-northeast-1.amazonaws.com/prod|jq
curlはunicodeをデコードしてくれないので、jqに渡しています。jqはunicodeのデコードもしてくれるので便利です。普通にエラーがなければうまくいっています。
Slack
さて、最後にSlash commandをインストールしましょう。
こちらから、Create New Appし、アプリ名とインストール先のワークスペースを指定します。今回はSearch by Googleとしておきます(あとからいくらでも変更できます)。
Slash Commandsをクリックし、Create New Commandしましょう。設定項目は、
| Key | Value |
|---|---|
| Command | |
| Request URL | 先程設定したエンドポイントのURL |
| Short description | Search by keywords |
| Usage hint | [keywords separated by space] |
としておきます。当然、Request URL以外は好きなものを設定してOKです。
最後にこのコマンドをインストールする必要があります。左カラムから、Basic Informationを選び
Install your app to your workspaceを開き、Install App to Workspaceをクリックします。Authorizeすれば完成です。
おわりに

出来上がりはこんな感じになります。ちょっと検索数多すぎ感もありますので、もう少し絞ってもいいかもしれませんね。
この組み合わせは外側からではなく内側からの実装なのが、いやらしいポイントだと思います。一番最初にそれなりにインターフェースを決めてから実装しないと、不自然なマッピングが増えて気持ち悪くなるので注意しましょう。