はじめに
セルの削除など重要な処理をする際にアラートを表示することで不本意な操作を避けることができます。
この記事では使い回しができるアラート関数を実装し、それを利用してアラートを表示していきたいと思います。
使い回しができるアラート関数は1つのTableViewを使いまわすことなどにより、関数内の記述が場合分けによって増えてしまうのを防ぐ有効な手段となります。
目次
- 環境
- 実行例
- 考え方
- TableViewの実装
- アラート関数の実装
- ソースコード
- 終わりに
環境
- Xcode 11.2.1
- Swift5
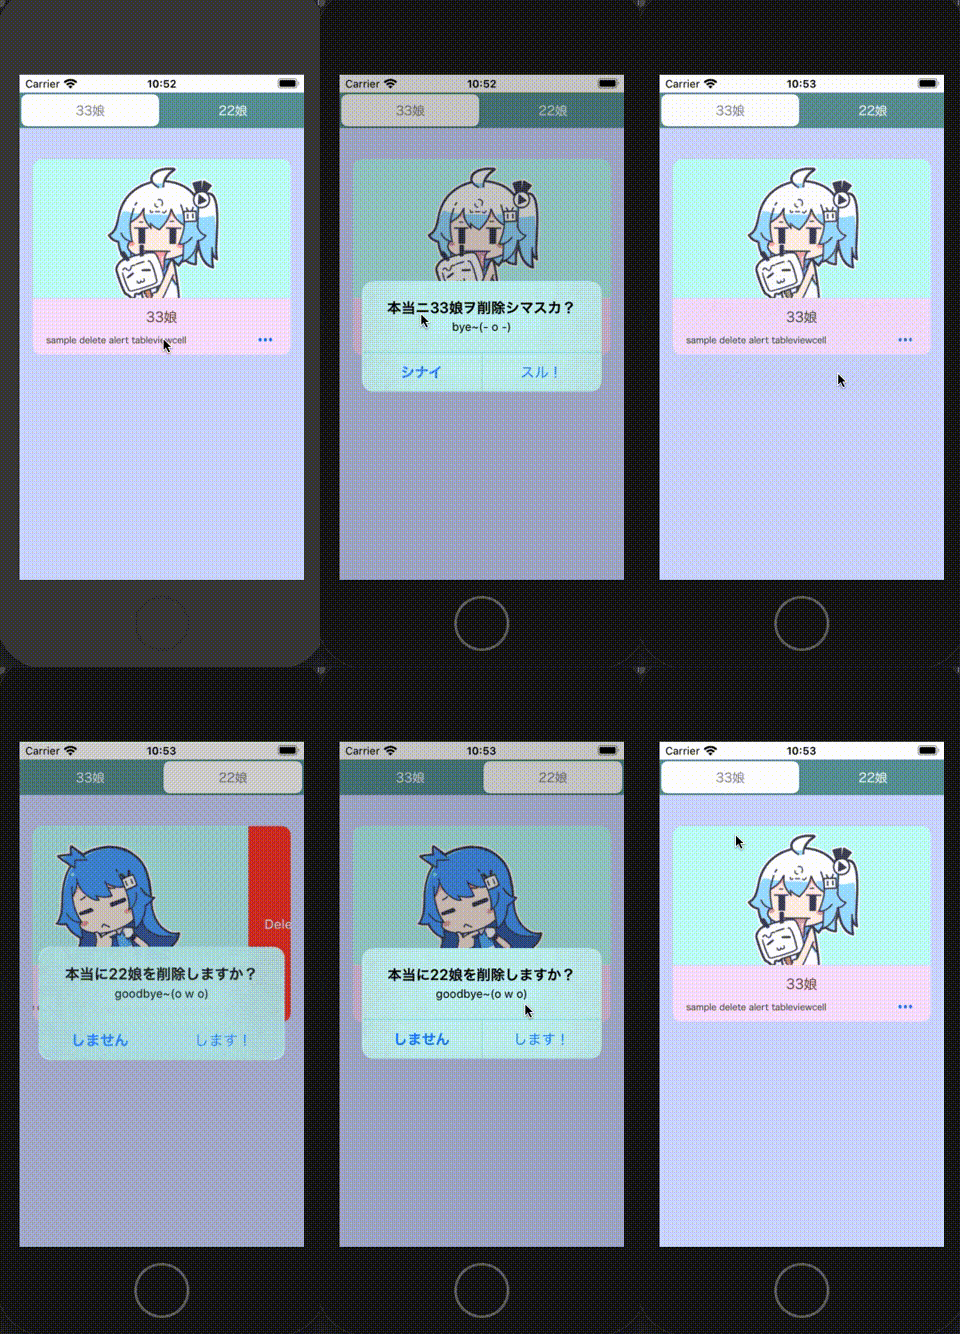
実行例
考えかた
実行例のようなプログラムを実装するにあたって説明しなければならない要素が3つあります。
TableViewとSegmentControlとアラート関数です。
今回はアラート関数に関する説明を重点的に行いたいので、その他の要素については軽く触れる程度にします。
また、SegmentControlに関しては必ずしも必要なわけではないので今回は説明しませんが、とても分かりやすい記事があるので共有しておきます。
TableViewの実装
はじめに、TableViewを削除可能にするための実装の説明を少しします。
以下のコードでセルの編集許可を与えることで可能になります。
func tableView(_ tableView: UITableView, canEditRowAt indexPath: IndexPath) -> Bool {
        return true
}
またセルに対する編集が行われた場合に呼び出されるイベント関数が以下になります。
func tableView(_ tableView: UITableView, commit editingStyle: UITableViewCell.EditingStyle, forRowAt indexPath: IndexPath) {...}
アラート関数の実装
さて本題ですね。クロージャさえ理解できればあとは簡単です。
アラート関数は以下のように表現されます。
private func alert(alertTitle: String, alertMessage: String, okTitle: String, cancelTitle: String, Closure: @escaping ((Bool) -> Void)) {
        var isOK = false

        let alert: UIAlertController = UIAlertController(title: alertTitle, message: alertMessage, preferredStyle:  UIAlertController.Style.alert)
        for subview in (alert.view.subviews) {
            subview.backgroundColor = UIColor(red: 50/255, green: 143/255, blue: 145/255, alpha: 1)
            subview.layer.cornerRadius = 20
            subview.alpha = 1
        }
        // OK
        let defaultAction: UIAlertAction = UIAlertAction(title: okTitle, style: UIAlertAction.Style.default, handler:{
            (action: UIAlertAction!) -> Void in
            isOK = true
            Closure(isOK)
        })
        // キャンセル
        let cancelAction: UIAlertAction = UIAlertAction(title: cancelTitle, style: UIAlertAction.Style.cancel, handler:{
            (action: UIAlertAction!) -> Void in
            isOK = false
            Closure(isOK)
        })

        alert.addAction(cancelAction)
        alert.addAction(defaultAction)
        present(alert, animated: true, completion: nil)
    }
引数にアラートのタイトル、アラートメッセージ、OKのタイトル、キャンセルのタイトル、操作時に呼び出す処理(クロージャ)を持っていることが分かりますね。
引数のクロージャに@escapingが付くのは、このクロージャがdefaultActionとcancelActionのクロージャで呼ばれるためです。
これは非同期処理によって引数のクロージャが解放されるのを防ぐという意味ですね。
このように実装することでアラート関数を短く呼び出すことが可能となります。
では呼び出す側を見てみましょう。
func tableView(_ tableView: UITableView, commit editingStyle: UITableViewCell.EditingStyle, forRowAt indexPath: IndexPath) {

        func update(_ isOK: Bool) {
            if(isOK) {
                //省略
                let indexSet = NSMutableIndexSet()
                indexSet.add(indexPath.section)
                tableView.deleteSections(indexSet as IndexSet, with: UITableView.RowAnimation.automatic)
                tableView.reloadData()
            }
        }


        switch self.mySegmentControl.selectedSegmentIndex {
        case 0:
            alert( alertTitle: "本当ニ33娘ヲ削除シマスカ?",
                   alertMessage: "bye~(- o -)",
                   okTitle: "スル!",
                   cancelTitle: "シナイ",
                   Closure: { isOK in update(isOK) })
        case 1:
            alert( alertTitle: "本当に22娘を削除しますか?",
                   alertMessage: "goodbye~(o w o)",
                   okTitle: "します!",
                   cancelTitle: "しません",
                   Closure: { isOK in update(isOK) })
        default: break
        }
    }
このようにスッキリ記述することができました。
ソースコード
func tableView(_ tableView: UITableView, commit editingStyle: UITableViewCell.EditingStyle, forRowAt indexPath: IndexPath) {

        func update(_ isOK: Bool) {
            if(isOK) {
                switch mySegmentControl.selectedSegmentIndex {
                case 0:
                    if let i = showndata.firstIndex(of: "33娘") {
                        showndata.remove(at: i)
                    }
                case 1:
                    if let i = showndata.firstIndex(of: "22娘") {
                        showndata.remove(at: i)
                    }
                default:
                    break
                }
                let indexSet = NSMutableIndexSet()
                indexSet.add(indexPath.section)
                tableView.deleteSections(indexSet as IndexSet, with: UITableView.RowAnimation.automatic)
                tableView.reloadData()
            }
        }


        switch self.mySegmentControl.selectedSegmentIndex {
        case 0:
            alert( alertTitle: "本当ニ33娘ヲ削除シマスカ?",
                   alertMessage: "bye~(- o -)",
                   okTitle: "スル!",
                   cancelTitle: "シナイ",
                   Closure: { isOK in update(isOK) })
        case 1:
            alert( alertTitle: "本当に22娘を削除しますか?",
                   alertMessage: "goodbye~(o w o)",
                   okTitle: "します!",
                   cancelTitle: "しません",
                   Closure: { isOK in update(isOK) })
        default: break
        }
    }


    private func alert(alertTitle: String, alertMessage: String, okTitle: String, cancelTitle: String, Closure: @escaping ((Bool) -> Void)) {
        var isOK = false

        let alert: UIAlertController = UIAlertController(title: alertTitle, message: alertMessage, preferredStyle:  UIAlertController.Style.alert)
        for subview in (alert.view.subviews) {
            subview.backgroundColor = UIColor(red: 50/255, green: 143/255, blue: 145/255, alpha: 1)
            subview.layer.cornerRadius = 20
            subview.alpha = 1
        }
        // OK
        let defaultAction: UIAlertAction = UIAlertAction(title: okTitle, style: UIAlertAction.Style.default, handler:{
            (action: UIAlertAction!) -> Void in
            isOK = true
            Closure(isOK)
        })
        // キャンセル
        let cancelAction: UIAlertAction = UIAlertAction(title: cancelTitle, style: UIAlertAction.Style.cancel, handler:{
            (action: UIAlertAction!) -> Void in
            isOK = false
            Closure(isOK)
        })

        alert.addAction(cancelAction)
        alert.addAction(defaultAction)
        present(alert, animated: true, completion: nil)
    }
終わりに
クロージャって便利ですね。
セルを削除する際のデータに対する処理が複雑になればなるほど、スッキリ記述する重要性は高まっていくと思います。
そのような時にこの記事が役に立てば幸いです。
