PDB fileをpython MDAnalysis ライブラリを使って解析した例
記事の背景
タンパク質の3次元構造データであるPDBファイルを同時に多数解析するためにMDAnalaysisを利用しました。
一般的にPymolのCUIコマンドを使ったが使われます。それよりも細かい条件で情報の抽出をしたいときに便利だったのでここで紹介しようと思います。
環境はWindowsのPowerShellを前提にしています。
スクリプトを作るうえでファイル名の処理が簡便にできるのでPathlibも追加でインストールします。
MDAnalysisとPathlibのインストール
pip install mdanalysis
pip install pathlib
PDBファイルのダウンロード
適当な作業ディレクトリを作成します。ここでは~/Desktop/PDBとします。まずはそのディレクトリを作り、そこにRCSB PDBのウェブサイトからPDBファイルのPDB: 2D80をダウンロードしてきます。
# ディレクトリの作成
mkdir -p ~/Desktop/PDB
# ディレクトリへの移動
cd ~/Desktop/PDB
# PDB:2d80のファイルをwgetコマンドでダウンロード
wget "https://files.rcsb.org/download/2d80.pdb"
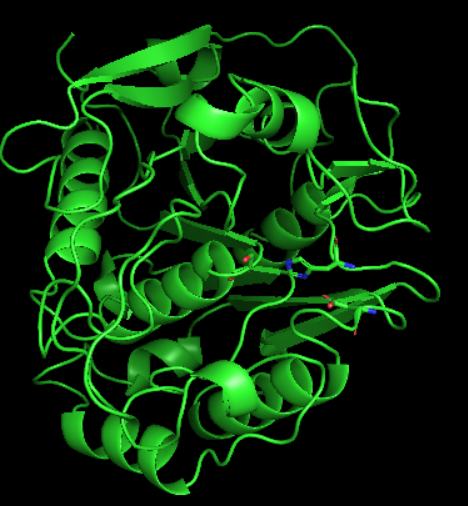
ダウンロードした対象の2D80をPymolで描画した画像。加水分解活性に重要なCatalytic triadをStick表示してあります。
PDBファイルをMDanalysisでChain IDごとにファイルを分割する
RCSB PDBデータベースからダウンロードしたPDBファイルはChain IDが複数含まれています。その中に蛋白質以外に水分子やリガンドのエントリーも含まれています。
そこで、タンパク質部分のChain ID Aのエントリーだけを抽出します。
import argparse
from pathlib import Path

import MDAnalysis as mda
from MDAnalysis.coordinates.PDB import PDBWriter

# 引数の設定
def parser_setting():
    parser = argparse.ArgumentParser(
        prog='split_pdbchainid.py',
        description=('extract only 1 chain id entry from a pdb file'))
    parser.add_argument(
        '-i', '--inpt',
        action='store', type=str,
        help='input pdb file containing several chain id.')
    args = parser.parse_args()
    return (parser, args)

def main(inpt):
    # Universeの作成。PDBのデータをmdanalysisのオブジェクトとしてロードする。
    u = mda.Universe(inpt)

    # Universeのオブジェクトのうち、タンパク質のエントリーのみを抽出する。
    atoms = u.select_atoms('protein')

    # Chainごとに処理
    for seg in atoms.segments:
        chain_id = seg.segid  # Chain ID は segment ID に対応
        selection = atoms.select_atoms(f"segid {chain_id}")
        output_filename = f"{Path(inpt).stem}_{chain_id}.pdb"

        with PDBWriter(output_filename) as writer:
            writer.write(selection)

        print(f"Wrote {output_filename}")

if __name__ == '__main__':
    parser, args = parser_setting()
    main(**vars(args))
モノマーだけにしたPDBファイルの中で活性残基周辺のアミノ酸残基を抽出する
一つ上のスクリプトまではmdanalysisなしでもかけないことはないですが、こちらのスクリプトはmdanalysisを使うことで簡潔に書くことができます。
import argparse
import MDAnalysis as mda

def parser_setting():
    parser = argparse.ArgumentParser(
        prog='extract_surrounding_residues.py',
        description=('extract residue ids near active residue.'))
    parser.add_argument(
        '-i', '--inpt',
        action='store', type=str,
        help='input pdb file containing one chain id.')
    parser.add_argument(
        '-a', '--actres',
        action='store', type=str,
        help='active residue number.')
    parser.add_argument(
        '-d', '--distance',
        action='store', type=str,
        help='extract residues closer than this distance (angstrom).')
    parser.add_argument(
        '-o', '--output',
        action='store', type=str,
        help='output file name.')
    args = parser.parse_args()
    return (parser, args)

def main(inpt, actres, distance, output):
    # Universeの作成。PDBのデータをmdanalysisのオブジェクトとしてロードする。
    u = mda.Universe(inpt)

    # 活性残基の原子を抽出
    target_residue = u.select_atoms(f"resid {actres}")

    # 活性残基のdistance (Å) 以内にあるアミノ酸残基(ただし自身は除く)の抽出
    nearby_c_atoms = u.select_atoms(
        f"name CB and (protein and around {distance} group target)",
        target=target_residue)

    # 抽出したアミノ酸残基をテキストファイルとして出力する
    outlist = [f"{x.resname}{str(x.resid)}" for x in nearby_c_atoms]
    with open(output, "w") as f:
        f.write("\n".join(outlist))

if __name__ == '__main__':
    parser, args = parser_setting()
    main(**vars(args))
Powershellで上記のスクリプトを実行して出力ファイルの中身を確認する
2D80のPDBの活性残基は以下のUniProtのFunction項目に書いてあるので、そこを参考にしました。SER39が活性残基と書いてありました。
https://www.uniprot.org/uniprotkb/B2NHN2/entry
活性残基から6Å以内のアミノ酸の一覧を出力させてみます。
実行コマンド
python .\extract_surrounding_residues.py -i .\2d80.pdb -d 6 -a 39 -o testout-script.txt
Get-Content .\testout-script.txt
出力結果(testout-script.txt)
    LEU38
    SER40
    TYR43
    PHE63
    ALA64
    VAL124
    CYS250
以下に示した画像でPymolでtestout-script.txtに載っている残基をline表示しました。
そのうち、ALA64との距離をPymol上で測ったときの結果が画像に載っています(白い点線部分)
実際に活性残基であるSER39と主鎖のCの距離が6Å以下になっています。

最後に
今回の例では、活性残基に近い残基をスクリプトで抽出できることを紹介しました。このスクリプト自体はタンパク質の変異体を作るときの変異候補の残基を活性残基周辺から探すということを網羅的に実行するのにすぐ活用できます。
ただ、このスクリプト以外にもMDAnalaysisを使って様々な条件でアミノ酸残基を抽出することができます。目的にあったスクリプトを作って、日々の研究の効率化に役立ててもらえれば幸いです。