はじめに
脆弱性でよく、特権を取られる(gain a privilege)や、特権の昇格(Privilege elevation)などの言葉が出てきますが、そもそもLinuxの認証・認可がどのような仕組みになっているのか?それを知らなければ特権奪取も権限昇格もよくわからないなと、調査してみましたのでここに報告します。
調査のアプローチ
認可(Authorization)
認可はプロセスが持つ権限と対象のもつ権限を比較し、一致すれば読み書きを許し、一致しなければ不許可とします。その実現を調べるため、以下を調査します。
- プロセスが持つ権限、アクセスしたい対象の持つ権限はそれぞれどこにあるのか
- それぞれの権限をどこでチェックしているのか
まずは手頃なところでファイルのアクセス権限のチェックがどこで、どのように行われているのかを調べます。これによってプロセスに紐づく権限情報がどこに格納され、ファイルのアクセス権はどこに格納されているのか、またopen/read/write のいずこでチェックしているのかがわかるはずです。
認証(Authentication)
プロセスの持つ権限について知ることができれば、認証において以下を調べれば理解できるはずです。
- ID/PASSWORD が一致するかをどこで、どのようにチェックしているのか
- 一致した場合どこでどのようにプロセスの持つ権限として設定し、認可につなげているのか
以上のように、認証して認可する逆の順から攻めていきます。
※なお、今回は認可のみの解説です。
解析するソースはLinux kernelで、以下からたどれます。
https://github.com/torvalds/linux
or
https://elixir.bootlin.com/linux/v4.20.12/source/kernel/groups.c
※認証は後日調査の上アップ予定です。
認可(Authorization)
ゴール
調査のアプローチで述べたように認可の目標は以下2点です。
- プロセスが持つ権限、アクセスしたい対象の持つ権限はそれぞれどこにあるのか
- それぞれの権限をどこでチェックしているのか
open() システムコールを題材に調べていきます。
DACとMAC
Linuxではアクセス権限のチェックを2段階で行っています。
まず標準の Discretionary Access Controls (DAC: 任意アクセス制御) を確認した後で、許可される操作をMandatory Access Control(MAC: 強制アクセス制御)でチェックします。(参照)
DACでは、ユーザーは自身が所有するファイルのパーミッション (オブジェクト) を制御します。
MACでは、定義されたポリシーを基に Linux システム内のファイルやプロセスおよびその他のアクションにルールを強制できます。
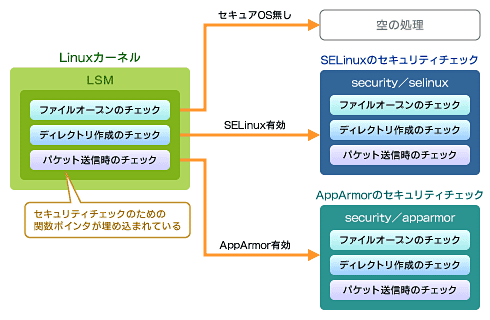
MACの実装としてSELinux (Security-Enhanced Linux), AppArmor (Application Armor), TOMOYO Linux があります。モジュール構造になっていて好きなものを選ぶことができます。
redhatの場合、最近のリリースのものはSELinuxがデフォルトで有効化(Permissiveモード)されています。(参照)
SELinuxにはモードが2つ(Enforcing/Permissive)ありどちらかを選ぶことになります。
- Enforcing: SELinux ポリシーが強制されます。SELinux は SELinux ポリシールールに基づいてアクセスを拒否します。
- Permissive: SELinux ポリシーは強制されません。SELinux はアクセスを拒否しませんが、enforcing モードでは拒否されたであろうアクションの拒否がログに記録されます。設定確認用に使います。
DAC編
openシステムコール
ではkernelを読んでいきます。
call graph
まずコールグラフです。open()がどのように関数を呼び出していくかを示します。
inode_permissionの中でDAC(acl_permission_check)とMAC(security_inode_permission)をやっています。
sys_open
    do_sys_open
        do_filp_open
            path_openat
                do_last
                    may_open
                        inode_permission
                            do_inode_permission
                                generic_permission
                                    acl_permission_check ★DAC
                                    security_inode_permission ★MAC
                    vfs_open
                        security_file_open
                        open = f->f_op->open;
                            open(inode, f);
open systemcallの使い方の説明はman pageにあります。
定義は以下
int open(const char *pathname, int flags, mode_t mode);
flagsとmodeの使い分けの例は以下です。
fd = open("/path/to/dir", O_TMPFILE | O_RDWR, S_IRUSR | S_IWUSR);
sys_open
sys_openのentry pointは以下です。fs/open.cにあります。
ここから順に関数を読んでいきます。なお、「…」はソースを省略していることを表しています。
SYSCALL_DEFINE3(open, const char __user *, filename, int, flags, umode_t, mode)
{
…
    return do_sys_open(AT_FDCWD, filename, flags, mode);
}
path_openat
途中にあるpath_openat()では、ソースを読んで確認していませんがwhile loopでlink_path_walkを繰り返し実行しているので、ルート(/)から目的のファイルまでディレクトリをたどり、パーミッションチェックをしているのではと思います。ファイル自体の処理はdo_lastで行います。
static struct file *path_openat(struct nameidata *nd, const struct open_flags *op, unsigned flags)
{
…
    const char *s = path_init(nd, flags);
    while (!(error = link_path_walk(s, nd)) &&
            (error = do_last(nd, file, op)) > 0) {
        nd->flags &= ~(LOOKUP_OPEN|LOOKUP_CREATE|LOOKUP_EXCL);
        s = trailing_symlink(nd);
    }
…
    return file;
}
inode_permission
do_lastからたどっていき、inode_permissionにたどり着きます。ここでDAC, MACのパーミッションチェックをしています。
/**
 * inode_permission - Check for access rights to a given inode
 * inodeのアクセス権をチェックします。
 * @inode: Inode to check permission on
 * @mask: Right to check for (%MAY_READ, %MAY_WRITE, %MAY_EXEC)
 *
 * Check for read/write/execute permissions on an inode.
 * inodeのread/write/実行属性のチェックをします。(lsで出る、rwxですね)
 * We use fs[ug]id for this,
 * fsuid, fsgidを使います。FileSystem Uer/Group IDですね。
 * https://linuxjf.osdn.jp/JFdocs/Secure-Programs-HOWTO/processes.html
 */
int inode_permission(struct inode *inode, int mask)
{
    int retval;
    // super blockのパーミッションチェックです。
    // そもそもパーティションにアクセスできる権限があるのかをチェックします。
    retval = sb_permission(inode->i_sb, inode, mask);
    if (retval)
        return retval; // 権限がないのでエラーで返ります.

…
    retval = do_inode_permission(inode, mask); // DAC のチェック
    if (retval)
        return retval; // 権限がないのでエラーで返ります.
…
    return security_inode_permission(inode, mask); // MAC のチェック
}
generic_permission
では do_inode_permissionの中を見ていきますが、実質generic_permissionを呼び出しているだけなので、generic_permissionを見ます。
/**
 * generic_permission -  check for access rights on a Posix-like filesystem
 * POSIXライクなファイルシステム上のアクセス権をチェックします。
 *
 * Used to check for read/write/execute permissions on a file. We use "fsuid" for this,
 * fsuid, fsgidを使い、read/write/実行権限をチェックします。
 */
// @return : 権限があると判断されれば0を、無ければ0以外を返します.
int generic_permission(struct inode *inode, int mask)
{
    int ret;
    /*
     * Do the basic permission checks.
     */
    ret = acl_permission_check(inode, mask);
    if (ret != -EACCES)
        return ret; // パーミッションチェックに成功したら抜けます。

…   // 追加のパーミッションチェック(directoryの場合とファイルサイズを読み出すためだけの場合)をします。

    return -EACCES; /* Permission denied */
}
acl_permission_check
DACの本丸、acl_permission_checkを読んでいきます。ココが参考になります。
inode#i_modeにはlsコマンドで見る、”rwxrwxrwx”の9bitの情報が載っています。
解説はコメントとしてソース中に書いてあります。
/*
 * This does the basic permission checking
 * @inode:	inode to check access rights for
 * @mask:	right to check for (%MAY_READ, %MAY_WRITE, %MAY_EXEC, ...)
 *        #define MAY_EXEC		0x00000001
 *        #define MAY_WRITE		0x00000002
 *        #define MAY_READ		0x00000004
 */
static int acl_permission_check(struct inode *inode, int mask)
{
    unsigned int mode = inode->i_mode;

    /*
     * まずオーナー権限をチェックします。プロセスが持つtask構造体の中のcred構造体(credential)の中のfsuidと、inodeの持つuidが一致すれば所有者ということになります。所有者ならアクセス権限はあります(read/writeできるかは別)。
     * ---
     * current_fsuid()はマクロになっており、自プロセスに関する情報が詰まったtask_struct構造体の中にあるcred構造体のメンバ、fsuidを返します。
     * task_structにある、変数credの定義は以下です。
     *
     * Effective (overridable) subjective task credentials (COW):
     * const struct cred __rcu	*cred;
     *
     * constがついているので静的には上書き禁止が保証されますが、実行時に無理やり書き換えることは防止できません。
     * cred構造体のfsuid変数は /* UID for VFS ops */ とコメントされています。filesystem用のユーザIDです。
     */
    if (likely(uid_eq(current_fsuid(), inode->i_uid)))
        mode >>= 6;
    else {
…
        // 所有者じゃなければ次にグループをチェックします。
        if (in_group_p(inode->i_gid))
            mode >>= 3;
    }

    /*
 * If the DACs are ok we don't need any capability check.
 * modeの下位3bitのみ評価します。オーナーでもグループでもない場合はbit shiftされていませんので、下位3bitは自然とotherの権限となりますね。
 * if文中の論理演算がわかりにくいですが、たとえばREADモードでopenしたい時、mask=100b(bは2進数を表す)となっています。
 * ファイルはrw-のアクセス権だとすると、mode=110bです。
 * C言語の&演算の結合規則は左から右です。
 * mask & ~mode = 100b AND 001b = 000b
 * (MAY_READ|MAY_WRITE|MAY_EXEC) は 111b となるので、結局下位3bitを取り出す処理となっています。
 * つまり結果は0となり、アクセス権ありです。
 * ではmask=110b(READ/WRITEでopen)、ファイルはREAD ONLYのr--だとするとmode=100b。
 * mask & ~mode = 110b AND 011b = 010b となり、0と等しくないのでアクセス権なしです。うまくできています。
 */
    if ((mask & ~mode & (MAY_READ | MAY_WRITE | MAY_EXEC)) == 0)
        return 0; // パーミッションありと判断
    return -EACCES; /* Permission denied */
}
ここまででGOALに据えた、
- プロセスが持つ権限、アクセスしたい対象の持つ権限はそれぞれどこにあるのか
- それぞれの権限をどこでチェックしているのか
の回答がでました。アクセスしたいファイルの必要とする権限はinode構造体中に、自プロセスのアクセス権の情報はcred構造体に詰まっています。認証時にはcred構造体に適正な値を入れるはずですね。
DACの権限チェックは acl_permission_checkでやっています。
inode構造体
inode構造体は include/linux/fs.h で定義されています。
struct inode {
    umode_t                     i_mode;
    unsigned short              i_opflags;
    kuid_t                      i_uid; // これを使用しました。
    kgid_t                      i_gid;
    unsigned int                i_flags;

    const struct inode_operations *i_op;
    struct super_block          *i_sb;
    struct address_space        *i_mapping;
#ifdef CONFIG_SECURITY
    void                        *i_security;
#endif
…
};
cred構造体
cred構造体は include/linux/cred.h で定義されています。
/*
 * The security context of a task
 * プロセスのセキュリティコンテキスト
 *
 * The parts of the context break down into two categories:
 * セキュリティコンテキストの内容は2つのカテゴリに分類されます。
 *
 *  (1) The objective context of a task.  These parts are used when some other
 *	task is attempting to affect this one.
 *   オブジェクティブコンテキスト:他のプロセスが自プロセスに影響を及ぼそうとする場合
 *
 *  (2) The subjective context.  These details are used when the task is acting
 *	upon another object, be that a file, a task, a key or whatever.
 *       サブジェクティブコンテキスト: 自プロセスがファイルなどを操作しようとする時
 *
 * Note that some members of this structure belong to both categories - the
 * LSM security pointer for instance.
 * objective/subjective context両方に属するものもあります(LSMとか)
 *
 * A task has two security pointers.  task->real_cred points to the objective
 * context that defines that task's actual details.  The objective part of this
 * context is used whenever that task is acted upon.
 * task_struct構造体は2つのcred構造体メンバへのポインタを持ちます。
 * 一つは task->real_credで、プロセスの詳細情報を持つオブジェクティブコンテキストへのポインタとなっています。
 *
 * task->cred points to the subjective context that defines the details of how
 * that task is going to act upon another object.  This may be overridden
 * temporarily to point to another security context, but normally points to the
 * same context as task->real_cred.
 * もう一つは task->credです。ファイルなどのオブジェクトにどのように振る舞うかを決定するサブジェクティブコンテキストへのポインタとなっています。
 * こちらは他のセキュリティコンテキストによって一時的に置き換えられる場合がありますが、普通はtask->real_credと同じものです。
 */
struct cred {
…
	kuid_t		uid;		/* real UID of the task */
	kgid_t		gid;		/* real GID of the task */
	kuid_t		suid;		/* saved UID of the task */
	kgid_t		sgid;		/* saved GID of the task */
	kuid_t		euid;		/* effective UID of the task */
	kgid_t		egid;		/* effective GID of the task */
	kuid_t		fsuid;		/* UID for VFS ops */ // これを使用しました。
	kgid_t		fsgid;		/* GID for VFS ops */
…
#ifdef CONFIG_SECURITY
	void		*security;	/* subjective LSM security */
#endif
	struct user_struct *user;	/* real user ID subscription */
	struct user_namespace *user_ns; /* user_ns the caps and keyrings are relative to. */
	struct group_info *group_info;	/* supplementary groups for euid/fsgid */
	struct rcu_head	rcu;		/* RCU deletion hook */
} __randomize_layout;
in_group_p
グループのアクセス権の評価について考えます。acl_permission_checkでグループのアクセス権の評価は以下でした。
    // 所有者じゃなければ次にグループをチェックします。
    if (in_group_p(inode->i_gid))
        mode >>= 3;
linuxのグループはメイングループとサブグループに別れます(リンク)。
linuxの仕様で、ユーザは必ず一つ以上のグループに入らないといけないため、ユーザ名と同じグループがデフォルトで作られ、所属します。これがメイングループ。任意のグループを作り、所属するのがサブグループです。
まずはメイングループを調べ、次にサブグループを調べます。サブグループは0個以上、複数の可能性があります。
/*
 * Check whether we're fsgid/egid or in the supplemental group..
 */
int in_group_p(kgid_t grp)
{
    const struct cred *cred = current_cred();
    int retval = 1;

    // メイングループの評価。つまりinode->i_gid == cred->fsgid を評価。
    // 一致すればif文の中は実行されずretval=1のまま、アクセス権あり
    if (!gid_eq(grp, cred->fsgid))
        retval = groups_search(cred->group_info, grp); // 一致しなかったのでサブグループを探しに行く.
    return retval;
}


/* a simple bsearch */
// bsearch はbinary searchで、つまり二分探索木の探索です。基本的なアルゴリズムなので覚えておきましょう。
// @group_info: cred->group_info この中にはユーザーが所属する全GIDが詰まっています。
// @grp: inode->i_gid
// @return: 1: 見つけた 0: 無かった
int groups_search(const struct group_info *group_info, kgid_t grp)
{
    unsigned int left, right;
    left = 0;
    right = group_info->ngroups;
    while (left < right) {
        unsigned int mid = (left+right)/2;
        if (gid_gt(grp, group_info->gid[mid]))
	    left = mid + 1;
	else if (gid_lt(grp, group_info->gid[mid]))
	    right = mid;
	else
	    return 1; // みつけた!
    }
    return 0; // 見つけられなかった
}
以上でDAC編、終了です。
MAC編
ではMACがどのようになっているのか調べます。inode_permissionを再掲します。
int inode_permission(struct inode *inode, int mask)
{
…
    retval = do_inode_permission(inode, mask); // DAC のチェック
    if (retval)
        return retval; // 権限がないのでエラーで返ります.
…
    return security_inode_permission(inode, mask); // MAC のチェック
}
security_inode_permission関数でMACのチェックをしますが、LSM→SELinuxと処理が流れていきます。
LSMとは
MACの実装としてSELinux (Security-Enhanced Linux), AppArmor (Application Armor), TOMOYO Linux があります。モジュール構造になっていて好きなものを選ぶことができます。
このモジュール構造を支えているのがLSM(Linux Security Modules)です。
LSMはプラッガブルな構成になっており、セキュリティモジュールを選べるわけです。 (ちなみにSE Linux、TOMOYO Linuxはセキュリティモジュールであり、ディストリビューションではないです。)
@IT > Security&Trust > Linux Kernel Watch番外編:セキュリティをやってるやつらは狂っている?!
LSMが生まれた背景が書かれていて、面白いです。是非ご一読を。
LSM自体は関数ポインタへのリンクリストが用途ごとに大量にある構造になっています。
SELinuxとは
MACの実装として、SELinux を取り上げます。
SELinux自体の説明は他に譲るとして、SELinuxの処理内容について見ていきます。
SELinuxのパーミッションは以下の構成になっています。login IDと連動するSELinuxのID(Identity)、SELinux特有のロール、タイプとあります。これらを使いMACを実現しています。
今回はCentOS7を使っていますが、デフォルトでSELinuxは有効化されています。
$ sestatus
SELinux status:                 enabled
SELinuxfs mount:                /sys/fs/selinux
SELinux root directory:         /etc/selinux
Loaded policy name:             targeted
Current mode:                   enforcing
Mode from config file:          enforcing
Policy MLS status:              enabled
Policy deny_unknown status:     allowed
Max kernel policy version:      31
ログインユーザにマッピングされているSELinuxの情報は以下でわかります。
$ id
uid=1000(ik) gid=1000(ik) groups=1000(ik),10(wheel) context=unconfined_u:unconfined_r:unconfined_t:s0-s0:c0.c1023
例として passwd コマンドを使ってみます。passwdコマンドは/etc/shadowファイルを読む権限が必要です。
SELinuxの情報はls や psコマンドに -Z をつけると表示されます。
$ ls -Z `which passwd`
-rwsr-xr-x. root root system_u:object_r:passwd_exec_t:s0 /usr/bin/passwd
/usr/bin/passwdファイルはpasswd_exec_tタイプです。ログインIDに割り当てられている unconfined_tタイプがpasswd_exec_tタイプにアクセスすることが可能であるはずです。
$ sesearch --allow | grep passwd_exec_t |grep unconfined
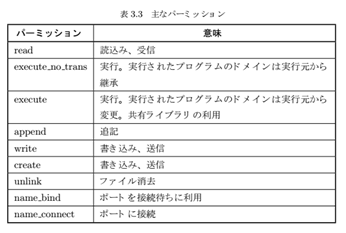
   allow unconfined_t passwd_exec_t : file { ioctl read getattr map execute execute_no_trans open } ;
確かに割り当てられています。
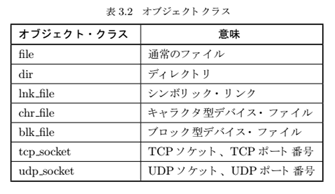
allowの構文は以下です。ドメインというのはプロセスに割り当てられたタイプのことです。
allow <ドメイン> <タイプ>:<オブジェクトクラス> <パーミッション>;
passwdコマンドが使用する/etc/shadowのパーミッションは以下です。
# ls -Z /etc/shadow
----------. root root system_u:object_r:shadow_t:s0    /etc/shadow
/etc/shadow ファイルのタイプはshadow_tとなっています。
passwdコマンドを実行したときのタイプ(=ドメイン)を見ると、passwd_tです。
shadow_tタイプはpasswd_tタイプによるread/writeが許可されています。
$ ps auxZ|grep passwd
unconfined_u:unconfined_r:passwd_t:s0-s0:c0.c1023 root 9587 0.0  0.1 221452 6192 pts/0 S+ 05:48   0:00 passwd

$ sesearch --allow | grep " shadow_t"|grep " passwd_t"
   allow passwd_t shadow_t : file { ioctl read write create getattr setattr lock relabelfrom relabelto append map unlink link rename open } ;
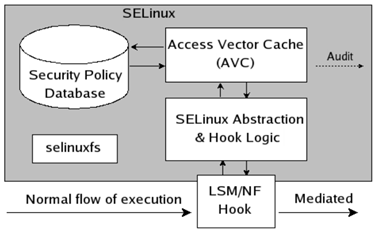
SELinuxのアーキテクチャは下図のとおりです。
先程 sesearch コマンドを使いましたが、Security Policy Databaseを見に行くコマンドです。
open処理でMACの処理は入り口がLSMとなっています。NFとあるのはファイアウォール機能となるNetFilterのことです。
LSMでフックした機能はSELinuxに処理が渡され、SELinuxのパーミッションが正しいかどうか、Security Policy Databaseの設定を確認します。
なお、SELinuxではSecrity Policyにないものはデフォルトでdenyされます。
LSM
ではソースを読んでいきます。
inode_permissionでMACの呼び出しは以下でした。
security_inode_permission(inode, mask); // MAC のチェック
security_inode_permission
https://elixir.bootlin.com/linux/latest/source/security/security.c#L715
int security_inode_permission(struct inode *inode, int mask)
{
    if (unlikely(IS_PRIVATE(inode)))
        return 0;
    return call_int_hook(inode_permission, 0, inode, mask);
}
call_int_hook はマクロ関数です。内部ではsecurity_hook_list構造体から該当する関数ポインタ(inode_permission)を探し、呼び出します。
call_int_hook
#define call_int_hook(FUNC, IRC, ...) ({                            \
    int RC = IRC;                                                   \
    do {                                                            \
        struct security_hook_list *P;                               \
                                                                    \
        hlist_for_each_entry(P, &security_hook_heads.FUNC, list) {  \
        RC = P->hook.FUNC(__VA_ARGS__);	                            \
        if (RC != 0)                                                \
            break;                                                  \
        }                                                           \
    } while (0);                                                    \
    RC;                                                             \
})
security_hook_heads
/**
 * union security_list_options - Linux Security Module hook function list
 *
 * Security hooks for program execution operations.
 *
…
* @inode_permission:
 *	Check permission before accessing an inode.  This hook is called by the
 *	existing Linux permission function, so a security module can use it to
 *	provide additional checking for existing Linux permission checks.
 *	Notice that this hook is called when a file is opened (as well as many
 *	other operations), whereas the file_security_ops permission hook is
 *	called when the actual read/write operations are performed.
 *	@inode contains the inode structure to check.
 *	@mask contains the permission mask.
 *	Return 0 if permission is granted.
…
* @file_open:
 *	Save open-time permission checking state for later use upon
 *	file_permission, and recheck access if anything has changed
 *	since inode_permission.
…
 */
struct security_hook_heads {
…
    struct hlist_head inode_permission;
…
    struct hlist_head file_open;
…
} __randomize_layout;
では inode_permission 関数ポインタはどこの関数を指しているのでしょうか。
SELinuxのソース内に実体があります。
static struct security_hook_list selinux_hooks[] __lsm_ro_after_init = {
…
    LSM_HOOK_INIT(inode_permission, selinux_inode_permission),
…
    LSM_HOOK_INIT(file_open, selinux_file_open),
…
};
selinux_inode_permissionが実体です。つまり、call_int_hookでこの関数が呼び出されます。
selinux_inode_permission
selinux_inode_permissionはSELinuxのコードです。つまり、LSM→SELinuxに処理が移ったということです。
https://elixir.bootlin.com/linux/latest/source/security/selinux/hooks.c#L3167
static int selinux_inode_permission(struct inode *inode, int mask)
{
    const struct cred *cred = current_cred();
    struct inode_security_struct *isec;
    struct av_decision avd;
    bool from_access;
    unsigned flags = mask & MAY_NOT_BLOCK/*= 0x00000080*/;
    u32 perms, sid, audited, denied;
    int rc, rc2;

    from_access = mask & MAY_ACCESS/*= 0x00000010*/;
    //#define MAY_EXEC	0x00000001
    //#define MAY_WRITE	0x00000002
    //#define MAY_READ	0x00000004
    //#define MAY_APPEND	0x00000008
    mask &= (MAY_READ|MAY_WRITE|MAY_EXEC|MAY_APPEND);
    if (!mask) return 0; /* No permission to check.  Existence test. */

    validate_creds(cred);
…
    perms = file_mask_to_av(inode->i_mode, mask); // i_modeについてAVC用にフラグを読み替えるだけ.本質は同じ。

    sid = cred_sid(cred); // get the security ID of a set of credentials
    isec = inode_security_rcu(inode, flags & MAY_NOT_BLOCK); // isec = inode->i_security;
…
    // サブジェクトのSID(Security ID)と、オブジェクトのSIDを持ってポリシーと突合させる。
    rc = avc_has_perm_noaudit(&selinux_state,
                              sid,          // source security ID (current_credより)
                              isec->sid,    // target security ID (inodeより)
                              isec->sclass, // target security class (inodeより)
                              perms,        // requested permissions
                              0, &avd);
    audited = avc_audit_required(perms, &avd, rc, from_access ? FILE__AUDIT_ACCESS : 0, &denied);
    if (likely(!audited)) return rc;

    rc2 = audit_inode_permission(inode, perms, audited, denied, rc, flags);
    if (rc2) return rc2;
        return rc;
}
current_credよりsecurity IDを取り出す。これがサブジェクト(プロセス)の権限。
inodeよりsecurity IDを取り出す。これがオブジェクトの求める権限(オブジェクトとはファイルのこと)
avc_has_perm_noauditで、サブジェクト、オブジェクトの権限をポリシーに基づいてチェックし、権限有り無しを返すわけです。
avc_has_perm_noaudit
AVCはAccess Vector Cacheの略です。
cacheとある通り、ポリシーの内容とアクセスのあったサブジェクト、オブジェクトのアクセス状況をメモリ上に保持しています。nodeという単語が散見されるのでキャッシュはリスト構造になっているようです。
/**
 * avc_has_perm_noaudit - Check permissions but perform no auditing.
 * パーミッションチェックはするが、監査ログはとらない。
 * @ssid: source security identifier ソースセキュリティID
 * @tsid: target security identifier ターゲットセキュリティID
 * @tclass: target security class   ターゲットセキュリティクラス
 * @requested: requested permissions, interpreted based on @tclass
 * @flags:  AVC_STRICT or 0
 * @avd: access vector decisions
 *
 * Check the AVC to determine whether the @requested permissions are granted for the SID pair (@ssid, @tsid),
 * 引数requestedで示されるパーミッションが引数ssid, tsidに許されるか、AVCをチェックします。
 * interpreting the permissions based on @tclass,
 * and call the security server on a cache miss to obtain a new decision and add it to the cache.
 *
 * Return a copy of the decisions in @avd.
 * Return %0 if all @requested permissions are granted,
 * -%EACCES if any permissions are denied, or another -errno upon other errors.
 * This function is typically called by avc_has_perm(),
 * but may also be called directly to separate permission checking from auditing,
 * e.g. in cases where a lock must be held for the check but should be released for the auditing.
 */
inline int avc_has_perm_noaudit(struct selinux_state *state,
				u32 ssid, u32 tsid,
				u16 tclass, u32 requested,
				unsigned int flags,
				struct av_decision *avd)
{
    struct avc_node *node;
    struct avc_xperms_node xp_node;
    int rc = 0;
    u32 denied;

    // source sid, target sid, target classをキーにしてcacheのnodeを探す.
    node = avc_lookup(state->avc, ssid, tsid, tclass);
    if (unlikely(!node)) // nodeがなかった
        node = avc_compute_av(state, ssid, tsid, tclass, avd, &xp_node); // nodeを作成
    else // nodeがあった
        memcpy(avd, &node->ae.avd, sizeof(*avd));

    denied = requested & ~(avd->allowed); // 処理要求(requestd)と許されている処理(allowed)を比較。0になればすべての要求事項が満たされていることになります。
    if (unlikely(denied))
        rc = avc_denied(state, ssid, tsid, tclass, requested, 0, 0, flags, avd);
    return rc; // 0: アクセス権あり それ以外: アクセス権なし
}
avc_lookup
/**
 * avc_lookup - Look up an AVC entry.
 * @ssid: source security identifier
 * @tsid: target security identifier
 * @tclass: target security class
 *
 * Look up an AVC entry that is valid for the
 * (@ssid, @tsid), interpreting the permissions
 * based on @tclass.  If a valid AVC entry exists,
 * then this function returns the avc_node.
 * Otherwise, this function returns NULL.
 */
static struct avc_node *avc_lookup(struct selinux_avc *avc, u32 ssid, u32 tsid, u16 tclass)
{
    struct avc_node *node;

    avc_cache_stats_incr(lookups);
    node = avc_search_node(avc, ssid, tsid, tclass); // ssid, tsid, tclassが全て一致するnodeを探す.
    if (node)
        return node; // あった.

    avc_cache_stats_incr(misses);
    return NULL; // なかった.
}
avc_search_node
static inline struct avc_node *avc_search_node(struct selinux_avc *avc, u32 ssid, u32 tsid, u16 tclass)
{
    struct avc_node *node, *ret = NULL;
    int hvalue;
    struct hlist_head *head;

    hvalue = avc_hash(ssid, tsid, tclass); // ssid, tsid, tclassすべてを使いハッシュを計算.
    head = &avc->avc_cache.slots[hvalue];
    hlist_for_each_entry_rcu(node, head, list) { // ssid, tsid, tclassすべて一致するノードを探す.
        // ssid, tsid, tclassすべてが一致するのが探しているノードです。
        if (ssid == node->ae.ssid &&
                tclass == node->ae.tclass &&
                tsid == node->ae.tsid) {
            ret = node; // あった
            break;
        }
    }
    return ret; // if null, なかった
}
avc_denied
パーミッションが無かった場合の処理です。EACCESを返します。
https://elixir.bootlin.com/linux/latest/source/security/selinux/avc.c#L595
static noinline int avc_denied(struct selinux_state *state,
			       u32 ssid, u32 tsid,
			       u16 tclass, u32 requested,
			       u8 driver, u8 xperm, unsigned int flags,
			       struct av_decision *avd)
{
    if (flags & AVC_STRICT)
        return -EACCES;

    if (enforcing_enabled(state) &&
            !(avd->flags & AVD_FLAGS_PERMISSIVE))
    return -EACCES;

    avc_update_node(state->avc, AVC_CALLBACK_GRANT, requested, driver,
        xperm, ssid, tsid, tclass, avd->seqno, NULL, flags);
    return 0;
}
最後に
SELinuxの内部を十分に調べきれていませんが、サブジェクト、オブジェクトの権限をポリシーでチェックする入り口までは至りました。
SELinuxはアクセスできるものを必要最小限に絞る。それはrootであっても例外ではないので攻撃に対しては非常に有効だと感じました。が、アクセスする必要があるもの厳密に把握し、ポリシーを書く必要があるので手間がかかりすぎるだろうな。という印象です。


